
Let's see how to edit your page access:
- When editing your page, click on the Share page >> option. Sharing of all your pages is controlled at one central place in Mahara and you may notice that you are now in the Share section of your portfolio as shown by the highlighted submenu item in the following screenshot:

- You should be on a page titled Edit access. Click on the help button next to the title to get an idea about what you can do on this page. At the top of the page you will see all of the pages that you have created. You can choose one or more pages to edit access for. For now, let's edit the access for one page, the one you just created. Punam noticed that her Tudor's page is already selected:

- Now, let's decide with whom you want to share your page. To the left of this page, there are all the people or groups of people you can allow access to and to the right, there are those people/groups who can already access your page. Currently you will see that there are no people/groups on the right-hand side:

- To add a group of users, click on the Add button next to that set of users:

- You will now see that the user group you selected has moved to the right-hand side under the Added label. Punam has decided that she doesn't want to allow access to all logged in users, just to limit it to those who are in her class. Click on the small cross to the right to remove access for the user group:

- To add individual users, first click on the Share with other users and groups option. That will drop down a small section that allows you to search for the user you would like to add. Find the user you would like to allow access to and click on Add. Again, you will see them pop up on the right-hand side of the screen once added.
- You will notice that when you add a user, you also get From and To boxes. This allows you to set a date period for that user to access the page. Enter from and to dates between which your users can access the page. If you leave this blank, it means that there is open access.
- Finally, at the bottom of the page, you will see the Advanced options section; click on the link to drop down the available options:

- You will see that you can control comments and copying of the page here, but we will come back to that later in this chapter. For now, notice that you have the ability to add an overriding start/stop date. This allows you to set a start and stop date for individuals and groups accessing your page. It will supersede any from or to dates that you have set.
Tip
Use the calendar!
Whenever you can add a date of any description in Mahara, you will see that there is a small calendar to the right of the input box. Usually, this is a quicker way of adding a date than typing it manually because it will enter the date in the correct format for you. You can also see ahead visually to the dates available in the future. This can help in deciding which dates you need to choose by seeing on which day of the week they fall.
- When you are happy with who you have allowed access to and when they can see your page, click on Save at the bottom.
You have just learned about how to allow different groups or individuals to access your page, and setting when those people can access your page.
Be careful when sharing your page with all logged-in users. When you do this, all users will receive an e-mail notification (if they have their notifications set up this way) to let them know that the page has been shared with them. Only share with all logged-in users if you really need to, so as to help prevent this spamming issue.
That was quite a lot to get to grips with. So, let's have a look at those stages in more detail now.
Another of the beauties of Mahara is just how much flexibility it gives you with regards to controlling access to your information. You can specify who gets to see what and when.
There are four standard global settings (five, if your site has additional institutions), and you can also allow access to individual users:
- Public: Choosing this option will allow your page to be seen by everyone whether the user has logged in or not, very much like a public-facing website. Sometimes your administrator may have switched off this option.
- Logged-in users: This will allow your page to be seen by everyone who is a member of your Mahara site and logged-in.
- Friends: This option will allow access to everyone you have as a friend. You will learn about friends in the next chapter. This is a useful option if you would like to share a page that is only relevant to people who know you within the Mahara site.
- My groups: You can choose to share your page with one, several, or all the groups you belong to as well as with individual groups you aren't part of yet. You will also be looking at groups in the next chapter.
- Institutions (if enabled): You can allow access to all users in an institution if there are any institutions available in your site. You will find out more about institutions in Chapter 6. Course Groups and Other Roles in Mahara.
You also saw that you can choose people individually.
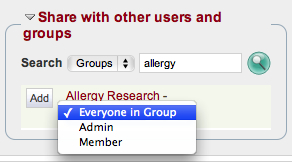
If you have lots of users or groups, it might be easier to type their name or part of the name into the Search box and get Mahara to search for you. Another thing you will notice is that you can limit access for a group to different roles, including the Admin and Member roles. Also, if the group is a course group, you can give access directly to your tutor. Don't worry too much about that now, you will be finding out what all that means in Chapter 6, Course Groups and Other Roles in Mahara.
Here is an example of Janet Norman searching for the allergy research group:
You saw how you can date-restrict access to certain users, but you may have also noticed that when you add a date from the calendar, a 24-hour time period also appears. Use this to set the access time to a specific minute of the day that you have chosen:
A student may use this feature to seek feedback on a job application. The student may ask a tutor, mentor, or friend (or all three) if they could provide some feedback on an application that they have put together for an internship at an employer they're interested in applying to. The student could give a week's worth of access to the application so that the reviewer can provide feedback. After that period the access is removed.
Another great feature is that you can add a user or group more than once and give them both different access slots. This may be useful if there are two parts of a course and you would like a break in between for you to rearrange a page for a second part of a course. Perhaps you would like to add answers to a page that posed some questions to a learner.
Tip
Using the calendar more efficiently
Rather than using your mouse to scroll through the months of the calendar to select an appropriate day, you can use the directional arrow buttons on your keyboard. When you are positioned over the correct day, press the Enter key and that day will be set as the to or from access date.
Finally, you also saw how you can give an overriding time. Remember, this takes priority over the access times set for individuals or groups.
|
Punam from Pennytown Primary thinks: | |
|
|
I am going to give the student teacher I am helping, Lizzie, access to my page for a week. I want her to be able to see it and get some ideas about how she may make her own page later on. Once she has some ideas for the kind of content she should add, she can start making her own pages from what she has seen. I also want to limit the dates between which my group of learners are going to be able to access the page. Once I know how to make groups, I will revisit my page, and set the access and time limits for my group. |
|
Neil from Training for Work thinks: | |
|

|
I really see this idea working for our learners. We have some people outside of our institution who need to verify a selection of learner work. I don't really want these "verifiers" to have long term access to the pages. Also, if you have restricted access to just before and after the visit, they won't get confused by seeing lots of pages that they don't need to see in later visits. |
You saw that Mahara has a tick box, which enables you to allow your page to be copied by those who can view it. This function can be useful in a variety of settings. You might want your colleagues to be able to copy your page. Suppose you wanted to create several similar pages, on different topics, but to keep a similar presentational theme for all of them. Rather than checking back constantly to see how you set up the first one, by ticking this box, you will be allowed to copy the first page (and as you will see later) rename it and edit it — much quicker than setting up several pages from scratch. This is great for teachers who want to create templates for learners.
|
Punam from Pennytown Primary thinks: | |
|

|
I really like this copying facility. All the teachers in our school are really good at working together and collaborating on ideas. Stewart has expressed an interest in our Tudors project, but thinks the content might not be suitable for his year 6 as it is aimed at younger students. I'm going to permit copying so he can copy my page and edit it so that he can put links with handouts that are more relevant for his year 6 group. |
Tip
Naming copyable pages
It is sometimes a good idea to make it obvious in the title of a page that it is copyable. This way, both you and other users will know that the page is copyable. One way you could do this is by calling your page a Template. For example, Punam may call her Tudors page "Template: The Tudors".
When somebody copies your page he/she takes over some of the artefacts (files and journals) that you have created, but this doesn't have to be the case. You may notice that if you have made your page copyable, you will have some more options for some of the blocks that you add:

You can decide whether or not a block gets skipped when somebody copies the page. For example, you may not want the copier to copy your journal. The extra options available for you are as follows:
- Skip this block entirely when copying the page: The block won't be copied.
- Others may display your Journal Entry in their page: The journal will be displayed, but you will not receive a copy in your journal area.
- Others will get their own copy of your Journal Entry: The whole journal entry will be copied to the journal area of the person who makes the copy.