
Chapter 12
Graphics
Not everything that you might ever want to put into a Graphical User Interface (GUI) is part of the standard GUI library. They have only added elements that are used fairly frequently. There are also times when you want to display your own graphics, something completely unique to your program, in a GUI. In order to do this, you have to be able to write graphics code.
Scala does not have its own graphics library. This is because the one in Java is quite complete and works well in a Scala style. The graphics capabilities of Java we will be using are collectively referred to as Java2D because they are the 2-D graphics libraries in Java. The types that we will use are primarily located in three different packages: java.awt, java.awt.geom, and java.awt.image.
12.1 Custom-Drawn Panels
To add your own graphics to a GUI, you need to create a Panel that draws what you want when it is displayed on the screen. The method for doing this is to make a new Panel and then change the way it is painted to the screen. The Panel type has a method in it called paint, which is passed a single argument of type java.awt.Graphics2D. We want to replace this method in our Panel. The act of changing what a method does is called overriding and we will do it with the override keyword. The syntax for this looks like the following.
val panel=new Panel {
override def paint(g:Graphics2D) {
// Draw to g
}
}
If you try this in your code make sure that you import java.awt.Graphics2D so that it will know where to find that type.
This panel can then be added to a GUI in the same way that you would add any other panel to a GUI. For this chapter, we will simply make our custom-drawn Panel the entire contents of our Frame.
12.2 java.awt.Graphics2D
The main capabilities of the Java2D library are accessed through the Graphics2D class in the java.awt package. This class has a number of different methods that we can break into different groups. We list a few of them here. To see all of them you would need to go to the Java API.
- Draw/Fill Methods
draw(s:Shape)drawLine(x1:Int, y1:Int, x2:Int, y2:Int)drawRect(x:Int, y:Int, width:Int, height:Int)drawImage(img:RenderedImage, x:Int, y:Int, obs:ImageObserver)drawImage(img:RenderedImage, x:Int, y:Int, width:Int, height:Int, obs:ImageObserver)drawRenderedImage(img:RenderedImage, trans:AffineTransform)drawString(str:String, x:Int, y:Int)fill(s:Shape)fillRect(x:Int, y:Int, width:Int, height:Int)
- Set Methods
- Get Methods
getPaint:PaintgetStroke:StrokegetTransform:TransformgetFont:FontgetClip:Shape
- Other Methods
rotate(theta:Double)rotate(theta:Double, x:Double, y:Double)scale(sx:Double, sy:Double)shear(shx:Double, shy:Double)translate(tx:Double, ty:Double)
The draw and fill methods actually do the drawing. The set methods change how things are drawn while the get methods let us ask about the current settings. The other methods also impact the ways in which things are drawn.
To illustrate how this works we can replace the comment in the paint method with a single line that does the simplest drawing possible.
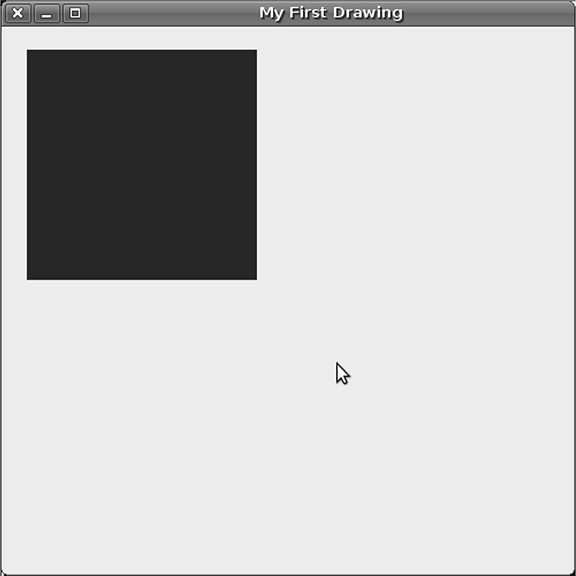
g.fillRect(20,20,200,200)
This line draws a rectangle whose top left corner is 20 pixels right of the left edge and 20 pixels down from the top.1 It also has a width and a height of 200 pixels. The result of adding this line is shown in figure 12.1.
You could make similar calls to drawLine and drawRect. These methods that you call by passing in coordinates are part of the Java graphics library that predates Java2D. While they are simple to use, they lack flexibility and power.
12.2.1 Shapes
The Java2D library added a significant level or abstraction with having a fill method that takes a Shape. This one method is remarkably powerful, but we will only see a little bit of that power in this chapter. In order to use this method or the closely related draw method, we have to be able to create objects of the Shape type. The java.awt.Rectangle type is a Shape. In addition, most of the java.awt.geom package is dedicated to providing you with different types of Shapes. Here are a few of the ones you can choose from and how you would go about making them. If you are going to be using these you probably want to have import java.awt.geom._ in your code.
- Arc2D – This is an arc of an ellipse. It can be created as an open arc or it can be closed either as a pie slice or using a chord. You could create one with new Arc2D.Double(x:Double, y:Double, w:Double, h:Double, start:Double, extent:Double, type:Int). The type can be Arc2D.OPEN, Arc2D. CHORD, or Arc2D.PIE.
- Area – This is a very general shape type that you can initially create from any other Shape with new Area(s:Shape). The power of this type is that you have methods like add, intersect, and subtract that will combine areas to create arbitrarily complex shapes.
- CubicCurve2D – Makes a curve described by cubic polynomials in x, y, and z. You can create this by calling new CubicCurve2D.Double(x1:Double, y1:Double, ctrlx1:Double, ctrly1:Double, ctrlx2:Double, ctrly2:Double, x2:Double, y2:Double).
- Ellipse2D – An ellipse that you can make using new Ellipse2D.Double(x:Double, y:Double, w:Double, h:Double). The specified x and y position is the top-left corner of the bounding rectangle for the ellipse.
- Line2D – A line that you can make with new Line2D.Double(x1:Double, y1:Double, x2:Double, y2:Double) or new Line2D.Double(p1:Point2D, p2: Point2D).
- Path2D – A general path in 2-D space that you can build as empty or using an existing Shape. You can add to the path with methods like moveTo, lineTo, quadTo, or curveTo.
- Point2D – A point in 2-D space you make with new Point2D.Double(x:Double, y:Double).
- QuadCurve2D – Makes a curve described by quadratic polynomials in x, y, and z. You can create this by calling new QuadCurve2D.Double(x1:Double, y1:Double, ctrlx1:Double, ctrly1:Double, x2:Double, y2:Double).
- Rectangle2D – Represents a rectangle. You make one with new Rectangle2D.Double (x:Double, y:Double, w:Double, h:Double) where (x, y) specifies the top-left corner.
- RoundRectangle2D – This is a rectangle with rounded corners. You make one with new RoundRectangle2D.Double(x:Double, y:Double, w:Double, h:Double, arcw: Double, arch:Double).
Most of these are fairly straightforward. The exceptions are the Area and Path2D types. Interested readers are directed to the Java API for more details on these and how to use them. For the types that end with 2D, they can be created with either .Float or .Double. We have used .Double in the list above because it makes things simpler.
We can demonstrate quite a few of these in just a few lines of code. In the body of the paint method put the following lines instead of the call to g.fillRect.
g.fill(new Rectangle2D.Double(20,20,50,80))
g.draw(new Ellipse2D.Double(0,200,500,300))
g.fill(new Arc2D.Double(250,0,250,250,45,270,Arc2D.PIE))
g.draw(new QuadCurve2D.Double(0,500,250,0,500,500))
When you run this code you will get a window like that shown in figure 12.2.

A sample drawing showing a rectangle, ellipse, arc, and quadratic curve made with calls to fill and draw.
12.2.2 Settings
Drawing shapes provides a significant amount of power and flexibility. However, there are some clear limitations that are visible in figure 12.2. The most significant of these is the fact that everything is appearing in the same color on the default light gray background. Another limitation is that the shapes are being drawn with thin, single pixels lines. In order to get around these limitations, we need to be able to tell the Graphics2D object to draw things in different ways. This is done by changing various settings.
12.2.2.1 Paint
The most significant setting in most application is the Paint setting. Prior to Java2D, this was a simple color setting. However, when you draw something there are a lot more options than just having a single, solid color. The Paint type is a way of representing these different options, just like the Shape type is a way of generally representing the different types of things that you might want to draw. The main options you can use for a Paint are listed here.
- Color – Solid colors are still helpful and the Color type represents these. A lot of standard colors are predefined for you. So you can use Color.white, Color.black, Color.red, Color.green, Color.blue, etc. You can also "mix" your own colors by combining different amounts of red, green, and blue with either
new Color(r:Float, g:Float, b:Float)or
new Color(r:Int, g:Int, b:Int).If you use the Float version, the values should be between 0.0f and 1.0f, inclusive. If you use the Int version they should be between 0 and 255, inclusive. A fourth argument can be added to either of these that is the amount of alpha, which represents opacity. A zero alpha value makes the color completely transparent.
- Gradient Paints – There are a number of gradient paints you can use including these two.
- LinearGradientPaint – This Paint allows the color to change gradually across a line. You can specify the endpoints of the line and multiple Colors that you want and where you want them on the line. There is no variation in color along the direction perpendicular to the line. You can make one of these with new LinearGradientPaint(startX:Float, startY:Float, endX:Float, endY:Float, fractions:Array[Float], colors:Array[Color]). The fractions should be between 0.0f and 1.0f, it should begin with 0.0f and end with 1.0f, and there should be as many elements in fractions as there are in colors.
- RadialGradientPaint – This Paint style allows you to have colors that vary as you move outward radially from a given location. You can make one of these using
new RadialGradientPaint(cx:Float, cy:Float, radius:Float,fractions:Array[Float], colors:Array[Color])or
new RadialGradientPaint(cx:Float, cy:Float, radius:Float, fx:Float,fy:Float, fractions:Array[Float], colors:Array[Color],cycleMethod:MultipleGradientPaint.CycleMethod).The latter form allows you to specify an off-center focal point. The cycleMethod is described next.
- Cycle Options - For each of the gradient paints listed above you can provide an extra argument when you make them specifying what you want to have happen outside the normal bounds of the gradient. By default there is no cycling so a solid color is used in these areas. However, you can also specify that the colors repeat or reflect. To do this, use one of the following three constants.
∗ MultipleGradientPaint.CycleMethod.NO CYCLE∗ MultipleGradientPaint.CycleMethod.REPEAT∗ MultipleGradientPaint.CycleMethod.REFLECT
- TexturePaint – This will fill the painted area using a specified image that is stretched over an area and repeated outside that area. You can make one with
new TexturePaint(txtr:BufferedImage, anchor:Rectangle2D). The BufferedImage type will be described in section 12.3.1.
These different Paint styles give us a significant amount of power and control over the coloring of things that are drawn. We can use them to fill our panel with a blank, white background then fill in each of the different things we drew above with a different type of Paint.
The following code can be put in the paint method to illustrate the different types of Paints other than the TexturePaint.
g.setPaint(Color.white)
g.fill(new Rectangle2D.Double(0,0,size.width,size.height))
g.setPaint(Color.red)
g.fill(new Rectangle2D.Double(20,20,50,80)) g.setPaint(Color.blue)
g.draw(new Ellipse2D.Double(0,200,500,300))
g.setPaint(new RadialGradientPaint(375,125,125,300,125,
Array(0.0f,0.3f,0.8f,1.0f),
Array(Color.yellow,Color.cyan,Color.magenta,Color.green),
java.awt.MultipleGradientPaint.CycleMethod.REPEAT))
g.fill(new Arc2D.Double(250,0,250,250,45,270,Arc2D.PIE))
g.setPaint(new LinearGradientPaint(200,500,300,250,
Array(0.0f,0.4f,0.7f,1.0f),
Array(Color.white,Color.darkGray,Color.lightGray,Color.black)))
g.draw(new QuadCurve2D.Double(0,500,250,0,500,500))
This code will produce the output shown in figure 12.3. Each of the different Shapes is drawn with the paint that is specified before it.

This figure shows what we get when we add some Paint settings to the drawing of Shapes that we had before.
12.2.2.2 Stroke
The main problem with what is shown in figure 12.3 is that you can not really tell what color the figures that were drawn, instead of filled, are. This is because they are drawn with lines that are only a single pixel in width. To fix this we need to introduce the next setting on Graphics2D, the Stroke. There is only one type of Stroke provided in the standard Java libraries. It is called BasicStroke. The name is a bit misleading though because this one type of Stroke has all the capabilities you are likely to need.
There are several forms that you can use to create a new BasicStroke and they range from a simple adjustment of the width to enabling dotted lines with rounded ends. Here are the different options.
- new BasicStroke(width:Float)
- new BasicStroke(width:Float, cap:Int, join:Int)
- new BasicStroke(width:Float, cap:Int, join:Int, miterlimit:Float)
- new BasicStroke(width:Float, cap:Int, join:Int, miterlimit:Float, dash:Array[Float], dashPhase:Float)
While the first one is rather straightforward, some of the settings in the others require some explanation.
The cap value specifies the style in which you want the ends of lines to be handled. There are three options for this value.
- BasicStroke.CAP_BUTT
- BasicStroke.CAP_ROUND
- BasicStroke.CAP_SQUARE
The CAP_BUTT and CAP_SQUARE options both produce a square ending. The difference is that the square-cap style extends the end half the width of the line beyond the endpoint. The CAP_ROUND style puts a circle on the end with a radius that is half the width of the Stroke.
The join setting determines how the joints between lines are drawn. To see why this is needed, simply picture two segments as rectangles that have a common midpoint on one edge. If nothing is done to fill it in, there will be a wedge missing. There are three options for how to fill it in.
- BasicStroke.JOIN_BEVEL
- BasicStroke.JOIN_MITER
- BasicStroke.JOIN_ROUND
The JOIN_BEVEL setting simply connects the outer corners with a straight line. The JOIN ROUND setting fills in the missing piece with a pie piece. The JOIN MITER setting extends the outer edges until they meet to make a sharp point. One potential problem with the JOIN MITER option is that if the lines come together at a very small angle, the miter can grow to be very long. This is why you can specify a miter limit to work as a maximum length for the miter.
The longest form of constructing a BasicStroke allows you the ability to make dashed or dotted lines. It takes an Array of Floats that specifies the dashing sequence. The numbers in the array tell how long the line will be drawn, then not-drawn, in a repeating fashion. The dashPhase allows you to have the dashing start somewhere in the middle of the sequence.
To illustrate some of these features, we will add two lines to our sample code. Before the Ellipse2D is drawn we add this line.
g.setStroke(new BasicStroke(6f))
This will make the line that is used for the ellipse be six pixels across and far more visible. Before the QuadCurve is drawn we insert this line.
g.setStroke(new BasicStroke(4f,BasicStroke.CAP_ROUND,
BasicStroke.JOIN_BEVEL,1f,
Array(8f,8f,14f,14f),0f))
This makes a dashed line that is four pixels thick with round caps on the end of segments. The result we get when these are both added is shown in figure 12.4.

This is what the drawing looks like after we have added some Stroke settings for the two elements that are drawn instead of filled.
12.2.2.3 Font
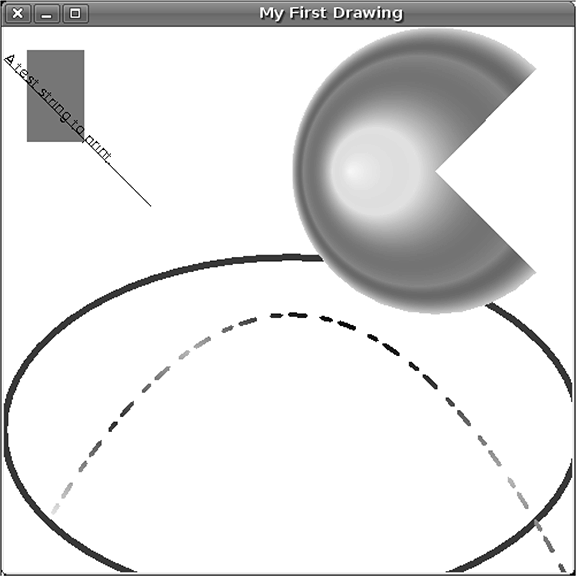
When you call the drawString method, the text is written using the current Font at the specified location. It is worth noting what that location is. To help illustrate that, we will add the following code to the end of the paint method.
g.setPaint(Color.black)
g.drawString("A test string to print.",20,20)
g.setStroke(new BasicStroke(1.0f))
g.drawLine(20,20,200,20)
This sets the color to black, draws a String, then makes the Stroke narrow again and draws a line going from the same position as the String off to the left. The result of adding this code is shown in figure 12.5. What you can see from this is that the position for a String is not the top-left corner as it is for most of the shapes. For a String, the position would be the beginning of the bottom line if the text were to be written on lined paper. So letters like "g" and "p" dip below the y-coordinate, but most of the text is above it. Everything goes to the right of the x-coordinate.

You can change the Font that is used by calling the setFont method. This method takes a single argument of the type java.awt.Font. To build a Font we simple call new Font(name:String, style:Int,size:Int). The name can be any valid Font installed on the machine. One potential problem is that if the program is run on a different computer you might not have the same fonts. To be safe there are a few defaults that are provided in the Font class.
- Font.DIALOG
- Font.DIALOG INPUT
- Font.MONOSPACED
- Font.SANS SERIF
- Font.SERIF
The style argument can be composed of the following values.
- Font.BOLD
- Font.ITALIC
- Font.PLAIN
You can combine these with a bitwise or, |, which was discussed in section 4.5. The size should be a point size.
One of the challenges in working with drawing Strings to graphics is figuring out how large the String will be when it is drawn. The simplest way to do this is to use the getStringBounds(str:String, frc:java.awt.font.FontRenderContext) method of the Font type. If you are not making your own special Font, you can call the getFont() method on the Graphics2D object to get the one that is currently being used. The simplest way to get a FontRenderContext is to call getFontRenderContext() on the Graphics2D object. Getting the bounds will return to you a Rectangle2D that will bound the drawing of the String. You can get the position, width, and height of that rectangle to determine where you want to place the String to make it centered or whatever other effect you desire.
12.2.2.4 Clip
Normally the things that you draw to a Graphics2D will be cut off by the edge of whatever it is drawing to. From what we have done so far that edge would be the extent of the Panel. It could also be the bounds of an image as we will see in section 12.3. However, there are times when you want the bounds to be artificially clipped down to something smaller. An example of this would be when you are drawing Strings or images that are bigger than the area you have allocated for them in your display. Instead of having them "leak" out into other areas, you want to clip them.
In Java2D, you can set the clipping region to any Shape object with the setClip method. This gives you significant flexibility. Most of the time you might want to clip to a rectangle, but you have the option of using an Ellipse2D, RoundRectangle2D, or even something far more complex like an Area.
Moving the clip around while drawing the same image can produce some interesting effects. If the clip is a circle it will look like you are moving a spotlight around. More complex clips can produce other, similar types of effects.
12.2.2.5 Transform
The last setting that we will consider is that of a transform. The next section is dedicated entirely to the topic of transforms so this will be the brief introduction. When you set the transform on a Graphics2D object, it will impact all subsequent elements that are drawn, including Strings and images. The transformations can be as simple as moving things around or rotating elements or they can be more complex combinations. A simple example of when you would want to use a transform is to write text that is oriented in some direction other than left to right.
12.2.3 Affine Transforms
As was just mentioned, the things you draw to a Graphics2D object can be altered by transformations. More specifically, they can be drawn after being changed by an affine transform. Java2D defines the java.awt.geom.AffineTansform type to represent these.
An affine transform is one that preserves parallel lines. So if two lines are parallel before the transformation is applied, they must be parallel after it is applied as well. Implicit in this is that lines are preserved as well. There are four types of basic affine transformations.
- Translate
- Rotate
- Scale
- Shear
Any combination of these is also an affine transformation.
The AffineTransform is represented by a 3x3 matrix in the computer, the details of which we will generally ignore. Interested readers can look at the Application Programming Interface (API) page for some details or should consider a course in graphics, which should cover the details of matrix transforms for application in both 2-D and 3-D graphics. When you call new AffineTransform() you get an identity transform. This is a transform that does not change anything and is represented for the identity matrix. There are options for passing arguments that will let you build the transformation matrix in whatever manner you desire.
Generally, you do not want to go down to the level of the matrix elements. Normally you want to be able to specify how much of a rotation or translation you want. There are number of methods that you can call to do exactly this.
- AffineTransform.getRotateInstance(theta:Double)
- AffineTransform.getRotateInstance(theta:Double, anchorx:Double, anchory:Double)
- AffineTransform.getScaleInstance(sx:Double, sy:Double)
- AffineTransform.getShearInstance(shx:Double, shy:Double)
- AffineTransform.getTranslateInstance(tx:Double, ty:Double)
These methods return AffineTransform instances that produce the specified transformations. For the rotations, the angle, theta, should be given in radians.
AffineTransforms can be combined as well. This can be done in a general way with the concatenate(tx:AffineTransform) method. There are also methods to build up more complex transforms.
- rotate(theta:Double)
- rotate(theta:Double, anchorx:Double, anchory:Double)
- scale(sx:Double, sy:Double)
- shear(shx:Double, shy:Double)
- translate(tx:Double, ty:Double)
These methods will alter the transform object, which is mutable, to include this new transform. It should be noted that the Graphics2D object as a whole had nearly identical methods. Calling those methods will apply these changes to the AffineTransform that is being used for drawing.
To illustrate what a transform can do, we will add one line of code into our running example.
g.rotate(math.Pi/4)
This line should be inserted after the QuadCurve is drawn and before the String is drawn. The result of adding this is shown in figure 12.6. Notice how the orientation of the String has been changed. This version of rotate does the rotation about the origin which is at the top-left corner by default. We turned it through π/4 radians, which is the same as 45 degrees.
12.3 Images
When we draw with a Graphics2D object, we have to be drawing to something. So far that something has always been a Panel that is displayed on the screen. That is not the only option, however, we can also draw to images. The Image type in Java is very general and flexible, but most of the time we will be using it to represent a raster-based graphic. A raster is a 2-D array of little points called pixels (short for picture element). The term pixel is used rather broadly these days as part of the term megapixel that can describe the resolution of digital cameras or graphical displays.
12.3.1 BufferedImage
The java.awt.image.BufferedImage is the primary raster-based image in the Java libraries. To create a blank image you can call new BufferedImage(width:Int, height:Int, imageType:Int). The width and height are measured in pixels. The imageType can be any of a number of different values defined in BufferedImage. For our purposes we will always use BufferedImage.TYPE_INT_ARGB. This type gives you a broad color range and full transparency possibilities by packing alpha, red, green, and blue values into a single Int. You can look in the API for the other types that are available as well as other constructors for BufferedImage, but in this book we will limit ourselves to these possibilities.
Using this, we might create a 500x500 pixel image with the following code.
val img=new BufferedImage(500,500,BufferedImage.TYPE_INT_ARGB)
Once you have an image the next question is what can you do with it. There are quite a few different methods you can call on a BufferedImage. The ones that we find to be most significant are as follows.
- createGraphics:Graphics2D - Returns an object of type Graphics2D that can be used to draw to this image.
- getHeight:Int - Returns the height of the image in pixels.
- getRGB(x:Int, y:Int):Int - Returns a packed ARGB value for the pixel at location (x, y). This is helpful for determining what is at certain locations in the image. This value could be compared to an Int that you pack yourself or a hex literal. However, it can also be compared to the result of the getRGB method in Color.
- getSubimage(x:Int y:Int, w:Int, h:Int):BufferedImage - Returns a new image that is pulled from a rectangular region of this image.
- getWidth:Int - Returns the width of the image in pixels.
- setRGB(x:Int, y:Int, rgb:Int) - Will set the ARGB value at the specified (x,y) position. You can pack your own ARGB values, use hex, or use the getRGB method in the Color type. So to turn the top-left pixel black you might do this: img.setRGB(0,0,Color.black.getRGB).
The createGraphics method is probably the most significant as it gives you back a Graphics2D object that you can use to draw to the image in the same way that we have been using them to draw to the panel on the screen. The getRGB and setRGB methods can also be very useful when you want to know exactly what is at a pixel or have full control over what color a pixel is drawn as.
Note that an ARGB value of 0 is a completely transparent black. So if you set all the pixels in an image to be 0 the image will be transparent. That way you can draw things on it and not have a background show up around them if you draw that image on top of something else.
12.3.2 Reading and Writing Images
In addition to creating blank images, you often want to be able to read images from files. In some situations it can also be nice to save back images to a file. Both of these activities can be accomplished easily with the javax.imageio.ImageIO type. For reading, there are two methods that are of interest.
- ImageIO.read(input:java.io.File):BufferedImage
- ImageIO.read(input:java.net.URL):BufferedImage
The first method should be passed a File object, much like what we have done previously with a Scanner. This will read in an image encoded in a standard format, such as a JPEG, GIF, or PNG, from the specified file.
The second method does basically the same thing, but not from a file. This method will read the image data from a URL so it can be located across the network on another machine. For obvious reasons, the URL class is part of the java.net package. You can make a new URL object with new URL(spec:String). The spec should be a URL formatted just as it would be in your browser.
Once you have read in a file, you can draw it with a Graphics2D object to include it in what you are displaying on screen. You can also call createGraphics to get the Graphics2D object that will allow you to draw on this image to edit it in some way. Once you have edited it, you might want to write it back out to a disk. You can do this by calling ImageIO.write(im:RenderedImage, formatName:String, output:File):Boolean. A BufferedImage is a type of RenderedImage. The formatName is a String with the informal name of the format type you want to use for the file. To see all the formats that are supported by your computer and installed software you can run ImageIO.getFormatNames:Array[String].
12.3.3 Double Buffering
Even in situations where you are drawing to a panel, it is often advisable to use an image. The technique is called double buffering and it improves performance and reduces flicker in animations. When you draw to the Graphics2D object that is passed into the paint method, the things that you here drawn are displayed on the screen, one element at a time. Normally it happens so fast that the user never notices. However, if there are a large number of elements in the drawing, or if you are repainting frequently for an animation, this can be visible and can cause flicker in the image. To speed things up and eliminate the flicker you can create an Image that is the same size as the Panel, do the drawing to the Image, then the draw that Image to the Panel. The following code shows what such a Panel might look like.
val panel=new Panel {
var img:BufferedImage=null
override def paint(g:Graphics2D) {
if(img == null || img.getWidth < size.width ||
img.getHeight < size.height) {
img=new BufferedImage(size.width, size.height,
BufferedImage.TYPE_INT_ARGB)
}
val g2=img.createGraphics
// Draw to g2
g.drawImage(img,0,0,null)
}
}
The first line in the Panel creates a new variable to store images. The BufferedImage type specification is required here because otherwise Scala will infer a type of Null. In the paint method, the first thing that happens is a check to see if the image has been created and if it is large enough to cover the Panel. If not, a new image is created.
After we are certain that we have an image of sufficient size, the code gets the Graphics2D object for drawing to that image and anything that we want to draw is drawn to that image. The last thing to happen in the method is to draw the image to the Panel so it appears on screen.
12.3.4 Revisiting TexturePaint
Now that we know about images we can revisit one of the Paint types that was discussed earlier, TexturePaint. The idea of the TexturePaint is to fill in the drawn/filled shape with a specified image that it repeated on a certain grid. When you make a TexturePaint you provide it with an image and a rectangle that is referred to as the anchor. The image will appear inside of that rectangle and will be repeated in a tiling pattern around it. To illustrate this, we can enter the following code before setting the color to blue for the ellipse.
g.setPaint(new TexturePaint(ImageIO.read(new File("rtImg.png")),
new Rectangle2D.Double(0,0,200,200)))
g.fill(new Ellipse2D.Double(0,200,500,300))
This fills in the same ellipse, but does so with a texture of a file that was loaded off disk. The result using this particular file is shown in figure 12.7.

This image displays the use of a TexturePaint. The ellipse is filled with a tiling of an image that is loaded from a disk.
12.4 Other Events
The standard components in the Swing library had code in them to publish events that were specific to the way you interacted with them or to make it very easy to provide the actions for those interactions. The Panel does not have any standard modes of interaction. The way in which the user interacts with it is completely up to you. As such, you have to handle events at a somewhat lower level. We need to listen to the mouse and keyboard actions directly and react to them appropriately.
12.4.1 Mouse Events
The mouse is often the most natural way to interact with components of a GUI. At first you might think that the only thing you" want to respond to with the mouse is the button clicks. However, if you take a minute to think about it you will realize that a lot of programs interact with the mouse in more complex ways than just when you click. There are eight different types of events that the mouse can fire. It is unlikely that you will care about all of them with any single panel, but you might need to handle several of them in order to produce the effect that you want.
These mouse events are available on all Components, even the standard ones that already handle things in their own ways. This allows you to include your own custom behavior. For this reason, all the Components contain an object called mouse. The mouse object, in turn, contains three Publisher objects called clicks, moves, and wheel. Each of these different Publishers will give you information about different things the mouse is doing. You need to listen to the one or ones that produce the events you need. So if you only need to know when the mouse is clicked, you would need to do listenTo(mouse.clicks). If you wanted to know where the mouse was moving or being dragged to, you would add mouse.moves to the list of things you are listening to.
This is a list of the different events in scala.swing.event organized by which of the Publishers produces them.
- MouseEvent - All of the events listed below are all subtypes of MouseEvent.
- mouse.clicks
- MouseClicked
- MouseEntered
- MouseExited
- MousePressed
- MouseReleased
- mouse.moves
- MouseMoved
- MouseDragged
- mouse.wheel
- MouseWheelMoved
All of the mouse events contain point, source, and modifiers as members. The point member is a java.awt.Point and it has members in it for x and y. The source is a Component so that you can figure out what in your GUI the mouse is over when the event is produced. The modifiers are stored in an Int and can give you information about which mouse button or buttons are down.
Any time a mouse button goes down, a MousePressed event will fire. When the mouse button goes up, a MouseReleased event will fire. The MouseClicked event only fires if the mouse button goes down and back up without the mouse moving. If the mouse moves while it is down, instead of getting a MouseClicked event, you will get MouseDragged events through the movement.
Inside of the reactions to the event, you will likely change some mutable data that alters what is drawn. This change will not automatically be seen in the drawing, however. To make it visible you need to tell the Panel that it should redraw itself. To do this, you call the repaint() method of the Panel. This method does not do the drawing, instead it schedules the drawing to be done in the future when the program is not too busy. The exact nature of how this type of thing works will be discussed in chapter 21. For now you only need to know that if you want a Panel to be drawn again you should call repaint()
12.4.2 Keyboard Events
You might also want to have your GUI respond to keys being pressed on the keyboard. An example of this might be to have something in your graphic that changes with letters or moves when arrow keys are pressed. The keyboard events are published by the keys object in components. So if you want to have reactions to the keyboard you add listenTo(keys) in the code.
Just like with the mouse, there are several types of different events that can come from the keyboard. All of them fall under the broad heading of KeyEvent.
- KeyEvent
- KeyPressed
- KeyReleased
- KeyTyped
This is simpler than the mouse. There are only four different types of events. The like the mouse, there are separate events for pressed and released. The KeyTyped event is similar to a MouseClicked, but there is not any equivalent to the mouse not moving. In this case, the KeyTyped event only fires when the key is a normal character key. It should also fire with the repeat rate you normally get when a key is held down. So if you want to react to arrow keys or other non-character keystrokes you need to use KeyPressed and KeyReleased.
When you are listening for KeyTyped you can use the char:Char field of the event to find out what character was typed. The KeyPressed and KeyReleased events can not have the key represented by a simple Char because they can handle things that are not normal characters. They have a field called key that has a value specified in the scala.swing.event.Key object. So if you want to check to see if the up arrow key was pressed you could put the following in your code.
if(e.key==Key.Up) ...
This assumes that the KeyPressed or KeyReleased variable is called e. The Key object has members for all the other keys that you can get on the keyboard as well. For a full list you should check in the API.
If you put in code that listens to the keys Publisher and then add a reaction to handle the events you are interested in, you will likely be quite disappointed when you run the program and nothing happens. Assuming that something is broken, you will probably start putting print statements into the code to try to figure out what is happening. What you will find is that you are not getting any key events at all, despite the fact that you are listening for them and have proper code to react to them. The problem relates to a concept called focus.
The currently selected element in a GUI is said to have focus. Keystrokes only go to that component. To understand this, simply picture a GUI with several text fields in it. When you type, the characters should not go to all the text fields at once. Instead, your typing only appears in one, the one with focus. To get your Panel to receive the key strokes you have to give it the focus. You can do this by calling the requestFocus method on the Panel. It does not help to do this before the Panel is displayed so you can put it after you set the frame to be visible. It is probably also a good idea to have a mouse event that requests focus. Depending on the application, you might want to do this in a MouseClicked event or a MouseEntered event. The former will only get focus if the user clicks on the panel. The latter will give it focus any time the mouse enters the panel area.
12.5 Animation with Timer
It is also possible that you want something to happen without any keys being pressed or the mouse being used. An example of this would be animations. In order to accomplish this you should use a javax.swing.Timer object. Timer objects cause code to be executed at regular intervals. We build a Timer with new Timer(delay:Int, listener:java.awt.event.ActionListener). The delay is a value given in milliseconds. The ActionListener type is used in the Java version of Swing as something that reacts to a simple action like clicking a button. These are used so much that the Scala version of Swing includes a simple method for making them, Swing.ActionListener(action: (java.awt.event.ActionEvent) => Unit). Here again we see a type from the Java libraries. You will rarely have to use this type in your code though.
Putting this all together, you could make a Timer with the following code.
val timer=new javax.swing.Timer(100,Swing.ActionListener(e => {
// code to mutate values used in drawing.
panel.repaint()
}))
The call to repaint is needed for the same reason that was discussed in section 12.4.1. The user will only see the changes that have been made after the next time the screen is painted. The full name for the Timer was used here instead of an import statement because it is quite possible that this is the only place it will be used. If you find yourself typing it in more than once you would probably want to have an import statement.
The Timer has start and stop methods that allow you to do exactly what they say to it. The Timer will not be running initially. You have to call the start method to get it going. The stop method can pose an interesting problem if the reason for stopping is part of the action that is supposed to happen in the Timer. Using the style shown above, the action in the Timer is built while the timer variable is being declared. That effectively makes it a recursive declaration. As such, you can not call timer.stop inside of the action code using this approach. There are two ways to get around this. One is to specify a type on the timer declaration. This duplicates the type information and probably indicates an import should be used. This is shown here.
import javax.swing.Timer
val timer=new javax.swing.Timer(100,Swing.ActionListener(e => {
// code that potentially includes timer.stop().
panel.repaint()
}))
The other approach is to use a slightly different style of setting up the timer in which we first give it a null action, then add an ActionListener to it later. Code using this approach might look like the following.
val timer=new javax.swing.Timer(100,null)
timer.addActionListener(Swing.ActionListener(e => {
// code that potentially includes timer.stop().
panel.repaint()
})
12.6 Putting it Together
We finish this chapter with an example program that includes getting input from the mouse and keyboard and that uses a Timer in order to update things at regular intervals. To make the example interesting, we will use these features to make a little game. In the game the player controls a little green dot with the keyboard. Little red dots try to catch the green dot and if they succeed, the player loses. The mouse is used to "draw" puddles on the screen area that slow down both the player and the enemies. That is the basic idea.
There are a few more details in the analysis. Puddles fade over time and enemies only live so long. Enemies do regenerate though. As the game goes on, enemies start to regenerate faster and live longer. So the real objective is to see how long the player can stay alive. Here is code for this game.
import scala.swing._
import event._
import java.awt.{Graphics2D,Color}
import java.awt.geom._
import java.awt.image.BufferedImage
import javax.swing.Timer
case class Enemy(x:Int,y:Int,time:Int)
case class Player(x:Int,y:Int)
val PanelSize = 600
var enemies = List(Enemy(PanelSize-100,PanelSize-100,0))
var player = Player(300,300)
var leftPressed = false
var rightPressed = false
var upPressed = false
var downPressed = false
var currentTime = 0
var regenDelay = 100
var enemyLifespan = 100
val puddleImage = new
BufferedImage(PanelSize,PanelSize,BufferedImage.TYPE_INT_ARGB)
for(i <- 0 until PanelSize; j <- 0 until PanelSize) {
puddleImage.setRGB(i,j,0)
}
val panel = new Panel {
override def paint(g:Graphics2D){
g.setPaint(Color.black)
g.fillRect(0,0,size.width,size.height)
g.drawImage(puddleImage,0,0,null)
for(enemy <- enemies) {
g.setPaint(new Color(1f, 0f, 0f,
(currentTime-enemy.time)/enemyLifespan.toFloat))
g.fill(new Ellipse2D.Double(enemy.x-5,enemy.y-5,10,10))
val dx = enemy.x-player.x
val dy = enemy.y-player.y
if(dx*dx+dy*dy<25) {
g.setPaint(Color.white)
g.drawString("You Lose!",200,200)
timer.stop
}
}
g.setPaint(Color.green)
g.fill(new Ellipse2D.Double(player.x-5,player.y-5,10,10))
}
val imageG = puddleImage.createGraphics()
imageG.setColor(new Color(200,150,50))
def drawPuddle(x:Int,y:Int) {
val radX = util.Random.nextInt(5)+5
val radY = util.Random.nextInt(5)+5
imageG.fill(new Ellipse2D.Double(x-radX, y-radY, radX*2, radY*2))
repaint
}
listenTo(mouse.clicks,mouse.moves,keys)
reactions += {
case mp:MousePressed => drawPuddle(mp.point.x, mp.point.y)
case md:MouseDragged => drawPuddle(md.point.x, md.point.y)
case me:MouseEntered => requestFocus
case kp:KeyPressed => if(kp.key==Key.Left) leftPressed = true
if(kp.key==Key.Right) rightPressed = true
if(kp.key==Key.Up) upPressed = true
if(kp.key==Key.Down) downPressed = true
case kp:KeyReleased =>
if(kp.key==Key.Left) leftPressed = false
if(kp.key==Key.Right) rightPressed = false
if(kp.key==Key.Up) upPressed = false
if(kp.key==Key.Down) downPressed = false
}
preferredSize = new Dimension(PanelSize,PanelSize)
}
def inMud(x:Int,y:Int):Boolean = {
(puddleImage.getRGB(x,y) >>> 24) > 0
}
val timer:Timer = new Timer(100,Swing.ActionListener(e => {
val speed = if(inMud(player.x,player.y)) 1 else 3
if(leftPressed) player = player.copy(x = player.x-speed)
if(rightPressed) player = player.copy(x = player.x+speed)
if(upPressed) player = player.copy(y = player.y-speed)
if(downPressed) player = player.copy(y = player.y+speed)
enemies = for(e <- enemies; if e.time+enemyLifespan>currentTime) yield {
val speed = if(inMud(e.x,e.y)) 1 else 4
val dx = if(e.x<player.x) speed else if(e.x>player.x) -speed else 0
val dy = if(e.y<player.y) speed else if(e.y>player.y) -speed else 0
e.copy(x = e.x+dx+util.Random.nextInt(5)-2,
y = e.y+dy+util.Random.nextInt(5)-2)
}
for(i <- 0 until PanelSize; j <- 0 until PanelSize) {
val argb = puddleImage.getRGB(i,j)
val alpha = argb >>> 24
if(alpha>0) puddleImage.setRGB(i,j,(argb & 0xffffff) | ((alpha-1) << 24))
}
currentTime += 1
if(currentTime%regenDelay==0) {
val cx = util.Random.nextInt(2)
val cy = util.Random.nextInt(PanelSize-10)
enemies ::= Enemy(10+cx*(PanelSize-20), cy, currentTime)
if(regenDelay>10) regenDelay -= 1
if(math.random<0.1) enemyLifespan += 1
}
panel.repaint()
}))
val frame = new MainFrame {
title = "Puddle Dash"
contents = panel
menuBar = new MenuBar {
contents += new Menu("File") {
contents += new MenuItem(Action("Start")(timer.start))
contents += new Separator
contents += new MenuItem(Action("Exit")(sys.exit(0)))
}
}
}
frame.visible = true
panel.requestFocus
There are effectively four broad sections to this code. At the top are various variable declarations. This is followed by the definition of a Panel, followed by a Timer, and finally a MainFrame. With the variables are declarations of two case classes called Enemy and Player. The enemies are stored in a List and there is a single player variable. There are also variables that keep track of what arrow keys are being held down. This allows the movement to be done by the Timer code, not the event handling. That allows us to control the relative speed of the player and the enemies. To make the game interesting, the player is roughly 25% slower than the enemies. There are also variables for keeping track of time and a BufferedImage that use used to draw and keep track of puddles.2
The Panel has a paint method that blanks the screen, draws the puddle image, draws the enemies, then draws the player. The puddleImage starts off completely transparent. The enemies also start off transparent and get more opaque until they die. This adds a bit of challenge as it is hard to see where they start, but makes the game more playable than it would be if enemies were transparent near their death. The Panel also has event handlers that call drawPuddle for MousePressed or MouseDragged as well as handlers for KeyPressed and KeyReleased that set the values of the Boolean vars which control player movement.
Most of the logic goes in the Timer. This moves the player based on keys and the presence of mud. It then moves the enemies toward the player with a speed based on the presence of mud. The enemy movement also has a random component to it to prevent things from being quite so predictable. After moving the enemies, every pixel of the puddleImage is run through and the alpha value, if greater than zero, is decremented. After that, the currentTime is incremented and checked to see if it is time to make a new enemy. If so, a random position along the edges is picked and the enemy is added there. At that time the delay between enemies is also decreased and there is a 10% chance the length of the enemy's life will go up.
The code ends with the creation of a frame, which hold the Panel and has a menu bar with a very basic menu. Enter this code and play the game a bit. For 125 lines of code it is a reasonably interesting game to play. Seeing it in action can also help you to understand what is going on.
12.7 End of Chapter Material
12.7.1 Summary of Concepts
- If you understand how to do graphics you can go beyond the standard GUI components and draw whatever you want to Panels.
- 2-D graphics are produced using the Java2D libraries. These are centered on the java.awt.Graphics2D type.
- There are a number of different methods for drawing things in Graphics2D the most flexible are draw(s:Shape) and fill(s:Shape). The java.awt.Shape type is flexible and allows many types of shapes to be described. Examples can be found in java.awt.geom.
- How things are drawn by a Graphics2D instance is determined by various settings.
- The setPaint method can change how things are filled in. There are a number of different types of Paint including java.awt.Color, java.awt.LinearGradientPaint, and java.awt.TexturePaint.
- The manner in which lines and curves are drawn is called the Stroke. You can change the stroke by calling setStroke and passing it a java.awt.BasicStroke.
- Strings can be drawn with different fonts. This is set with a java.awt.Font object that is passed into setFont.
- You can adjust the clipping area that is used for any part of the drawing by calling setClip(s:Shape).
- Everything drawing to a Graphics2D can be transformed using any affine transform.
- An affine transform is any transformation that preserves parallel lines. They are represented by java.awt.geom.AffineTransform. There are four basic types of affine transforms and they can be combined in any way to create more complex affine transforms.
- Translate moves what is drawn around in the 2-D space.
- Rotate spins the drawing around a particular point in space.
- Scale can change the size of the drawing in the x or y direction independently.
- Shear can introduce part of one axis into the other.
- In addition to drawing to the screen, you can draw to images. The basic image type is java.awt.Image. It is extremely general and can represent many types of devices.
- You will most commonly use a java.awt.image.BufferedImage which represents a raster of pixels.
- You can read or write images from and to files with methods in the javax.imageio.ImageIO class.
- One very significant use of images is double buffering, where drawing is done to an image off the screen, then the completed image is drawn to the screen.
- The Panel type does not have natural default forms of interaction like clicking a Button or typing into a TextField. Instead, you make them interactive by handling the mouse and keyboard events directly.
- All Components have a mouse object that contains three objects in it for dealing with different types of mouse events.
- mouse.clicks gives you MouseClicked, MousePressed, MouseReleased, MouseEntered, and MouseExited events.
- mouse.moves gives you MouseMoved and MouseDragged events.
- mouse.wheel gives you MouseWheelMoved events.
- To get information on what keys are pressed you listen to the keys object in a Component.
- Keyboard events only go to the Component with focus. Use the request Focus method to give focus to the proper Component.
- A KeyTyped event will be returned when a normal character key on the keyboard goes down and up. It has a char member that will tell you the Char for the key that was typed.
- The KeyPressed and KeyReleased events let you know when a key goes down or up and works for any key, including non-character keys. To know what key way pressed or released, compare the key member to values in the scala.swing.event.Key object.
- All Components have a mouse object that contains three objects in it for dealing with different types of mouse events.
- To make things happen at regular intervals without requiring user interaction, for example animations, use a javax.swing.Timer object.
12.7.2 Exercises
- Create a panel that draws several geometric shapes with different types of paints and strokes.
- Use the java.awt.geom.Area type and create an interesting shape.
- Use the java.awt.geom.Path2D type to make an interesting shape that includes at least one section that is not a line.
- Use a gradient style paint and Timer to make a pattern where the colors move.
- Use a dotted line on a wide stroke along with a Timer where the dotted line moves with the Timer ticks.
- Write a script where you control the movement of a geometric figure with the arrows keys. Put another figure at the location of the mouse click draw them in a different color when the two intersect.
- Polish up the the evade game from the end of the chapter.
12.7.3 Projects
- If you did project 1 (p.243) you should have noticed that looking at the numbers to figure out what is going on is quite a pain. To see if particles are moving properly it really does help to have a plot of their motion. For this project you will add a GUI with a custom-drawn panel onto that program so that you can draw where particles are located.
The only challenge in doing this is getting from the coordinates that your particles are at to coordinates that fit in a normal window. There are two ways to do this. One is to do the math yourself. Specify a minimum and maximum value for x and y and use linear equations to transform from the range (min, max) to (0, width) or (0, height). You can also do this with an AffineTransform using a combination of scale and translate. There is benefit to each approach and neither is significantly harder than the other.
To make the GUI more functional you could include TextFields that allow the user to change the values of Xmin, Xmax, Ymin, and Ymax. You could also include a CheckBox that lets the user select whether the background is cleared each time particles are drawn. Without clearing, you will see the paths of the particles as they move. With clearing you will only see whatever shapes you use to draw the particles.
- For this project you should write a script that reads in a text file of numbers and plots the data. You can pick what style of plotting you want to enable and what format the data should be in. As with the previous project, the main challenge in this is to convert from the coordinates that the data points are in to something that appears nicely on screen.
- The movie Tron (http://www.imdb.com/title/tt0084827/), released in 1982, included a number of different early arcade-style games. One of these, light cycles, can be simplified down to a level where it is very easy to write. For this project, you will do just that.
In the game, the players ride cycles that leave colored walls behind them. Running into a wall kills the player. The last player alive wins. For your implementation, the walls will be lines of pixels in a BufferedImage and the cycle will just be the end where the line is growing. You do not have to graphically represent the cycle. Two humans can play. One uses arrow keys and another uses letters. Only two keys are needed for each, one to turn left and one to turn right. Using an image to store the walls prevents you from having to keep that data in a separate array.
For an extra challenge, try putting in a computer-controlled player. This is not really all that hard. The easiest one to write is virtually impossible for a human to beat because it has perfect reflexes. Throw in occasional random turns to make things more even.
If you are having a hard time picturing what this is supposed to look like, the website includes an executable JAR that you can run to play a version written by the author.
- A step up from the Tron Light Cycles game is the far more common Snake game. In this game a single person controls a snake that goes around eating apples or something else. Each time one is eaten, the snake grows longer. This continues until the snake runs into itself or an edge of the screen.
The reason this is more challenging than Light Cycles is that the cycles leave walls that can stay until the program is done. The walls can also be a single pixel wide. With Snake, the body parts that follow the head have to "move" because the snake does not simply get longer all the time.
- One of the early educational programming languages, called Logo, made graphics easy to use by implementing a turtle graphics system (http://en.wikipedia.org/wiki/Turtle_graphics). The idea of turtle graphics is that you have a cursor, typically called the turtle, that has a position, an orientation, and pen settings. The turtle can turn and move. When it moves, it can either draw or not. Simple systems only allow the turtle to move along straight lines and that is what you will do for this project.
A simple way to encode instructions for a turtle is with a String. Different characters tell the turtle to do different things. A 'F' tells the turtle to move forward while drawing. A 'f' tells it to move forward without drawing. The '+' and '-' characters tell it to turn to the left and right, respectively. Other characters can be added to give the system more power and later projects will give you the opportunity to do so. The amount that the turtle moves or turns for each character is considered to be a fixed parameter. Using this system, one could draw a square by setting the angle to 90 degrees and using the string "F+F+F+F". Two squares that are separated could be made with "F+F+F+FfF+F+F+F".
Make a GUI that has a TextField where the user can enter a String. You might also have fields for segment length and turn angle. There should be a Panel that, when painted, will draw the appropriate set of lines. Simply ignore any characters that are not 'F', 'f', '+', or '-'.
- For this project you will model the process of crystal growth. This might sound like something of a challenge, but it is not really all that hard. Crystals grow when material dissolved in a solution meets a surface of the crystal and sticks. The dissolved material moves around due to Brownian motion and is basically a random walk. You start the process by putting a seed crystal in the solution for stuff to stick to.
For our purposes, the crystal is simply represented as one color on top of a background that is another color. Use a BufferedImage to store this so that you can get and set pixels. This image should be drawn on a Panel that is in the GUI. If the user clicks on the panel it should add a new "seed" at the click location (simply set the color at that point in the image to the crystal color).
There should be either a Button or a menu option to release more particles. When a particle is released, it should start at one of the edges. You just need to keep track of the x, y location of it. Using a while loop, have the particle move randomly around until the move would put it on top of a spot that already has a crystal. At that point you change the pixel at the location the particle had been to the crystal color.
To move the particle randomly you could use util.Random.nextInt(4) to get a number in the 0-3 range and move either up, down, left, or right depending on that value. If a move would put a particle outside of the image, simply ignore that move. The menu option should probably run through a loop that drops 100 or so particles and lets each run until it sticks. You only need to repaint after all have found their place.
Note that especially early on when the crystal seed is small, it can take a long time for a particle to run around until it hits that seed.
- If you have been doing ray tracing options in earlier projects, it is time for you to finally see something. You can use the code you wrote for project 2 (p.244) that makes a grid of parameter values and simply set colors in a BufferedImage based on the t intersect parameters. To do this you will probably want to build your own colors. You can make a new Color object by saying new Color(r:Int, g:Int, b:Int) where r, g, and b are in the 0-255 range. Values outside of that range will cause an error. Simply display the image in a Panel that you have put in the GUI to see depth information for your ray trace.
- Write a simple 2-D game of your choosing with simple geometry or sprites (little images for characters). Your game should have a Timer to make actions occur as well and take input from the user in the form of key pressed or mouse movement. At this point you know enough to write many types of games, but it is suggested that you strive to keep things simple. Have movement and some collision checking.
- This project has you write another simple "game" that you are likely familiar with that involves sliding tiles in a 4x4 grid where one piece is missing. The tiles might have numbers or parts of a picture. Your goal is to move then around by sliding pieces into the one open space until they are in the desired order.
Write a GUI with a Panel that shows the 4x4 grid. You can choose if you want to use numbers of parts of an image. If you want to use parts of an image, you can get the small sections by loading the full image, then drawing it into smaller images with offsets so that only the part you want for a given piece appears in the smaller image.
The user should interact with the game by clicking on the piece that they want to slide. In the simplest implementation, they have to click on a square immediately adjacent to the open square. For a bit of an extra challenge you can make it so that they can click on any square in the same row or column as the empty one and multiple pieces can be moved over at the same time.
- If you did project 8 (p.281) then you already have a GUI set up for keeping track of what a person has in their pantry and checking on recipes. However, this GUI is fairly bland. Now that you know how to put in graphics you have the ability to make it more visually appealing. For this project you should add onto your previous GUI the ability to have images associated with ingredients and recipes. You should also add in directions for how to make the recipe in the GUI.
A basic implementation should specify a file name for images. Image files are to be copied into the directory that the script is run from. If you want a bit more of a challenge, use the ability to ImageIO.read to take a URL object. Then the paths to images can be given as a full URL and loaded off the web. To take this a step further, let the user type in a URL the first time, then save that locally as an image. You can save the image using the write method from ImageIO. Details are in the API.
- An alternative upgrade to project 8 (p.281) is to make it so that it can help you organize your shopping trip. To make this happen, you need a second data file that tells you where items are located in the store. This can be as simple as listing rows that items are in. If you want to put some information for roughly where on an aisle each item is, you can.
You need to give the user that ability to build a shopping list using the items that are in the store file. They should be able to do this while looking at the current pantry contents, or at least flip between the two views quickly. The grocery list should have the ability to specify an item and an amount. The user should be able to say that they are buying that list and have those items added to the pantry.
The row information is used to build a simple graphical representation of the store. You can draw rectangles for rows and put labeled dots for the items in each row. The details are left up to you.
- For this option, you can add a graphical representation to the schedule that is built in project 10 (p.282). The goal is to have what looks like a fairly standard "week view" of the schedule. You will have a column for each day, and the courses should be displayed as labeled rectangles that span the section of the day that course would occupy. This makes it easier to see when there are overly long blocks of class time or too many small breaks spread around.
How you specify times is left up to you. In the previous project in this line, it was suggested that each time in the schedule be given a unique integer number. To stay with that, you need to hard code the times and days for those time slots. The alternative is to add functionality so that the user can enter specific times and days. Taking that route will require more complex code in the schedule building to make sure that no two courses are scheduled for the same time.
- The Mandelbrot set is a famous fractal in the complex plane discovered by Benoit Mandelbrot. A web search will provide you with lots of information on this beautiful structure. Part of what is so remarkably about the Mandelbrot set is that it has such a simple definition, but contains infinite complexities. The set is defined as the points, c, in the complex plane for which the equation , where z0 = 0, gives a bounded sequence.
In practice, if the value of |z| ever goes beyond 4, the sequence will diverge. So programs to explore the Mandelbrot set count the number of iterations to reach that point and assign a color based on how many iterations it takes. Because the points in the set itself will never diverge, there has to be some maximum number of iterations at which point you simply say it is in the set.
For this project you will write a GUI program that displays the Mandelbrot set. You have a view on the set with minimum and maximum values in the real and complex axes. Allow the user to zoom in by clicking.
- Most applications that allow you to keep track of your music, like that written for project 7 (p.281) will show cover art for albums. Put that into your solution so that when albums (or possibly songs) are selected, the cover art for the album is displayed. Cover art can be stored in the same directory as the script and data file or you can use URLs.
- Most interactive box scores do more than just present the statistics in the way you did for project 12 (p.282). They also use graphics to display things like team logos and photos of players. For this project you should extend what you did for project 12 so that it displays this information. You should also make it interactive so that the images of things like players can be changed by user actions. For example, you could listen to MouseEntered events on labels of their names. If the box scores involve different teams the logo displays should change with what teams are in the current box score.
Additional exercises and projects, along with data files, are available on the book's website.
1The term pixel is short for "picture element". It refers to a single dot in an image. The dots are typically arranged in a grid called a raster. How big these are depends on the resolution of the device you are using.
2The option of making a Puddle type and keeping a list of those was considered. This path was taken as it is more efficient and it also demonstrates the use of BufferedImage nicely.