Object-Orientation
From the beginning we have said that Scala is a completely object-oriented language. You have been using objects and calling methods on them since back in chapter 3 when we were taking our first steps in the language. Despite this, we have actually done very little with object-orientation. This has been intentional. So far we have been building up your logic skills and teaching you to break problems up into different functional units. Now that your problem-solving skills have reached a sufficient level, we will take the next step to have you doing full object-oriented decomposition of problems. Beginning with this chapter we will also start really revealing many of the details behind things that we have been using all along.
16.1 Basics of Object-Orientation
The basic idea of an object is that it is something that contains both data and the functionality that operates on that data. We grouped data originally with tuples and then in chapter 10 we started using case classes to group data together in a more meaningful way. What we did not do with either of these was to bind any functionality to them directly. We wrote functions that could operate on them, but it was independent of the data itself. In the case of tuples, we can not bind the functionality into objects. case classes do allow us to do this, we simply did not.
In this chapter we will learn how to do proper object-oriented programming in Scala. This is the model that we will use through the rest of the book as well. Scala is a class-based object-oriented programming language. That means that programmers create classes in their programs and those classes define types that are used to make objects. We already saw how the case classes that we made defined new types. We did not put anything in them though except some data elements that we wanted any function to be able to access.
The case keyword in front of a case class worked well for our needs in chapter 10, but it is not required to define a class. We will be writing normal classes now and only using case classes when they are called for. The way that you should think of a class is as a blueprint for an object. The class tells Scala what goes into the objects of that type and what type of functionality those objects should have. The syntax for a class is as follows.
class TypeName(arg1:Type1, arg2:Type2, ...) {
// Methods and Members
}
As you can see, the only things that are different between this and the case classes we have already worked with is the lack of the keyword case and the curly braces with stuff in them after the class. These curly braces, like all curly braces in Scala, define a new scope. This scope is associated with the class and anything you want to put in the class goes inside of them. There should be nothing too surprising about that.
16.1.1 Methods and Members
Inside of the class you can write code exactly the way you have anyplace else. There are small differences that will be discussed and the meaning and terminology changes a bit. When you write a variable declaration with val or var inside the body of a class, that is now a member declaration. It is data that is stored in the objects created from that class. When you use def to create a function, we call it a method because of its scope in the class and the fact that it is something that you will be able to call on objects created from this class. Any statements that you write that are not declarations of members (val or var) or methods (def) will simply be run when an object of this type is instantiated.
To see how this works, we will write a little script that includes a class declaration. For the class we will go back to the concept of grades in a course and write the class to represent a student. Here is a first draft of the class with some lines that use the class.
class Student(name:String,id:String) {var tests = List[Double]()
var quizzes = List[Double]()
var assignments = List[Double]()
def testAverage = tests.sum/tests.size
def quizAverage = quizzes.sum/quizzes.size
def assignmentAverage = assignments.sum/assignments.size
}
val john = new Student("John Doe","0123456")
john.tests ::= 78
john.tests ::= 85
println(john.testAverage)
The class begins with a class declaration that looks a lot like a case class and really is not too different from a def. After the keyword class is the name of the type, in this case Student. This is followed by a list of parameters to the class. In this case we have two Strings called name and id. The body of the class is denoted with curly braces and inside of the curly braces we have three member variable declarations for grades and three method declarations for taking averages. More will need to be added, but we need to explore what this really means before we can do that.
After the class declaration are four lines of code. The first declares a variable called john that is set to be a new Student with the name John Doe and a student number of 0123456. The second and third statements adds two test grades of 78 and 85 to this student. While this is simple, it is not clear that we really want the grades to be this accessible. We will talk more about that later. The last statement in the script prints the average for the tests by calling the testAverage method.
16.1.1.1 Parameters as Members
Everything in this example should seem fairly straightforward. It really does not look much different from things that we have done before. This would change though if we try to make the print statement a bit more informative.
println(john.name+" has a "+john.testAverage+" test average.")
If you change the println to this and run the script you will get an error message that might not make much sense to you.
ScalaBook/ch17.scala:15: error: value name is not a member of this.Student
println(john.name+" has a "+john.testAverage+" test average.")
^
one error found
You should definitely find this surprising. This would have worked for a case class. Indeed, if you put the case keyword at the beginning of the class declaration this works fine. It is worth exploring why it does not work without the case keyword and how we can fix it.
The error message tells us that name is not a member of Student. This is because, by default the arguments passed into a class are not turned into members. The logic behind this is that members have to be stored by each instance of the class that is created, so extra members consume memory. Even if they do have to be remembered, they will not be visible to any code outside of the class. For example, if you add the following method into the class you can call it to get the last name, but you still can not get the name itself.
def lastName = name.split(" +").last
If you want an argument to be a member simply put val or var before the name. It will then become a member with the proper behavior for either a val or a var. For our Student class we likely want both to be constant so we should change the class declaration to the following.
class Student(val name:String,val id:String) {
If you make this change you can use the print statement shown above without an error.
16.1.1.2 Visibility
The possibility of things being visible or not is pretty much new to us, but it is a very important aspect of object-oriented programming because it allows you to hide details of the way an object works away from the code that uses the class. The value of this is that you can change those details without causing problems for the code that depends on the class to work. In the case of member data, you can also hide away details that you do not want other parts of code to have free access to.
A great demonstration of this last part comes in the form of a bank account. Let us consider the simplest possible class that we might write to represent a bank account.
class Account {
var balance=0
}
This class does not take any arguments when it is constructed and, as a result, the parentheses have been left off. It has one piece of member data, an Int for the balance. As you might recall from chapter 3, money should be stored in Ints because the arithmetic of the Double type is inaccurate due to the limited precision. This representation is simple, but it has a significant drawback. The member balance is a var that can be set by any code that gets hold of an Account object. For a real bank program that would not be acceptable. The balance can not just be any value. For example, negative numbers generally are not allowed. In addition, changes to the balance are typically supposed to happen in specific operation, deposits and withdraws. Those operations can enforce certain rules and, for a real bank, would log any changes to the balance so that it is possible to go back and figure out what happened. While we could make functions for those operations, there would be nothing that forces programmers to use them. It would be possible for a programmer to "get lazy" at some point and access the balance directly. The results of this in banking software could be quite extreme.
The ability to force access to data to occur through certain methods is one of the most significant capabilities of object-orientation as a way of improving software construction and controlling complexity. The real benefit of this capability is to take responsibility for proper usage away from the users of the objects. If the only ways to use the object are through methods or data that is safe for them to use, then they know they can not mess it up and do not have to worry about that. Instead, they can focus on the logic that they are working on.
So how do we accomplish this in our classes? We do it by setting the visibility of members. There are three main levels of visibility in Scala and they are very similar to what you will find in other class-based object-oriented languages.
- Public - This means that something can be accessed by any code inside of outside of the class. In Scala this is the default visibility for elements so there is no keyword for it.
- private - This means that the member can only be accessed inside the class. Attempts to get to the member outside of the class will result in a syntax error. If you prefix a declaration in a class with the private keyword, that member will be private.
- protected - This is like private except that protected members are also visible in subtypes. This will be discussed in detail in section 19.2.2.
In our example Account we really want the balance to be private. We can do this by simply adding it before the var.
class Account {
private var balance = 0
}
Unfortunately, this leaves us with a class that is completely useless. Before making this change we could have done something like the following.
val myAccount=new Account
println(myAccount.balance)
myAccount.balance += 100
println(myAccount.balance)
If we do this now though we get a set of error messages.
/ScalaBook/ch17.scala:24: error: variable balance cannot be accessed in
this.Account
myAccount.balance += 100
^
/ScalaBook/ch17.scala:24: error: reassignment to val
myAccount.balance += 100
^
/ScalaBook/ch17.scala:25: error: variable balance cannot be accessed in
this.Account
println(myAccount.balance)
^
5 errors found
Note how the error message is different than what we saw previously for name on our Student class. Instead of telling us that balance is not a member, it tells us that balance can not be accessed. This is precisely because the balance is now private and the code is outside of the class.
To make this class useful, we would need to put some methods in it that are public that manipulate the balance in allowed ways. We will start with methods for deposit and withdraw. Here is what the deposit method might look like. Note that this is indented because it appears inside of the Account class.
def deposit(amount:Int):Boolean = {
if(amount>0) {
balance += amount
true
} else false
}
The method takes the amount to deposit as an Int. It returns a Boolean to tell us if the deposit went through. This method does not support logging because adding that functionality goes deeper than we want to at this point. It does check to make sure that the amount of the deposit is positive. If it is, then that amount is added to the balance and we give back true, otherwise nothing is done and we give back false.
We can add a very similar looking withdraw method.
def withdraw(amount:Int):Boolean = {
if(amount>0 && amount< = balance) {
balance -= amount
true
} else false
}
The only difference between deposit and withdraw is that you can not withdraw more money than you have and the amount is subtracted from the balance.
The last thing we need to add is a method to get the balance so that it can be checked. This method might look like the following.
def getBalance = balance
It simply gives back the balance in the account. This style of calling a method that retrieves a member using a method that begins with "get" is standard practice in Java. For reasons that we will see later, this is not the recommended style in Scala. Instead, in Scala we would use a different name for the private member and use a method with the normal name for getting the value. There are different approaches to how you name the private var. In this book we will typically use a shortened version of the word, in this case bal. You can pick whatever style you want, but be consistent with it. Having made this change, the class as a whole looks like this.
class Account {
private var bal = 0
def deposit(amount:Int):Boolean = {
if(amount>0) {
bal += amount
true
} else false
}
def withdraw(amount:Int):Boolean = {
if(amount>0 && amount<=balance) {
bal -= amount
true
} else false
}
def balance = bal
}
We can utilize this code by doing the following.
val myAccount=new Account
println(myAccount.balance)
myAccount.deposit(100)
println(myAccount.balance)
Note that because of the use of the name balance, the println statements appear the same way they did when balance was a public var. The difference is that you can not set balance now unless you go through either the deposit method or the withdraw method.
Scala has more flexibility in visibility modifiers than what is described here. Either private or protected can be followed by square brackets and the name of an enclosing scope of a package, class, trait, or object type. (The object construct will be introduced later in this chapter. The trait construct will appear in a few chapters.) This will make that member publicly visible for everything at that scope and closer to the declaration. The primary benefit of this is that you can give special access to closely related bits of code without making a member public to the whole world.
The square brackets can also include the keyword this. Declaring a member to be private[this] means that is it private not only to other pieces of code, but also to any other instances of the enclosing class. Normally if a method gets hold of a reference to another object of the same type, they can access private members. This will not be the case if the member is private[this].
16.1.2 this Keyword
By default, when you write code in a class that calls a method or uses a member of that class, the call is made on the current object or the value from the current object is used. All calls are implicitly made on the current instance. That is exactly what you want most of the time and given the scoping of variables it feels very natural. This implicit specification of an object prevents you from having to specify one. That is fine in general, but occasionally you will have a need to be able to put a name to the current object. For example, you might need to call a function/method that needs an instance of the object as an argument and you want to use the one that the code is currently executing on. When that situation arises you will use the this keyword. this is a name that always refers to the current instance in a class.
Scala is implicitly adding this. in front of your calls to methods and when you access local members. For example, the line
bal += ammount
is really short for
this.bal += ammount
Scala simply added the this for you.
16.1.3 Encapsulation/Separating Interface from Implementation
The binding of data and functions together is called encapsulation. It might not seem like much, but it can have a profound impact on the way that software is developed. Having functionality bound into them makes objects far more self-sufficient. It can also free the programmer from having to think about many types of details.
One of the goals we would like to strive for in our object-oriented programs is to have separation of interface and implementation. The interface of an object or some other module of code is the set of constructs that you can interact with directly. For objects that are instances of a class, that would be the public members and methods. The implementation of that interface is what goes on to make the interface do what it is supposed to do. You want these things separate for a few reasons.
One reason is so that modifications to the details of the implementation do not break other code. If the interface and implementation are truly separated, then the code that makes calls to the interface does not depend at all on the details of the implementation. All that it depends on is that the elements of the interface adhere to a particular contract. That contract tells you what information is needed, what information you will get back, and what side effects, if any, will happen in between. It should not tell you how things are done in between. It should be possible to completely redo the details of how things happen, as long as the new approach does not violate the contract, and still have any code using the implementation work just fine.
Another reason for trying to keep interface and implementation separated is that the interface is typically much simpler than the implementation and it benefits coders to not have to keep too many details in their heads at once. Software has the ability to be arbitrarily complex. This is both a blessing and a curse. The flexibility that this provides is part of why software can do so many different things. However, humans can only keep so many details straight in their head at any given time. When the complexity of the software goes beyond what the programmer can deal with, it is essential that some parts of the complexity can be safely ignored.
The reality is that you have been taking advantage of this separation in everything you have done in this book and will continue to do so as long as you program computers. When you call println, you do not really care about all the details that go on between your call and having characters appear on a display. Thankfully you do not have to think about them either. All those details could change and as long as println keeps its contract of sending your information to the standard output you will not care that it has been changed. This is not just true of println, but of most of the Scala library code that we have been using.
16.1.4 Special Methods
There are a few method names that are special when you put them into classes in Scala. In a way, these special methods are rules that you have to learn as special cases. Such things often weigh upon a language. In this case there are not many of them, and the power they provide is quite remarkable.
16.1.4.1 Operator Methods
The first set of things that we might consider special are operator methods. It turns out that these are not really special in Scala. In reality they are just like any other methods in Scala. You can use any method call that takes a single argument using operator syntax as was discussed back in chapter 3. That means you can leave out the dot and the parentheses and just put the operator between the two operands. What makes this more interesting is that Scala accepts names that have symbols in them and most languages do not. This includes names for methods.
We have been using names that contain only letters and numbers and begin with a letter.1 You can also include symbolic operator characters in certain ways. You can have names that include only operator characters, or you can have letters and numbers, beginning with a letter, followed by an underscore and operator characters. Note that once you get to operator characters in a name, all subsequent characters must be operator characters.
So while we have been using names like timesTwo or times2, the names ∗, ∗∗, ∗++∗, etc., are also completely valid. As with so many things in life, just because you can use symbolic operator names for methods does not mean that you should. They have their place, but if you abuse them it can lead to code that is very difficult to read. As a general rule, you should only use symbolic names when they make sense. Changing from text names that people can read to arbitrary symbol sequences will make it nearly impossible for you, or others, to understand what is going on.
When you call a method using the normal method notation, the order in which things happen is obvious. This is because the argument to the method is found inside of parentheses and the parentheses determine the order. When you use operator notation, there have to be precedence rules. You already know that 2+3∗4 is 14, not 20. That is because multiplication has higher precedence than addition. This is true in Scala as it is in math. However, the + and ∗ are simply names for methods in Int in this expression. So how does Scala decide that the ∗ should happen before, or have higher precedence than, the +? When methods are used in operator notation, Scala uses the first character in the name to determine precedence. Table 16.1 lists the different levels of precedence that are used.
This table shows the precedence rules for operators in Scala. The precedence is based on the first character in the operator.
In the case of + and ∗, the first character happens to be the only character. The table tells us that ∗ has higher precedence than + so it is done first. If you put methods called ∗+∗ and +∗+ in a class, the ∗+∗ would have higher precedence by virtue of starting with ∗. If you also put a method named ^∗^ it would have lower precedence than either of the other two because of the low precedence of ^. These types of precedence rules exist in most other programming languages as well. The only difference with Scala is that you have the capability of defining our own methods that can be used as operators and have the appropriate precedence.
What if two operators are at the same level of precedence? Which comes first? For example, is 5-3+2 equal to 4 or 0? If the - happens first you get 4. If the + happens first you get 0. The order in which operators of the same precedence occur depends on associativity. You are used to operators being left-associative. This means that the furthest left operator of a given precedence is done first. Such is the case of + and - and hence the value of the expression 5-3+2 is 4. However, there are some operations that should be right-associative. An example of this from standard math is exponentiation. For example 333 = 3(33) ≠ (33)3. The numbers are grouped from right to left here, not the normal left to right of other operations.
An operator in Scala is right-associative if it ends with a :. In addition to being right-associative, it is called on the object to the right side of it and the value on the left side is the argument to the method. We have actually seen this behavior before with the :: operator.
3 :: 4 :: lst
This expression only makes sense if the :: operator is right-associative. The :: operator is not defined on Int, it is defined on List. So Scala sees this as the following.
3 :: (4 :: lst)
This happens to be the same as this.
lst.::(4).::(3)
There are quite a few other methods in the Application Programming Interface (API) that work in this way. We will see some more in chapter 20.
There is one other aspect of symbolic operator methods that is worth discussing before moving on and that is assignment methods. We have seen statements like cnt += 1. The operator in this case is an assignment operator. It performs an operation and does an assignment all in one step. You are allowed to write methods with names like += or -=. If you do, Scala will use those in expressions like cnt += 1. However, if Scala can not find a match for an operator that ends in =, it will try to expand it out. So if there is no += defined on the type of cnt, then Scala will try translating the cnt += 1 into cnt = cnt + 1. If that still does not work, you will get a syntax error.
The significance of this is that unless you really need specific behavior from a particular assignment operator, you do not have to write one. Instead, you will get the behavior you want automatically by including just the binary operator. So if you define +, you will normally get += for free. Note that this only works for symbolic operators. There is no assignment form for normal methods even though you can use them with operator syntax.
16.1.4.2 Unary Operators
Not all operators take two arguments. Operators that take only a single argument are called unary operators. You can write these in Scala by writing methods that do not take any arguments. Any method you write, whether it is made of operator characters or normal letters and numbers, can be used as an operator if placed after the object it is operating on. To see this, consider the toInt method of String.
scala> "5".toInt
res0: Int = 5
scala> "5" toInt
res1: Int = 5
The first version here uses the "normal" dot syntax. The second version leaves off the dot and simply specifies toInt as a post-fix operator. Post-fix simply means that the operator comes after the argument. The binary operators we considered in the last section were used in-fix. For some unary operators, it is standard to use pre-fix notation instead of post-fix notation. Consider the - to make a number negative. With a value like -5 you could say it is just part of the number. However, with -(a+7) the role of the - is clearly that of an operation that is performed on the result of a+7. The ! and ~ methods are other examples we have seen for pre-fix unary operators.
One of the major goals in allowing methods to be used in operator syntax is that you can create your own types that work in the same way you would expect language features to act. Indeed, the pre-fix unary operations for +, -, !, and ~ are part of the Scala libraries. You can write methods in a class that are interpreted as pre-fix unary operators. To do so, simply name the method unary_op, where op is replaced by +, -, !, or ~. So if you wanted your own negation you could create a method called unary_-.
16.1.4.3 Property Assignment Methods
Back in the bank account example we said that having a method that starts with the word get followed by the value you were getting was the Java style of doing things and that in Scala you simply name a method with the name you want people to see for the property. In our example this was balance. In Java style the partner to the get method is a set method. In Scala that counterpart to set is an assignment method. The advantage of the assignment method is that it allows you to set a property using normal assignment syntax. To create an assignment operator, write a method with the name prop_=, where prop is the name of the property.
To help you understand this, let us assume that you did want to be able to enter something like myAccount.balance = 700. We had this ability with the public var, but we decided that was too little control. We could get that back by adding the following method.
def balance_=(b:Int) = bal=b
Thanks to the way Scala handles assignment operators, this will let both of the following lines work.
myAccount.balance = 700
myAccount.balance += 40
So doing += will work like a deposit and -= will work like a withdraw. The downside is that neither returns a Boolean to let you know if it worked. As written, neither checks the value being deposited or withdrawn either.
This particular method leaves things too open. We might as well have the var because we are doing exactly what the var would do. However, the advantage of an assignment method is that it can be more complex and have more logic behind it. For example, the balance_= method could be altered to the following.
def balance_=(b:Int) = {
if(b>=0) {
if(b<bal) withdraw(bal-b) else deposit(b-bal)
} else false
}
This version will reuse the code from withdraw or deposit include any error checking, logging, etc. It also throws in checking so that assignments to invalid balances will not go through.
Note that you only include a set method for properties that are mutable so there are many situations where they are left off. If you are programming in a more functional style, you will not have these assignment methods. It is only when objects specifically need to be able to mutate that these are helpful. The real advantage in that case is that the code can look like a normal assignment, but will call the method that can do various types of error checking.
16.1.4.4 The apply Method
Things get a bit more interesting in a much more subtle way with the apply method. You write apply just like any other method that you might put in a class. You can call it just like any other method as well. However, Scala will allow you to call the apply method without using a dot or the name apply. When you remove those, it makes it look like you are treating the object as a function. Indeed, this is how all functions work in Scala. As was said very early on, everything in Scala is an object. That includes functions. A function is just an object of a type that has an apply method that takes the appropriate methods.
The intelligent use of apply is how you have been indexing into all of the collection types. Consider the following code that you could write in the REPL.
scala> val arr=Array(5,7,4,6,3,2,8)
arr: Array[Int] = Array(5, 7, 4, 6, 3, 2, 8)
scala> arr(3)
res0: Int = 6
scala> arr.apply(3)
res1: Int = 6
The call to arr(3) is actually just a shortcut for arr.apply(3). Scala is doing nothing more here than assuming the presence of the call to apply.
How can we use this in our own code? Consider that we write a class called CourseSection that will keep track of students in a course for us. We could make it so that we can "address into" the course section using either a student name or a student ID.
class CourseSection(val subject:String,val number:Int,
val title:String) {
private var students=List[Student]()
def addStudent(stu:Student) {
students ::= stu
}
def apply(key:String):Option[Student] = {
students.find(s => s.id==key || s.name==key)
}
}
The apply method here returns an Option[Student] because it is possible that there is no student that matches. In that case this returns the value None. Otherwise, it will return a Some[Student] with the proper Student data. With this in place you could write the following code.
val course=new CourseSection("CSCI",1321,
"Principles of Programming II")
course.addStudent(john)
course("0123456").get.quizzes += 88
This makes a new course then adds in the student we created above that is in the variable john. The last line looks up our student by his ID and adds a quiz grade. The call to get is required because of the fact that apply returns an Option. Note that if the course did not have a matching student, this code would result in an error.
16.1.4.5 The update Method
Having an apply method is sufficient for many situations. For example, it is all that is needed for immutable collections. It is also all we will want for our CourseSection class given how we have written it. However, it is not sufficient if you want to do something like an assignment into an Array. Basically, it looks things up, it does not change things. To do this, you use the update method. When Scala sees an expression like this
obj(args) = e
it converts it to a call of the form
obj.update(args,e)
So you can get assignments for indexing by simply implementing the proper update methods.
16.1.4.6 Overloading Methods
Methods can be overloaded. This means that you can have two different methods that have the same name as long as they take different numbers of arguments or different types of arguments. The ability to overload methods can come in handy, but it is something that you do not want to abuse as it can make it difficult for readers to understand what is going on or even make code ambiguous so that it does not compile. In the case of special methods, which have to have a particular name, overloading is the only way to make it so that you can get the desired functionality with different types.
To understand this, consider that you have a class that represents a grid of numbers, perhaps for a spreadsheet. This is a situation where it makes sense to use the apply method to get values out. However, there are several ways to refer to cells in a spreadsheet. The most obvious approach in a program would be to pass two Ints for the row and column. However, when you run a spreadsheet program it is common to refer to cells using letters for the column and numbers for the row. You might want to allow these to be passed in a String and an Int (e.g., "C", 13) or just a String (e.g., "C13"). With overloading you could write three different apply methods and update methods as shown here.
class Spreadsheet(rows:Int, columns:Int) {
private val data = Array.fill(rows,columns)(0.0)
def apply(c:Int, r:Int) : Double = data(r)(c)
def update(c:Int, r:Int, v:Double) = data(r)(c)=v
def apply(c:String, r:Int) : Double = data(r)(calcColumn(c))
def update(c:String, r:Int, v:Double) = data(r)(calcColumn(c))=v
def apply(cell:String) : Double = {
val (c,r) = cell.partition(_.isLetter)
data(r.toInt)(calcColumn(c))
}
def update(cell:String, v:Double) = {
val (c,r) = cell.partition(_.isLetter)
data(r.toInt)(calcColumn(c))=v
}
private def calcColumn(c:String) : Int = {
c.toLowerCase.foldLeft(0)((v,c) => v∗26+(c-’a’))
}
}
Using this code you can do things like this.
val ss = new Spreadsheet(10,10)
ss("c5") = 14
ss(3,8) = 24
println(ss("c",5)+" "+ss("d8"))
This provides a very natural way to access elements using whatever style is convenient. In general you probably should not overload a method if you could use a slightly different name. Much of the time, different names will lead to code that is less error prone and easier to read.
16.1.4.7 Vector Example
To help demonstrate how these different features can work we will write a class that represents a 3-D vector. We will give it x, y, and z components then define the types of operations that we would want to be able to perform on it. One of the first major design decisions we have to make for this is whether we want the vector objects to be mutable or immutable. For this example we will go with the immutable version as it does a better job of demonstrating functional design and works better here. This approach is more memory intensive and can be slower in some applications because it does not mutate the vectors. However, it often produces better, more reliable code that, in some applications, will be faster because it prevents defensive copying. That is where you make a copy of an object to pass into other code when you do not want your version of the object to get changed.
We will start with the declaration of the class that includes operators for +, -, ∗, and /. It also has two versions of apply. Lastly there is a method called toString that we will learn more about in chapter 19. This method determines what we see when an object of the Vect type is printed out. It is very useful to have a form that helps you see what is going on to correct problems.
class Vect(val x:Double, val y:Double, val z:Double) {
def +(v:Vect):Vect = new Vect(x+v.x,y+v.y,z+v.z)
def -(v:Vect):Vect = new Vect(x-v.x,y-v.y,z-v.z)
def ∗(c:Double):Vect = new Vect(c∗x,c∗y,c∗z)
def /(c:Double):Vect = new Vect(c/x,c/y,c/z)
def apply(i:Int):Double = i match {
case 0 => x
case 1 => y
case 2 => z
}
def apply(is:Seq[Int]):Seq[Double] = {
is.map(Array(x,y,z))
}
override def toString = "<"+x+", "+y+", "+z+">"
}
The first version of apply lets you index into the different coordinates. It is written using a match expression though there are certainly other ways it could be done. The second version of apply is more unusual. It allows you get the x, y, and z values back as a sequence by passing in a sequence of indexes.2
With this code written, we can instantiate objects of the Vect type and perform the specified operations on them.
scala> val v1=new Vect(1,2,3)
v1: Vect = <1.0, 2.0, 3.0>
scala> val v2=new Vect(2,-4,7)
v2: Vect = <2.0, -4.0, 7.0>
scala> val v3=v1+v2
v3: Vect = <3.0, -2.0, 10.0></3.0,>
scala> val v4=v3∗8
v4: Vect = <24.0, -16.0, 80.0>
Note that with the code that we have here, we have to put the scalar on the right of the multiply. If you tried to do 8∗v3 you would get an error. This is because Scala sees that as (8).∗(v3). The value 8 is an Int, it does not have a version of ∗ that works on a Vect. It is possible to get around this, but it requires another more advanced concept called an implicit conversion which we do not want to consider at this time. For now we will be happy putting the scalar on the right.
There are two other common operations on 3-vectors: the dot product and the cross product. The dot product returns a scalar and the cross product returns a vector. When writing these, we have to make a significant decision, do we want them to be symbolic or words? We can not use just ∗ for both because Scala could not figure out which one we meant to use at any given time. For that matter, people reading the code probably could not either. Scala does give us the ability to use longer symbol names with multiple operator symbols. So maybe ∗+∗ for a dot product and ∗-∗ for a cross product. You can not use ∗.∗ and ∗x∗ because . and x are not operator characters. The choice of + and - in these comes from knowledge of the formulas for dot and cross products, but neither really fits well or will read to most people as dot and cross. For that reason, we will stick with normal alphabetic method names.
def dot(v:Vect):Double = x∗v.x+y∗v.y+z∗v.z
def cross(v:Vect):Vect =
new Vect(y∗v.z-z∗v.y,z∗v.x-x∗v.z,x∗v.y-y∗v.x)
We can still use these in operator notation. The only problem is that characters have lower precedence than multiplication would so parentheses will have to be used to enforce order of operation.
There is no update method provided because these are immutable. You could, in theory, make them mutable and provide an update. You would probably also want to provide +=, -=, ∗=, and /= operators that mutate instead of making a new copy. Doing so is left as an exercise for the reader.
16.1.5 object Declarations
Scala has another type declaration that is similar to a class in syntax, but which has a very significant difference in meaning. The object declaration creates a single object in the current scope with the members and methods that you put in it. Unlike a class, you can not pass an object any arguments. This is because you do not make the object with new. The declaration of the object is what makes it.
Even though an object declaration does not create a new type, we use a capital letter as the first letter in the name to distinguish it from normal instantiated objects. To use the members or methods of an object, use the object name and call it just like you would for an instance of a class. object declarations can be used in any scope where you want an object, but you only want one object of that type. At the top level they are typically used as a place to organize functions, but they have far more versatility than this overall.
16.1.5.1 Applications
The fact that you can use an object without instantiation is very significant. The objects effectively exist as soon as the program starts running. You do not have to have a line that makes a new one. This is most significant when we move beyond the REPL and scripts and into full-blown applications. A top-level object declaration defines an entry point to an application if it contains a method called main that takes an argument of type Array[String] and returns Unit. Here is a simple example:
object FirstApp {
def main(args:Array[String]) {
println("My first application.")
}
}
The scripts that we have been using can be converted to applications by doing nothing more than putting the code inside of a main that is in an object. If you use the variable name args for the command-line arguments, then references to them in a script will even work.
The main difference between a script and an application is how you organize the code in files and how you run them. By definition, a script is supposed to be a small program. All of the code for a script goes into a single file. When the amount of code that is required gets larger, it needs to be split apart and organized. The organizational structure you should follow in Scala in nearly all situations is to put each top-level class or object in a separate file that is the name of the class or object followed by ".scala".
Consider the example of a grade book application. We might use the Student class from above and put it in a file called "Student.scala". The CourseSection class from above would go in "CourseSection.scala". Finally, we would have an object declaration for a grade book that would go in "Gradebook.scala". In addition to having a main method, this would keep a collection of courses and provide whatever functionality we wanted for the grade book, whether it was a text or graphical interface.
Running an application like this is a two-step process. First you have to compile the code. This is done with the scalac command, which stands for "Scala compiler". You have to tell the Scala compiler what files it is you want to compile. If you organize your code so that all the code for an application is under a directory you can execute something like scalac ∗.scala. This will compile all of the files ending in ".scala" in the current directory.
When you do this, if you have any syntax errors they will be found and reported to you in much the same way they were when you ran programs as scripts. Once you have found and fixed all syntax errors, the compiler will produce a set of files in compiled bytecode that you can run. These files will end with the ".class" extension. To run the application you go back to using the scala command. Only now you follow it by the name of the object you want to run the main from. So in the case of our grade book we could run it by entering scala Gradebook. Other command-line arguments can be specified after the name of the object.
The application has to be an object because methods in a class can only be called on instances of that class, not the class itself. So in order to call a method you have to have executed new on that type. However, main has to be called right off the bat, before any other logic has been executed. This is not a problem with an object as the single instance exists without a call to new.
16.1.5.2 Introduction to Companion Objects
The most common use of objects is as companion objects. A companion object is an object that has the same name as a class. Both the class and its companion object should be placed in the same file. The companion object has access to private members of the class it is a companion with. Similarly, the class can see private elements in the object.
You might have wondered why it is that when we are building objects in Scala, sometimes we use new and sometimes we do not. The reality is that making a new object always invokes new. When you do not type it, it means that you are calling other code that does. When you use the name of the type without new to build an object, you are calling the apply method on the companion object and that apply method is calling new.
Unfortunately, you can not easily write classes with companion objects in the REPL or in scripts. For us to create our own companion objects, we have to be working in the mode of writing applications, compiling with scalac, and running the compiled files with scala. We will come back to this next chapter.
16.1.6 Object Decomposition
At first, the use of object-orientation might not seem all that significant. Anything that is a method could be written as a function that takes the object as a first argument. However, over time you will come to see that bundling data and functionality actually has the ability to change a lot of how we approach solving problems. Instead of simply thinking of what functions you should break your problem down into and how to group the data as separate considerations, you take them together. You think of what data members and what functionality belong together in objects.
It is common to use the analogy when teaching object-orientation that objects are nouns and the methods are the verbs that act on those nouns. This analogy oversimplifies the situation though. Objects in programming do not always have to reflect things that we consider to be objects in the real world. They can represent much more abstract concepts. Indeed, functions in Scala are objects. A large portion of the second half of this book will be devoted to helping you see how we can use objects to express various ideas and to make our lives easier as we develop software.
16.2 Revisiting the API
Another significant change in the second half of the book will be our reliance on the API. In the next few chapters we will be uncovering many elements of Scala that will help you to understand different parts of the API and you will be expected to go into the API to get information on what you can do with the libraries.
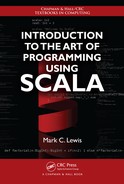
We have already learned enough to help a bit with understanding what some things mean in the API. When you open up the API, the left side has a frame that looks like figure 16.1. We have used the generic word "type" to describe the things that are listed in this frame. Now we can be more specific. There are really three different declaration styles in Scala that appear over there and the API indicates which one you are dealing with.
This is part of the right panel that you see when you first enter the API. The little circles with the letters c, o, and t indicate whether it is a class, object, or trait.
The circles next to the names contain one of three letters in them. The meaning of these letters is as follows.
- c - For a class.
- o - For an object.
- t - For a trait, which we will learn about in chapter 19. For now you can think of a trait as being like a class.
When you click on one of these, you are shown the methods and members that are defined in them, whether it be a class, an object, or a trait. The API itself is built by running a program called scaladoc on Scala code to generate Hyper-Text Marup Language (HTML) descriptions of what is in the code.
When there is an "o" next to a "c" or a "t" it is a companion object. If you want to know if you can build objects without a direct use of new, look there and see if there is an apply method defined. If there is, it generally implies that is the preferred way to make instances of that type.
16.3 Meaning of case classes
The first usage of the term class that we encountered was back in chapter 10 when we looked at case classes. Now that you know a bit about regular classes, you might wonder what case keyword does for a case class. It does not do anything that you could not do without the use of case, it simply adds a lot of code for you.
First, all the data passed into the case class are turned into public vals instead of just being arguments. Second, it automatically creates a companion object that has an apply method that you can use to make instances of the case class without using new. It also adds a copy method to the class that has default arguments for all the values. There are a few other things added in that allow the pattern matching that we have not talked about yet.
16.4 import Options
The usage of import that we have seen so far with all the import statements at the top of the file giving full package names is the most basic usage in Scala. It mirrors the way import has to be used in Java. There are a lot of additional options in Scala that we have not really considered. Here is a list of some details of import starting with the general usage. Each one includes situations where you might want to use it.
- So far, we have been putting import statements at the top of the file. This is not required though, they can go anywhere. import follows normal scoping rules. So if you put the import at the top of the file then the names brought in by it are visible through the whole file. However, if you put it inside of curly braces, the names that are imported will only be visible through the end of the current scope.
- As we have seen before, you can use an underscore as a wildcard to represent everything in a certain scope.
- If you do not want to import everything, but you do want to import several things, you can put multiple names inside of curly braces.
- Names of packages and classes in Scala are truly nested. So if you have imported all the contents of some package, and want to then import a subpackage, you can leave off the first part of the name for the subpackage. For example, after you do import scala.swing._ you can do import event._ instead of import scala.swing.event._. For that matter, because scala._ is imported by default, you can leave that off of everything.
- So far we have used import to bring in the contents of packages. It can be used to bring a lot more into the current scope. You can import package names or the members of objects. Things like the members of objects should definitely be done in limited scopes.
- You can give a different name to things that you import using a rocket, => inside of the curly braces. Put the name the thing normally goes by on the left side and the name you want on the right side. For example, if you need to use the java.util.List you probably do not want it hiding the List in Scala. To get around this you could do import java.util.{List => JUList} so that the name JUList refers to the Java version. You can also hide a name by putting an underscore to the right of the rocket. So if you want to import all of the java.util package except the List you could do this: import java.util.{List => _, _}.
- Due to the nesting of packages, there are times when a particular name could refer to more than one package. To remove ambiguity, that name _root_ can be used to refer to the base below all packages. So import _root_.scala.io.Source can be used to refer to the Source type even if there are conflicts with the names io or Source.
16.5 End of Chapter Material
16.5.1 Summary of Concepts
- Objects are constructs that combine data and the functionality that operates on that data.
- The standard way of making objects in Scala is to define a class and instantiate objects from it. You can think of a class as a blueprint for making objects.
- A def declaration in a class defines a method. A val or var declaration defines member data.
- classes can take parameters. By default they are not members. Adding val or var in front of the name makes it member data.
- By default, constructs declared inside of a class are public and can be seen by any code. A big part of the power of object-orientation comes from the ability to hide things so that other code can not get to it. The private modifier makes it so no code outside of the class can see the declaration. There is also a protected modifier that makes declarations visible only to subtypes.
- A big part of the benefit of making things private is that it can be used to hide implementation details. This facilitates the separation of interface and implementation.
- To enhance the expressivity of the language, Scala allows a broader range of names than most languages and interprets some method names in special ways.
- In addition to the "standard" names that start with characters or underscores and then have characters, numbers, or underscores, Scala allows two other types of names. One of those is names that include only operator characters. The other is a "normal" name followed by an underscore and one or more operator symbols. Operator syntax, dropping the dot and the parentheses works for any method with a single argument. Operator precedence is determined by the first character. Operators ending in : are right associative.
- Unary prefix operators can be declared with a method name of unary_ followed by symbols including +, -, ~, and !.
- Scala does not has a strong syntactic distinction between methods and members. You can mimic a property of the class by writing a method with no arguments or parentheses along with a special method for assignment. That method has the name of the property followed by _=.
- Function call syntax is expanded out to calls to the apply method.
- Indexed assignment is expanded out to a call to update.
- You can have multiple methods with the same name as long as they have different arguments. This is called overloading.
- Scala also allows object declarations which create singleton objects. These can not take arguments and are not instantiated with new. A single instance just exists for using.
- Scripts are good for small programs, but larger programs are written and run as applications. The entry point to an application is defined by a main method in an object. Top-level declarations are split to different files. Code is compiled with scalac and run using scala.
- An object with the same name as a class can be declared in the same file and it becomes a companion object. Companions have access to private declarations.
- The case keyword on a case class effectively adds a bit of code to a class. It makes all parameters into val declarations. It also adds a copy method and code for pattern matching.
- You can do a lot of different things with import statements. They can go anywhere in the code, rename things or hide them.
16.5.2 Exercises
- Code in the chapter developer an immutable vector class. For this exercise you should develop a mutable vector class. When you do this, keep the behavior of the existing methods the same. What makes it mutable is that you will also define +=, -=, ∗=, and /= methods that mutate the vector on which they are invoked.
- You can turn any script that you wrote previously into an application by embedding everything into an object in the main method. The results of this should compile with scalac and the run with scala.3
The result of this simple conversion is not generally ideal. Any method or case class declarations should generally be pulled out of main. The methods likely should go inside of the object, but outside of main. If those methods are not generally useful, they should be made private. The case classes could go inside of the object where they might or might not be private, depending on how generally useful they are. However, if they truly stand on their own and have meaning, they should go outside the object and into a separate file bearing their name.
The results of this modification might not compile. That will depend on the quality of the original code and whether you used variables that were declared outside of in those methods. If you use variables defined outside of the methods in their body, you have one of two choices. Generally your first choice should be to pass those variables in by adding extra parameters to the method. If a variable really deserves to be a data member/property of the object, it can be moved up a level so it too is in the object, but not in main.4
Your goal for this exercise is to run through this process on a number of scripts that you wrote earlier in the book. When you do this it is recommended that you make a subdirectory for each script you are converting, then copy files into there. This way you not only preserve the original script, you make it easier to compile that single application. Doing this on a number of scripts will really help to build your feel for how this new approach differs from what we had been doing previously.
- Another thing that you can do to help you get used to some aspects of the objectoriented model is to convert case classes over to normal classes. This is generally a less significant modification, but it will require some changes in other parts of the code such as forcing you to use new when instantiating an object. You will also lose the copy method.
While converting scripts to applications has some general use to it, keep in mind that not all case classes need to be changed. The case classes exist in Scala for a reason that goes beyond the educational purposes that have benefited us in this book. It is quite possible that a number of your case classes should ideally remain that way over the long term. Practice with changing them is good for you to see how that matters, but it is not always something you want to do.
- For any of the things you code as applications, you can put in proper scaladoc comments and then run scaladoc on your source to see the HTML files that are generated.
16.5.3 Projects
All the projects in this chapter switch from running as scripts to running as applications. That means that you need to run scalac first to compile the application, then run scala on just the name of the object you put the main method in. This also allows you to split code up into separate files for different classes and objects. All code must be inside of a class or an object for this approach to work. If you put the files for the project in their own directory you can compile them all by running scalac ∗.scala.
- One way to build on top of project 15.3 is to give the user the ability to plot functions.
For this to work, the formula parser needs to support variables.
In the formula parser, there were two possible cases where you did not find an operator: a number and parentheses. The variable becomes a third possibility. To keep things simple for now, the only variable allowed in a formula will be x. So if you do not find an operator and the value of the String you are parsing is "x", you will say it is a variable. To use variables, you need an extra argument to the evaluation, a Double that represents the value of the variable x.
To fit in with the contents of this chapter, you are to make your code for this objectoriented by having it run as an application and including two separate classes called Plot and Formula. The Formula class is where your earlier parsing code will go. The class should take one argument that is a String for the formula. You will put the parsing code into a method in that class. The method should take a single argument of x:Double. It does not need to accept a String because the class as a whole knows what formula is being used. You could also add things like trigonometric function support so that you can plot more interesting curves.
The Plot class will keep a private var List that tells it all the formulas that are to be plotted. This List could contain instances of Formula or of some case class that groups a Formula with a Color so that different functions are drawn in different colors. The Plot also needs to keep bounds for the x and y axes. You should put a draw(g:Graphics2D) method into Plot that can be called from the application itself. That method will loop through the different Formula objects, evaluating them at proper points inside the range to be plotted, and connecting the points to draw a line for the function.
You can decide exactly how to create the application. Clearly the object will need to have a main and include a MainFrame and a Panel that calls draw on a Plot object. If you want an extra challenge to make the application more useful you can add the capability for the user to edit settings on the Plot. As with previous plotting work, it is recommended that you not try to support labels on axes. However, if the range or domain crosses zero, you might consider drawing in lines for the axes themselves.
- If you did project 3 (p.387) and you did gravity integrations before that, then you can consider doing this option. The basic idea is that you will add variable support to your formula as described in the previous project and then have the user type in a force formula that is used instead of gravity.
In the GUI for your integrator you should have a text field that lets users input a formula. You should use "x" for the distance between the bodies. You can also define standard variables that are used, like "ma" and "mb" for the masses of the first and second particles in an interaction. Using this, gravity would be input as "-ma∗mb/(x∗x)". A spring connection would be "-x". You can play with other options as well and see how they change the way particles move.
To make this work with the Formula type described above, you will need to build a String where the variables like ma and mb have been replaced by the proper numeric values for the masses of the particles being considered. You might even consider keeping those formulas in an Array[Array[String]] so that they do not have to be rebuilt each time. Then you have the Formula evaluate using the proper distance between the particles.
You could also extend the Formula type so that it accepts variables for x, ma, mb, and possibly others that you want to define. This second approach is less than ideal for the Formula type as it makes it less generic, but is probably the easiest way for you to get some flexibility user in the force-functions.
Note that this version of the integrator is going to be significantly slower than what you did before because every force calculation involves String parsing. In chapter 29 we will learn how to get back most of the speed while still allowing the force function to be determined by the user.
- If you did the Tron in an earlier project, you could update it to be object-oriented. For Tron you can make a class the represents a light cycle with the position, direction, and color. It could have a method called move that alters the position appropriately for the direction. Other methods could include turning left or right that are called by reactions to key presses or a draw method that put a point at the appropriate location. You might also encapsulate whether a cycle is alive or not into the class.
With this change it is now feasible to add in more players and have walls from one player disappear when that player dies. Extend the game to have three human players (or add a computer player) and make it so that when a player dies, the line for that player goes away.
- If you worked on any other type of graphical game in earlier chapters, you should also be able to convert it to be an application with an object-oriented approach by making the different elements of the game into classes that store the relevant information and have appropriate methods.
- If you implemented the Mandelbrot set calculation and display previously, this is the project for you. First, use what you have learned in this chapter to make a class called Complex that represents complex numbers and alter your original Mandelbrot calculations to use that. Once you have done that, you will take further advantage of it by adding the ability to display Julia sets of quadratic polynomials.
Every point in the Mandelbrot corresponds to one of these Julia sets. The equation for a quadratic polynomial looks much like that for the Mandelbrot set, with c being a fixed value and z0 being the point in the plane you are calculating for. By contrast, the Mandelbrot set used a different c value for each point and z0 = 0 so z1 = c. Again, you iterate until either the value leaves the area around the origin or until some pre-specified number of iterations.
If the user clicks on a location (use the MouseClicked event) then you should pop up another window (use Frame, not MainFrame for that window) with a different panel that will draw the Julia set associated with the point the user clicked on. You can decide what functionality you want to put into the window. It should start with a bounds of r ∈ [−2, 2] and i ∈ [−2, 2] for the real and imaginary axes, respectively. It should not be hard to add zooming, but that is not required.
- This project continues project 5 (p.206), where you had to figure out how many elements of each type were on the different sides of a chemical equation. You should recall that the output of that program was something like the following.
C: a∗1=d∗1H: a∗4=c∗2O: b∗2=c∗1+d∗2We want to treat this as a system of linear equations and solve it to find the proper values of a, b, c, and d. These particular formulas give you three equations for four unknowns. If you remember systems of equations, that is typically not a good thing as the system is underdetermined so there are an infinite number of solutions. The easy way to fix that is to assume that a certain number of the coefficients are 1 so that you are left with equal numbers of equations and unknowns.
The form given above would be fine for solving this equation by hand, but for solving it on a computer we will want to move things around a bit. The idea is that we want to get it into the form Ax = y, where A is a matrix giving the explicit numbers in the equations, x is a vector with the variables we are solving for, and y is a vector with whatever constants wind up being on the right side of the equal sign. Let us make this more explicit by rearranging the equations above into something more like the form we want.
1∗a-1∗d=04∗a-2∗c=02∗b-1∗c-2∗d=0Now we have to pick a coefficient to set to 1 so we get down to equal numbers of equations and coefficients. Any will do equally fine, but programmatically you will probably find it is easiest to set the last coefficient to a constant value (so everything is still zero indexed in your code). In this case that is d. If we do that and move constants to the right side we get the following equations.
1∗a=14∗a-2∗c=02∗b-1∗c=2This can be transformed into Ax = y if
and
Both x and y are column vectors here so they have a single column and multiple rows. Remember that
and that is what we want to solve for. The way you will do this is through a process called Gaussian elimination. It turns out that there are many methods of doing this that have different numerical properties. Gaussian elimination is not the best, but it is the simplest to describe and sufficient for our purposes. Gaussian elimination is also exactly what you would do if you were solving this problem on paper so hopefully it will make sense.
What we do in Gaussian elimination is multiply and add together rows in A and y to remove coefficients and turn A into a triangular matrix. We might also have to swap rows at certain times. In fact, we will do that generally to improve numerical stability. To begin with, we want to remove the a term from everything but the first row. We could do this with A as it is, but for numerical reasons it is best if we keep the largest coefficient. You will see other reasons for this when we remove b. So the first thing we do is we note that the largest coefficient of a is 4 and it is in the second row so we swap the first and second rows. Note that we swap them in both A and y.5 This gives the following values.
and
Now we eliminate the a terms in the second and third rows by multiplying their values appropriately so that when we subtract them from the top column we do not have anything left. If the a term is already zero in a row we can leave it alone. In this case we will remove the a term from the middle row by multiplying it by 4 and subtracting the top row from it. We will do nothing with the bottom row. This gives the following values.
and
Now the top row is set so we look at the smaller nested matrix ignoring the first row and column. We want to eliminate the b coefficients from that. Here it really matters that we swap up the row with the largest coefficient because what is there right now has a zero coefficient and that will cause division by zero if we do not move it. We do the swap and since the last row already has a zero in the b coefficient we will not do anything else. That leaves us with the following values.
and
This we can solve by working our way up the matrix. The bottom row tells us that c=4. We plug that into the next row and get 2∗b-4=2 and find b=3. It is easy for us to say that, but we should probably examine how the computer will find these values. For the first one, the computer simply does c=y(2)/A(2)(2). Then as we move up we have to do some loops to subtract things off before we do the division. In this case b=(y(1)-c∗A(1)(2))/A(1)(1). Note that we are always dividing by the component on the diagonal and we subtract off all the terms to the right of the diagonal. Now we are down to our top equation which is a=c/4 so a=1. In the program that will be a=(y(0)-c∗A(0)(2)-b∗A(0)(1))/A(0)(0). The values of y(0) and A(0)(1) are both zero, but the math in the program will include them and it will not matter.
Your program should take an input just like the earlier project where you type in a chemical equation. It should then print out the same output as in that assignment and follow that with a solution. In this case it would print out "a=1 b=3 c=4 d=1" as the last line of output. There might be some decimal points in there as well. This example was well behaved and gave us integer results. However, our procedure does not guarantee that. If you want an extra challenge you can scale things up so they are all integers.
Make this object-oriented by making an application and having a class that represents a chemical formula. You can add methods to access the information that is calculated using the approach described above.
- It is time to make your map program into a true text adventure game. It does not matter how you do this, but you need to add in a goal to the game and have it inform the player if he/she wins or loses. Most of the original text adventure games had some type of puzzle solving where the items could interact with one another or with rooms in certain ways to make things happen. You probably do not want to go the Role-Playing Game (RPG) route and have equipment, combat, and the like though simple combat might be feasible. You must add a "help" command, which prints out the objective of the game and how to play. This should read and print the content of a file so you do not have to type in the full help in print statements.
- If you did project 1 (p.387) for the ray tracing with recursion and the graphics projects before it, now it is time to add lighting and proper colors and make it so that you have a real image. You will also organize things into an application with objects and classes.
You already have a case class scene that includes spheres, planes, and lights. So far you have not made use of the lights. Each of the geometry objects and lights should have a color attached to it. You need to write a function that takes a ray and the scene and tells you what color to use. If it never hits anything the color should be black. It is recommended for this that you make your own class called DColor that uses Doubles for the red, green, blue, and alpha values. You can put in methods to scale and combine these in meaningful ways. This might include a + method for adding DColors and a ∗ method for scaling when multiplied by a Double.
The reason for using your own DColor class is that you can represent colors with components that go outside the normal 0.0 to 1.0 range when you are doing calculations. You only have to bring things back to that range when you build a normal Color object. That operation makes another good method for the DColor type.
You should also update the existing ray tracer code so that it uses classes for the various components including points/vectors, spheres, planes, lights, etc. The Point and Vect6 classes in particular can have methods for doing mathematical operations that will make your code much simpler and easier to read. Methods like mag and normalize could also come in handy.
To color a point you need the color of the object that was hit, and the lighting on that point. To get the lighting, send a ray from the point of contact to the light source. If there is any geometry in the way (t value between 0.0 and 1.0), then that point is shadowed and the light does not get to it. If there is not anything in the way, that light contributed to the point. The color should be the component wise product of the colors of the light and the object hit, scaled by the cosine of the angle between the normal and the direction to the light. To find the cosine, keep in mind that . To make this easier, you should probably store the colors of lights and geometry using DColor. This hopefully helps to demonstrate why putting proper methods in the DColor, Point, and Vect will help to make the code easier to write and to read.
If the geometry that is hit is reflective, you do the recursive call to find what it hits and add the resulting colors, scaled by the appropriate fractions, together to get the color value of the incoming ray.
- You can make the scheduling script from project 6 (p.388) into an object-oriented application. To do this, you want to put a body on your Course case class. It is possible that you will leave it as an immutable case class and just add methods to it. The methods should probably include one that takes another Course and determines if the two overlap or not. There might also be methods designed to do specific types of copy operations that you find yourself doing frequently, such as making a copy of a course at a different time or with a different professor.
The fact that the choice of professor often impacts how much you want to take a course, you could split this off and make a class called Professor that has the name of the Professor and a favorability rating. The Course could then hold a reference to Professor and have a rating that is independent of the professor. A method can be written to give you the combined favorability. This way you can easily copy course options with different professor selections and have that change automatically taken into account.
You can also build a mutable Schedule class that keeps track of what the user wants in a schedule along with what has been met so far from the courses that have been put inside of the schedule. Put this all in an application and tie it together in a GUI.
- To upgrade the recipe project from 15.5 to be more object-oriented, you will most convert case classes to have methods and possibly make them mutable classes. You will also move the main functionality of the script into an object with a main method.
In addition to having classes for Pantry, Recipe, and Item, you might want to have a class that keeps track of all the known Item types that have been used in the program. That class should have methods that facilitate looking up items by names or other attributes so that users do not wind up creating duplicates of Item objects.
- The music library script from project 9 (p.389) can be converted to an object-oriented application by filling out the different case classes with methods or turning them into mutable classes.
You can also make types for playlists or other groupings of information that would benefit from encapsulation. Put the main script into an object with a main and you have an application.
- There are a number of features of the L-Systems script from project 4 (p.388) that call for object-orientation. Starting at the top, an L-System should be represented by a class that includes multiple Productions as well as an initial value. The Production type should be a class that includes a Char for the character that is being changed and a String for what it should result in.
One of the advantages of encapsulating a production in an L-System is that you can make probabilistic productions. These start with a single character, but can result in various different Strings depending on a random value. Whether a Production is deterministic or not does not really matter to the whole system as all the system does is ask for what a given character will be converted to.
Using a String to represent the state of the L-System at any given time works fine, but there is some benefit to creating your own class that is wrapped around a String. This class might also include information on what generation you are at in applying the productions. The advantage of this is that the type makes it clear this is not any random String, instead it is the state of an L-System.
You should make these changes and adjust the script to go into an object with a main to create a complete application.
Additional exercises and projects, along with data files, are available on the book’s website.
1Names can also start with and include underscores though that has also been avoided in this book.
2This type of indexing is a standard operation in MATLAB® where dealing with arrays and matrices is the primary usage of the language.
3Remember that when you run an application with scala you give only the name of the object, not the name of the file. Most of the time the file name should start with the object name so you are just leaving off the .scala.
4Note that if a variable is set by user input, it almost certainly needs to stay in main. Having singleton objects that request users to enter input will lead to very odd and unexpected behaviors in larger programs.
5The fact that value in both A and y need to be swapped at the same time means that your implementation could represent both A and y in a single Array[Array[Double]] where each inner array stores a row of A followed by the corresponding y value.
6There is a standard collection type called Vector. We suggest the shorter name Vect so as not to conflict with that.