Bigger Programs/New Tools
We have been working in the command-line environment this far because it is a good thing to know and it works very well for both the REPL and scripts. It supported the little steps that we needed to take early on. However, it is now time to move beyond scripts and write larger programs as applications. This can be done using the command-line, as was described in the last chapter, but there are easier ways.
17.1 Eclipse IDE
Large scale software is generally developed with the assistance of many tools, including an Integrated Development Environment (IDE). At this point we want to move our own efforts from the command-line to an IDE. For this book we have chosen to work with the Eclipse IDE. There are others that you can certainly try, but Eclipse supports many languages and is one of the first platforms for which a Scala plug-in was created. It is also the IDE that is being officially supported for Scala by Typesafe.
The IDE makes it a lot easier to manage the multiple files that are typically created when writing larger applications. It also automates the process of compiling the code and can show you syntax errors as you are writing the code.
You can download Eclipse for free from http://www.eclipse.org. There are multiple different versions of Eclipse that have been customized for different types of usage. You should download the Classic version. Follow their instructions for installation. When you run Eclipse it will ask you for a workspace directory. The default should be perfectly fine to start with. The first time you run Eclipse you will get a welcome screen that looks something like figure 17.1. You can spend as much time as you like running through the tutorials and other information they have. When you are ready to start programming, click the bubble that takes you to the workspace.

Figure 17.2 shows what the Eclipse workspace will look like when you first run it. The window is divided into a number of different regions and has the normal set of menus you expect from a graphical application. If you look through the menus you will see that there are lots of different options. Do not let this scare you. We will only be using a small number of them in this book and you do not have to know what all the others do to make use of Eclipse.
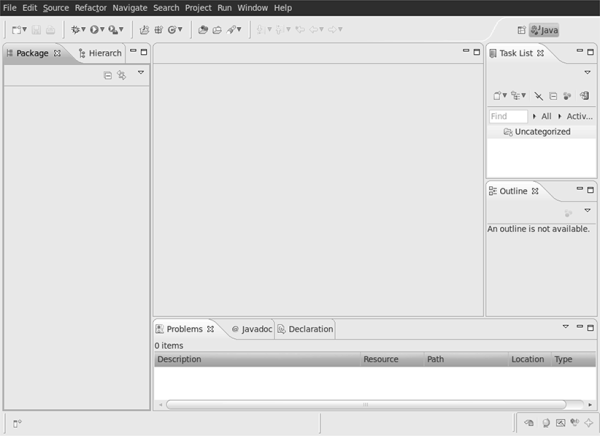
A blank Eclipse workspace. This is what you will start with when you are ready to begin programming in Eclipse.
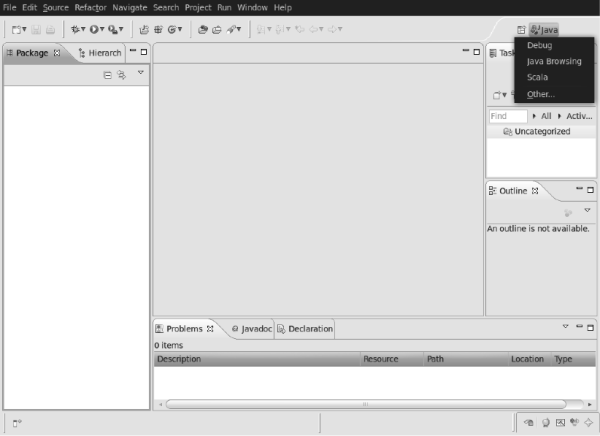
By default, Eclipse Classic is set up to program in Java. You can tell this from the top-right corner where there is a little button that is selected with an icon and the word Java. In order to program in Scala we will have to add something to Eclipse. If you go to http://www.scala-ide.org they have instructions for adding the Scala plug-in to Eclipse. If you follow these correctly you will be asked to restart Eclipse. After the restart, things will look the same, but you will have the ability to write in Scala. To do this you will need to switch to the Scala perspective. You can do this by clicking the icon in the top-right corner of the workspace and selecting Scala as shown in figure 17.3. If Scala is not listed on the initial menu, pick "Other" and select Scala from the window that comes up.
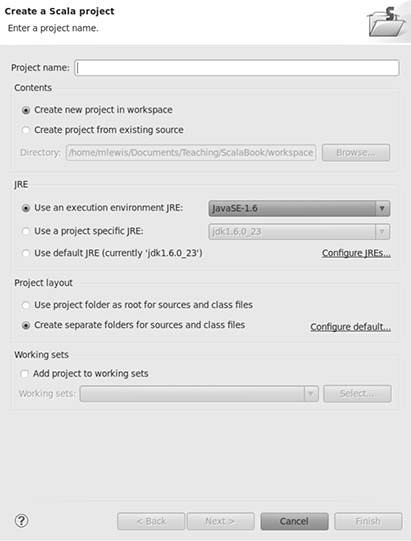
In the command-line you could just start editing a file that ended in .scala and you had a program. Eclipse makes you go through some other steps to keep code organized. All code in Eclipse is placed in projects. Different projects can use different languages for development. We want to make a project that is associated with Scala. You can do this from the File menu or by right clicking on the "Package" region on the left side of the workspace. If you are in the Scala perspective the option to make a "Scala Project" should be right up at the top of the "New" submenu. If it is not, pick "Other" and find the "Scala Project" option. Doing this will bring up a dialog box that looks like figure 17.4. You can enter a name and click "Finish". The default options should work well enough for our purposes at this point.
For this example we will make a project called "ScalaBook" that will be used for all the code written in the remainder of the book. You can pick a different name if you like. Just keep in mind that projects are intended to be groupings of fairly large groups of code. Do not make a new project for every little ten-line program you write. You make a new project when you truly have a project to be working on.
Inside of a project you need to organize your code into packages. We first ran into packages back in chapter 9 when we had to start importing code from the standard library packages. Now we are going to start making our own packages. When writing applications, it is considered poor style to not use packages. If you do not specify a package, your code is put into what is called the default package.
To make your code part of a package all you technically have to do is put in a package statement. This can be done in two ways. If you put a package statement at the top of the file, all the code that appears in the file will be part of that package. This style is adopted from Java. Scala packages have true nesting though and you can follow a package declaration with a code block and all the code inside the curly braces of that block will be in the package. In this book we will typically use the former approach, primarily for purposes of organizing code.
In Java, packages are also directories and when code goes in a package you have to have it in a directory with the same name as the package. While this is not required in Scala, it is recommended because it makes it easier to find the code you want. This is part of the reason that in this book we will adhere to the Java style. When you make packages in Eclipse the corresponding directories are automatically created for you.
We will go ahead and make our first package for putting our first bits of code into. To make a package you can right click on the project and select "Package" from the "New" menu. This will bring up a dialog box where you can enter the package name. For now we will create a package called "simple". Note that the name is in all lowercase. This is the accepted style for packages. All letters should be lowercase with no spaces or special characters. We called this package simple because it is where we are going to put little code snippets that we will need to write occasionally. We will be creating other packages as well to organize other parts of the code that we write.
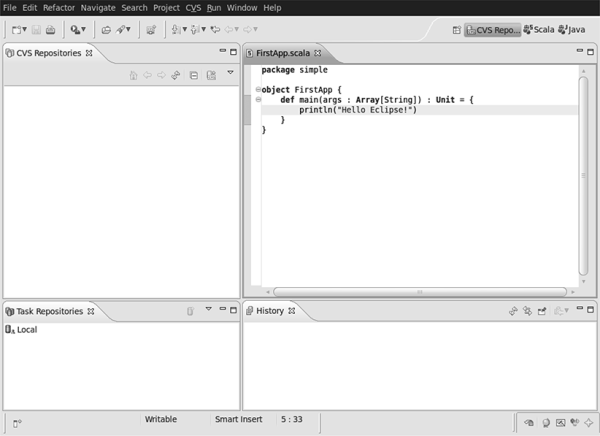
Now that we have a package we need to put something in it. If you expand the project and the src directory you can right click on the package. The "New" menu will have a number of different Scala related options. You will see that you can make a class, a trait, an object, or an application. We want to make an application, but we will do it by making an object and including an appropriate main method. You can give the object the name FirstApp and go with all the default settings. After you have done this, a file will be created and will be opened in the main editor area. After you enter the main method you should have a screen that looks like figure 17.5.1

This figure shows what the workspace will look like after you have selected to create your first application.
The application is just a object with the proper main method defined. To make your first little program in Eclipse do something, simply fill in the body of the main method. A println will suffice to prove that it works. There are many ways to tell Eclipse to run a program. Perhaps the most direct is to right click on the editor window with the application and go down to the "Run As" submenu. Select to run it as a Scala application. The result you might see from doing this is shown in figure 17.6. Note that the output appears in the "Console" tab at the bottom.

This shows the application with a single println and the result of running it with output in the Console.
When writing code in Eclipse you will write it in the object-oriented style putting all of your code in classes, traits, or objects. You will not be writing scripts. Ideally each class, trait, or object that you declare at the top level will be in its own file that has the same name as the class, trait, or object. This is not required by Scala, but helps to organize the code and makes it easier to find things. When writing small programs alone it does not matter so much. However, as programs get larger or if you start writing code with other people, the ability to easily find things that you wrote long ago or that others wrote grows more important.
This does not mean that every five-line class you ever write needs its own file. Proper Scala style tends to lead to many smaller classes. Type declarations can be nested just like everything else in Scala. If you find a need for a quick little class in one part of your code and it will only be used in that part of the code, just write it where you need it, even if that is inside of some other class or object. You can even make new types inside of functions/methods. Proper scoping rules will apply.
To get yourself familiar with Eclipse you should consider re-solving some earlier problems writing them as applications instead of scripts. To keep things organized, put each problem is a separate package inside of the simple package. So you might have simple.rational or simple.gui. You can also bring up an REPL in Eclipse if you right click on a project and select "Scala > Create Scala Interpreter".
17.2 Concurrent Versions System (CVS)
A significant tool of software development is the versioning system. These help developers keep track of code and deal with the difficulties of having multiple people working on software at one time. They can also be useful for individual developers who are working on a piece of code from multiple different computers as it can help in keeping the code on the different computers in sync.
There are a number of different versioning systems that developers choose to use for different reasons. For this book we will be using the Concurrent Versions System (CVS). CVS is one of the older versioning systems, but it is very available. It is also the versioning system that comes by default with Eclipse. You could choose to use an alternate system, such as Subversion or Git, but you will have to install a different plug-in for Eclipse to get that functionality.
17.2.1 Making the Repository
To use CVS you need to make a CVS repository on some computer that you can access from any of the locations where you will be working on the project. If you are on a Linux system you can do this from the command-line. First you need to make a directory for the repository. A directory called CVS in your home directory will work fine. If you are in your home directory you can do this with mkdir.
mkdir CVS
Once you have the directory, you have to set it up as a CVS repository. The cvs command under Linux will do this, and any other functions you need to do with CVS. To see all the different options you have use man. If you just want to initialize the directory that you made you can use the following command.
cvs -d$HOME/CVS init
The $HOME can be replaced with the fully specified path of your home directory if it is not defined on your system.
You can use the cvs command to commit code to the repository or to update it from the repository. We will be doing these functions from inside of Eclipse instead of from the command-line.
17.2.2 Set-up in Eclipse
To get started with CVS in Eclipse you should open the "CVS Repository Exploring" perspective in Eclipse. That will change the workspace to look like figure 17.7. If you right click on the "CVS Repositories" view in the top left you can choose to set up a new repository. That will bring up a window into which you need to enter the information for your system and repository. You might need to ask a system administrator for connection information if there are security restrictions. For example, if your system requires a secure connection, "extssh" could be required.
Once you have a repository set up you can go back to the Scala perspective and right click on the project you want to use with the repository. From that menu you will select "Team > Share Project". This will let you select the repository you want to place the code in. For sharing a repository, you can skip the previous step of setting up a repository an set one up when you choose to share. Going the other way requires that you set up the repository first though.
At this point you will be asked to commit your code to the repository. A dialog box will come up allowing you to select which files you want to commit and ask you for a comment associated with this commit. When you click that you are done, the current version of your code will be copied into the repository.
17.2.3 Getting Access on Other Systems
When you want to gain access to your project on another system you will bring up the "CVS Repository Exploring" perspective again and open the proper repository. Under the repository will be a selection called "HEAD". If you expand that it will tell you all the projects currently in that repository. Right click on the one you want and check it out. That will pull down the version of that code currently in the repository to your local machine and put it in a project. You can then switch back to the Scala perspective to edit that project.
17.2.4 Repository Usage and Rules
Editing the code on any machine does not automatically change what is in the repository. To do this, you have to commit your changes. You also do not automatically get changes from the repository. In order to do that you have to update. Once a project is connected to a repository, the "Team" menu will have options for both commit and update.
Often it is good to see what you are committing to or updating from the repository. You can do this by selecting the "Synchronize with Repository" option from the "Team" menu. This option will ask you to switch to a different perspective and you should let it. From there you can see what files you need to commit, what files you could update, and if any file needs both, it will show it as a conflict that you can look through and resolve.
When you are working by yourself and just using the repository to enable a single code base across multiple computers, you just have to remember to update the code anytime you start working on a computer and commit it when you are done. If you forget to do this you will not have the latest version when you go to work on a different machine. Working alone you might find you need to commit code that is not working because you need to go somewhere else, perhaps even to see someone who will be helping you to fix the problems. However, when you are working on a code base as a group, the primary rule of CVS or any other code repository system is that you never commit broken code.
The reason for this is quite simple. If you commit code that does not work and someone else updates before you fix it, now they have the broken code and it might prevent them from compiling or running the full project. Just fixing your problems before you commit is not quite enough though. After you have made your changes and made sure everything compiles and runs properly, you need to update from the repository again and check your code one more time before you commit. To understand why you need to do this, imagine you are in a work environment and you last updated your code an hour ago. There are multiple developers on your team, and some might have committed their own changes since you did an update. Just because your code works fine with what was in there an hour ago does not mean it will work fine with what is there now. If you commit without updating and your code does not work with other more recent commits, you will put the repository into a state where the code will be broken for anyone else who updates. So before you commit, you update and check for errors. If there are not any, you can commit. If there are errors, you have to fix them, update again and repeat the process. Basically, you can not commit until your code checks out with an update you have just done.
17.3 Scaladoc Comments
You were introduced to Scala comments back in chapter 3. Through most of the book we have not been all that particular about putting comments into the code as descriptions of the code were part of the text. With the move to doing larger, object-oriented projects there is another reason for including comments. The comments you have been using previously, with // for a single line comment and /∗ followed by ∗/ for a multiline comment, were passive. You would put them in the code to help remind yourself what a piece of code was doing. If you had been working on code with a group of people, those comments could have been useful for letting other people understand your code. Such comments can be very helpful, but they are also prone to certain risks. The risk is that if programmers are not extremely diligent, the comments can get out of sync with the code. This can lead to significant confusion and cause real problems. For this reason, there are many programmers who try not to rely too much on comments to explain their code and instead try to make the code "self-documenting". This is done by choosing variable and method names that reflect what is happening and breaking problems down in ways that make them more readable.
Now that you are writing full classes and objects, there is another factor to consider with comments, external documentation. The point of comments up to this point has just been for the benefit of programmers looking at that source code. Hopefully people who have access to the code in this way know how to read it and can figure out many things from the code. classes and objects can be part of libraries that will be called upon by people who do not have access to your code or who really should not be expected to go through your code to figure out what it does. This type of thing is so common that there is special formatting for comments that support documentation that is intended to be used without the code. This is not a completely new concept. The Application Programming Interface (API) documentation that you have been using for quite a while now works in exactly this way. You need to know what types are in the libraries and what members those types have as well as how you can use them. The API tells you that without you having to go through the code to find it. The API is created by putting comments in the code that have a specific format, then running a program called scaladoc to generate web pages.
You can insert your own scaladoc style comments in your code and generate web pages from them. While these comments are just as likely to get out of sync with the code as normal comments, these serve a more active purpose for outside documentation and, as such, warrant the effort that is required to maintain them.
A scaladoc comment is just like a multiline comment except that the opening has an extra asterisk. So you open the comment with /∗∗. This still starts with /∗ so the compiler will ignore it like any other multiline comment. However, his opening tells the scaladoc tool that the contents are related to the thing that follows the comment. You should put scaladoc comments directly above the class/object/method/member that the comment modifies. This code shows an example.
/∗∗
∗ This is an object where I am putting math functions.
∗
∗ If I had more to say about this object I could put that here. You can
∗ use HTML tags if you want. To show code use triple curly braces.
∗ {{{val a=5}}}
∗/
object MathFuncs {
/∗∗
∗ This function can be used to get Fibonacci numbers.
∗
∗ @param n index of the Fibonacci number oyu want to calculate.
∗ @return that Fibonacci number.
∗/
def fib(n:Int):Int = if(n<2) 1 else fib(n-1)+fib(n-2)
}
Here we have a single object called MathFuncs with a single method called fib. Directly before the object declaration and the method declaration you see scaladoc comments. The first line in the comment should be the main thing you want people to know. In the case of methods, this is all that people will see unless they expand the view. After that you can put a full description. You can use HTML tags for formatting. You can also include code elements using triple curly braces. This is helpful if you want to demonstrate how something might be called.
The comment on the method includes two lines that start with @param and @return. These special tags are used to give extra information about calling that method. The @param tag is followed by the name of a parameter and a short description of that parameter. You should have one of these for each parameter the method takes. The @return tag should be followed by a description of what the method returns. Though not shown here, you can use @tparam to describe any type of parameters that are in square brackets for a method or class.
When you installed Scala, you got a number of other programs that are in the bin subdirectory of the install. One of these is called scaladoc. You can use scaladoc -help to see how this command is used. In the simplest usage, you follow it by all the files you want to generate web pages for. Doing this on the program above results in figure 17.8. As you can see, this looks just like the API for Scala.

There are many other tags and options for scaladoc, but this has covered the most significant ones. You should get into the habit of adding scaladoc comments for the types you declare and the non-private members and methods inside of them.
17.4 End of Chapter Material
17.4.1 Summary of Concepts
- Integrated Development Environments, IDEs, are tools that pull the different parts of software development together. They often make coding easier and faster.
- Eclipse is a free, open source, multilanguage IDE that we will be using for the rest of this book. There is a Scala plug-in you can install that will allow you to work with Scala.
- All code in Eclipse is organized into projects. You should create a project for each large grouping of code you work on.
- Code should be organized packages so that related pieces of code are grouped together. Packages are typically represented as directories.
- The Concurrent Versions System, CVS, is a tool for keeping code consistent across multiple workspaces and developers. It is an older tool that comes by default with Eclipse. There are also plug-ins for newer tools such as Subversion and Git.
- The scaladoc tool will convert commented code directly into API documentation. Comments for this should begin with /∗∗ and go directly before the thing they describe.
17.4.2 Exercises
- Spend some time writing simple code samples in Eclipse. They do not need to be big. They just need to help you get familiar with how you work in Eclipse. They can all go into a single project for now. The fact that Eclipse does not work with scripts means that this will also give you some experience in doing things in a more object-oriented way.
- Make a CVS repository and check in some code into it on one computer. Then go to another computer and check out that project.
17.4.3 Projects
Instead of listing individual project here, you should take any of the projects from the previous chapter and migrate them over to Eclipse. Do not put the code for this in the default package. Instead create at least one package with an appropriate name. If there are many classes and you feel that some belong together in their own package, you can organize them that way.
Additional exercises and projects, along with data files, are available on the book’s website.
1The option to create an application directly uses a technique we have not covered yet.