
Cubase accommodates two similar-but-different types of recording—the recording of traditional audio tracks and the recording of MIDI tracks. There’s a lot of technology involved in both types of recording and a lot of equipment to deal with. In fact, one of the biggest challenges most musicians face when starting their journey into the music production arena is understanding how they can record performances in Cubase.
Even though Cubase 6 is surprisingly simple to start using, at least on a basic level, it’s easy to get lost in the shuffle if you don’t understand the technology and terminology involved with a typical recording project. This chapter lays down some of these issues and describes the concepts behind such terms as ports, inputs, outputs, and channels.
Here’s a summary of what you will learn in this chapter:
A brief introduction to digital audio and MIDI fundamentals
How sound is digitized and what the parameters are that affect the quality of your digital audio recording
How MIDI and digital audio are handled inside Cubase
How MIDI tracks, ports, channels, inputs, and outputs function
What audio tracks, channels, inputs, and outputs are
What the differences are between windows, dialog boxes, and panels
What the Project window components are
Musical instruments and voices used to be recorded in analog fashion, on acetate discs or magnetic tape or even thin wires. Today, however, music is recorded digitally—that is, the analog sounds generated by the instruments and voices are converted into digital signals. Understanding how analog sound is transformed into digital audio will put you in a better position to predict and control the results of your Cubase recordings—and help you produce better results.
A musical instrument vibrates when played. Examples of this include the string of a violin, the skin of a drum, and even the cone of a loudspeaker. This vibration is transferred to the molecules of the air, which carry the sound to our ears. Receiving the sound, our eardrums vibrate, moving back and forth anywhere between 20 and 20,000 times every second. A sound’s rate of vibration is called its frequency and is measured in Hertz. (The human range of hearing is typically from 20 Hz to 20 kHz (kilohertz).) If the frequency of the vibration is slow, we hear a low note; if the frequency is fast, we hear a high note. If the vibration is gentle, making the air move back and forth only a little, we hear a soft sound. This movement is known as amplitude. If the amplitude is high, making the windows rattle, we hear a loud sound!
If you were to graph air movement against time, you could draw a picture of the sound. This is called a waveform. You can see a very simple waveform at low amplitude on the left in Figure 2.1. The middle waveform is the same sound, but much louder (higher amplitude). Finally, the waveform on the right is a musical instrument that contains harmonics—a wider range of simultaneous frequencies. In all of these waveforms, there is one constant: The horizontal axis always represents time, and the vertical axis always represents amplitude.

Figure 2.1. The vertical axis represents the amplitude of a waveform, and the horizontal axis represents time.
The second dimension of sound is amplitude, or the intensity of molecule displacement. When many molecules are moved, the sound will be louder. Inversely, if few molecules are moved in space, the sound is softer. Amplitude is measured in volts because this displacement of molecules creates energy. When the energy is positive, it pushes molecules forward, making the line in Figure 2.1 move upward. When the energy is negative, it pushes the molecules backward, making the line go downward. When the line is near the center, it means that fewer molecules are being moved around. That’s why the sound appears to be quieter.
Space is a third dimension to sound. This dimension does not have its own axis because it is usually the result of amplitude variations through time, but the space will affect the waveform itself. In other words, the space will affect the amplitude of a sound through time. This will be important when we talk about effects and microphone placement when recording or mixing digital audio. But suffice it to say now that the environment in which sound occurs has a great influence on how we will perceive the sound.
Where analog sound is a continuous variation of the molecules of air traveling through space, creating a sound’s energy, digital sound consists of a discrete—non-continuous—sampling of this variation. In digital audio, there is no such thing as continuous—only the illusion of continuum.
Digital audio works on the theory that a wave form can be reproduced if one samples the variation of sound at least twice in every period of that waveform. A period is a full cycle of the sound, measured in Hertz (Hz). So, if you have a sound at a frequency of 20 Hz, you need at least 40 samples per second to reproduce it. The value captured by each audio sample is the voltage of that sound at a specific point in time.
In the analog world, amplitude is measured as a voltage value. In the digital world, this value is quantified and stored as a number. In the computer world, numbers are stored as binary memory units called bits—and the more bits you have, the longer this number will be. Longer numbers are also synonymous with more precise representations of the original voltage values the digital audio was meant to store. In other words, every digital audio sample stores the value of the amplitude (or voltage) as a binary number. The more bits per sample, the more values you can represent.
Because digital audio records in discrete units rather than smooth curves, recordings literally jump from one digital value to the next. This creates noise-like artifacts, a kind of digital distortion known as quantization error, which is not something you want in your sound. So, the more values you have to represent different amplitudes, the more closely your sound will resemble the original analog signal in terms of amplitude variation.
The sampling frequency (measured in Hertz) represents the number of times a voltage value is recorded each second, using bits to store this (voltage) value once it has been converted into a binary number. As with amplitude values in bits, the sampling frequency greatly affects the quality of your sound—in particular because it directly affects the highest frequencies that can be captured and played back. Because most audio components, such as amplifiers and speakers, can reproduce sounds ranging from 20 Hz to 20 kHz, the sampling frequency standard for compact disc digital audio was fixed at 44.1 kHz—a little bit more than twice the highest frequency produced by your monitoring system.
The first thing you notice when you change the sampling frequency of a sound is that with higher sampling frequencies—or greater numbers of samples per second—you get a sharper, crisper sound with better definition and fewer artifacts. With lower sampling frequencies (fewer samples), you get a duller, mushier, and less-defined sound. Why is this? Because you need twice as many samples as there are frequencies in your sound, higher sampling frequencies allow you to capture higher harmonic components in the source audio—and that’s where the sound qualities mentioned previously are found. When you reduce the sampling frequency, you also reduce the frequency bandwidth captured by the digital audio recording system. If your sampling frequency is extremely low, you not only lose harmonics, but fundamentals as well. And this will change the tonal quality of the sound altogether.
Digital audio recordings, like analog audio recordings, are not all created equal. Recording with higher digital resolutions and superior equipment will allow you to create better-sounding results; that’s because the higher the recording resolution, the more accurate the resulting sound. To that end, all professional audio hardware available today supports at least 16-bit resolution. Better-quality audio interfaces also support 20- and 24-bit resolutions.
With 16-bit resolution, the vertical steps corresponding to voltage values are few and far between. In the 24-bit resolution, there are many more steps than in 16-bit recordings. In 32-bit, the binary word is twice as long; instead of having 65,535 steps, you have more than four billion steps. This dramatically increases the dynamic range (the range between the loudest sound before digital clipping and the minimum level) of a digital audio recording. On the minus side, it also increases the hard disk space required to record digital audio as well as processing time when applying changes, such as adding an effect to a sound. Ultimately, to record using precisions higher than 24-bit resolutions, you’ll need a fast computer, a fast hard drive, and lots of memory, both in disk space and in RAM.
Up until recently, recording audio was limited to fixed integer values, as mentioned previously. With floating-point recording, the computer adds a decimal value and can move that decimal point wherever it needs it to get greater precision. The steps in the digital recording are not fixed, but rather variable points that adjust themselves according to the needs of the audio waveform.
It’s important to know that the bit depth (resolution) of the recording’s final mix does not have to be the same as the recorded tracks. Cubase allows you to select a different format to mix down your tracks when you are finished working on them; you can record at a higher quality and then mix down to the lower quality used in compact discs and online downloads.
You see, Cubase records in a format that is superior to CD or digital download formats. As a rule of thumb, always work with the best quality your entire system supports (all devices involved in the recording process especially), and decrease the quality to a more common 44.1-kHz, 16-bit format only when rendering a CD- or onlinecompatible mix. (Cubase itself uses 32-bit processing for all its operations; you mix down to 16 bits later in the process.) As long as your hardware and software can handle it, go for it. But remember this: Audio CD format supports only 44.1-kHz, 16-bit stereo files. So, if you don’t convert your audio beforehand, either in Cubase or in another audio-conversion application, you won’t be able to write it in audio CD format unless your CD-writing software specifically offers tools for converting source audio files from higher resolutions.
Likewise with digital downloads; set the audio quality too high, and you’ll create files that are simply too large for today’s music download services. You need to convert Cubase’s high-quality audio to lower-quality compressed files, such as those in the MP3 format, for optimal downloading convenience.
As noted in the previous chapter, Cubase was initially conceived as a MIDI sequencer named Pro 16. The latest version of Cubase retains this MIDI functionality, along with the ability to record traditional instruments and voices.
MIDI is an acronym that stands for Musical Instrument Digital Interface. As such, this interface provides a way to digitally represent musical notes.
With traditional audio recording, you’re recording actual sounds—those waveforms that travel through the air and are captured by the microphone (or in the case of direct-injected instruments, the waveforms generated by the instrument’s electrical impulses). MIDI, in contrast, doesn’t record sounds. Instead, MIDI records computerized instructions. These instructions tell any computer what sounds to generate in terms of frequency (musical pitch), velocity (volume level), and duration (note length).
MIDI, then, is a communication system used to transmit information from one MIDI-compatible device to another. These devices can include musical instruments (keyboard controllers, samplers, synthesizers, sound modules, drum machines) and computers or other hardware devices, such as MIDI control surfaces or synchronizers.
The key to understanding what MIDI does and how it works is to recognize that MIDI transmits performance data, not sound. You can think of MIDI as an old player piano using a paper roll. The holes in the paper roll marked the moments at which the musician played the notes, but the holes themselves were not the sounds. MIDI information is transmitted in much the same way, capturing the performance of the musician but not the sound of the instrument on which he or she played.
To hear the notes that MIDI data signifies, you will always need some kind of sound module that can reproduce the musical events recorded as MIDI data. This sound module could be an external synthesizer, a sampler, a virtual synthesizer inside your computer software, or even the synthesizer chip on your audio interface. This is precisely one of the types of information Cubase allows you to work with—recording a musical performance through your computer, using a keyboard to trigger MIDI events, and using Cubase as the recording device and the sound generator, thus creating a virtual paper roll inside the application.
MIDI transmits digital data in the form of messages. MIDI messages are sent at a rate of 31,250 bps (bits per second); this is called MIDI’s baud rate. Because MIDI is transferred through a serial port, it sends information one bit at a time. Every MIDI message uses 10 bits of data (8 bits for the information and 2 bits for error correction), which means that MIDI sends about 3,906 bytes of data every second (31,250 bps divided by 8 bits). If you compare this to the 176,400-byte (or 172.3-kilobyte) transfer rate that digital audio requires when recording or playing back CD-quality sound without compression, MIDI may seem very slow. But, in reality, it’s fast enough for what it needs to transfer. At this speed, you can transmit approximately 500 MIDI note events per second.
MIDI sends or receives the following information:
Data related to the performance being recorded. This includes when a note starts and how long it lasts, as well as the velocity of the note—how loud or soft it sounds.
Parameters for these actions, such as the channel settings. Each MIDI cable or port can support up to 16 channels of information, much like having up to 16 separate instruments playing at once.
Wheels and pedal controls, such as pitch bend and modulation wheels or levers, sustain pedals, and switch pedals.
Key pressures of pressed keys, also known as aftertouch information, sent by the controller keyboard or by the sequencer to a sound module. Note that not all keyboards support this function, but when they do, the information is sent as MIDI data.
Program changes or patch changes, as well as sound bank selections.
Synchronization for MIDI devices that have built-in timing clocks. These timing clocks may determine the desired tempo of a drum machine, for example. Through synchronization, MIDI devices can also follow or trigger other devices or applications, such as sequencers or drum machines, making sure each one stays in sync with the “master” MIDI clock.
System Exclusive messages used to alter synthesizer parameters and control the transport of System Exclusive-compatible multi-track recorders.
MIDI Timecode or MTC, which is a way for MIDI-compatible devices to lock to an SMPTE device—a translation of SMPTE timecode into something MIDI devices can understand.
MIDI devices come in many flavors, shapes, and sizes. Manufacturers have adapted the MIDI format to fit today’s needs and market. Earlier devices would typically have either two or three MIDI-connector plugs: In and Out; or In, Out, and Thru. Twoport configurations were reserved for computer-related hardware (see the left side of Figure 2.2), as well as software-based synthesizers because the output connector could be switched within a software application. Soft-switching allows users to transform the MIDI output into a MIDI Thru connection.
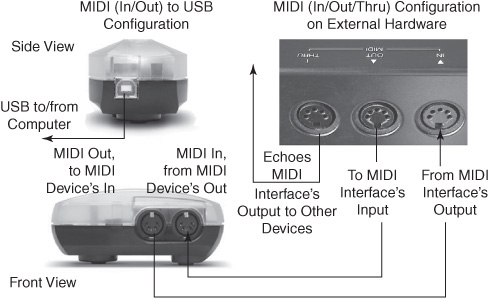
Figure 2.2. On the left is an example of a two-connector configuration typical of a USB-to-MIDI interface for computers. On the right is a typical three-connector configuration found on keyboards and sound modules.
On most newer hardware devices, a single USB port is used in place of the two (more expensive to produce) MIDI connectors. As a result, many devices now communicate MIDI events to and from a computer workstation using a USB connector, which can be configured via the computer’s operating system.
MIDI does not transmit sound over cables the way audio components in a sound system do. Instead, MIDI sends a message that contains an identifier portion and its associated parameters. For example, when you play a note, the identifier would be that this is a “note on” event, whose parameters would be the note number for the key you pressed, plus a velocity parameter indicating how hard you hit that note.
As you play on a MIDI keyboard or other type of MIDI controller, the internal processor in that device examines your performance, converting it into a stream of MIDI events that represents your actions. That information is sent out over the instrument’s MIDI output to other synthesizers that reproduce the performance using their own sounds—and/or to Cubase in order to be recorded as part of your project.
A device’s MIDI output will not echo (retransmit) any MIDI events received at its MIDI input. If you want to do this, you need to use the MIDI Thru connector, which is described later in the chapter.
Many freestanding MIDI synthesizers can be viewed as two machines in one (see Figure 2.3):
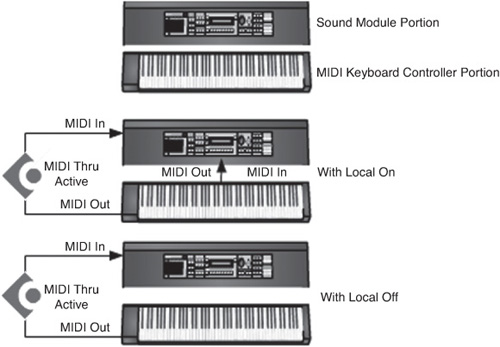
A sound module. The electronics that actually produce the sounds in a MIDI device, as directed by the onboard processor.
A MIDI interface. The computer processor that monitors the keyboard, front panel displays, and program memory to send events to the sound module or out through the device’s MIDI ports.
The MIDI input receives incoming MIDI information and sends it to the instrument’s processor, which will act upon it in much the same way as a performance on the instrument itself, such as pressing a key to play notes. It makes no difference to the soundmaking parts of a synthesizer whether the command to play notes comes from a key press on the instrument’s local keyboard or as a command from other MIDI devices and programs.
When you are working with a program that offers MIDI sequencing, as does Cubase, it is recommended that you set your MIDI instrument’s local switch parameter to off, as both Cubase and the local keyboard would be sending MIDI information to the sound module portion of your instrument if it were connected to Cubase through MIDI.
When the local switch is enabled, your instrument plays sounds directly when you press keys on its keyboard; when the local switch is set to off, the instrument responds only to incoming events on its MIDI In port. In other words, setting it to off will disconnect the bridge between the actual MIDI playing surface (the keyboard) and the sound module part that allows you to hear the keyboard’s sounds as you play the keys.
When using Cubase, you will use your keyboard or other MIDI controller to send MIDI to the host computer through the instrument’s MIDI Out port. As Cubase records the information you play it can also send it back out to your keyboard’s MIDI In connector. If your keyboard’s MIDI setting isn’t set to Local Off, the sound module portion of your instrument would play the sounds twice—once when you play the notes on your keyboard, and once when Cubase sends the MIDI information back to it. Note that this precaution also applies to MIDI controllers that serve as a tactile mixing interface when mixing in Cubase.
On the other hand, if you have a sound module without a keyboard, you will not need to take this precaution because there is no MIDI being sent to the device’s MIDI input besides what is connected to this input.
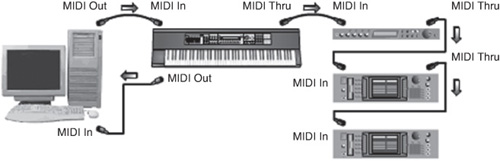
MIDI data can be chained from one device to another. As such, the MIDI Thru port retransmits the MIDI data received at the MIDI input of a device so that it can be received by another device in a chain.
When putting together a MIDI-based music system, know that anything played on a MIDI controller goes only to the MIDI Out port and not to the MIDI Thru port. This third port is very useful when you want to avoid MIDI loops when hooking together your MIDI devices. (A MIDI loop occurs when MIDI information is sent from one instrument to another and ends up being routed back to the MIDI In initial instrument; this causes the instrument to play each note twice and, in some cases, causes a feedback of MIDI data that could potentially cause your sequencer to crash.)
If you have a MIDI patch bay or a multiport MIDI interface—MIDI devices with multiple MIDI inputs and outputs—you are better off using a separate MIDI output for each connected device, thus reducing the amount of information flowing through a single MIDI cable. Each MIDI port in a MIDI setup sends or receives up to 16 MIDI channels. For example, if you are using a MIDI interface with four MIDI ports, you will have four MIDI inputs and four MIDI outputs, and you will have independent control over 64 MIDI channels. If you do not own a multiport or MIDI patch bay, daisy-chaining MIDI devices using the MIDI Thru socket is your best bet (see Figure 2.4).
An audio connection creates a link between your audio interface’s physical inputs and outputs (for microphones and other instruments, such as guitars and keyboards) and the Cubase program. Before sound can reach Cubase, it needs to enter your computer through an audio interface. This audio interface, typically an outboard hardware box, is then identified by your computer’s operating system through an ASIO driver or, in the Mac OS, an optional Core Audio driver. This driver is what Cubase uses to identify the inputs and outputs of the audio interface installed on your system.
When dealing with audio connections, there’s a lot of technical terminology to deal with. Let’s take a look at the technology and terminology involved, starting outside your computer and moving upstream into the Cubase program.
The audio device port is where you make the physical connection to your audio interface—where you plug in your bass guitar, mixer, microphone, synth, or whatever. A device port is typically an input or output on your audio interface device. How many device ports your interface has depends on the model itself and the number of physical ports it offers. You will need a minimum of one mono input and one mono output to get sound into Cubase and out of it, but if you plan to record live musicians, additional inputs are recommended. (For example, if you want to record eight instruments at the same time, you’ll need an audio interface with eight device ports—one for each instrument.)
These device ports are identified by the audio device driver installed on your system. The driver lets you tell Cubase which audio device to use. Once Cubase knows which audio device to use, it then displays the available ports mentioned previously. There may be several types of drivers on your computer, but on both Windows and Mac computers, Cubase works best with ASIO drivers.
Busses are created to group together ports on an audio device to create mono, stereo, or, in Cubase 6, surround recordings. If necessary, you can change the name of a bus to give it meaning inside your own studio setup. By selecting a mono input bus when recording, for example, you decide that the content will be recorded in mono. You can create multiple bus configurations using the same ports on your audio interface for different purposes, reducing the need for a complex patch bay to change how ports are used by Cubase.
An audio channel is created in Cubase whenever an audio, effect, VST instrument, or group track is created. The audio channel offers controls over several audiorelated and routing parameters. When you want to record audio on an audio channel, for example, you need to select which input bus to use as its source. The bus selection depends on where the sound source you want to record is actually connected. To monitor during recording, or to play it back, you need to assign the audio output from that channel to an output bus.
By creating connections within Cubase, you can use the same physical connections in multiple configurations; for example, if your hardware audio interface offers four audio inputs, you can either use inputs 1 and 2 as a single stereo input bus or as two mono input busses. You could also create an external effect bus, using an additional output to send a signal to an external reverb or other device and two inputs to receive the stereo signal back from the effect device.
Bus configurations are saved with each Cubase project file, and you can also save them as templates to be recalled later and used when creating new recording projects. If you find yourself using certain configurations each time you begin a new project, then you can simply set the connections once at the beginning of a project; Cubase will save these connection configurations along with the project file so that you don’t need to repeat the configuration every time you open the project.
Let’s examine these items in more detail.
An input bus is a bridge between the physical inputs of an audio interface and the source for the audio that you want to record onto an audio track (represented by a channel in the Mixer). By selecting an input bus, you also decide whether the audio track will record mono, stereo, or surround content, depending on how you configured this input bus in the first place. You can also adjust the input level coming from the input bus.
Output busses enable you to monitor the content of an audio track through one or several audio outputs on an audio interface and/or send the signal to an external hardware effect or a headphone amplifier. As with input busses, you can create multiple output bus connections, depending on your needs. You need a minimum of one master stereo output bus, but you can create as many output busses as you need.
An audio track in Cubase is similar to an audio track in a traditional multi-track audio recorder. It has, however, the advantage of being mono, stereo, or multichannel to support surround sound, depending on the configuration of the input/output audio busses you choose for it. You can create as many audio tracks as you need in Cubase. That said, there will be practical limits related to your computer’s speed, disk access, or memory capacity, so working within these limits will be your only concern.
Your project’s settings determine the audio properties of audio tracks (record format in bits per sample and sample rate in Hertz); however, the number of audio channels each track will support is determined when it is created. Cubase will ask you which configuration you want to use: mono, stereo, or one of many multichannel setups. This will ultimately influence your available choices for assigning input and output busses on this track later. For example, if you want to create a vocal track, you would typically create a mono track and then select a mono input bus.
As a rule of thumb, you should:
Record mono signals on mono tracks using a mono input bus, and then monitor through either a mono or stereo bus.
Record stereo signals on stereo tracks using a stereo input bus, and then monitor through a stereo bus.
Record multichannel signals on equivalent multichannel audio tracks, using the same type of input bus, and monitor through the same type of multichannel output bus.
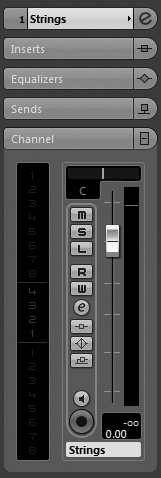
Whenever you create an audio track, an audio channel is also created. This audio channel is visible in the Mixer (see the Strings channel in Figure 2.5), as well as in the Inspector area of a selected track in the Project window under the Channel section (shown in Figure 2.6).

An audio channel in Cubase is similar to a mixer channel on a hardware mixer—with some notable exceptions:
If you set a track to record or play stereo or multichannel events, a single mixer channel will display information for all the subchannels that comprise its signal path. On hardware mixers, stereo channels often require two channel strips.
Adding an FX channel or a Group channel track also creates its own channel in the Mixer. Obviously, this can’t happen in a hardware mixer.
Because this is a virtual mixing environment, the Mixer will change as you create more tracks in a project. Unlike with hardware mixers, you’re not limited to a fixed number of tracks.
Although MIDI and audio handle recording quite differently, the two technologies follow similar philosophies regarding connections. That is, connecting hardware and software devices to record or play back MIDI is similar to how you connect audio devices.
With audio recording, you have an audio signal connected to an audio port that’s associated with an input bus assigned as the source for a track; with MIDI recording, you have MIDI events coming from a MIDI port on the selected MIDI input channel for a MIDI track, which plays through a MIDI instrument. The MIDI instrument, of course, can be either a software-based virtual instrument or an external device (such as a MIDI keyboard) connected to the selected physical MIDI output for the track.
A MIDI port is a hardware (physical) or software (virtual) point of entry or exit for your MIDI data. The number of physical MIDI ports that will be available is determined by your computer’s MIDI interface. This might be a standalone MIDI interface box or MIDI connectors included on an audio interface device. If your interface has four MIDI inputs and four MIDI outputs, you will have four MIDI ports available for this interface in Cubase.
On the other hand, if you are using Cubase to send or receive MIDI information to or from another application inside your computer, you will also be using virtual MIDI ports. Why virtual? Because they do not require additional hardware. This is the case when you are using VST instruments (which will be discussed further in Chapter 10, “Using VST and MIDI Instruments”) or when using separate, third-party programs in conjunction with Cubase, such as Reason, Ableton Live, or others. Whenever you load virtual instruments, they create virtual ports that can be addressed in Cubase much like external MIDI instruments that are plugged into your computer through an actual MIDI port. The virtual ports will, in other words, allow you to receive MIDI from these applications or send MIDI to them.
The MIDI port determines which physical or virtual MIDI socket the events on a MIDI track are coming from and going to. Each MIDI port can carry up to 16 independently addressable MIDI channels.
View/change a MIDI track’s input and output port settings
Select the MIDI track you want to view in the Inspector, as shown in Figure 2.7.
To view/change input settings, click the MIDI Input Routing field in the Inspector, then select the appropriate port from the list.
To view/change output settings, click the Instrument field in the Inspector, then select the appropriate device from the list.
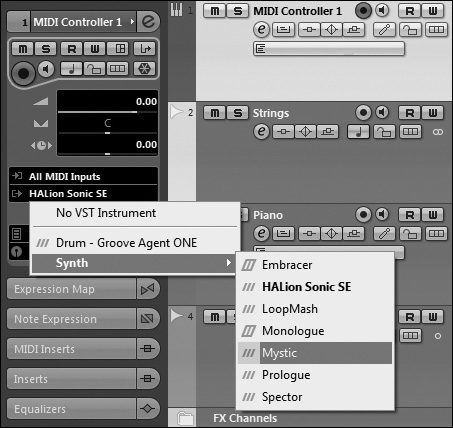
Each MIDI track has its own MIDI input and output port settings. The available MIDI input ports that appear in your MIDI Input Routing field depend on which ports that are currently set as active in Cubase’s MIDI Device Setup window. You can record MIDI from multiple MIDI sources directly in your project as long as you have a MIDI input device, such as a keyboard or other MIDI controller, connected to these input ports. The MIDI output can then be sent to various MIDI or VST instruments.
Each MIDI port will support up to 16 simultaneous MIDI channels. The channel used by a MIDI device connected to the MIDI input has little effect over the result, unless the MIDI track’s channel setting is set to Any, which implies that incoming MIDI events are re-transmitted to any channels at the output. As a result, incoming signals coming on channel 2, for example, would be re-transmitted on channel 2 as well. Otherwise, the MIDI track’s channel setting re-transmits the events through the channel number you choose.
It is the MIDI output channel you assign to the track that determines how the incoming MIDI data is routed and which sound is applied. For example, suppose you have connected a multitimbral instrument to the MIDI output port of this track. A multitimbral instrument can play one sound per MIDI channel. So you might configure a piano sound on channel 1 of this instrument, a guitar on channel 2, and a bass on channel 3. If you change the output MIDI channel on the piano track to channel 2, a guitar sound will play what the piano was previously playing.
Once your MIDI channel is selected, you can assign to it any preset sound (sometimes called a patch). This type of audio preset is merely a reference to a particular instrument sound, such as a bass or a trumpet. When you assign a preset, the MIDI signals are sent to the selected instrument or sound.
Each MIDI channel playing over a device or virtual instrument plug-in has the capacity to play one MIDI program at a time. You can change the preset along the way, but you can have only one patch or preset assigned to that channel at a time. In other words, you can have up to 16 sounds/presets/MIDI devices playing simultaneously on one MIDI port.
If you run out of MIDI channels for one MIDI port, you will need to use another MIDI port to play the MIDI events. Each virtual instrument loaded into a project will create its own virtual MIDI port, so running out of MIDI channels because of MIDI events is unlikely. It might become an issue when you are using MIDI controllers that require several MIDI channels to transfer control data through a MIDI port.
Whenever the channel is set to Any, the MIDI channel assignment is determined by either the channel information recorded on the track or the channel information being sent by the input device connected to your MIDI interface, such as a MIDI keyboard or other controller, for example. It’s common to send MIDI performance data to multiple MIDI channels simultaneously, especially with guitar and drum set controllers. This enables you, for example, to create a “fatter” guitar or drum sound by having multiple instruments sound the same notes. In this instance, MIDI channel Any setting is the appropriate choice.
A MIDI track contains MIDI events for a single MIDI port. When you play on a MIDI controller (such as a keyboard), it sends out MIDI events on a MIDI channel that is recorded into a MIDI track. Before recording a MIDI part, you assign a MIDI channel and program number to the MIDI track to get the appropriate sound at the output, as mentioned previously. (You can also reassign the MIDI channel and program number after the track has been recorded; the notes played remain the same, but the output device changes.)
Each track has its own MIDI input and output port settings, as well as its channel setting. You can also record from multiple input sources and multiple channels simultaneously on a single track by selecting the appropriate settings for this track; however, it is recommended that you keep each musical part on a separate track for easier editing later. Because you can create as many MIDI tracks as you need in Cubase, you don’t really need to worry about running out of them.
Cubase uses a number of windows, dialog boxes, context menus, and panels to display settings and options. I will refer to these elements throughout this book, so to be sure you understand the terminology, make a note of these elements that set them apart:
A window contains a toolbar at the top and sometimes a toolbar on one side. It may also have a local menu bar at the top of the window. You can edit information inside a window (as with other elements). You don’t need to press any buttons to accept or apply changes made to windows. When you make changes to information within a window, the window is automatically updated.
A dialog box appears when you want to apply a process or transformation that requires you to accept or apply this process. It is usually associated with a function, such as the Save function or a setting of some sort, such as the Metronome Setup or the Project Setup dialog box. When a dialog box is open, you most likely have to close this dialog box by accepting or rejecting the changes (via OK and Cancel buttons, for instance) before doing anything else in your project.
A panel is similar in nature to a front panel of a device. Panels have controls or fields in which you can make selections. Panels do not have any menus or toolbars and do not have any confirmation or cancel button. An example is the Mixer panel, which enables you to mix channels, route signals, assign effects to channels, and modify their parameters, as well as perform other mix-related tasks.
A context menu appears only through a right-click action on a PC or a Control-click action on a Mac. Context menus often provide a quick contextual set of options. As the name implies, the options found in this type of menu are context-sensitive, so right-clicking/Control-clicking over an audio track will reveal different options, depending on the object found underneath the cursor.
To work with audio inside a Cubase project, it is important to understand the associated audio terminology. In Cubase, audio is referred to as audio clips, events, parts, regions, and slices. This section describes how, when, and why these terms are used.
In the Project window, recorded audio is referred to as an audio event. In essence, when you edit an audio event inside Cubase, you edit the graphic representation of all or part of an actual audio file on your media drive (called an audio clip), without changing the original content of that file. When an audio clip is placed on a track in a project, it becomes an audio event. So the difference between an audio clip and an audio event is that the event has been positioned (either manually or through recording) in order to play at a specific time in the Project window’s timeline, whereas clips don’t have a playback time associated with them and are viewed outside the Project window, in the Pool, MediaBay, and SoundFrame Browser windows.
Audio clips in the Pool also can contain regions. Regions can be created automatically when recording in Cycle mode, or you can create regions manually inside the Sample Editor. Regions represent a portion of a single audio clip or audio event.
When placing an audio event that contains several regions in an audio track, it is possible to change which region will play without changing the event’s location. You simply need to tell Cubase to play another region instead. For example, if you have recorded three takes of a solo performance in Cycle recording mode, each time the recording started a new lap, a region might have been created. (This depends on the recording preferences found under File (PC)/Cubase (Mac) > Preferences > Record > Audio > Audio Cycle Record Mode options.) You can later decide which lap you want to listen to by selecting which region is active (on top).
Another type of event/region combination found in Cubase is called an audio slice. Slices are used with rhythmic parts, such as drum loops. Using the Hitpoints tool enables you to define where important beats or slices occur in rhythmic or percussive musical content. For example, you can cut a drum loop into individual hits. Each hit is what Cubase then calls a slice.
When you place a drum loop sample containing slices onto an audio track, Cubase creates an audio part that holds this drum loop, and each event in the part corresponds to a slice of the audio clip. By dividing rhythmic audio events using slices, you can later quantize these events the same way you would quantize MIDI events. Furthermore, if you change the tempo of a project, the position of each slice’s start point will be adjusted to maintain its relation to the beat. If an audio file containing a rhythmic loop is not time-sliced, changing the tempo would not affect the bar/beat location of this loop’s start point, but the rhythmic accuracy will suffer because the tempo of the audio loop won’t match the project anymore.
Finally, you can have audio parts in your project. Audio parts are containers for multiple audio events, regions, or slices. An audio part does not represent a recorded or imported audio event, but you can place audio events inside of a part. You also can convert an event into a part, and you can place additional audio events inside an existing part. In other words, audio parts are similar to MIDI parts in that they hold information that can be moved across other audio tracks or in time. Audio parts are useful when you want to move together multiple related audio events, such as the ones found when using slices.
Each of these three types of audio objects offers different editing properties when placed on a track. Table 2.1 takes a look at how different these objects are.
Table 2.1. Differences Between Events, Regions, and Part Objects on an Audio Track
Events | Regions | Parts |
|---|---|---|
You can modify the length of an event on a track, but you can’t extend the event beyond the limit of the source disk file to which it refers. | You can modify the length of a region on a track and extend it beyond the original limits of the region itself, but not beyond the limit of the clip to which the region refers. | You can extend the boundaries of a part as much as you want because a part is simply a container that does not refer to a particular audio clip, event, or region. |
Audio events have envelopes (fade in, sustain level, fade out). You can use these envelopes to control the level of the event. The envelope is locked with the event, so when you move the event, the envelope follows. | Audio regions also have envelopes (fade in, sustain level, fade out). You can use these envelopes to control the level of the event (refer to Figure 2.6). The envelope is locked with the region, so when you move it, the envelope follows. | Audio parts do not have envelopes associated with them, but the events and regions they contain have individual envelopes that can be edited inside the Audio Part Editor. |
The default editing window for events is the Sample Editor. | The default editing window for regions is the Sample Editor. | The default editing window for parts is the Audio Part Editor. |
On an audio track, you can convert an event into a region or a part using the Audio > Events to Part option. | On an audio track, you can also convert a region into a part using the Audio > Events to Part option. Also, if you have resized a region in the Project window beyond the original region’s boundaries, you can bring back the region to its original size using the Audio > Advanced > Events From Regions option. | You can dissolve an audio part containing several events and regions to create independent objects on a track using the Audio > Dissolve Part command. |
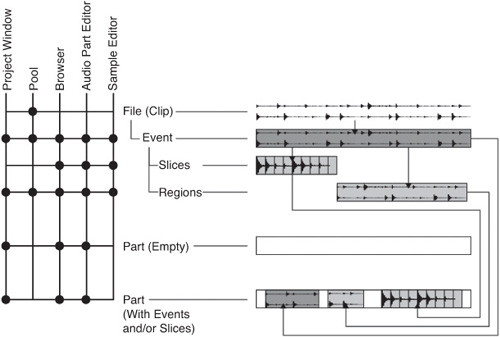
Figure 2.8 shows the relationship between the various audio parts available in Cubase 6. The figure is divided into three sections. On the left, you can see where to find the different types of audio terms mentioned in this section. In the center, you can see the hierarchy of relationships between these terms, and on the right, a diagram displaying how this hierarchy works in your project. By default, when you double-click an audio part in the Project window, it launches the Audio Part Editor. Once a part is opened in the Audio Part Editor, you can drag other regions, events, or sliced events into it. When you double-click on an individual audio event or a region inside the Audio Part Editor or in the Project window, it launches the Sample Editor. You can’t drag anything into the Sample Editor.
This hierarchy allows for nondestructive editing because what you normally edit is the audio clip, its associated event, regions, and slices, not the audio file itself. When a portion of the audio event is processed, Cubase creates an additional audio clip on the media drive containing the newly processed section of your audio. The audio parts containing references to processed audio material update themselves to correspond to this new link.
It’s quite common to get a musical idea that requires you to take risks or to try out things and listen to them to see how they sound. If you don’t like how they sound, it’s nice to be able to put things back the way they were. To facilitate this type of experimentation, Cubase offers a way to reorganize the musical information inside the application without affecting the saved data on the disk—in effect, to undo any changes you make. In fact, Cubase doesn’t even change the content of the files it refers to unless you specifically tell it to.
In Cubase, media files are called clips. These clips are on the media drive, usually inside a project subfolder appropriately called Audio. When you save a Cubase project file (with the .CPR extension), that file itself does not contain the audio, but merely links to or references the original audio clips. When you split an audio event and place it somewhere else in your project, you are changing the reference points found in the project file to the audio clip, but not editing or transforming the original clip in any way. The same applies to effects or volume changes you might add to a project; none of these transformations affect the original audio file. This type of editing is referred to as nondestructive editing.
If we push the editing further and decide to apply a time stretch, a normalize, or fade out to a portion of an audio clip, Cubase still does not touch the original content of the file. Instead, Cubase creates additional files inside the Edits subfolder of your project folder to store the results.
If this is not enough to convince you that Cubase is a completely nondestructive environment, you also can use multiple undo levels through the History option in the Edit menu. In addition, the Offline Process History option in the Edit menu allows you to select processing that you applied to an audio file—let’s say, seven steps ago—and edit the parameters of that processing without affecting the other six steps you did after that ... even after the project file has been saved various times!
The primary downside to Cubase’s nondestructive editing is that it requires more space than traditional destructive editing—where changes are made to the original files. When you work on large project files, every processed audio bit in your project is retained unless you decide to clean up the audio (through another function called Remove Unused Media, which I discuss later). Keep in mind that a project can grow quickly, and you should prepare sufficient media drive space when working with a digital audio multi-track project using high-resolution recordings. If space is not an issue, enjoy the benefits of working in an environment that allows you to undo large numbers of steps that may have led your music in the wrong direction and to take creative risks with the audio files you record.