As projects grow in size, so does the real-time processing demand on a computer’s CPU, which eventually can cause the project to outgrow the computer’s limited resources and require more processing power than what is available. Although this might sound a bit limiting creatively, it doesn’t always have to be this way.
Naturally, you can invest in a newer, faster computer for your recording and mixing chores, and with the rapidly decreasing prices of computers today, that may not be a bad option. But you don’t have to spend good money on a new computer; you can get your project done with the resources that are available to you today. All you have to do is learn how to manage the resources you have available and optimize your project when these resources are running low.
Here’s a summary of what you will learn in this chapter:
How to disable unnecessary audio tracks to reduce disk access
How to use offline processing instead of online (real-time) processing to reduce CPU load
How to free up resources by freezing audio channels, object edits, real-time processes, and VST instruments
How to use folder tracks to group and control several tracks together
After you start recording audio inside a project, you will gather more audio takes than needed in the final version, because you will most likely have different takes from which to choose and different versions of the same audio content. You might also create several working tracks along the way that are not used anymore. These tracks take up valuable system resources, as they are all loaded into your system when you open the project. After a while, these tracks will drag down the performance of your project.
To avoid this, you can disable audio tracks that are not currently being used in your project. This offers the advantage of shutting down all disk activity related to the audio content found on these tracks, while the tracks still remain in your project in case you need them later.
You can re-enable a track after it has been disabled by repeating this operation. The option in the context menu is replaced by Enable Track instead.
VST plug-in effects, as you saw earlier in this book, can be added as inserts or used as send effects on an FX channel track. When doing so, you are processing the audio in real-time, as described in Chapter 13, “Using Insert Effects.” You also can apply VST plug-in effects available on your computer to a file directly, if you want to affect only a portion of a track or don’t want to add real-time processing load on your computer’s CPU.
Remember that when you apply one of these offline process effects to all or part of a selected object, the processed result is saved in a special file, leaving your original file intact. This new file is seamlessly integrated into your project. In other words, you won’t even feel or see it’s a different file, other than the fact that this portion is processed.
Because VST plug-in effects vary from one to another, I will not discuss the specific settings of these plug-ins, but understand that you can use these effects in an offline process (non-real-time) the same way as you would use them in an online process (realtime). The only difference is that with offline effects you don’t have the flexibility to vary their parameters over the range of time that will be affected by this processing.
Many effects, edits, VST instruments, and automation tasks are occurring whenever you press the Play button with a full project going. When you need more processing juice than your computer can muster, but you don’t want to render tracks permanently in case you’d like to change something, think of freezing them.
Freezing renders a new audio event incorporating all that track’s processing and loads it up in an invisible audio channel. Then it locks the event, track, VSTi, or plug-in effects, saves their settings, and unloads them from memory until you decide to change something, such as a cutoff frequency parameter on filter, for example.
If you like trying different things while you are composing, chances are you might load up your memory with instances of VST instruments, giving you access to many layers of sound. This layering is what makes using Cubase such a great experience. What’s not so great is when you run out of resources and your computer starts its “I’ve had enough” routine, crackling the sound, jerking playback, and exhibiting other related computer behaviors.
In the following sections, I’ll discuss several techniques that let you free up some valuable processing power, while keeping the option of change conveniently close enough that you won’t feel like you are spending most of your time dealing with problems during playback.
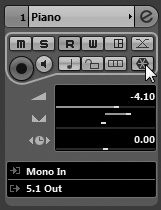
The Freeze Audio Channel button found in the Audio Settings section of the Inspector (shown in Figure 40.1) renders a temporary audio file of the audio track, including all its pre-fader insert effects in slots 1-6. You can still adjust the track’s volume, pan, EQ, and Sends parameters. To unfreeze an audio channel, click on the Freeze Audio Channel once again; this time, the button is orange. A dialog box prompts a selection:
Unfreeze erases the temporary audio rendering and unlocks the audio channel.
Keep Freeze Files keeps the temporary audio rendering in case you need to re-freeze. If an error occurs that prevents you from getting the same result you had before you froze, and the freeze file is no longer available, you won’t be able to get the same process, even though the original unprocessed file will still be there.
The Freeze Edits option makes it possible to write all the offline processing added to an event in this project to a new file on a media drive, or to replace the original file with the new, processed version. When you freeze edits, the original always remains on the drive unless it is used only once in the project. Freezing the edits of an event that’s used in more than one place in a project automatically prompts you to save to a new file.
If there is only one edited version of the selected event, you are prompted to either replace the original file or create a new file. If the selected event has multiple edit versions, you are prompted to either apply the processing to the current version of the event or to create a new event.
In this situation, you use Cubase’s Freeze function to create a temporary audio render of the VSTi for all MIDI events routed through the selected VSTi you chose to freeze. As a result, the MIDI track becomes locked from editing and muted, the VSTi unloads from memory, and Cubase creates a special audio rendering corresponding to the result of the MIDI events going through the VSTi. This offers the advantage of hearing what you heard before—MIDI events playing through a VSTi—without the resource real estate required by VSTi.
The frozen audio will not appear in the project as a separate audio channel, but will continue to be controlled in the Mixer panel through its VSTi channel. So, any volume, EQ, or routing will continue to have an effect on the sound.
If you later want to change something in the MIDI track, you can unfreeze the VSTi, change the MIDI, and refreeze again. Once a VSTi is unfrozen, the freeze file is removed from its special Freeze folder, which can be found inside the project’s main folder. Note that parts that are muted will not be frozen. In other words, the result of a freeze, in terms of what you hear, is identical to the VSTi generating the sounds in real-time.
Freeze a VSTi
Open the VST Instruments window.
Click on the Freeze button next to the desired VSTi.
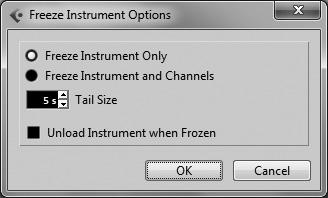
When the Freeze Instrument Options dialog box appears, as shown in Figure 40.2, choose to either freeze the instrument only or the instrument and all channels to which it is applied. This lets you freeze all channels using the same VST instrument simultaneously, if you wish.
Check the Unload Instrument When Frozen option to free up more system resources.
Click OK.
Cubase will now create the audio render. This might take anywhere from a few seconds to a few minutes, depending on the complexity of the process and the computer resources available.
When a VSTi is frozen, the Freeze button will appear orange, and you won’t be able to make any changes to the MIDI tracks being sent to this VSTi. To unfreeze a VSTi, click the Freeze button again.
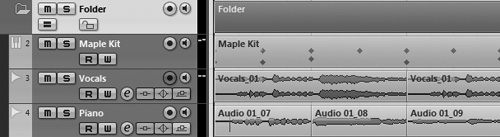
Folder tracks, as you might have guessed, are used as folders into which you can put any combination of track classes, including other folder tracks. You can use folder tracks as you would use folders in your computer, grouping related tracks into a single folder which you name appropriately. You can also hide the folder track to give you more working space on your screen, or mute or soloing its entire contents with a single click.
For example, if you have several percussion tracks, you could create a folder, name it “Percussion,” and drag all these tracks inside it. When you’re not working on your percussion tracks, you can fold up the folder track to minimize the space that these tracks would otherwise use in the Track List. When the time comes to edit these tracks, all you need to do is unfold the folder track to reveal all the tracks and controls inside.
When tracks are moved inside a folder track, a folder part is created in the Event Display area, which graphically represents the contents of the folder track even when it is minimized.
The Inspector for a selected folder track only contains one section. This section contains the name of the tracks you moved inside the folder track. Whenever you click on the name of a track in this section, that track’s Inspector area is displayed below the Folder section (also in the Inspector area, as shown in Figure 40.3).

At the top of the folder track’s Inspector are some buttons that are also found in other track classes (and explained previously). These buttons affect all the tracks inside the folder track simultaneously. For example, clicking the Mute button for a folder track in the Inspector or the Track List mutes all the tracks inside the folder track. Similarly, clicking the Lock button locks all these tracks from editing. As you would guess, this makes recording, monitoring, muting, soloing, or locking multiple tracks simultaneously very easy.
Move tracks into a folder track
In the Project window’s Track List, click and drag the track you want to move to a folder track.
When a green line appears within your folder track, drop your track into it by releasing the mouse button.
Repeat this process to add additional tracks to the folder. You can drag multiple consecutive tracks simultaneously into a folder track by clicking the first track in the Track List area, and then Shift-clicking the last track you want to move into the folder track. To move nonconsecutive tracks, use the Ctrl (PC)/
 (Mac) key to select your tracks before dragging them.
To remove tracks from a folder track, simply drag them outside of the folder track in the Track List, just as you moved them inside of it.
When tracks are added to a folder track, a folder part is created. As you can see in Figure 40.4, the folder part displays the position and colors used by the parts on the tracks it contains. In this example, the folder track has been unfolded, showing the details of these tracks. You can click the track’s Folder icon (to the left of the Mute button) to toggle the folded/unfolded states of selected folder tracks. You also can rename folder tracks as you would any other tracks through the Inspector area.