
Once you start getting comfortable with Cubase, working habits will also start settling into place. That’s when you’ll start wondering whether you can customize where tools are laid out and how you can more efficiently do the actions you perform the most often. This chapter discusses ways that you can customize settings and create reusable documents to suit your working preferences and habits.
Here’s a summary of what you will learn in this chapter:
How to create and organize your Workspaces
How to create a project template
How to customize key commands
How to create a macro and add commands to it
How to use a macro in a project
How to change the appearance of a toolbar and save this customization
How to show/hide Transport panel sections
How to create customized track controls for the Track List area and select customized settings
Given all the possible windows and controls necessary in even a moderately sized recording project, screen real estate and the layout of those windows are of primary importance. As such, Cubase’s Workspace feature helps you organize your on-screen Workspace.
Workspaces provide an easy way to recall a particular window layout for your Cubase project, such as a useful view for editing events, or a wide Mixer panel for the mix-down phase of a project. Workspaces are saved along with the project file or can be saved as presets that are available for all projects in Cubase. Workspaces and Workspace presets retain the current position and state of windows inside a project, but not the project-specific content within windows, such as a part loaded in a particular editor or the size of the main Cubase window on the desktop.
Create a Workspace
Open and organize the windows you want to display on your desktop.
After you are satisfied with the layout, select Window > Workspaces > New Workspace.
When the New Workspace dialog box appears, enter an appropriate name for this Workspace.
Repeat these steps to create additional Workspaces.
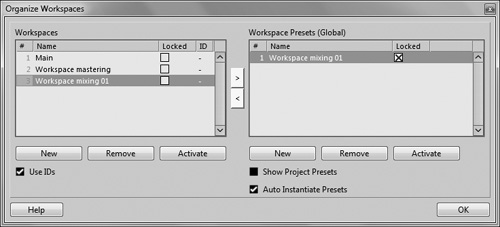
Select Window > Workspaces > Organize.
When the Organize Workspaces window appears, as shown in Figure 39.1, click the Locked option next to the newly created Workspaces. (This prevents the layout from being overwritten by mistake; you can still move windows around afterward, but recalling the Workspace returns all windows and panels to their saved states and locations.)
Check the Use IDs option.
Click the ID column next to the first Workspace and select an appropriate ID number. (The ID number determines the position of the Workspace in the Workspaces submenu.)
Select ID numbers for the other Workspaces.
Click OK when you are finished.
You can create several Workspaces and recall them through a set of customized key commands. You’ll find more on how to customize key commands later in this chapter.
When we work, we often start with basic settings. For example, if you have a favorite VSTi that you load for drums, a favorite window layout, a typical bus routing, or a number of tracks that you always name the same way, you might consider creating a template.
Templates are Cubase project documents that are saved in a Template folder. Saving a project as a template before you start recording events into it allows you to save all these settings, including preferences, output and input settings, and all the previously mentioned settings.
To use a template, select File (PC)/Cubase (Mac) > Create New Project. This opens the Project Assistant, shown in Figure 39.2. Click the More tab to view all the template files you’ve created.

Because templates are just like regular project files, you can use Windows Explorer or the Mac Finder to rename or delete them from your hard drive and subsequently change the template list. This also means that you can save audio and MIDI events within a template file if necessary.
Throughout this book, references are made to key commands, also known as keyboard shortcuts. Although Cubase provides a default set of key commands for a number of functions and operations, you can change these default settings to reflect your working habits better and add some of your personal favorites to the existing key commands.
The commands that can be associated with keyboard shortcuts are found in the Key Commands dialog box, which you open by selecting File (PC)/Cubase (Mac) > Key Commands. As you can see in Figure 39.3, all the key commands are grouped by category in the Commands list area; you can also use the Search box to search for specific commands. The keyboard shortcut associated with a given command is displayed in the Keys list on the right.
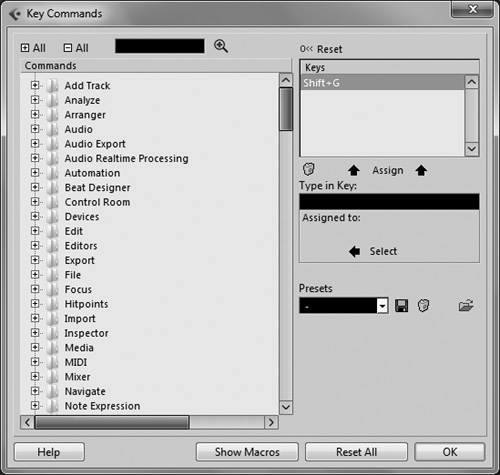
Within the Key Commands dialog box, the Recycle Bin (Delete) icon below the Keys area removes the keyboard shortcut associated with a selected command. The Presets field below manages the previously saved presets or enables you to save a preset to memory.
Note that there are already presets available for Cubase VST and selected other applications. Using the same shortcuts to do the same tasks from one software program to the next can make sense, so if you’re used to working with a specific set of keyboard shortcuts, this dialog box customizes the key command associations to better meet your needs.
Using Cubase macros is a way to save a sequence of tasks that you perform regularly, one after the other. For example, you might often need to quickly create four audio tracks and a marker track, select a window layout, and select a zoom level. Performing these tasks can take many steps—or only a single step when programmed as a macro command.
Create a macro
Select File (PC)/Cubase (Mac) > Key Commands.
In the Key Commands dialog box, click the Show Macros button. This reveals the Macros section at the bottom of the dialog box, as shown in Figure 39.4.
Click the New Macro button to add a new macro in the Macros area.
Double-click the new macro’s name and type a new name for it.

Now your new macro is created, but it won’t do anything. Let’s add commands to it.
Cubase enables you to easily change the tools that are displayed in a window’s toolbar and save these layouts for further use. This can come in handy when you need certain tools during one part of your creative process, but not during another. Also, depending on the resolution currently selected for your computer’s display, you may not have enough space on-screen to display all the tools at once—this may particularly be the case with the Project window toolbar, for example.
You can also save these customizations and select them later from the same context menu. This is a very useful technique that you should try to incorporate as soon as possible in your learning process with Cubase.
Save a toolbar customization
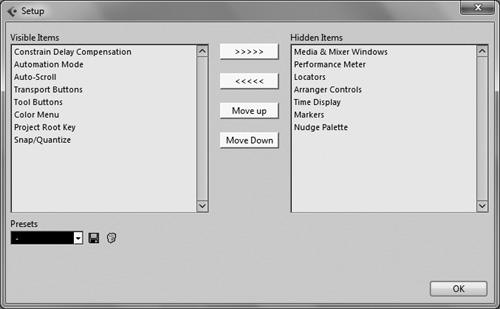
Right-click anywhere in the toolbar and select Setup from the context menu.
The Setup dialog box now appears, as shown in Figure 39.5. Items that appear under the Visible Items column are currently visible, whereas the items in the Hidden Items column are not.
Use the arrow buttons in the center to move items between the left and right columns. You can also use the Move Up and Move Down buttons to change the order in which the visible items will appear from left to right in the toolbar.
Once you are satisfied with your changes, click on the disk icon at the bottom of this dialog box to save the changes into a preset. Note that clicking on the Recycle Bin (Delete) icon deletes the preset currently displayed in the Presets field.
Another dialog box will appear, prompting you to enter a name for your preset. Enter a descriptive name for your preset. The name you enter here will appear in this dialog box’s Presets selection field.
Click OK twice to return to the previous window.
The newly created preset can now be selected from this toolbar’s customization context menu.
If you want to return the toolbar to its default state, you can do so by selecting the Default option in the same context menu, or you can choose to display all the available toolbar items by selecting the Show All option instead.
You can choose to hide certain portions of the Transport panel if you don’t need them or if you want to free up some valuable desktop space. Later, you can choose to redisplay any hidden areas of the Transport panel.
Although working with controls in the Track List is convenient, sometimes dealing with all the controls available might become cumbersome and confusing. Certain controls are used only during the recording process, whereas others are used only during the editing process. Furthermore, some users might never use a particular control from the Track List, using the Inspector or Mixer panel instead, whereas others might never use the Mixer panel and only use the Track List.
You can customize the controls that are displayed in the Track List, save these settings for each track class, and recall them later when you need them.
Create customized track controls for the Track List area
Right-click (PC)/Control-click (Mac) anywhere within the Track List and select the Track Controls Settings option, or select the same option from the Track Controls Settings drop-down menu that can be opened via the button at the top left of the Track List area.
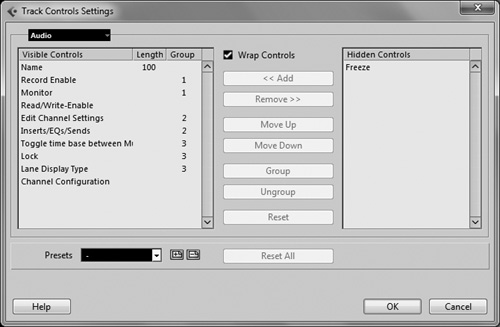
When the Track Controls Settings dialog box appears, as shown in Figure 39.6, select the desired track type from the Track Type drop-down list in the upper-left corner of the dialog box. The control elements on the left side are currently visible in the Track List. The control elements on the right are available, but not currently visible. Before creating a preset, let’s look at an existing one to see whether there’s already a preset that would suit your needs.
From the Presets menu in this dialog box, select the appropriate preset to see its current track control settings.
To add a control to the current preset, select the control under the Hidden Controls column on the right and then click the Add button.
To remove a control from the current preset, select the control under the Visible Controls column on the left and then click the Remove button. As you probably noticed, the selected control will move from one side to the other. You can also change the order in which the controls appear in the Track List area.
Select the control that you want to modify in the Visible Controls area and click the Move Up or Move Down button to move this control to a new position in the list. To make sure two or more controls always stay together on the same line when you resize the Track List area, you can group them.
Select the first control you want to group; then Ctrl-click (PC)/
 -click (Mac) on the other controls you want to group together. Note that if a control is already in a group, you’ll need to ungroup it first, before you can group it with another control.
Click on the Group button to group the controls.
Repeat Steps 4 through 8 until you are satisfied with the results.
Click the Add Preset button (the “+” button next to the Presets list) to create a new preset.
Enter the desired name in the field and click OK.
Click OK once again to return to the Project window.
Remember that you can always remove unwanted presets by selecting them in this dialog box and clicking on the Remove Preset button (the “-” button next to the Presets list).
To select a customized track control setting, select the appropriate preset from the Track Controls drop-down menu found at the top-left corner of the Track List area.