
The Pool holds references to all audio and video clips used in a project. For example, when you record onto an audio track, an event is created in the Project window, and a clip representing the audio file on disk appears in the Pool. In addition, when you import an audio file, an audio clip representing this file appears in the Pool.
Each project has its own Pool, which optionally can be saved separately so that its contents can be imported into another project. You also can open more than one Pool in a single project, allowing you to share Pool resources between projects. The Pool also enables you to view your audio clip references (called events) and corresponding regions. You can use the Pool to monitor, update, and manage these references.
Here’s a summary of what you will learn in this chapter:
How to access and use the Pool
How to use the audio event preview functions in the Pool
How to find audio files using the Pool’s Search functionality
How to recover missing audio files with the Pool
How to optimize the disk space used by the project’s audio assets
How to archive and export Pools from a project
How the Pool can interact with a project
How to use offline processes in the Pool
You open the Pool for your current project by selecting Media > Open Pool Window, clicking the Open Pool button on the Project window’s toolbar, or by using the keyboard shortcut Ctrl+P (PC)/![]() +P (Mac). As you can see in Figure 14.1, the Media column shows three default folders in the Pool: Audio, Video, and Trash. You can create any number of additional subfolders within these folders as you see fit, but you can’t rename or delete these default folders.
+P (Mac). As you can see in Figure 14.1, the Media column shows three default folders in the Pool: Audio, Video, and Trash. You can create any number of additional subfolders within these folders as you see fit, but you can’t rename or delete these default folders.
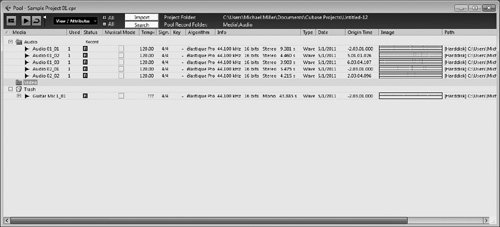
Enable the Show Info button (the first button on the left in Figure 14.1) to reveal the Information bar at the bottom of the Pool to view the current status information for your Pool, the number of files it contains, how many are currently used in this project, the total size of the Pool, and how many of the media files that it references reside outside the project’s folder.
The next two buttons in the toolbar are used to monitor a selected event or region in the Media column below. The Play button starts/stops playback of the selected file. The Loop button next to it loops the playback, and the small fader adjusts the preview volume. This volume is linked to the main stereo output when the Control Room features are disabled or to the main Control Room monitors when this latter feature is enabled. To stop the playback, click the Play button again.
The View/Attributes field customizes the Pool columns displayed below it. There is a total of 12 information columns available. To add an attribute to the columns displayed in the Pool, check that attribute in the View drop-down menu. Selecting the Hide All option hides every column to the right of the Media column.
Use the plus (+) All or minus (–) All button next to the View field to expand/collapse the tree found under the Media column. The Import button lets you import supported media files to the project’s Pool. Cubase supports most audio file formats, as well as video files in AVI, QuickTime, WMV (Windows only), DV (Mac OS X only), and MPEG 1 and 2 formats.
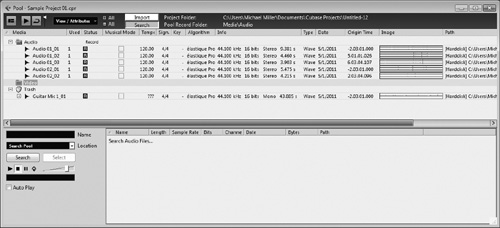
The Search button, found below the Import button, opens the Search panel at the bottom of the Pool, shown in Figure 14.2. The search parameters are similar to any search tool on your computer. For example, enter keywords or use wildcard characters to find multiple files whose names contain specific strings of characters.
To the right of the Import and Search buttons at the top of the Pool window, you can see the project folder’s path and its associated Pool Record folder. By default, the Pool Record folder is found inside the project folder and is called Audio; it can easily be backed up later with the rest of the project.
Directly below the toolbar are the column headers for each column in the Pool. Click on a header to sort the Pool’s contents according to the information in this column if necessary. Columns used to sort information have a little arrow pointing up or down next to the column’s header that indicates ascending or descending order. You also can drag the column headers horizontally to change the columns’ order. The header is inserted to the right of the column found on the left edge of the header’s border when dragged.
You perform most Pool-related operations not from the Pool window itself, but from Cubase’s Media menu. You can also access the options from this menu by right-clicking (PC)/Control-clicking (Mac) anywhere in the Pool window to display the context menu.
The Media column displays the names and types of media used in the project, as well as any folders that you might have created inside the Pool to organize your media files. There are three different icons displayed next to the name (see Figure 14.3), representing an event object, a region object, and a sliced event object. Region objects are positioned under the event object to which they refer. You can click on the plus sign to expand an event object to reveal its defined regions.

The Used column displays the number of times the object in the row appears in the project. In other words, it displays how many times you’ve used it. Objects that aren’t used anywhere in the project have no value in this column. Used sliced objects are incremented by the number of slices found in the object every time you repeat, copy, or duplicate the corresponding part in the Project window. For example, a drum loop divided into eight slices will display 16 in the Used column if this object is used twice in a project (two parts), even if these are shared copies of the same object.
The Status column offers information on the status of the objects inside your Pool. Table 14.1 describes each icon’s meaning in this column.
Table 14.1. Understanding the Status Column’s Icons
Icon | Its Meaning |
|---|---|
| Represents the content found in the Pool’s Record folder; found next to the Audio folder. If you create a folder in the Pool, you can click in the Status column next to this folder to make this the new Record folder. Subsequent recordings appear under this folder. This does not create a new folder on your hard disk, but it helps you manage the appearance of your files in the Pool. For example, you could create a folder for a vocal session called Vocals. When you click in the Status column next to this folder, the record icon moves next to it, and all recordings made from this point on appear in this Pool folder. |
| Represents events that have been recorded since the last time you opened the project, making it easy to find newly recorded material. |
| Represents events that are not located in the current Pool Record folder. These events might have been imported from another location on your hard disk. This occurs if you don’t select the Copy to Project Folder option when importing them. In other words, if you were to back up your project’s folders, these files would not be included unless you use the Prepare Archive function described later. |
| Represents events that have been processed offline. In other words, they consist of both references to the original clip and other portions that have been processed and saved in the Edits subfolder within your project’s folder. |
| Represents files that have not been found when loading the project. You can use the Find Missing File function to scan these missing files. This is explained later in this chapter. |
| Represents files that have been processed in some way by using offline processes or effects and for which some of the processed portions have been lost or misplaced. Cubase displays this indication in the Status column when it can reconstruct the missing portions. |
The Musical Mode column identifies samples that contain musical loops that have been detected when the file was imported or that you have identified in the Sample Editor by enabling the Musical Mode button. Clips that are in Musical mode will be time-stretched when the tempo of a project changes, without altering the pitch of the sample. A check in the Musical Mode column also will appear when you import ACID wave files, and Cubase will automatically adjust the tempo of the file to its current project tempo when you add the file into the project. The Tempo and Signature columns are also associated with the Musical mode. You can toggle the Musical mode on and off for a sample by adding or removing a check mark in the option box.
The Info column displays one of two things—either the event’s file format and length details or a region’s start and end locations.
The Image column displays a graphical representation of the event or the region within the event’s boundaries. You will notice that the contents of all the events are displayed within rectangles corresponding to the current width of the Image column; however, regions are represented as a portion of this length. You can quickly preview any portion of an object’s content by clicking on its image representation.
Generally speaking, the Pool is not something you worry about or use the most at the beginning of a project unless you begin the project by importing a whole bunch of audio files. When your project is taking shape, you will probably also want to organize your Pool to quickly find what you need, so managing content should be something to keep in mind here.
We’ve already discussed certain managing functions related to the Pool through the creation of folders in which to put additional media objects, or through the renaming of existing objects. Let’s take a look at other typical Pool functions, such as knowing what to do when an audio file goes missing, or when the Pool starts getting messy and locating the files you need gets hard. Archiving a Pool for backup is also something to keep in mind to avoid losing precious work later.
Not that you try to make mistakes, but it happens; just about every recordist has, at one time or another, accidentally deleted important audio files. When a mistake like this happens, Cubase might not be able to find files previously used in this project—especially if you forget to update your Pool before saving it. The file references in Cubase are now pointing to the wrong place. Whatever the reason may be for Cubase not finding missing files, when references to files need to be reestablished, use the Find Missing Files option from the Media menu. Missing files are identified with a question mark in the Status column.
In the event that a file is still missing, even after a search (or you don’t want Cubase to keep referring to a file because you’ve erased it anyway), you can use the Remove Missing Files option from the Media menu. This affects any object in the Pool with a question mark in the Status column.
After five or six recording and editing sessions, or a long import session, hundreds of audio files can start piling up in the Pool. Optimizing the Pool lets you keep it organized so that files are easy to access. That’s when you can create folders, drag and drop objects inside these folders, and organize your project’s assets. When you delete events or regions from the Pool, they often end up in the Trash folder. This means that the files are still using space on your computer. Use the Empty Trash option in the Media menu to free up some of that media drive real estate. Cubase prompts you once again to make sure you really want to erase the files from the hard disk or only remove them from the Pool. If you choose to erase the files, you cannot get them back because this function can’t be undone. This is one of the only ways that you can erase audio clips from your drive within Cubase.
Besides the trash you’ve collected, there might be some files that were used at the beginning of your project, but aren’t being used any longer. If you don’t need them, you can use the Remove Unused Media option in the Media menu. This time, you are prompted to choose whether you want to remove these files from the Pool completely (although the source files will still remain on your media drive) or just send them to the Trash folder of the Pool. Removing files from the Pool when you are done with them doesn’t erase them from your computer’s hard drive. It is, therefore, recommended that you always use the Trash folder as a transitional stage when optimizing your Pool. When you are finished, the Media > Empty Trash command gives you the option to actually erase the source files for items in the Pool’s Trash folder, which will free up space on your hard drive.
Recording long segments often includes useless audio that takes up extra space on your hard drive. Creating regions, resizing, or splitting events in the Project window to hide unneeded portions does not remove these portions from the source file on your hard drive. Using the Minimize File option in the Media menu creates new copies of the selected files in the project, effectively removing any portions of the original file on your hard drive that aren’t used in the current project. It also initializes the offline process history for this file. However, bear in mind that the Minimize File command doesn’t take into account how the affected files may be used in other Cubase projects! Before using this option, it might be advisable to consider another option available in Cubase that also enables you to minimize the file sizes of all audio clips for your project.
Use the Save Project to New Folder option in the File menu to save all the files referenced in a project, as well as the project file itself, to a new folder, minimizing the space used by the project. However, by doing this, you still have the original content in the original folder where you began the project. If you want to revert to this project at a later date, the files will still be there.
When you want to save a backup of your project or use it in another studio, it’s important to have access to all the files that are used by the project. Saving the project using the Save command updates the project file, but it doesn’t copy any files that reside outside the project folder. Use the Prepare Archive option in the Media menu or in the Pool’s context menu to copy all the audio clips used in your project to the audio project folder. Cubase automatically copies the content of the Edit folder into a backup folder, along with all files used by the project. After this operation is completed, simply copy the resultant project file, its Audio folder, and any video file referenced in the project to a backup CD or DVD, for example.
If you are in the final stages of a project and you want to save a final version of the project files, repeat the previous steps with the addition of a couple more steps to save only the necessary material. Before heading on to Step 3 from the previous list, you can use Media > Conform Files option to change all audio files in your project. This converts all your files to the currently selected sample rate and word length (bit depth) for your project. You can then use the Minimize Files option, as described previously, to reduce each file to only its portions that are actually used in the project. Then proceed to Step 7 and use the File > Save Project to New Folder option instead.
Exporting a Pool also makes it easy to store drum loops and sound effects that have been edited and need to be shared between project files. Whenever you want to use these sounds later on, all you need to do is import that Pool into your current project.
Now that you know how to files get into the Pool and sort them once they are in it, let’s look at getting the content from the Pool into the project. The quickest and easiest way is to drag events from the Pool to the Project window. When you drag an object from the Pool into the Project window, the actual location of this object depends on two variables:
The snap and quantize grid settings.
The position of the snap point inside the audio event or region. Because the snap point can be anywhere within the event, when the Snap button is enabled, it’s the snap point itself that adjusts to the closest grid line in the Project window.
The location displayed above the cursor as you move the selected object over a track indicates the snap or start position where this object will be inserted, depending on the two variables mentioned. When the blue line next to the cursor and location display the desired location, drop the object into place.
When you apply any type of offline process (from the Audio > Process or Audio > Plug-Ins menu) to an object inside the Pool, this processing affects the entire object. For example, if you apply a delay effect to a region, the whole region is affected. To process only a portion of a region, use these processes from the Sample Editor’s context menu instead. Offline processes in the Pool window can be viewed in the Offline Process History panel found in the Audio menu, as can processes applied in the Project window or Sample Editor.