
Editing the data inside audio and MIDI events is one thing, but organizing events inside a project’s timeline or tracks offers perhaps the most flexible way for a producer to build (and rebuild) entire projects. Creating different mixes, versions, and styles is only possible if the events can be edited in time as easily as building with blocks in a LEGO set. For example, you can split events and parts to move content around, or have an event repeat 16 times to fill an entire track—both options are discussed in this chapter.
You can find editing options inside the Project window in three places—in the Edit menu, through the Project window’s context menu in the Edit submenu, and finally, through the editing tools found in the Project window’s toolbar. All three locations include the basic Cut, Copy, and Paste commands, in addition to other options specifically designed to give you more control over project editing tasks.
Here’s a summary of what you will learn in this chapter:
How to use the cursor location to split selected events
How to split events to create moveable blocks of music
How to move and copy blocks of content defined by a locator range
How to crop content inside a project
How to insert additional empty time in a project
How to use different Cubase-specific Cut, Copy, and Paste functions
How to resize objects and understand sizing options
How to shift content inside events or parts
How to mute objects
How to lock objects in the timeline
Revisiting the edit history
Sometimes you record an audio event that needs editing or even deletion during just part of the event. In this instance, you can split the single large event into several smaller events, and then edit just those parts that need it.
When you want to divide events in this fashion, you have several options at your disposal. The simplest and most common approach is to use the Split (scissors) tool to split an event in two. The exact position of the split is determined by the snap’s Grid settings if they are active, or by the location of your click. The result is that you get two events instead of one, as shown in Figure 28.1; the split parts do not have to be of equal duration.

Sometimes it’s easier to use the project’s cursor position to determine where the split occurs, such as when you need to split all the events across all tracks in a project.
Split selected objects at the cursor’s location
Position the cursor at the desired location.
Select all the objects crossing the cursor at this location that you want to split. All non-selected objects will not be affected.
Select Edit > Functions > Split at Cursor.
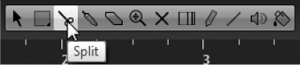
Alternatively, you can select the Split tool from the Project window toolbar, as shown in Figure 28.2, then click at the desired split point in the event you want to split.
When you want to create a loop with the objects (parts or events) between two locators, use the locators’ positions to determine where the split will occur. After these objects are split, you can select only the objects that occur in this range and copy them elsewhere.
You can achieve an effect similar to the Split Loop option by using the Edit > Range > Split command. In this case, however, all the objects within the selected range are split at the start and end positions of the selected range, instead of the range between the locators.
Another quick way to split objects is to use the Edit > Range > Crop command. Select the objects and range you want to keep, and all the rest will be removed. This technique offers a quick way to build game scene soundtracks, where you build a score around prerecorded elements common to the entire game, but rearrange and crop only the content you want to keep for the current scene.
The Edit > Range > Insert Silence command performs various tasks, depending on the tool used to make the selection prior to launching this command.
For example, when you select a range using the Range Selection tool, all objects within the selected range are moved to the end point of the range when the silence is inserted, as shown in Figure 28.3. This technique is useful when you want to insert time in the middle of recorded events, but you don’t want to apply the change to all tracks.

On the other hand, to insert silence or add time at any point in the project over all tracks, use the Object Selection tool, then set the locators’ positions appropriately, and then use the Insert Silence command. All events are split at the left locator position and moved after the right locator position, which inserts silence in the range between both locators.
Conversely, if you want to remove the time, including events recorded within this range, use the Edit > Range > Delete Time command. This deletes events within the selected range and moves all events following the range to the start point of the range.
Using the Range Selection tool or a combination of the Object Selection tool and the locators, you can copy the content found inside a designated range and paste it back into the project using four different pasting commands: Paste, Paste at Origin, Paste Time, and Paste Time at Origin.
In Figure 28.4, the top track displays a highlighted selection made with the Range Selection tool. This selection was then copied to clipboard using the Edit > Copy command. With the project cursor position always at bar 4, here’s what happens depending on the Paste function used:

Using Edit > Paste, the clipboard content gets pasted after the cursor position without moving the content that follows farther along the timeline.
Using Edit > Functions > Paste at Origin, the clipboard content gets pasted at the same place in time. Use Paste at Origin to copy or move content from one track to another without changing its position in the timeline. Content following the newly pasted clipboard content does not move either.
Using Edit > Range > Paste Time, the clipboard content gets pasted after the cursor position, moving the content that follows farther along the timeline.
Using Edit > Range > Paste Time at Origin, the clipboard content gets pasted at the same place in time, pushing the content that follows the newly pasted clipboard content farther along the timeline.
Cubase offers the standard copy/paste combination when you need to copy certain selected events from one location to another. Once again, content can be selected with the Range or Object Selection tool. For more specific copying applications, Cubase offers a variety of functions tailored to music production.
Select Edit > Functions > Duplicate to make a single copy of selected events or parts. The start time of duplicated events occurs immediately following the end time of the selected object(s) being duplicated.
Figure 28.5 displays different results from a Duplicate action:
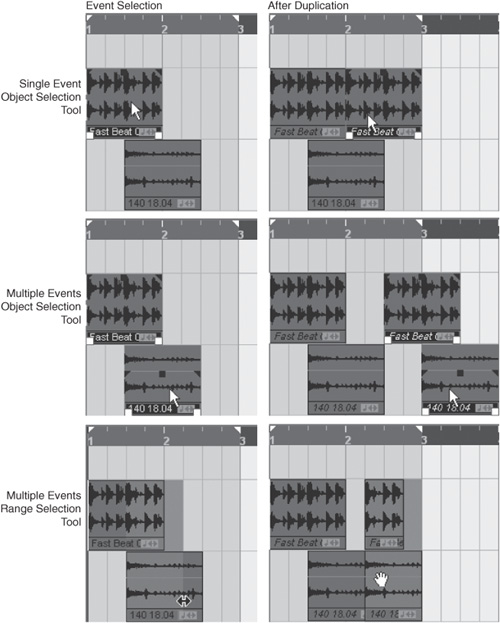
In the top row, a single event is selected with the Object Selection tool and duplicated. As a result, the duplicated event begins immediately after the previous one ends. If you’re working with loops, it makes sense to adjust the length of events with the Snap’s Grid mode enabled. By doing so, you can avoid creating duplicate copies that aren’t aligned with the tempo grid if the event happens to be slightly longer than the grid size.
In the middle row, two events are selected with the Object Selection tool and duplicated. As a result, the duplicated events begin where the entire selection ends.
In the bottom row, the Range Selection tool was used to highlight a range that overlaps multiple events, and the range was duplicated. The duplicated range begins where the previously highlighted range ends.
To make more than one duplicate of a range or object selection, consider using the Edit > Functions > Repeat command. This is a great way to repeat looped material several times instead of copying it over and over again. When repeating entire objects, you can share the copies, so when you edit one of the events, all shared repeated copies are automatically updated to reflect those edits. If you want to edit only one copy of the repeated material without affecting the others, either create real copies in the first place, or select the shared copy you want to edit and transform it into a real copy using the Edit > Functions > Convert to Real Copy option.
Cubase asks how many copies you want to make of the selected objects or range. If you are repeating objects, you will also be asked whether you want to create shared or real copies. The Repeat option follows the same behavior as described for the Duplicate option. Also, Cubase always assumes you want to create real copies when you use the Range Selection tool to repeat content.
When using the Repeat function, you also will notice that the positions of the left and right locators have no effect on the placement of the repeated material. On the other hand, the Grid mode settings for the Snap function play a role in where your repeated objects appear if you have selected objects that do not start or end exactly on grid increments (for example, bars and beats).
Repeat selected objects or ranges over time
Select the appropriate tool (Object Selection or Range Selection).
Select the objects or range you want to repeat.
Select Edit > Functions > Repeat, or press Ctrl+K (PC)/
 +K (Mac).
When prompted, enter the number of times you want this selection to be repeated.
If you have selected objects rather than a range, check the Shared Copies option if you want to do so.
Click OK.
Another variation on copying events is offered through the Fill Loop function, which allows you to specify a cycle region between the left and right locators in which events will be repeated. If the last repetition of these events doesn’t fit completely inside this area, it will be trimmed to fit within the range defined by the locators.
As with the Duplicate and Repeat commands, you also can use the Range Selection tool to highlight the range that will be used to fill a loop section. This is a great way to create a section structure inside a project in which all selected objects are repeated until they arrive at the right locator position.
Sizing or resizing an object makes it possible to adjust the start and end times of the object without affecting the media file itself. Think of sizing an object as a way to define which portion of the object plays in the project.
Different objects have different sizing restrictions. For example, you can resize an audio event, but not beyond the boundaries of that event’s source audio file. The same restriction goes for audio regions: You can expand the event containing the audio region in the Project window beyond the region’s boundaries, but not beyond the original clip’s boundaries. In terms of MIDI parts or events, you have no such restrictions, because a MIDI part does not actually refer to any content; it only acts as a container for content.
That said, you might want these objects to react differently to the sizing you apply. The Object Selection tool has three resizing modes: Normal Sizing, Sizing Moves Contents, and Sizing Applies Time Stretch. You select a mode by clicking the Object Selection button then clicking the down arrow beneath the button, and then choosing a mode from the resulting context menu.
Normally, when you change an event’s length by moving its start or end point, the content within the event stays in place and only the start or end point moves, as illustrated in Figure 28.6. Moving the end of the MIDI part in this case (middle segment) moves the end point back in time, whereas moving the start point later in time causes the events occurring before the new start point to be ignored during playback. But the events that were playing during bar 3 in the original version are still playing at bar 3 in the resized version.

In other instances, you also might want to move the content inside of the object (event or part) when resizing it. This works differently with audio than it does with MIDI events, as you can see in Figure 28.7.
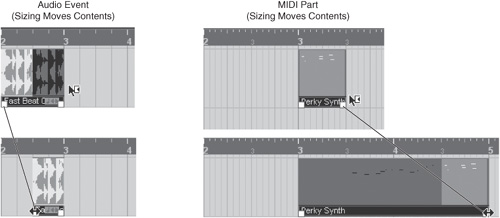
The left example in Figure 28.7 is the audio event; the right example is a MIDI part. In both instances, the top row displays the original content. For the audio event, the start handle is moved forward in time (bottom row), moving the content forward as well, whereas the end point remains unchanged. For the MIDI part, the end handle is also moved forward, unwrapping the MIDI events recorded earlier in time. This is done when the Sizing Moves Contents mode is selected from the Object Selection tool’s pop-up menu.
The final resizing mode available in the Object Selection tool’s pop-up menu enables you to time-stretch objects so that the duration of the events inside is adjusted to fit the new object’s size. This stretching can be applied to both audio and MIDI events.
Figure 28.8 displays both types of events being stretched. In the top portion, MIDI events’ note length values are adjusted to fit within the new proportion. Note, however, that stretching MIDI events in this fashion can throw off the quantization of your project. That is, if you stretch in a proportion that changes the quantizing of events, you might have to do a bit of editing inside the MIDI editor to get the MIDI events to work with the quantize grid. For best results, try stretching in a proportion that is suitable to the time subdivision currently used in your project.

Figure 28.8. Resizing an event using the Sizing Applies Time Stretch mode of the Object Selection tool.
Using this option on audio is a great way to make a drum loop, for example, fit inside a specific number of bars—especially when the tempo difference is minimal. If you look at the audio example in Figure 28.8, you can see that the original content is less than one bar long. Stretching it allows you to loop it an even number of times using the Fill Loop or Repeat options described earlier in this chapter. You can select the algorithm and quality applied to audio through the File menu (PC)/Cubase application menu (Mac) > Preferences > Editing > Audio > Time Stretch Tool Algorithm field. The option you select in this dialog box is applied to all audio events that are stretched using this tool, and the best algorithm for a specific task will depend on the nature of the source material.
You should know that applying a large proportion of time-stretching on an audio file will probably create some major artifacts in the resultant sound. For natural-sounding results, avoid using time-stretching in a proportion greater or less than 25 percent of the original content’s length. For MIDI events, there are no such time-stretching limitations. The positions and durations of MIDI events are simply recalculated and re-quantized.
Adjusting the timing of two takes can sometimes be daunting, and moving the start and end points of an event is not always the best way to go. That’s when shifting events inside an object without moving the object’s boundaries comes in handy.
Shifting the content inside the event is done by offsetting the position of the audio clip inside the object’s start and end points. You also can shift MIDI events inside a MIDI part. In both cases, there is only one condition that applies: The object in which the events are found has to be smaller than the events themselves. For example, if you have MIDI events at bar 1, beat 1 and bar 3, beat 4 within a MIDI part that spans from bar 1 to bar 4, you cannot shift these events inside because the container covers the same area as the events inside the container.
You can use this technique creatively by shifting a drum loop, for example, trying out different beat combinations when playing a shifted event along with other events in the same timeline.
When trying out ideas inside the Project window, you might want to silence a track by using the Mute button found in the Inspector and Track List area. However, if you only want to mute one or more events within a track, select those events and then select Edit > Mute. The default key command to mute events is Shift+M. After an object is muted, you can unmute it using the Shift+U key command or by selecting Edit > Unmute.
If you’ve worked hard at positioning events in the timeline, you can lock them in place to prevent time-consuming mistakes. When an object is locked, a tiny lock icon appears in the bottom-right corner of the object next to the end point handle. You lock selected events by selecting Edit > Lock [Ctrl+Shift+L (PC)/![]() +Shift+L (Mac)]. After objects are locked, you cannot move or edit them from the Project window. To unlock objects, select Edit > Unlock or press Ctrl+Shift+U (PC)/
+Shift+L (Mac)]. After objects are locked, you cannot move or edit them from the Project window. To unlock objects, select Edit > Unlock or press Ctrl+Shift+U (PC)/![]() +Shift+U (Mac).
+Shift+U (Mac).
When you apply a transformation, such as deleting an object, moving, and so on, each action is saved in a list, which enables you to undo an unlimited number of actions. Although you can undo the last step you made by using the Edit > Undo command, if you want to undo more steps—or steps farther back in the list—you must use the Edit History dialog box. You open this dialog box, shown in Figure 28.9, by selecting Edit > History.
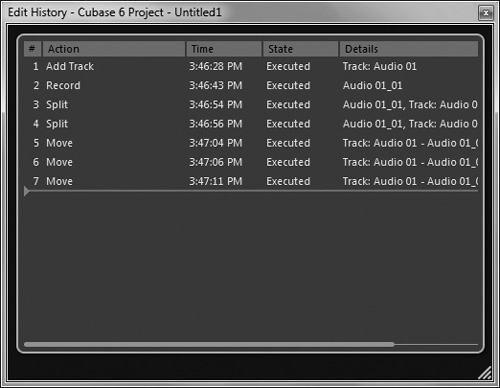
The Edit History dialog box displays actions on the left and the details about each action on the right. The first actions appear at the top of the list, and the latest ones at the bottom.
The list is separated by a horizontal orange line. Clicking on this line and dragging it creates a selection. All the actions that are included in this selection will be undone. This means that you can undo from the last edit to the first one, unlike in the Offline Process History panel, in which you can edit any single action within the list.