
Just about everything you do in Cubase happens in the Project window, which contains a variety of tracks that serve as containers for different media types, such as audio and MIDI events, automation, effects, and VST instruments. You can create a project from a preset template that includes the appropriate types of tracks, or add new tracks to an empty project.
This chapter discusses the different areas found in the Project window and how you can work with the information and tools these areas provide. After all, most of your editing and production time will be spent in the Project window; you need to know what’s what, as well as where and what it all does.
Here’s a summary of what you will learn in this chapter:
How to recognize the Project window areas
What tools are available on the toolbar
How to use the Inspector and Track List
What different types of tracks are available
How to add tracks to a project
The Project window is your main working area; it displays all the tracks and events for your project. More than one project can be open simultaneously, but only one can be active at any time. When you make a different Project window active (by clicking within it or selecting it from the Window menu, and then clicking its Activate Project button at the left end of the Project window toolbar), all other project-related windows also update their content to display the settings of this active Project window. The Project window is essentially divided into a dozen main areas, each one of which provides some kind of control, function, or access to information within a project.
Here’s a list of the areas identified in Figure 15.1, to serve as a quick reference to all the components included in the Project window.
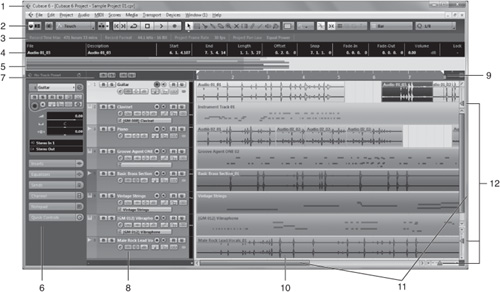
Title bar. Displays the current project’s title.
Toolbar. Displays commonly used tools and can be customized by right-clicking on it (or Control-clicking on a Mac) and selecting the tools you want to see or unselecting those you don’t use.
Status line. (This is optional.) Displays information about the status of the project, including recorded time, record format, bit rate, and so forth.
Information line. (Optional.) Displays information on selected events in the event display area (see number 10).
Overview line. (Optional.) Displays an overview of the current project—that is, the portion of this project currently displayed in the window. This bar also serves as a navigational tool; you can quickly zoom to a specific section or move your point of view by using this area.
Inspector. Displays a series of settings for a selected track. The settings in the Inspector are different for each type of track.
Track List Header bar. Controls global track states as well as Track List (see number 8) display settings.
Track List. Displays controls for all the tracks in a project. Tracks are stacked as rows in a column, and you can rearrange them by dragging up or down the list with your mouse.
Project Ruler. Displays the main timeline for a project, as well as the left and right locators. You can’t hide the ruler, but you can change its format or use it to move your cursor in the timeline.
Event Display. The main work area where all events and automation are represented. The Event Display area lets you move and edit events, such as MIDI, audio, and automation recordings. Most edits can be done within this area, whereas others are done in separate editing windows.
Scroll bars. Let you navigate within the project’s timeline (horizontal) or tracks (vertical).
Zoom controls. Give you control over the time zoom level (horizontal zoom control), the track height (middle vertical zoom control), and the vertical scale of the audio and MIDI content displayed within the rectangles that represent events and parts on tracks (upper vertical zoom control).
When more than one project is open within Cubase, a blue rectangular button found in the upper-left corner of the Project window indicates the active project. Clicking the Activate Project button will make the top window active and automatically deactivate the background window. You can have many projects opened simultaneously, but only one can be active at a time.
The toolbar contains a variety of controls and tools for working with a Cubase project. We’ll examine each part of the toolbar separately.
This is the first button on the left side of the toolbar, as shown in Figure 15.2. As the name implies, clicking this button activates the current project. This is mostly used when you have more than one project open in Cubase.
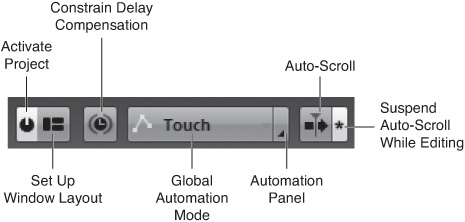
This is the second button on the left in Figure 15.2. Click this button to display a panel that lets you show or hide specific Project window elements—Status Line, Info Line, Overview Line, and the Inspector. (The Inspector is the only one of these elements displayed by default.)
Use the Constrain Delay Compensation button (the third button on the left in Figure 15.2) if you encounter sync or latency issues when recording live audio through Cubase or playing VST instruments. If what you play syncs perfectly with your previously recorded tracks, leave this button deactivated; Cubase will automatically compensate for audio hardware and effect processing latency during playback or recording to maintain more coherent time alignment between your tracks.
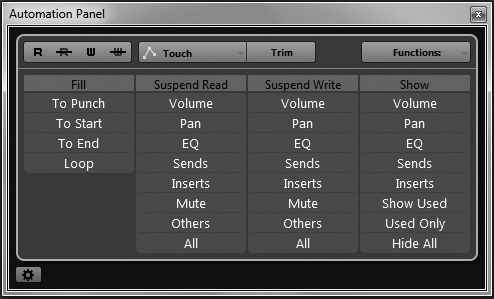
Click the Global Automation Mode button (fourth on the left in Figure 15.2) to select between three automation modes: Touch, Auto-Latch, and Cross-Over. Click the down-arrow next to this button to display the Automation Panel, shown in Figure 15.3. This is a floating panel that provides access to all of Cubase’s automation options. Learn more about these automation options in Chapter 36, “Writing and Reading Automation.”
The final button in Figure 15.2 is the Auto-Scroll button. When the button is depressed (active), the tracks in the Project window follow the position of the project cursor in time as the project moves forward during playback; the display refreshes every time the project cursor moves past the right edge of the window. To turn Auto-Scroll off while making edits in the Project window, click the smaller Suspend Auto-Scroll While Editing button.
Cubase 6 offers two sets of Transport controls. One set of Transport controls exists in the Project window toolbar, as shown in Figure 15.4. The other, more complete set is in the Transport panel, which we’ll discuss later in this chapter. (The toolbar Transport controls lack the rewind and fast forward buttons found on the Transport panel.)

The Transport controls in the toolbar include the following, from left to right:
In the middle of the Project window toolbar is a series of Tool buttons, as shown in Figure 15.5. You can also display a pop-up version of these tools by right-clicking (PC)/Control-clicking (Mac) anywhere inside the Project window. From left to right, these tools include the following:
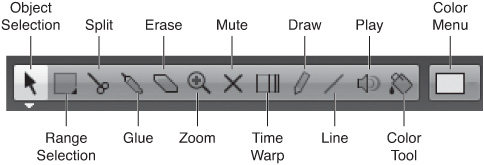
Object Selection. This “arrow” tool is probably the most-used tool on the toolbar. You use this tool to select events or parts by clicking on these event or by dragging a box over several events or parts. You can also use this tool to resize events by dragging the end of the event; learn more in Chapter 28, “Arranging in the Project Window.”
Range Selection. Make a selection of events over several tracks with this tool by dragging the mouse over the desired content. You can also select a specific portion within an event or part with the Range Selection tool. Once it is selected, you can apply different range-specific editing processes, such as delete, cut, insert, or crop to the selected range. These editing functions are also discussed in Chapter 28.
Split. Clicking events or parts anywhere in the Event Display area separates them into two segments, with the exact point of the split depending on the currently active Snap mode and grid settings.
Glue. Joins events or parts to the next event or part in the same track, creating either a continuous event (if you use Glue after splitting an event in two) or a continuous part containing two or more events (if you Glue either two nonconsecutive events or two parts together).
Erase. Clicking with this tool deletes events/parts from a track.
Zoom. Zoom in to your project by dragging a box around the area you want to view more closely, or click to zoom in one step closer. Hold the Alt (PC)/Option (Mac) key while clicking (double-clicking will have the same effect) to zoom out a step.
Mute. Silences individual events or parts. This is an alternative to erasing them because muted events are not heard during playback; however, they can be “unmuted” later. This is different from the Track Mute button, which mutes all events on the track.
Time Warp. Provides a way to insert tempo changes for musical events to match up with video sequences or tempo changes in a live recording. More on this in Chapter 30, “Working with Tempo.”
Draw. This “pencil” tool can be used to create an empty part on a track, a series of envelope points for a volume curve associated with an individual event, or a series of automation points in any of the automation subtracks for tracks in the Project window.
Line. Adds automation points in any automation subtrack. As with the selection tools, a pop-up selector for the Line tool offers different operation modes. The Parabola, Sine, Triangle, and Square modes allow you to create different automation shapes, creating automation points that recreate the shape of the selected mode. For example, using the Line tool in Sine mode lets you create a panning automation shaped like a sine wave. These editing modes of the Line tool will also be discussed in Chapters 23, “Using the Key Editor and Note Expression,” and 36.
Play. In the Play mode of this tool, you use the “speaker” icon of the Play tool to monitor a specific audio or MIDI event/part from the point where you click until the moment you release the mouse. In Scrub mode, you can drag your mouse back and forth over an event/part to monitor its contents. The direction and speed of scrubbed playback is proportional to the movement of your mouse as you click and drag with this tool.
Color tool. Click this button to activate the Color or “paint” tool. You can then click an element in the Project window to “paint” it with the currently selected color in the Color menu (next).
Color menu. Click this button to display a drop-down menu of available colors. Click a color to then “paint” the color using the Color tool.
To change the key signature of all the events in your project, use the Project Root Key button, the first button shown in Figure 15.6. Click this button to display a pull-down menu of key signatures; select the desired key signature from the list, and your project will be transposed to the new key.
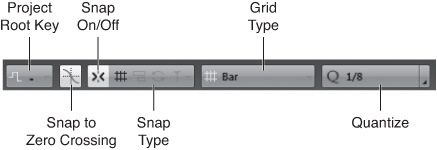
This button is the second on the left in Figure 15.6. When you activate this button, splitting and sizing of audio events are done at zero crossings—that is, places in the audio where the amplitude (volume level) is zero. This helps avoid pops and clicks at editing points.
This is a connected group of snap controls on the toolbar, as shown in Figure 15.6. These controls help you determine the accuracy of these movements by snapping events to the time increments on a grid, other events, the cursor, or any combination of these items.
The Snap On/Off button enables/disables the Snap Type button to the right. When enabled, movement of events/ parts is restricted by the selected Snap mode—by default, a grid—selected by the Snap Type button. Cubase offers eight Snap modes from which to choose, which you access from a drop-down menu that appears when you click the Snap Type button:
Grid. When Grid is selected in Snap mode, snap positions are set to an invisible grid of either bars or beats, selected by the Grid Type button to the right.
Grid Relative. With this snap type, events and parts are not precisely “magnetic” to the grid. Rather, the grid determines the step size for moving events, and a moved event keeps its original position relative to the grid.
Events. The start and end of parts or events, as well as markers on marker tracks, become “magnetized.” So when you move a part, it will snap to the previous or next event as you move closer to it.
Shuffle. This moves events/parts that are adjacent to other events/parts by switching places with them. Shuffle mode is also very useful for editing voice-over narrations, since when you cut out any portion of the track’s content, such as a false start by the narrator, the following material in the track will move up earlier in the timeline to close that gap.
Magnetic Cursor. The project cursor becomes magnetic. Moving an event/part close to it will cause it to snap to the cursor’s position.
Grid + Cursor. A combination of the Grid and Magnetic Cursor modes.
Events + Cursor. A combination of the Events and Magnetic Cursor modes.
Events + Grid + Cursor. A combination of the Events, Grid, and Magnetic Cursor modes.
This button lets you select which type of grid is used when you activate one of the Grid Snap modes. You can choose from the following:
Bar. The grid is based on the bars (measures) of the project.
Beat. The grid is based on the individual beats within each bar.
Use Quantize. The grid is customized to the value set with the Quantize control, discussed next.
The final button on the default toolbar is the Quantize control. This lets you set the Grid Snap value to any specific note value within your project. That is, quantize values divide each bar in fractions equivalent to a note value. For example, a 1/4 quantize value indicates that there will be a grid line at every quarter note.
There are three groups of quantize value fractions: normal, triplet, and dotted. Here’s how they work:
Normal. The normal fractions (1/2, 1/4, 1/8, 1/16, and so on) represent note values that can be divided by two. For example, there can be four quarter notes in each 4/4 bar, eight eighth notes per 4/4 bar, and 16 sixteenth notes per 4/4 bar.
Triplet. Triplet notes are divisible by three and place three notes in the place of two. For example, a 1/4 triplet value means that you can have up to six quarter-note triplets per 4/4 bar, a 1/8 triplet value means 12 eighth notes per 4/4 bar, and so on. In other words, for every two notes in normal quantize value, you have three notes in triplet quantize value.
Dotted. A dotted quantize value represents one and a half normal quantize value. For example, three quarter notes are equal to two dotted quarter notes, or three eighth notes are equivalent to a single dotted quarter note.
The Inspector is the area below the toolbar to the left of the recorded tracks in the Project window. It’s visible by default, but it can be hidden if you need more screen real estate.
You use the Inspector to view or edit certain details pertaining to a selected track. The information displayed in the Inspector is always relevant to the selected type of track, and is organized on multiple tabs. For example, an audio track Inspector, like the one in Figure 15.7, has tabs for Inserts, Equalizers, Sends, Channel, Notepad, and Quick Controls. A MIDI track Inspector, like the one in Figure 15.8, has tabs for Expression Map, Note Expression, MIDI Inserts, MIDI Fader, Notepad, and Quick Controls. Click a tab to expand that section and access the available settings.


For track types that support insert and send effects, the symbol next to the corresponding section’s title bar will be colored when any insert effect or send is active in that section. A similar color indicator appears on the EQ tab of any track that contains an active EQ setting. (An active EQ is displayed as green.)
By default, when you click on one tab to expand that section of the Inspector, any other expanded section automatically folds up. When a section is folded, all the settings you have made in that section remain intact, and bypass and assignment indicators remain visible.
Viewing Multiple Sections of the Inspector Simultaneously
To maximize more than one section of the Inspector area at once, hold down the Ctrl (PC)/![]() (Mac) key as you click the tab for an additional section. You also can minimize all currently open panels at once by holding down the Alt (PC)/Option (Mac) key while clicking on any tab. Inversely, you can maximize all the sections at once by using the same key combination.
(Mac) key as you click the tab for an additional section. You also can minimize all currently open panels at once by holding down the Alt (PC)/Option (Mac) key while clicking on any tab. Inversely, you can maximize all the sections at once by using the same key combination.
The Track List area in the Project window, shown in Figure 15.9, enables you to view all tracks at once, enable multiple tracks for recording, and organize your material by type of content. Changes made in the Track List are also reflected in the Inspector and the Mixer.
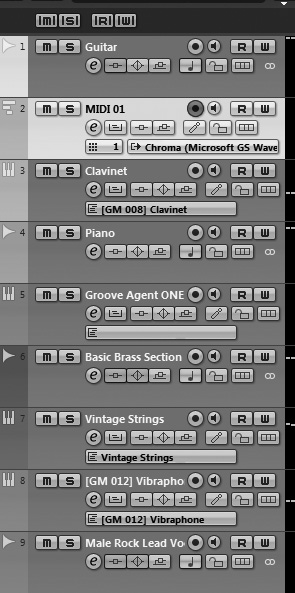
All events inside a track appear to the right of the track’s position in the Track List. The content of each track in the Track List differs according to the type of track. You can resize each individual track vertically to make it easier to view the contents of recorded events, as well as reorder the tracks by clicking and dragging them into new positions.
Resizing the Track List
You also can resize the width of the entire Track List by dragging the right edge of the Track List area left or right. To adjust the height of all tracks simultaneously, hold down the Ctrl (PC)/![]() (Mac) key as you drag the lower border of any track.
(Mac) key as you drag the lower border of any track.
Recorded automation associated with tracks—such as volume or pan, for example—is saved in automation subtracks, called “lanes,” and moves along with the track whenever you move it inside a project. Each automation parameter can be viewed in its own automation lane. For example, if you automate the Gain, Frequency, and Q-Factor on one band of the StudioEQ plug-in, you would have three automation lanes associated with the audio track where this insert resides.
To view an automation lane, right-click the associated audio or MIDI track and select Show Used Automation from the context menu; alternately, you can click the down arrow that appears in the bottom-left corner of the desired track. If you want the used automation visible for all tracks, select the Show Used Automation for All Tracks option instead.
There are two fields in each automation lane. The first field indicates the automation parameter displayed in that lane. The second field represents the value of the automation parameter at the current cursor location. You also can change the automation parameter displayed in the current lane without affecting any recorded automation if you want.
The Transport panel, shown in Figure 15.10, is a floating panel that duplicates and supplements the toolbar’s Transport controls. You display the Transport panel by selecting Transport > Transport Panel, or by pressing F2 on your computer keyboard. We’ll discuss the Transport panel in more detail in Chapter 16, “Mastering Project Navigation.”
There are several types of tracks in a Cubase project; these types are sometimes called classes. In Cubase 6, these track classes include the following:
Audio tracks are used for audio events and automation. You can have an unlimited number of audio tracks per project (in theory).
MIDI tracks are used for MIDI events and automation. They are also unlimited in Cubase 6.
Instrument tracks provide a fast and convenient way to use VST instrument plug-ins in a combined MIDI/audio channel/track.
Arranger tracks (called Play Order tracks in older versions of Cubase) enable you to work with sections of your project in a non-linear fashion. Within this track you create arranger events of any length; they don’t have to correspond to existing audio or MIDI events. You can then rearrange the arranger events to reorganize the sections of your recording. For example, you might create arranger events for each verse and chorus of a song, and then rearrange the events to change the order of verses and choruses. You can create one Arranger track per project.
FX Channel tracks are used for audio plug-in effects. You can route audio to FX Channel tracks by using sends from various other audio-related track types, in order to process their signal in real time with insert effects you have placed on the FX Channel track. You can create up to 64 FX channels in Cubase 6.
Folder tracks are used to group together other tracks in the Project window, making it easier to work on projects with a great number of tracks. For example, use folder tracks to group different takes of a solo or multiple drum tracks. Some folder tracks are created automatically. For example, a VST instruments folder track contains all VST instruments that you add to the project.
Group Channel tracks are used to combine the signal from various tracks into a single channel. Use Group Channel tracks to create submixes where a common set of controls or insert points for effects for all the channels assigned to this group are needed. For example, you can have the track outputs for various backup singers assigned to the same Group Channel fader in the Mixer, where perhaps a compressor plug-in has been inserted. When you want the level of the background vocals to go down, reduce the level of this group channel, rather than reducing the levels of individual tracks. You can create up to 256 group channels in Cubase 6.
Marker tracks are used to easily manage markers in a project. You can create only one marker track per project.
Ruler tracks are used to view the time displayed in a project’s timeline. Create additional ruler tracks when you need to view alternate time references, such as timecode, seconds, and bars and beats simultaneously with the main ruler in the Project window.
Signature tracks enable you to view and edit key signature data in your project. There is one signature track per project.
Tempo tracks enable you to view and edit the tempo of your project. There is one tempo track per project.
Transpose tracks enable you to transpose sections of your project into a different key. There is one transpose track per project.
Video tracks are used to synchronize your music to a digital video file whenever this is needed.
When you start with an empty project, you have to add tracks for each instrument you record. New tracks are also added for automation and certain types of effects.
Add a track to your project
Click Project > Add Track on the menu bar, and then select the type of track you want to add. Alternately, you can right-click (PC)/Control-click (Mac) anywhere in the Track List and select the type of track you want to add.
When the Add Audio Track dialog box appears, as shown in Figure 15.11, select how many instances of that type of track you want to add by changing the number in the Count field.
Some types of tracks have a mono or stereo option; select the appropriate option for your new track, if available.
Many types of tracks let you choose from a variety of preset configurations. If you want to use a track preset, click the Browse button and choose from the available presets.
Click OK to create the new track(s).
