
In a Cubase project, audio tracks can contain any type of audio events—from live audio recordings to looped samples, from rendered effect tracks to duplicated and processed audio tracks. Audio tracks can be automated and routed to various audio outputs, including studio sends and group channels. Each audio track in Cubase has its own dedicated four-band parametric equalizer section and can have up to eight inserts and eight sends for effects processing.
Many of the controls found in audio tracks are similar to the ones discussed for MIDI tracks in the previous chapter and will behave in a way that should start to feel familiar to you by now. Also, audio, instrument, input, output, FX channel, and group tracks share many of the same basic controls.
Here’s a summary of what you will learn in this chapter:
How to display and change audio track settings through the Inspector sections
How to set up the Auto Fade options associated with audio tracks
How to configure the input and output busses of an audio track
How to use and customize the Channel Settings panel
How to work with overlapping audio events
Because audio tracks are very common to Cubase projects, they can be created in a number of ways and in various windows inside Cubase. For example, you can add an audio track through the Track List area’s context menu, in the Mixer window’s context menu, or by dragging an audio clip from the Pool or desktop to the empty area below the last track in the Project window’s Track List. The most common method, however, involves selecting Project > Add Track > Audio. This displays the Add Audio Track dialog box, where you can select a preset configuration for your new track.
Once an audio track is created, its settings are available in the Inspector. Some of these settings are also mirrored in the Mixer window, through the channels strip for that track.
As you can see in Figure 18.1, the Audio Track Settings in the Inspector (on the left) and the Track List controls offer many of the same functionalities. Many of these functions are similar to those available on MIDI tracks, with a few new functions available:
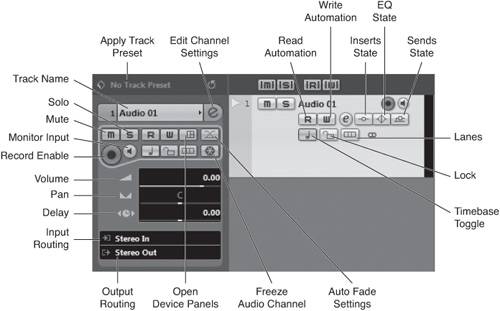
Double-click on the track name to edit it, or click on it to reveal/hide the Track Settings section.
Click the right-arrow next to the track name to assign a color to all events in a track.
Click the Record Enable button to arm this track for recording.
Enable the monitor to listen to the incoming audio even when the Record Enable button is not active.
Use the Timebase button to switch the track’s time references for the events it contains between linear and musical timebase.
Lock your track from editing using the Lock button.
The Lanes button lets you display (or not display) individual lanes for overlapping events within the track.
The Freeze Audio Channel button “freezes” the track to help reduce the CPU load imposed by using real-time plug-in effects as inserts. Learn more in Chapter 40, “Optimizing Your Project.”
The Volume and Pan sliders control the track’s volume level and left-to-right position within the stereo space.
The Delay slider adds a positive or negative delay in milliseconds to your track. Use this control to adjust for tracks that do not properly sync up to other tracks or to create a “fattening” duplicate track with a slight delay.
The Input Routing field lets you select the audio source for this track. This setting is particularly important when you are recording multiple audio sources, because it determines which track will record each input signal on your audio interface. The input busses available in this menu are those created previously in the VST Connections window.
The Output Routing field lets you select where the signal gets routed at the output of each track. Audio tracks can be routed either to output busses created in the VST Connections panel or to group channels. If your project contains any group channels, a horizontal line in this pop-up menu will separate the output busses from the group channel assignments.
Clicking the Edit Channel Settings button opens the Channel Settings panel, which displays key audio channel controls all in one location, including inserts, sends, and equalization.
Click the Open Device Panels button to see a tree structure view of all inputs, sends, EQ, and the like.
The Inserts State button monitors the state of insert effects assigned to this track. Clicking this button causes all inserts for this track to be bypassed, as indicated by a yellow color on this button.
The EQ State button determines the status of equalization for this track. Click the button green to activate EQ settings; click it yellow to bypass all EQ settings.
The Sends State button functions in much the same fashion as the Inserts State button, except for sends effects.
Clicking the Auto Fade Settings button opens the Auto Fades dialog box, shown in Figure 18.2. Here you can create short 1- to 500-millisecond fades at the start and end of an event, typically used to reduce the possibility of clicks—an audio glitch that occurs when an audio event ends or begins at a point where the audio waveform is not at a zero crossing (silence on the amplitude scale). When the Auto Fade In, Auto Fade Out, or Auto Crossfades option is enabled for an audio track, Cubase automatically applies the corresponding fade at the beginning or end of each event in real time. The dialog box also lets you choose the type of fade curve to apply. To use the dialog box’s settings across all audio tracks, click on the As Default button. Note that Auto Fade lengths can’t exceed 500 ms (half a second)

By default, the Inspector displays the audio settings at the top, followed by the Inserts, Equalizers, Sends, Channel, Notepad, and Quick Controls sections. You can customize which sections the Inspector displays by right-clicking (PC)/Control-clicking (Mac) over a section’s header. A context menu will reveal a number of additional sections, including an EQ curve display, studio sends (which can be used to route the track to a headphone mix, for example), a graphic surround pan display, and a customizable user panel. All these sections share a few functionalities:
Click on the section header to expand the section and reveal its controls, hiding all others.
Hold the Ctrl key (PC)/
 key (Mac) while clicking on a header to expand the section’s controls without collapsing any other Inspector sections that are already open. For example, this will be particularly useful for keeping both the Equalizers and Equalizer Curve sections of the Inspector, discussed later in this chapter, open simultaneously.
The Inserts, Equalizers, Sends, and Studio Sends sections offer a bypass button. This control lets you bypass these entire sections with a single click. The Track List, the Channel section of the Inspector, and the Mixer window also offer Inserts, EQ, and Sends State buttons that perform a similar function for bypassing these entire sections on a channel. Whenever the bypass function is enabled, this button in the Inspector turns yellow. An indicator at the right end of these same sections of the Inspector also shows whether any insert, equalizer band, or send is currently active within them.
The Inserts and Equalizers sections offer a Preset Management button that lets you load, save, or manage presets for these sections.
For more information on the Inserts section, please take a look at Chapter 13, “Using Insert Effects.”
The Inspector’s Channel section, shown in Figure 18.3, offers controls over the track’s audio signal path. Many of these controls are mirrored in the Track List area and the Mixer.

Among the controls found in the Channel section of the Inspector are the Mute, Solo, Listen Enable bus, Read/Write Automation, Edit Channel Settings, Inserts State, EQ State, Sends State, Monitor Input, and Record Enabled buttons. Remember that when the Monitor button is enabled, the level indicator to the right of the channel fader becomes a pre-fader input level meter; changing the level of this fader will not have any effect on the input level.
The settings overview panel on the left of the Channel section displays active settings found in the channel. The eight numbers on the top correspond to the eight channel inserts (the last two of which are post-fader), the following four numbers correspond to the four EQ bands, and the last eight numbers correspond to the eight channel sends (each of which can be switched between pre- and post-fader modes). Clicking on any of the numbers currently illuminated will disable the corresponding setting.
The channel fader controls the output level of this channel. As with many other controls in Cubase, to return the fader to its default 0 dB position, hold the Ctrl (PC)/![]() (Mac) key down as you click on it. If you want to move the fader by smaller, more precise increments, hold down the Shift key as you click and drag. This is useful when you want to create slow and precise fade effects with automation. The Channel Level numeric display below the fader tells you the position value (in dB) of this channel’s fader. If you have a scroll wheel on your mouse, you can also adjust the selected channel’s fader level by moving the wheel up or down.
(Mac) key down as you click on it. If you want to move the fader by smaller, more precise increments, hold down the Shift key as you click and drag. This is useful when you want to create slow and precise fade effects with automation. The Channel Level numeric display below the fader tells you the position value (in dB) of this channel’s fader. If you have a scroll wheel on your mouse, you can also adjust the selected channel’s fader level by moving the wheel up or down.
Directly below the output level for the channel, the Peak Meter Value indicator represents the distance between the highest audio peak in this track and the maximum digital audio level. This value resets itself as soon as you move the channel’s fader or if you click inside the field. It’s important to keep an eye on this margin because you don’t want the audio on this track to go above 0 dB, but you don’t want it to always stay very low when recording either. Ultimately, the Peak Meter Value indicator should remain between –12 dB and 0 dB when recording.
The Audio Channel Settings panel, shown in Figure 18.4, appears when you press the Edit Channel Settings button for any audio-related track in the Inspector, Track List, or Mixer window. This window shows all of that track’s audio parameters, making it easy to perform detailed settings.

By default, the Channel Settings panel displays four key sections—Inserts, Equalizers, Sends, and Faders. However, you can customize its contents to display up to 11 types of settings. Just right-click (PC)/Control-click (Mac) anywhere inside the window and select Customize View from the context menu. From the resulting submenu, check those sections you want to display.
When you record audio on a track, an audio event is created in your project. You can record multiple events on a track, as shown in Figure 18.5, and then move events along the project’s timeline.
Know, however, that each audio track can play only one audio event at a time. This is fine if the multiple events follow each other successively, but if audio events overlap each other, you only hear the topmost event at any given position.
Changing the order of these events offers a way to control which event plays back on the track, as shown in Figure 18.6. In the overlapping events found in the upper portion of this figure, Event A is in front (on top) and Event B is in back (behind). As a result, the track plays Event A until its end, and then plays Event B. The same events overlap in the lower portion of the figure, but this time, Event A is the one behind, while Event B is in front. You can change the order of these events by selecting the event you want to place in front, and then selecting Edit > Move To > Front.
