
In a Cubase project, MIDI tracks hold any type of MIDI event—from MIDI note events to controllers, such as velocity, modulation wheel, pitch bend, and so on. MIDI tracks also contain MIDI automation information for parameters such as pan, volume, or MIDI plug-in and send effects that might be assigned to a track. MIDI tracks can also contain MIDI filters and effects, such as MIDI compression. All recorded MIDI events are saved as part of the Cubase project file itself.
Here’s a summary of what you will learn in this chapter:
How to set your MIDI input port
How to recognize the different functions associated with MIDI tracks
How to recognize the different functions associated with MIDI channels
How to change and access the MIDI Channel Settings panel
How to convert MIDI into audio tracks for your final mix-down
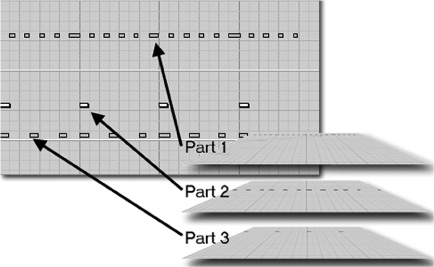
When you record MIDI events, such as musical performances, through your MIDI controller, these events are stored in a MIDI part, which appears on the MIDI track’s Event Display area in Cubase’s Project window. You can have many parts containing MIDI events on your track, and parts can overlap each other on the track. Parts that are underneath other parts on the same MIDI track will still be active, and events inside them will still be heard when you play the track.
You can compare a part to a container for MIDI events. In the case of MIDI, these containers can be stacked one on top of the other, playing either different drum instruments, different channels (if the MIDI track is set to play “any” MIDI channels, rather than just a specific one), or simply as part of your working process.
In the example in Figure 17.1, there are three different parts playing at the same time on the same track, creating a rhythmic pattern. These three parts could be playing events for different MIDI channels. However, you should know that when parts are stacked one on top of the other in a MIDI track, the only visible part is the one on top of the others. If all the parts are of equal length, this might lead to confusion because you will hear the parts playing, but you won’t see them unless you select all the parts by dragging the Selection tool around the visible part and then opening your selection in the MIDI (Key or Drum) Editor.
To create a new MIDI track, select Project > Add Track > MIDI. Alternatively, you can right-click (PC)/Control-click (Mac) in the same area and select Add MIDI Track.
To use a MIDI track, you must choose a MIDI input port and a MIDI output port for that track. The MIDI input port receives incoming MIDI events on the track and should reflect the MIDI input device you’re using. For example, if a MIDI keyboard or other controller is hooked up to your MIDI input port A, you set your MIDI track to input port A to record events from your keyboard/controller. (You could also select All MIDI Inputs, which would send all incoming MIDI ports to the selected track.)
Set your MIDI input port for an external MIDI instrument
Be sure the MIDI Thru is active in the File (PC)/Cubase (Mac) > Preferences > MIDI option.
Select the MIDI track you want to set up for input.
Open the Track Settings section in the Inspector, shown in Figure 17.2, by clicking the track name at the top of the Inspector.
Click in the MIDI Input field to reveal a pop-up menu showing the available MIDI input ports.
Select the appropriate port.

Figure 17.3 provides a look at each element found in the Track Settings section of the Inspector and in the Track List. Here are a few of the tasks you can perform in these areas:
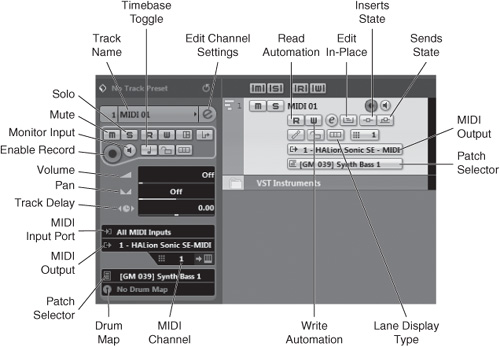
Double-click on the track name to edit it, or click on it to reveal/hide the Track Settings section.
Click the right arrow next to the track name to assign a color to all events in a track.
Click the Input Transformer button if you want to transform MIDI messages between the MIDI input and the track itself (thereby affecting what actually gets recorded). For example, you can use this function to filter channels in the MIDI input port, allowing only the desired input channels to be recorded for this track.
Click the Record Enable button to arm this track for recording. When you press the Record button on the Transport panel, incoming MIDI events will be recorded on this track.
Enable the monitor to hear incoming MIDI messages played through this track even when its Record Enable button is not active.
Use the Timebase button to switch the track’s time references for the events it contains between linear and musical timebase. When a track is displayed in musical timebase, changing the tempo of the song readjusts the events in the part according to the new tempo setting. When a track is displayed in linear time, changing the tempo of the song does not affect the start position of the parts it contains.
Lock your track from editing using the Lock button.
Click the Show Lanes button to enable a display mode where overlapping parts appear on several lanes inside the MIDI track.
The Edit In-Place button expands the track to display a piano-roll style MIDI editor within the track that is very similar to the Key Editor for MIDI events. This function is called “in-place” because it allows users to edit MIDI events directly in the Project window. A keyboard is also displayed along its left side, as is the case in the Key Editor.
The Track Volume and Track Pan controls transmit MIDI Control Change message numbers 7 and 10, and display the corresponding values for these controller types if any MIDI volume or pan automation is active for this track.
The track delay slider adds a positive or negative delay in milliseconds to your track. Events in a track with a negative delay play earlier, whereas positive values make them occur later in time.
MIDI events coming through the MIDI Input Port selection field can be recorded onto the track and/or monitored through its assigned MIDI output port. Note that the main Track Settings controls don’t allow you to select which MIDI input channel passes through a MIDI track, but usually this is not a problem. If you do need to select which channel comes in, try the presets available for the Input Transformer. MIDI events that have been recorded on a track play through the devices or software selected in its MIDI Output Port field. You can also use the output port to monitor incoming MIDI events through some other port.
When a VSTi is assigned to the track, the Edit Instrument button opens the control panel for that VST Instrument, which allows you to edit its parameters and settings. (MIDI tracks assigned to a physical MIDI output, any other non-VSTi-compatible MIDI port, or a ReWire MIDI output will not display the Edit Instrument button.)
The MIDI output channel sets the MIDI channel used by the MIDI output port to play MIDI events on this track.
For any MIDI device that hasn’t been configured through the MIDI Device Manager, the Bank Selector and Program Selector fields are used to send MIDI messages that change bank and program numbers according to your particular MIDI device’s preset structure. Typically, programs are grouped in banks of 128 sounds each. (This is the maximum number of sounds MIDI can support.) To access sounds above this value, banks are created. You can access up to 128 banks of 128 programs using these settings.
With some VSTi or MIDI devices that have been configured through the MIDI Device Manager panel, you can select the presets the instrument should play by name, using the Patch Selector drop-down menu. This menu then replaces the Bank and Program fields, and the names for the instrument’s presets appear in the Patch Selector.
If the preset represents a drum kit, the Drum Map drop-down menu will associate a drum map with the MIDI events on this track. This is useful when you record a drum part on this track. You can also use the Drum Map setting in the Track List area.
The Inserts State button monitors the state of MIDI insert effects assigned to this track. The button is blue when any insert effect is assigned to the track, and a corresponding blue rectangular “active inserts” indicator appears in the title bar of the Inserts tab in the Inspector. Pressing this button in the Track List causes the MIDI to bypass all the inserts in this particular track, indicated by a yellow color on this button. There is also a dedicated bypass button for the Inserts section in the Inspector, just to the left of the active inserts indicator, which additionally turns yellow when a track’s entire Insert section is muted via either of these methods.
When the Insert section (or a specific insert within it) is bypassed, the MIDI events do not pass through the current inserts, but settings of these inserts remain untouched.
The Sends State button, found in both the MIDI Fader section and in the Track List, monitors the state of MIDI send effects assigned to this track. The button is blue when any send effect is assigned to the track, and a yellow rectangle appears in the title bar of the Sends tab in the Inspector. Pressing this button in the MIDI Fader section of the Inspector or in the Track List will prevent the MIDI on this track from going out through the MIDI send destinations, but the sends settings remain untouched.
The track activity indicator at the right edge of the Track List monitors event activity on each track. In MIDI tracks, this may be any MIDI messages (note, controller, and SysEx if it is not filtered by Cubase).
You can jot notes to yourself about any track by using that track’s Notepad section. Use this feature if you need to exit quickly and you just want to keep some notes on the current state of your project, describe which devices, settings, and connections were used for this track, discuss whether it was changed from its original setup, enter names and phone numbers of your musicians or voice talent, and so on—anything you feel is worth writing down. The Notepad enables you to refresh your memory the next time you work on this project.
To enter a note in the Notepad, expand the Notebook section of a given track’s Inspector, and then type your notes into the text field area. Any changes you make will be saved as part of the project file.
Cubase lets you set up direct control of up to eight different MIDI parameters via the Quick Controls tab in the Inspector. Use the Quick Controls area as a track control center, with the most important controls assembled in one place. (Figure 17.4 shows a typical Quick Controls section, set up with a variety of controls.)
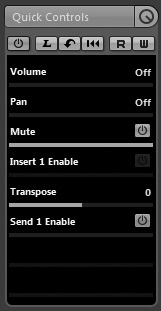
Figure 17.4. A configured Quick Controls area; drag the colored bar to adjust the control in a given slot.
To set up the Quick Controls area, expand the Quick Controls tab and click in the first empty field. This displays a pop-up menu of control choices; double-click the control you want to appear in this slot.
Using the Quick Controls is relatively easy. If a slot controls a variable parameter, such as volume or pan, use your mouse to drag the colored bar at the bottom of the slot left or right and thus adjust the parameter. If a slot controls an on/off parameter, as with enabling insert effects, drag the colored bar all the way to the right to turn on the effect, or all the way to the left to turn it off.
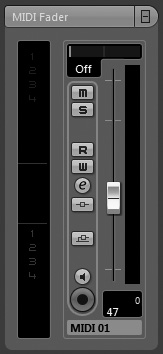
The MIDI Fader section of the Inspector (see Figure 17.5) offers many of the same options as you find in the MIDI Settings section of the Inspector area, as well as in the Track List area for a MIDI track. It also mirrors the information you find in the Mixer panel for this specific track class, as well as most of the buttons that you have seen earlier in the Track List and Track Settings sections of the Inspector area. You can use this section to set the pan and volume levels of the device or VSTi assigned as the output destination for this track. You also can use this section to change or monitor which insert or send effects are active.
A MIDI channel is added to the Mixer window each time you create a MIDI track in the Project window. Although VST instrument tracks display MIDI settings in the Inspector, their corresponding channel in the Mixer displays the audio output of the VST instrument, rather than the MIDI controls found in on a normal MIDI track—you can choose to view the MIDI inserts for an Instrument channel in the Mixer window. A MIDI channel in the Mixer window displays an exact replica of the MIDI Channel section in the Inspector for a MIDI track with the exception of the View Options menu. The function of each control found in Figure 17.6 is described in the following list:
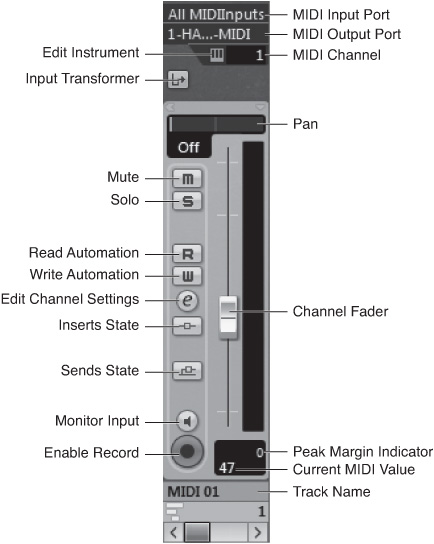
MIDI Input and Output Port selection fields. These allow you to choose the source and destination of MIDI events for this channel.
MIDI Channel selection field. This allows you to choose the destination channel for your MIDI events.
Edit Instrument button. This opens the control panel for the VSTi and makes it possible to perform parameter changes to the instrument or loads and changes presets in the VSTi.
Input Transformer button. This allows you to access the Input Transformer panel for the selected track.
Pan control and display. This displays a numeric and graphic representation of the Pan setting for this MIDI channel. Ctrl-clicking (PC)/
 -clicking (Mac) brings the pan back to its center position, which is represented by a C in the numeric display. On MIDI tracks, the Pan control actually corresponds to MIDI Controller #10.
Channel setting option buttons. This is a group of buttons, identical to those found in the MIDI Channel section in the track’s Inspector area; whatever settings you made in the Inspector are displayed here and vice versa. These buttons include Mute, Solo, Read, Write, Open Channel Editor Panel, Insert Bypass, Send Effect Bypass, Monitor (switches the track to input monitor mode), and Record Enable.
Channel fader. This controls MIDI Controller #7 (Volume), which can only be an integer value between 0 and 127. You should also be aware that the fader’s default position is set at 100; holding down the Ctrl (PC)/
(Mac) key as you click on the fader’s handle brings it back to this value. You also can hold down the Shift key while moving your fader for a finer level of precision. The level display on the right of a MIDI channel’s fader, unlike the audio channels, does not represent the output level of the instrument. This level cannot be monitored because the sound of the MIDI instrument a MIDI channel is destined for is not monitored through the MIDI channel itself. In fact, this meter represents the velocity value of Note On and Note Off messages. Changing the volume level with the fader to the right does not, therefore, affect the level displayed in this bar, and no digital clipping can occur because of high velocities being monitored by this display.Current MIDI value and Peak Margin Indicator. Both fields display MIDI values. The first represents the current position of the MIDI volume fader, and the second represents the highest MIDI Note On velocity value.
The MIDI Channel Settings panel offers a convenient way to edit all MIDI channel settings for a selected MIDI channel in a single window. You can access a Channel Settings panel through the Edit MIDI Channel Settings button in the Inspector’s Channel section, the Track List area, or in the Mixer window.
As you can see in Figure 17.7, the MIDI Channel Settings panel presents three distinct areas. Here they are, from left to right:
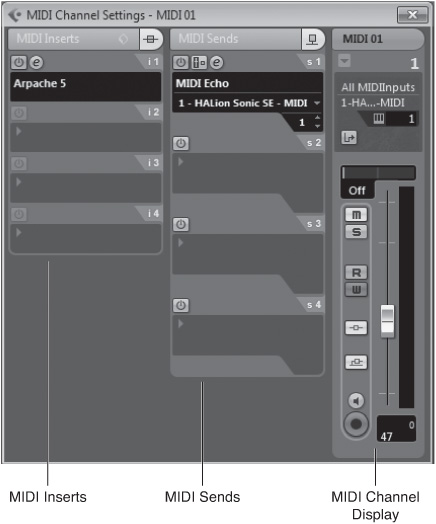
The MIDI Inserts panel displays the current inserts settings for this channel. As with the MIDI channel settings, any changes you make here or in any other window in the project update this channel’s settings in all windows.
The MIDI Sends panel, as with the inserts, displays the current settings for this channel.
The MIDI Channel display offers settings identical to the ones found in the Mixer or Channel section of the Inspector in the Project window. Any changes you make here or anywhere else are reflected in all parts of the project.
You can change the channel currently displayed in the MIDI (or audio) Channel Settings panel by accessing the drop-down menu in the upper-right corner of this panel. This makes it easy to navigate or change the settings for different channels without changing your view.
You also customize this panel by right-clicking (PC)/Control-clicking (Mac) in an empty area of the panel and selecting Customize View > Setup from the context menu. The resulting Setup dialog box, shown in Figure 17.8, lets you hide or display panels and re-sort the order in which they appear. Clicking on the Save Preset button (a small disk icon) allows you to save the current view and name it accordingly.
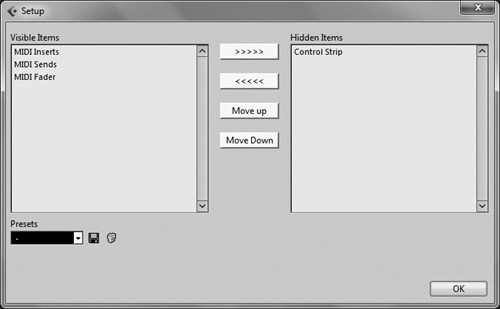
Once you’ve saved a customized view of the Channel Settings panel, it will appear as a selection in the context menu when you right-click (PC)/Control-click (Mac) in the panel. To switch between different views, simply select the appropriate preset from the context menu.
MIDI provides a great way to lay down ideas and record music using synthesizers, samplers, and drum machines, among other things. However, distributing your work on a CD or through the Internet using MIDI files is not a practical solution. That’s because all a MIDI track records is MIDI instructions, which don’t copy directly to a digital file or CD.
If you want to include MIDI tracks in you final recording, you first have to convert those tracks to VST instrument or standard audio tracks. This MIDI-to-audio conversion process typically takes place before you begin the final mix-down and mastering for your project, although it can occur at any point when you’re done working with a given MIDI track.
Before you can convert the audio output from an external MIDI instrument into an audio track, it’s important to set up the connections properly in the VST Connections panel, as described in Chapter 4, “Monitoring and Connecting Audio.” An external instrument connection ensures that MIDI events are sent to the external MIDI device and that its audio outputs are routed back to the project through instrument tracks. This is definitely the best way to set up your external MIDI keyboards and sound modules in Cubase.
What you now have is an audio track that mirrors your original MIDI track, with the selected MIDI instrument playing. From this point on in the mixing process, you should mute the original MIDI track (by clicking that track’s Mute button in the Track List) and perform all future mixing, EQ, and effects processing on the new audio track.