
This chapter takes a look at Cubase’s online and offline audio processing options. Offline and online processes offer identical parameters and results; however, offline processes are rendered to a temporary file. Cubase then reads this temporary file instead of calculating the effect each time. This technique lessens the load on the computer’s resources.
Here’s a summary of what you will learn in this chapter:
How to use audio processes found in the Audio menu
How to use the recovery tools found in the Offline Process History panel
How to shift tempo and pitch in Musical mode
Audio processing can be applied to audio in two ways: You can apply effects in real time that affect the entire track (known as online processing), or you can apply processing that alters the content of the audio events played back by Cubase (known as offline processing). With online processing, you can change an effect’s parameters in real time. With offline processing, effects are calculated beforehand and fixed to the selected audio event.
The end result of both types of processing is the same in terms of sonic qualities, but the impact on your system’s performance is significantly different. Online processing can slow down system performance, whereas offline processing doesn’t affect system performance at all.
When you apply an online effect to a track, the audio passing through an insert, send, or main bus effect is processed by your computer in real time. The effect itself is not saved to an audio file, although the effect’s parameters are saved as part of your project. Every time you play the project, the computer has to process all the active effects, which is why you can change parameters easily. On the other hand, this type of real-time effects processing can add a serious load on your computer, slowing performance down to a grind when your real-time processing needs exceed the computer’s capabilities.
In contrast, an offline effect does not use up the computer’s CPU time each time the file plays. Processing audio offline offers a less CPU-intensive method of processing audio because the CPU doesn’t have to process the audio every time you press Play.
When you process audio files offline, you replace the affected portion of an audio event with the processed version. This alteration, saved as part of the project file, creates the effects without changing the original audio file’s content. It also doesn’t require any processing time during playback, because the files are simply read from the media drive.
The disadvantage of offline processing is that you cannot automate the application of effects by using automation in real time. There are many instances, however, in which automation is not needed. When you want to add an effect to a portion of an audio clip, event, region, or slice, processing this portion and writing the effect to a file might be more effective than using real-time effects—not to mention it would reduce the load imposed on your computer. Pitch-shifting and time-stretching operations are notoriously heavy consumers of computer resources, so using them in offline processes is highly recommended, especially on slower computers or for large process-intensive projects.
You apply real-time online effects and processes through the insert effects and FX channels (a special type of audio track intended as a send destination, where you have enabled one or more insert effects). You apply offline processes and plug-in effects through the Plug-Ins or Process submenu found in the Audio menu, or through the same submenus in the Project window’s context menu.
In audio terminology, any effect applied to an audio signal is referred to as audio processing. However, in Cubase, the commands found in the Audio > Process submenu relate to more basic audio transformations, such as changing gain or pitch.
Audio effects, such as reverb, chorus, and delay, are found under the Audio > Plug-ins submenu; this submenu effectively mirrors the offline processing options available using VST plug-in effects. Although I can’t go into all these options (which are useful for applying layers of special effects on specific audio selections within a track, for example), bear in mind that many of the same basic dialog box options apply.
You can apply processing to an entire audio event or region in the Project window or just to a portion selected within it using the Range Selection tool. You can also apply processing on individual audio events seen within the Audio Part Editor. Selecting an event or region in the Pool applies the processing to the entire selected object. Finally, you can apply a process specifically to a selected portion of an event or region in the Sample Editor. In all these situations offline processing can be applied either via the Audio > Process submenu or via the Process submenu of that window’s context menu.
Applying an offline effect is similar to applying an audio process. Remember, offline effects are identical to the online plug-in effects discussed in Chapter 13, “Using Insert Effects;” they’re just applied offline, rather than in real time.
Because some objects may be shared (used more than one time in the project’s timeline), when applying a process or effect, Cubase asks whether you want to create a new version or change all the instances of this object throughout the project’s timeline. If you opt to create a new version, the selected object is the only one affected by this process, and the processed version of the object replaces that instance of the original content in the Project window (but not on your media drive; the results of online processing are always stored in your project’s Edits subfolder). If you want all the shared instances of this object (event or region) to change, you can select the Continue button. This replaces the currently selected object rather than creating a new version, which causes all shared occurrences to change as well in the project.
Cubase 6 offers 15 offline audio processes. These processes are described in Table 20.1. I’ll discuss the parameters for the most popular of these processes in the following sections.
Table 20.1. Cubase 6 Audio Processes
Process | Location | Description |
|---|---|---|
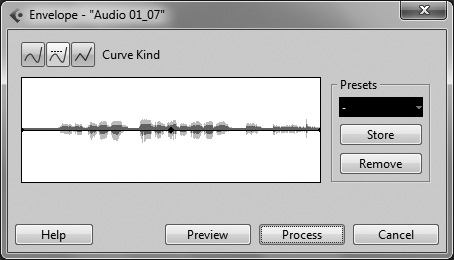
Envelope | Audio > Process > Envelope | Applies a volume curve for a given event, which can be used to limit the upper and lower volume levels. |
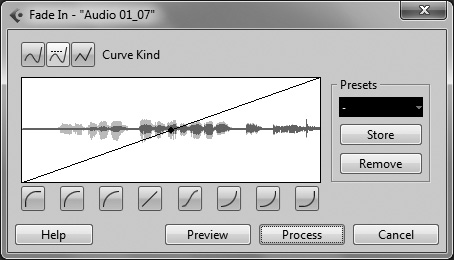
Fade In | Audio > Process > Fade In | Gradually fades in the volume. |
Fade Out | Audio > Process > Fade Out | Gradually fades out the volume. |
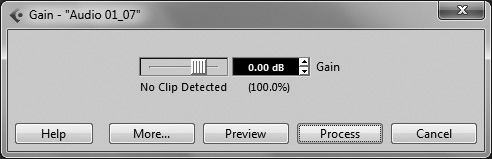
Gain | Audio > Process > Gain | Increases or decreases the overall volume level of the event. Typically used to increase the volume level (add gain) to an event recorded at too low a level. |
Merge Clipboard | Audio > Process > Merge Clipboard | Mixes the audio in Cubase’s clipboard into the selected event. |
Noise Gate | Audio > Process > Noise Gate | Silences any audio that occurs below a selected threshold level; typically used to remove background noise from areas of a recording that should be silent. |
Normalize | Audio > Process > Normalize | Specifies a desired maximum audio level and raises other levels accordingly; typically used to increase the level of audio recorded at too low an input level. |
Phase Reverse | Audio > Process > Phase Reverse | Reverses the phase of the selected event, turning the waveform “upside down.” |
Pitch Shift | Audio > Process > Pitch Shift | Shifts the pitch of the selected event up or down by a specified number of halftones, without altering the tempo or length of the event. |
Remove DC Offset | Audio > Process > Remove DC Offset | Removes a large direct current (DC) component in the audio signal. |
Resample | Audio > Process > Resample | Resamples the event at a lower or higher sampling rate. |
Reverse | Audio > Process > Reverse | Reverses the selected event, essentially playing it backwards. |
Audio > Process > Silence | Replaces the selection with silence. | |
Stereo Flip | Audio > Process > Stereo Flip | Flips the right and left channels in a stereo recording. |
Time Stretch | Audio > Process > Time Stretch | Changes the length or tempo of a recording, without altering the pitch. |
The Envelope process lets you apply a volume envelope to the selected audio event, effectively limiting the upper and lower volume levels of the event. As you can see in Figure 20.1, you can choose from three envelope curves or apply a preset envelope.
When you want to add a soft attack to a new event, use Cubase’s Fade In process, shown in Figure 20.2. Likewise, you can create smooth fade outs by using the Fade Out process. They both work in a similar fashion, applying a specific type of fade curve to the beginning or end of the audio event.
The Gain dialog box, shown in Figure 20.3, lets you increase the gain, or volume level, of a recorded signal. Moving the slider to the right adds gain, whereas moving the slider to the left reduces it. You also can enter the desired amount of change in the Gain field by typing in the appropriate value. When you click the Preview button, Cubase indicates whether this gain change causes the object to clip (digital distortion caused by the amount of gain change exceeding the maximum permitted level).
The Merge Clipboard process merges audio content that has been previously copied to the clipboard into the currently selected object. This process enables you to specify a mix ratio between the audio selected for processing and the audio on the clipboard through a percentage slider. On the left side, you can see the proportion of the original (selected) object, and on the right side, you can see the proportion of the audio previously copied in the clipboard.
When you make a noisy recording, much of the noise is hidden by the recorded sound itself. That is to say, when an instrument is playing, the listener hears the instrument, not the background noise. However, when the instrument stops playing (or the vocalist stops singing), that background noise is no longer masked. The listener hears the noise clearly and distinctly, and that isn’t good.
This is why audio engineers invented noise gates. A noise gate is a device or process that identifies passages that should be silent and automatically erases all noise and hiss from those passages. The process works by setting a volume threshold; all signals below that threshold are muted.
The Noise Gate dialog box (see Figure 20.4), then, lets you silence any portions of an audio signal that are below the specified Threshold level. Imagine a gate that opens when a signal is strong enough (above threshold) and closes when it isn’t (below threshold). You can use this to silence portions of an audio signal during relatively silent passages. For example, you can use a noise gate to remove a guitar amplifier’s humming noise from your recording during passages where the guitar player is not actually playing any notes. A noise gate does not remove this noise when the guitarist is playing because the signal will most likely be loud enough to pass the threshold, but the noise at that point should be less noticeable because it is masked by the guitar sound. If the noise level is too loud even when the guitarist is playing, you should consider using a noise reduction plug-in or rerecording this part.
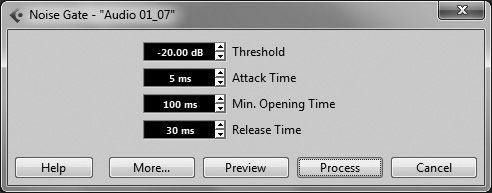
The Attack Time controls how long it takes for the gate to open, letting the sound through, and the Release Time controls how long it takes to close after the signal goes below the threshold level. The Minimum Opening Time defines the minimum amount of time the signal has to be over the threshold before the gate can close again; this can be useful if you discover after using this dialog box’s Preview button that many brief transients in the selected audio are causing the gate to “flutter” open and closed.
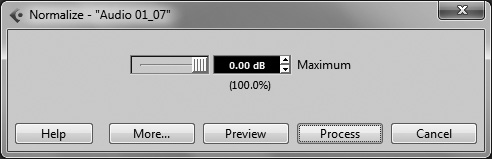
Normalizing an audio signal affects its overall amplitude level by adjusting its highest peak to the value set in the Normalize process dialog box (see Figure 20.5). It is similar to the Gain process in the sense that it acts on the level of the signal, but instead of calculating the level generally, it brings these levels up in proportion to the highest peak found in the signal, making sure that there is no clipping in the signal as a result of the level change. You can set the level value you want to assign to the highest peak level in this object by adjusting the slider or entering a value in the Maximum field.
Reversing phase, or polarity, does not change the shape of a sound file, but it changes the direction this shape takes. For example, the slopes going up will now go down, and vice versa. In practice, this function is only rarely required, since each channel in Cubase has an Input Phase button (in the Mixer or VST Audio Channel Settings window), which is generally a more efficient way to accomplish such a fix.
When you mix different sound files that contain the same audio content captured by microphones at different distances, phase cancellation can occur. The most common examples are probably snares being captured from above and below or guitar amps from the front and back. This can sometimes produce a hollow sound as different frequencies in its harmonic spectrum are reinforced or cancelled out, known as comb filtering. Inverting the waveform on one of the files can prevent this phase cancellation from occurring. In other words, if the phase of the current audio file does not sound correct, changing its polarity via this Phase Reverse process might fix the problem.
If you can barely hear the signal, you might have phase cancellation occurring. In Cubase, you can reverse the polarity of both channels in a stereo file or only one or the other. You should preview the result before applying this process.
Imagine that you’ve recorded a backing track for a vocalist to sing to. The singer arrives, but says, “This is a little outside my range. Can you lower the key a half-step?” What do you do?
In the old days, the only way to change pitch was to speed up or slow down the tape, which also affected tempo. Fortunately, computer technology enables more sophisticated changes, which in this case means changing the pitch without changing the tempo.
Cubase’s Pitch Shift process can either change the pitch of the selection by a fixed amount throughout its duration, or vary the amount of pitch change over time by using an envelope that determines how and when the pitch is shifted upward or downward.
At the top of the Transpose tab in the Pitch Shift dialog box (see Figure 20.6) is a keyboard layout that can help you set the relationship between the pitch of the original audio content and the pitch-shifted version. In this example, the fundamental pitch or “root note” of the original content is D3, so this note is selected as the pitch-shift base area and appears red on the keyboard display. Clicking another note changes the pitch-shift settings automatically to match the value needed to get this pitch. In this case, B2 is pressed and displayed in blue on the keyboard. If you want to create a chord effect, creating several pitch shifts simultaneously, you can enable the Multi Shift check box, which adds other notes to the process. Remember that if you also want the root note to be included in the multi-shifted signal, it must also be selected (highlighted in blue). You can use the Listen Key (or the Listen Chord button, if Multi Shift is selected) to hear the notes you selected.

Keeping the Time Correction option enabled changes the pitch without altering the duration of the shifted content. If this option is disabled, events shifted upward play faster, and events shifted downward play slower. Finally, the MPEX 4 Preset list lets you select from a variety of algorithms for implementing the pitch shift.
Clicking the Envelope tab at the top of the dialog box reveals the envelope settings for this process. Using an envelope rather than a keyboard changes how the affected audio selection is shifted over time. The settings in this tab are similar to those on the Transpose tab.
The Stereo Flip process can only be applied on stereo audio objects because it manipulates the stereo channels of the selected audio clip or event (including regions or other selections within an audio event). You have four modes available in this process, which appear in the Mode field. For example, you can merge both channels to create a mono file, or subtract the left channel from the right channel to remove the lead vocal. (In this regard, items that are equally present in both channels, like a lead vocal, will be cancelled out.) Note that if you want to apply the basic mode here, Flip Left-Right, to an entire track rather than just a specific audio event or other selection, this is more efficiently accomplished by simply enabling the Dual Combined Panner view and dragging the left and right channel panners to their opposite sides.
When you’re doing television or movie work, you often have to work within very rigid time constraints. Imagine that you’ve recorded a theme song for a movie or television show. The song clocks in at exactly 63 seconds in length, but the producer comes to you and says that the closing credits are only 60 seconds long. Somehow, you have to make that 63-second recording fit into a 60-second slot—without affecting the pitch.
Here’s another fun situation. Imagine you’ve recorded a dance track at 120 beats per minute. But the track just before this one is at 110 bpm, and your producer wants the two tracks to merge seamlessly into another. That means slowing down the tempo of your song, without changing the pitch of the recording.
In the old days, your only solutions to these problems involved speeding up or slowing down the tape, which also affected the pitch of the original recording. With Cubase 6, these challenges can be solved using Cubase’s Time Stretch process—without affecting the underlying pitch.
As you can see in Figure 20.7, you can change the selection’s tempo (in beats per minute) or length. You’ll probably have to do a little math beforehand, but the results are impressive.

These three processes offer very different results; however, they do not offer any settings for you to configure. DC offset is a bad thing, reducing headroom and introducing random pops and clicks; Cubase’s DC Offset process removes any audio signal offset of this type. The Reverse process simply reverses the audio, making it sound as if it is playing backward. The Silence process brings all the samples in a selection to a zero value, creating an absolute digital silence.
When you apply an offline process or plug-in to an audio event or selection, an entry is made in that event’s Offline Process History. Remember that offline processes mean that the effect is not calculated during playback (online), but on a “one-shot” basis that actually creates new audio data to contain the result (offline). Each process is displayed on its own row in the Offline Process History dialog box, shown in Figure 20.8. You can decide to modify the settings of any process that appears here, even if there are subsequent offline processes in this list.

For example, you can select a previously rendered Normalize process and change the peak value. If a process has no parameters to modify (for example, the Reverse process), clicking the Modify button simply displays a warning telling you this process cannot be modified.
You also can replace one previous offline process with another. For instance, you could select the Reverse process and select another process in the drop-down menu below the Replace By button. The new process’s dialog box will appear. Once replaced, the old process is removed from the list, and the new process takes its place.
Finally, you can remove a process from the list entirely by selecting it and clicking the Remove button, no matter where it is in this list, as long as you haven’t applied any resampling or time-stretching processes, which affect the overall number of samples (and ultimately this event’s position in the project).
As you just learned, you can change the tempo and pitch of an event or selection by using offline audio processing. You can also make these changes using Cubase’s AudioWarp function in Musical mode.
When you use the Musical mode approach, the tempo and pitch-shifting are performed in real time and affect the timing of audio events as they are played back within tracks. They also make some significant demands on your CPU’s processing power. You apply these processes to an individual event via the Sample Editor; to this end, all the operations described in the following sections assume that you have already opened the audio event in the Sample Editor.
To employ these AudioWarp effects, you first must enable Musical mode for the selected audio event. This mode works best with “loopable” audio events, or at least events that start and end on a beat.
The AudioWarp features in Cubase let you match a time-based sample to a tempo-based grid. As a result, you can get a drum loop to match the tempo changes in a project, correct timing errors in an audio recording, or tighten the kick of a drum by shifting it closer to the project’s feel—all without editing the original media file on the drive.
Enabling Musical mode for an audio event lets Cubase adjust an audio loop’s tempo to the project’s tempo in real time, without affecting the pitch. Whenever the tempo in the project is different than the tempo displayed next to a Musical mode–enabled event, this audio is automatically time-stretched to match the current project’s tempo.
Change tempo via AudioWarp
From the Project window, double-click the audio event you want to edit to open the Sample Editor.
As shown in Figure 20.9, enter the appropriate number of bars and beats (if necessary) in the corresponding fields of the Sample Editor’s toolbar. Cubase will automatically display the audio tempo for this event.
Enable the Musical Mode button on the Sample Editor toolbar.
Click the Algorithm field and select the most appropriate time-stretching algorithm for this audio content. You can choose from seven standard algorithms (Drums, Plucked, Pads, Vocals, Mix, Custom, and Solo) or nine more sophisticated élastique algorithms (Pro-Time, Pro-Pitch, Pro-Tape, Pro-Formant Time, Pro-Formant Pitch, Pro-Formant Tape, Efficient-Time, Efficient-Pitch, and Efficient-Tape). The standard algorithms are the most efficient for real-time processing; the élastique algorithms, while less efficient, often produce better-sounding results.
You can also customize the warp settings if you wish. Choose the Standard Custom option in the Algorithm control to open the Advanced Warp Settings dialog box; enter your desired settings, then click OK.
You can also manually position the musical bars/beats gridline over the audio event, as long as the beat does not change tempo over the course of the event. Open the Definition tab in the Sample Editor Inspector and click the Manual Adjust button. You can then use your mouse to drag the first bar marker in the waveform display to correspond to the first downbeat in your sample. The remaining gridlines should adjust themselves accordingly. Even better, go to the Sample Editor Inspector’s Definition tab and try the Auto Adjust control. In many cases, this will automatically fit the gridline to your existing beats.