
There are many ways to edit the MIDI events recorded inside individual MIDI parts. If all you want to do is select, move, copy, or erase note events and Control Change events within a MIDI part, you can use the In-Place Editor (refer to Chapter 22). On the other hand, if you want to edit several MIDI parts at once, you need to add events that cross the boundary between two MIDI parts. If you would like to move or copy parts while they are being edited, the Key Editor is a better and more robust choice.
Most of the basic editing techniques associated with the Key Editor are also available through the In-Place Editor in the Project window; however, the Key Editor offers several additional features, such as multi-event and multitrack MIDI editing, as well as the ability to edit multiple lanes of controller events simultaneously. In addition, the Key Editor offers Note Expression editing, which is Cubase 6’s new way to edit MIDI controller data.
Here’s a summary of what you will learn in this chapter:
How to use the different tools in the Key Editor to edit MIDI events
How to adjust the velocity of inserted events
How to adjust the positioning of events using the Snap and Quantize features
How to record MIDI events using step recording and real-time MIDI input
How to create a playback loop within this MIDI editor, independently from the project’s playback or locator positions
How to add a Controller Lane to the Key Editor
How to edit more than one event and track at a time
How to view, record, and edit Note Expression data
Like the In-Place Editor, Cubase’s Key Editor uses a piano roll analogy, in which events appear as “blocks” within a strip moving from left to right as you play the events. The vertical axis represents the pitch, and the horizontal axis represents the timeline of the event being edited. The start of the MIDI part(s) currently being edited is always on the left of the piano roll, and the end of a part appears on the right of the piano roll.
You open the Key Editor, shown in Figure 23.1, by double-clicking on a MIDI event or by selecting the event and then selecting MIDI > Open Key Editor.

Unlike the In-Place Editor, the Key Editor features its own dedicated toolbar. The first button, shown in Figure 23.2, lets you set up the layout of the Key Editor window. Next is the Solo Editor button, which mutes all MIDI parts not currently loaded in the Key Editor. The Acoustic Feedback button, next to that, plays notes when they are selected with the Selection tool or when you’re moving a note in time or to different pitch values. This is basically the MIDI equivalent of the audio Audition (scrub) tool. Hold down the Ctrl (PC)/![]() (Mac) key to hear all notes playing at the same time as the note you are selecting.
(Mac) key to hear all notes playing at the same time as the note you are selecting.

The fourth button on the toolbar is the Auto-Scroll button, which toggles the Auto-Scroll function on or off. When enabled, the window follows the project playback cursor. When disabled, the contents of the window don’t scroll. Alternatively, you can leave the button enabled but click the right-arrow next to the button; this suspends the Auto-Scroll function while you’re editing.
Next is a series of 10 tools for applying various editing operations to MIDI events found in your editor (see Figure 23.3). These tools are similar to those found in the Project window, but they offer editor-specific characteristics.

Object Selection. This “arrow” tool serves to select and resize events. Use this tool to move, copy, and select a range of events or to change the start or end position of existing events in your editor.
Draw. This “pencil” tool adds events by drawing them one by one inside the Key Editor or modifies existing note and controller events in a freehand style.
Erase. This tool allows you to erase events by clicking on them. If multiple events were previously selected, they all can be erased by clicking on any one of them with this tool.
Trim. This tool modifies the length of one or several events by trimming off the end (by default). If you hold down the Alt (PC)/Option (Mac) key before using this tool, the beginning of the note is trimmed instead.
Split. This tool splits selected events at the split mark. Exactly where the split occurs is determined by the Snap and Grid modes.
Mute. An alternative to the Erase tool, the Mute tool silences a note so that you don’t hear it but does not erase it. This provides a way to mute certain events that you’re not sure you want to get rid of but that you don’t want to hear right now. Click and drag over a selection with the Mute tool to silence all events within the selection.
Glue. This tool adheres two notes of the same pitch together. More specifically, when they are playing at the same pitch value, it glues the event that follows to the precedent event that you click on.
Zoom. This tool allows you to magnify your view of the content by dragging a box around it. You also can elect to click on a particular note to zoom in on it.
Line. This tool performs as a multifunction tool in two modes. The Line mode allows you to draw a series of events in the shape of the tool (you can switch between Line, Parabola, Sine, Triangle, and Square) or to draw controller information in one of these shapes as well. Paint, the last mode in the tool’s pop-up selector, allows you to insert multiple notes by dragging the cursor across the note display area in a freehand style.
Time Warp. This tool creates tempo changes in the tempo track to match recorded musical events. Note that the Time Warp tool (available in the Project window, the Sample Editor, and the Audio Part Editor) plays a similar role in each—it’s a tool that helps composers in the task of matching absolute, linear time (seconds, frames, and samples) with relative musical time (bars and beats). However, Time Warp is applied differently to MIDI than it is to audio. You will find more on this tool in Chapter 30, “Working with Tempo.”
The Auto Select Controllers button, shown in Figure 23.4, is useful when you are editing or moving MIDI Control Change messages. When this button is enabled, selecting and moving note events also selects and moves any Control Change events with the identical start time.
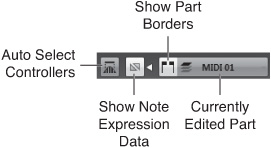
Next to the Auto Select Controllers button is the Show Note Expression Data button. Note Expression is a new way of editing MIDI controller data; we’ll discuss it in more detail later in this chapter.
The next two buttons shown in Figure 23.4 offer editing options related to editing multiple MIDI parts that have previously been selected in the Project window simultaneously inside the Key Editor.
Use the Show Part Borders button to display each MIDI part’s border limits inside the Key Editor. When enabled, you will see a start and end handle for each MIDI part that is currently open in this MIDI editor. Clicking and dragging either one of these handles will modify the part’s borders in the Project window as well.
The Currently Edited Part button is available for when you have opened several MIDI parts simultaneously in the Key Editor. Click this button and select the MIDI part from the Part List drop-down menu that you want to edit.
The Indicate Transpositions button, shown in Figure 23.5, helps you compare transposed notes with the originals. When you activate this control, the Key Editor shows the note pitch you hear after the transposition.
Next to the Indicate Transpositions button is the Insert Velocity button. Click this button to specify a velocity value for any notes manually entered into the Key Editor. You can change this value in one of three ways:
Double-click the button and type in the desired value.
Click on the up or down arrow next to the current value to increase or decrease the value.
Click the button and select one of the preset values available in the drop-down menu.
The Snap and Quantize options in the Key Editor are similar to the ones found in the Project window. Activate the Snap On/Off button (the first button on the left in Figure 23.6) to make the fields to the right of this button active. Click the Snap Type button to determine how the Snap and Quantize functions will work.

The Quantize Presets button determines the grid’s spacing and influences many operations inside the MIDI editors. For example, setting your grid to 1/32 note allows you to move, cut, and insert events at thirty-second-note intervals. In other words, the grid you select prevents you from moving, cutting, or inserting events at positions other than the one defined by the field.
The Length Quantize button determines the length of inserted events in the Key Editor. For example, if you set the length to 1/2, clicking in the display with the Draw tool will add a half-note to the part. When using the step-recording technique covered in detail later in this chapter with a Quantize value of 1/4 note and a Length Quantize value set to Quantize Link, all notes are inserted at quarter-note intervals and will be of quarter-note length. The Insert Velocity field, on the other hand, determines the velocity of Note On events that are added with the Draw tools.
The next buttons on the toolbar, shown in Figure 23.7, help you configure how MIDI input is recorded.

The first of these buttons is the Step Input button. Step input is a boon for the rhythmically challenged—and for those less-than-proficient keyboard players who have great ideas but just need some help entering them into a sequencer. It’s also great for creating rhythmically complex patterns, such as machine-like drum fills using sixty-fourth notes at 160 BPM, no matter what your skill level with the keyboard or other MIDI controller. Step input may also be useful for musicians who can’t enter MIDI events in their computers using VSTi in real time because their sound card’s latency is too high. No matter what the reason, step recording lets you enter notes or chords one by one without worrying about timing.
Table 23.1 describes the function associated with each of the Step Input buttons (also shown from left to right in Figure 23.7).
Table 23.1. Step Input Controls on the Editor’s Toolbar
Button Function | |
|---|---|
Step Input | Enables or disables the step input recording mode. Whenever this button is activated, the Auto-Scroll function is disabled. |
MIDI Input | When this button is enabled, you can select a note and assign it a new pitch by playing a new note on your keyboard or other MIDI controller. |
Note Expression MIDI Input | Same as the MIDI Input button, but with Note Expression data enabled. |
Move Insert Mode | Adds the played event at the position corresponding to the next quantize value following the playback line, pushing any subsequent events to the next quantize value (when this option is enabled). When the Move Insert Point option is disabled, events added using Step Input mode are added at the current position of the Step Input cursor, leaving previously recorded content in place. |
Record Pitch | Allows you to use your MIDI keyboard or other controller to reassign the pitches of existing events, advancing one note at a time through the existing MIDI note events in this editor as you play notes on your MIDI controller. |
Record NoteOn Velocity | When enabled, the NoteOn velocity values of the notes you play in Step Input mode are recorded. When disabled, the velocity assigned to the note you record is fixed by the Velocity field in the toolbar. When Record NoteOn Velocity is enabled, pressing lightly on your keyboard adds notes with low velocity values, whereas pressing harder adds a higher velocity value to the notes recorded through the step recording method. |
Record NoteOff Velocity | Records the NoteOff velocities entered in Step Input mode—otherwise set to a fixed value. |
Finally, there’s an Event Colors button at the very end of the toolbar. You use this button to change the color of specific events in the Key Editor window.
The Key Editor offers two main display areas—one for MIDI note events and another for controller events. In the Note Display area, which is most of the top of the Key Editor window, a keyboard appears vertically along the left edge. The ruler spanning from left to right represents the time at which events occur. You can change how time is displayed by right-clicking (PC)/Control-clicking (Mac) in the ruler and selecting one of the many display formats available, or by selecting the desired format from the Ruler Format selection menu found at the right of the ruler itself.
The Controller Display area, shown in Figure 23.8, is a customizable portion of the window that displays one or more controller types, such as volume, pan, expression, pedal, pitch bends, and so on. Using multiple Controller Lanes gives you a better view of the MIDI messages associated with the part you are editing.
If the desired controller is not displayed in this list, select the Setup option at the bottom of the drop-down menu. This displays the MIDI Controller Setup dialog box, shown in Figure 23.9. There are two areas inside this dialog box: the Visible area and the Hidden area.

To add a controller to the menu: Select it from the Hidden area and click the triple-arrow button below the area.
To remove a controller from the menu: Select it from the Visible area and click the triple-arrow button below the area. Click OK when you are finished adding or removing controllers from the menu, and then select the new controller to add its corresponding lane.
To remove a Controller Lane: Select the Remove This Lane option at the bottom of the same context menu you used to add a new lane.
Controller events seen in the Controller Display area are represented by blocks, whereas note velocity values are represented by lines and are aligned with their corresponding MIDI note events. Moving a note moves its associated velocity value, but it doesn’t move any controller events unless the Auto Select Controllers button is enabled in the window’s toolbar. The field below the controller’s name represents the value of the controller if you were to add this value at the current cursor position. The Quantize value, when active, will affect the distance between each added or recorded controller event. For example, if a quantize grid is set to 1/2 note, controllers can be added at half-note intervals. To enter a greater number of controller events, disable the Snap mode or set the Quantize value to a smaller value. More controller events create smoother changes, but they also create greater numbers of MIDI events that can bog down the MIDI at the port’s output. This is especially true when you are using lots of MIDI in your project.
Step Input functions are available in the Key Editor’s toolbar. When the Step Input mode is enabled, a new insert cursor (a vertical blue bar) appears in the note display area. Keep an eye on the location of this line; events that are inserted appear at the grid line immediately to the right of this insertion point. You can move this line by clicking inside the note display area at the location where you want to insert new events in Step Input mode.
Editing several tracks together can be useful to compare events on different tracks in a single editing window. Fortunately, you can edit more than one MIDI track simultaneously by selecting parts on different tracks in the Project window and opening them in the Key Editor.
Edit more than one track at a time
In the Project window, click the first part you want to edit in a track.
Shift-click the next part you want to edit in another track or, with the Object Selection tool, drag a selection box over the range of parts you want to edit simultaneously.
Press Ctrl+E (PC)/
 +E (Mac) or select MIDI > Open Key Editor.
Previously, we discussed how to edit MIDI controller data in the Key Editor’s Controller Lane. Cubase 6 adds a new, more intuitive way to edit certain types of controller data for certain types of controllers. Note Expression, as this new functionality is called, lets you display and edit controller data directly on the associated MIDI events in the Key Editor display. By fine-tuning this articulation information, you can create remarkably real-sounding MIDI recordings.
With Note Expression enabled, a MIDI note and its associated controller data are treated as a unit. As you can see in Figure 23.10, you view Note Expression curves, each representing specific controller data (such as modulation, balance, and pitch bend) in the Key Editor on top of the corresponding MIDI note. When you move, copy, duplicate, quantize, or delete notes, all the associated controller data follows.

To show Note Expression data in the Key Editor, click “on” the Show Note Expression Data button on the toolbar. This displays controller values, if any are recorded, on the individual MIDI notes.
You’ll also want to get to know the elements of the Note Expression tab in the Key Editor Inspector. As you can see in Figure 23.11, the Note Expression tab includes the following parts:
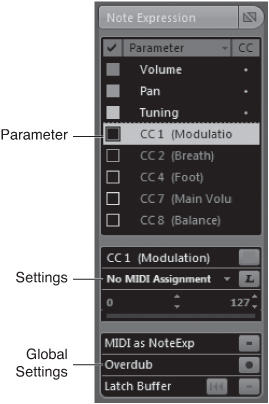
Parameter. This section lists available VST controllers (top) and MIDI controllers (bottom). Each controller is color coded; controller assignment, if any, is shown in the CC column.
Settings. This section displays settings for the selected controller. These settings are specific to each controller type.
Global settings. This section includes settings that apply to all controllers, such as Record MIDI Controller as Note Expression, Overdub Note Expression Data in Existing Notes, and Record Buffered Parameter Values as One-Shots to Notes.
Use the color-coding in the Inspector to identify specific controllers in the main display.
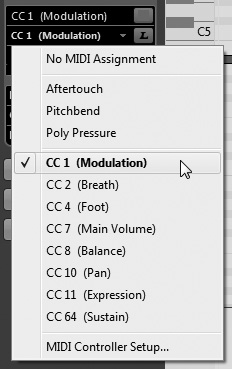
Most external MIDI keyboards have no controls or faders to input the VST3 parameters used in Note Expression. Instead, you need to assign specific MIDI controllers (such as Pitchbend or Aftertouch) to each of the desired Note Expression parameters. You can map the same MIDI controller for different parameters, but only one controller can be active at a time.
When mapping controllers, know that the VST3 Tuning parameter is automatically assigned to the pitch bend wheel of your MIDI keyboard. All other parameters are assigned by default to the first MIDI controller (typically Modulation). You can, however, manually map parameters to controllers.
Manually map a MIDI controller to a Note Expression parameter
Select the parameter to map.
Click the MIDI Assignment control in the Settings section to display the drop-down menu, shown in Figure 23.12.
Select the MIDI controller to assign to the parameter.
When recording new projects, you’ll want to record Note Expression data along with your MIDI recordings. This is made easy by using the Note Expression tab in the Inspector in the Project window.
You can edit Note Expression data for any MIDI note within the Key Editor. You can edit existing data or add new Note Expression data from scratch.
Edit Note Expression data
In the Key Editor, double-click the MIDI note you want to edit. This opens the Note Expression Editor, shown in Figure 23.13. All parameters are displayed as curves on top of the MIDI note.
Select the parameter you wish to edit by clicking that curve in the editor. To add a new parameter to the note, select that parameter in the Note Expression tab of the Inspector.
Use the Draw or Line tool to enter or modify the selected curve.

Editing Note Expression data in this fashion enables you to create highly expressive MIDI recordings.