
Editing MIDI events is different from editing audio events for the sole reason that MIDI events contain digital instructions, not recorded audio. As such, you can edit these instructions using either the In-Place Editor or the Key Editor. In addition, Cubase 6 adds a new Note Expression feature that lets you draw controller values directly onto MIDI events.
Here’s a summary of what you will learn in this chapter:
How to select and edit MIDI events
How to mute/unmute, merge, and resize one or more notes or controller events
How to create notes using the Draw tool or insert events using the Line tool
How to create a ramp of MIDI events using the Sine, Triangle, or Square tool
You can edit MIDI events in either the In-Place Editor or the Key Editor; MIDI drum tracks are typically edited using the Drum Editor. Basic editing functions are similar between all of these MIDI editors. (Learn more about the Key Editor in Chapter 23; learn more about the Drum Editor in Chapter 24).
In this chapter, we’ll use the In-Place Editor to discuss basic MIDI editing functions. To open the In-Place Editor, shown in Figure 22.1, click the Edit In-Place button found in the Track List area of the Project window.
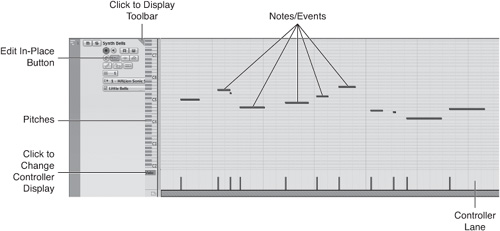
Most of the In-Place Editor tools are available in the Project window’s toolbar; select functions are also available from the context menu that appears when you right-click (PC)/Control-click (Mac) anywhere in the Event Display area. In addition, you can display a toolbar for the In-Place Editor window by clicking the small gray triangle in the upper-right corner of this MIDI track’s Track List area.
Within the In-Place Editor window, individual notes (or events) are shown as “blocks.” The pitch of the note is shown on the vertical axis; the timing of the note is represented on the horizontal axis. So, for example, a higher-pitched note appears higher in the window, whereas a longer note appears as a longer horizontal block.
Editing MIDI events is not unlike editing text in a word processor. For example, if you want to copy, cut, or move a group of events, you need to select these events first, and then apply the desired operation to these selected events. That’s when you use the Object Selection (arrow) tool.
Select MIDI/audio events
Single event: Just point and click on it.
Group of events: Click and drag a selection box around these events.
Multiple nonconsecutive events: Hold down the Shift key while selecting the additional events.
All the notes on the same pitch in a part: Hold down the Ctrl (PC)/
 (Mac) key and click on the corresponding pitch in the Keyboard Display area to the left of the Event Display area.
In all of Cubase’s MIDI editors (except the List Editor), the zooming functions are similar to those found in the Project window, with the exception that you do not have a Presets menu next to the horizontal or vertical scroll bar. However, you do have access to the Zoom submenu options in the context menu or in the Zoom submenu of the Edit menu.
You also can use the Magnifying Glass tool on the toolbar to draw a selection box around the range you want to zoom into. Clicking inside the editor with the Magnifying Glass tool zooms in one step at a time, and Ctrl-clicking (PC)/![]() -clicking (Mac) zooms out one step at a time. The data can be zoomed vertically and horizontally at the same time by holding down the Ctrl (PC)/
-clicking (Mac) zooms out one step at a time. The data can be zoomed vertically and horizontally at the same time by holding down the Ctrl (PC)/![]() (Mac) key while dragging the Zoom tool over the desired area.
(Mac) key while dragging the Zoom tool over the desired area.
After you select one or more MIDI events, you can apply the desired editing functions. Most editing consists of moving an event or note to a new pitch or beat.
To move one event, you simply need to click and drag it to its new location. To move several events, select them as mentioned previously, and then click and drag one of the selected events to the new destination.
You can move both notes and Control Change values this way, provided that the appropriate Controller lane is visible; hold down the Alt (PC)/Option (Mac) key as you select and drag events in the Controller lane. If you move the velocity value of a note, you will also move the note.
To lock pitches in place as you move notes in time or to change the pitch without changing the timing, hold the Ctrl (PC)/![]() (Mac) key down as you drag the notes. If you start moving the notes horizontally along the time axis, the pitch will be locked, and if you start moving the notes vertically along the pitch axis, their original time positions will be locked. You can also move selected notes by using the up and down keys on your keyboard or by using the Transpose Notes button on the toolbar.
(Mac) key down as you drag the notes. If you start moving the notes horizontally along the time axis, the pitch will be locked, and if you start moving the notes vertically along the pitch axis, their original time positions will be locked. You can also move selected notes by using the up and down keys on your keyboard or by using the Transpose Notes button on the toolbar.
Again, as with text in a word processor application, when you want to paste events to a new location, you need to select them, cut or copy to place these events into the clipboard, decide where you want to put them by placing your insertion point (in Cubase, this is the project cursor), and then apply the Paste command. As with the Project window, it is possible to hold the Alt (PC)/Option (Mac) key down as you drag selected events to copy rather than move them. You will see a small plus sign (+) appear next to the cursor as you move your mouse. If you hold down the same key (Alt or Option) as you drag parts or events horizontally by their bottom-right corner in the Project window, the pointer turns into a pencil, and the events will be copied instead of moved to the new time location.
Cubase offers additional functions that make editing MIDI easier. For example, you can use the Select options in the Edit > Select submenu to define what you want to select. Using this method, position the left and right locators across two bars, click in the Note Display area, and use the Select in Loop option. All the MIDI events (including both notes and controller events) between the locators will be selected; now click on a controller event and repeat these steps. You can copy these events, position the project cursor at another location, and then paste the events.
As an alternative to muting an entire track, you can also mute selected events (notes and controller events).
Splitting and resizing note events is handy when you need to modify the length of MIDI notes within a part or need to bring the end of a MIDI note inside the right boundary of a part. These operations also can be applied to a single note, a group of selected notes, or a range of notes in a MIDI editor.
Resize a note or a group of notes
Select the note(s) using the Object Selection tool.
Bring the arrow over the start or end of the notes you want to resize. The arrow will turn into a double-headed arrow.
Click and drag the edge to the desired length. The precise increments as you resize will be determined by the quantize grid setting if it is enabled. Hold the Ctrl (PC)/
(Mac) key while resizing to override this grid setting temporarily.
There are four ways you can split note events, and the quantize grid setting influences precisely where the split occurs in all methods:
Use the Split (scissors) tool at the desired location on single or selected notes.
Use the Split Loop function in the Edit menu or context menu, which splits selected notes at the current left and right locator positions.
Use the Split at Cursor option in the Edit menu or the context menu to split all note events that cross the current position of the play cursor.
Hold down the Alt (PC)/Option (Mac) key as you click notes with the Selection (arrow) tool to split them at the point where you clicked. If more than one event is selected, all events will be split.
The Glue tool is the counterpart to the Split tool. It joins the note you click with the following note of the same pitch or merges the selected event with the next one in time, as shown in Figure 22.2. Use it when you’ve split a note by mistake or when you need to join two or more notes into one.

Dragging a note with the Draw (arrow) tool determines the length of that note. You can also use the Line, Parabola, Sine, Triangle, Square, and Paint tools to add note events in the Event Display area.
Events are always created with the same MIDI channel as the part you are editing. After you have inserted notes using the Draw tool, you can modify their length by clicking on the existing note and dragging it farther to the right to lengthen the note or dragging it to the left to shorten the note. Remember that note lengths always snap to the next quantize grid value when Snap is enabled in the editor’s toolbar.
The Draw tool can lengthen only the end point of an existing event. To modify the start point of a note, use the Selection tool, as described in earlier sections of this chapter.
The Line tool, like the Draw tool, can be used to insert both note and controller events. The most common use for the Line tool is to edit Control Change information, creating MIDI ramps, such as pan effects or fade outs. Here’s a look at these tools and their capabilities.
Double-click the Line tool to display other shapes to draw—Parabola, Sine, Triangle, and Square. Each of these shapes under the Line tool offers its own characteristics.
Moving the mouse up and down with the Paint tool adds notes on different pitches, whereas moving the mouse left and right adds them at different points in time. When dragging to create note events, the Paint tool is different from the Draw tool because it adds a note each time your cursor crosses a grid line. Both tools work the same when you are inserting Control Change events.
The Line tool draws a line across the Note Display area or the Controller Display area to create a series of events along the line. In the case of notes, these will be created at an interval, length, and velocity determined by the quantize setting. Figure 22.3 displays such lines: In the left half, note events are added, and in the right half, controller (Control Change) messages are added. In the case of controller events, you also can use the Line tool to edit existing controller messages to create a linear ramp.

Insert events using the Line tool
Set the quantize values appropriately. You also can leave the Snap off; however, a greater number of events will be generated, which can create a bottleneck in your MIDI stream if combined with other dense MIDI tracks.
Select the Line tool from the toolbar or the context menu.
Click where you want the line to begin. To move this point after clicking (but before releasing the mouse button to actually create the new events), hold Alt+Ctrl (PC)/Option+
(Mac) keys down until you are satisfied with the start location.Drag the mouse where you want the line to end, and release the mouse button to add the events.
The Parabola tool is similar to the Line tool except that it draws a parabolic ramp rather than a linear ramp (see Figure 22.4). Inserting events or modifying existing events using this tool is done in the same way as with the Line tool, with the following additional options:
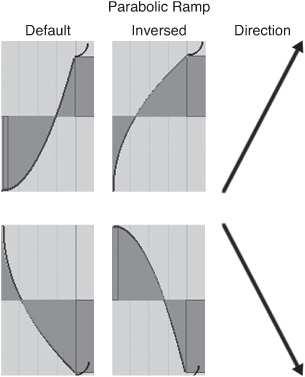
While still dragging this tool (before releasing the mouse button to create the new events), press the Ctrl (PC)/
(Mac) key to change the type of parabolic curve that will be created.As with the Line tool, you can hold down the Alt+Ctrl (PC)/Option+
(Mac) keys while still dragging to move your start point to a new location.
The sine, triangle, and square ramps have similar options. However, as you drag to create these shapes, the farther you drag the mouse cursor away from the center point where you first clicked, the greater the amplitude of the shape will be. A small movement upward, for example, will create a small variation in note pitches or controller values. Dragging your mouse downward from the start point inverts the shape of the “waveform” you’re using to draw.
Create a ramp using the Sine, Triangle, or Square tool
Select the appropriate tool from the toolbar.
Set the quantize grid if you want to use this setting to control how many and where the events will be created. For a smoother curve or change, disable the Snap to Grid option.
Click where you want to start inserting the events and drag the mouse to the right.
To adjust the frequency of the shape you are drawing, hold down the Shift key as you move the mouse left or right to adjust its period to the desired length. When you are satisfied with the period of the waveform, release the Shift key and finish dragging the mouse to the desired end location for the entire shape.
Try holding down the Alt (PC)/Option (Mac) or Ctrl (PC)/
(Mac) key down while dragging the mouse to obtain different behaviors. Experiment on an empty track with different grid settings or without the snap mode enabled.Hold down both Alt+Ctrl (PC)/Option+
(Mac) keys after you’ve started drawing the new shape (but before releasing the mouse button to create the new events) to drag the start point and entire shape to a new location.
Release the mouse button at the desired end location to insert events corresponding to the current shape setting.