
When working on a project, you might find yourself reorganizing the order in which sections of a song play so you can create variations, or simply to find which arrangement works best. To more easily facilitate this type of on-the-fly reorganization, Cubase 6 lets you divide your project into sections and then play these sections in any order you want. You can opt to play section B before section A, or repeat section C five times, or skip section D entirely. It’s like working with LEGO blocks; you can construct your recording, start to finish, in whatever order you like.
In Cubase 5 and 6, this is called the Arranger function. (In previous versions of Cubase, it was called the Play Order function; little has changed since, save for the name.) To create this sort of arrangement, you first insert an Arranger track into your project. Within this track you create Arranger events that can then be organized in a type of playlist, called an Arranger chain. You can organize the events in a chain however you want—and you can create multiple Arranger chains from your original project.
Here’s a summary of what you will learn in this chapter:
How to enable the Arranger mode
How to create and manage Arranger events
How to populate an Arranger chain
How to manage Arranger events inside an Arranger chain
How to navigate an Arranger project
How to convert an Arranger project into a linear project
An Arranger project is not different from a normal Cubase project; in fact, it’s a normal Cubase project with an Arranger track added. But just as you would save a copy of a normal project and use an alternate version to create musical notation, for example, it makes sense to work on a copy of an existing project to create an alternate version of its arrangement. Furthermore, when you want to create several versions (arrangements) of the same project, it’s always easier when you can start fresh with the original project. So save your current project using the File > Save As command, and give the saved version a new name.
Once you’ve saved the project under a different name, you are ready to start working with the Arranger features. The first step in this process is to create an Arranger track. You will create events on this track that correspond to sections of your recording—one event for the first verse, one for the chorus, another for the second verse, and so forth. You can then rearrange the order of these events to rearrange the parts of your song.
To create an Arranger track, select Project > Add Track > Arranger. You can have only one Arranger track per project.
Once you’ve created this track, you next need to make the Arranger controls visible in the Transport panel.
Displaying the Arranger controls, as illustrated in Figure 29.1, reveals a number of navigational controls specific to the Arranger track. These controls are also present in the Track List area for the Arranger track. Here’s a quick overview of what each of these controls does:
The Activate Arranger Mode button switches Cubase’s playback mode from Linear (reads from left to right) to Arranger mode (beginning of playlist to end of playlist).
The Current Chain field displays the current Arranger chain. Click the down arrow to select other chains to play.
The Previous Chain Step button lets you move to the previous Arranger event in the chain.
The Next Chain Step button lets you move to the next Arranger event in the chain.
The First Repeat of Current Chain Step button moves the play cursor to the first occurrence of the Arranger event in the chain.
The Last Repeat of Current Chain Step button moves the play cursor to the last occurrence of the Arranger event in the chain.

For any of these controls to work, the Activate Arranger Mode button needs to be activated (it appears as orange when it is active). And before you can move any Arranger events around, you must first define the events—and add them to a chain.
A new arrangement created via the Arranger track is called an Arranger chain. Each chain is comprised of multiple steps or events, each step representing a part of the song you’ve recorded. These events reside in the Arranger track, as shown in Figure 29.2.

A few things to note. First, you can start and end an Arranger event anywhere in the project; you don’t have to start with event A in measure 1. Second, the Arranger events do not have to flow in a linear order; that is, event B can come before event A, if you want. Third, Arranger events can overlap, so that two events share selected measures. Finally, not every measure of your project has to be assigned to an Arranger event; any measure that is not part of an Arranger event will not be included in the final recording.
By default, Arranger events are labeled alphabetically in the order they’re created—not in left-to-right order in the track. The first event you create, then, is labeled A, the second is labeled B, and so forth. You can, however, rename these events to more logically represent the sections of your song. For example, you could rename one event “Verse 1,” another event “Verse 2,” and a third event “Chorus.”
If you don’t like the Arranger events you’ve created, you can move them around, without affecting the other tracks in your project. Just click the Object Selection tool and use your mouse to drag any Arranger event to a new position. In addition, you can stretch or shrink an event by dragging the left or right border of an event one direction or another. You can even stack Arranger events on top of each other!
You can edit the order of events in an Arranger chain within the Inspector for the Arranger track, as shown in Figure 29.3, or within a special Arranger Editor. The Arranger Track Inspector consists of two panes, the Current Arranger Chain (top) and the Arranger Events (bottom). The top pane is where you organize the events; the bottom pane contains all the events you’ve created in the Arranger track.
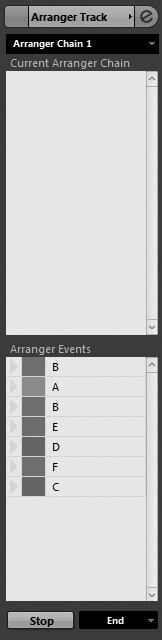
To create an Arranger chain, simply drag events from the Arranger Events pane up to the Current Arranger Chain pane. You can change the order of events in the chain by dragging them up or down the list. To repeat an event consecutively, click the number column and enter the number of times you want the event to play.
I find it easier to use the Arranger Editor to create Arranger chains. You can display the Arranger Editor, shown in Figure 29.4, by clicking the Open Arranger Editor control in the Arranger Track Inspector.

The left side of the Arranger Editor contains the events contained in the current Arranger chain. The right side of the editor lists all events created within the Arranger track. There’s a toolbar at the top of the window that contains the Arranger controls, as well as other important commands.
Within the Current Arranger Chain pane are several columns of useful information. The Repeats column indicates how many times an event plays in a row; the Counter column displays this information visually. The Duration column shows the length of the current event (or repeated events), whereas the Song Time column displays the total time of the arrangement.
There are other similarly useful columns within the Arranger Events pane. In addition to the name of the event, the Start and Length columns tell you when, within your original recording, that event starts and ends.
There are several ways to add events to an Arranger chain. All involve some variation of clicking and/or dragging with your mouse.
When playing the project in Arranger mode, Cubase reads the events in the Arranger chain from top to bottom. To enter this non-linear playback mode, enable the Activate Arranger Mode button.
You can also begin playback from any point within the chain. The starting point is always displayed in the Arranger Controls section; select a different event, or click inside any counter display to move the play line to that specific point inside the chain during playback. In addition, you can click the small triangle to the left of any event in the Arranger Editor to immediately skip playback to that location.
You can change the order of events in a chain the same way you can rearrange tracks in a project: by dragging the event’s name to its new position in the Current Arranger Chain list. Once again, a blue line displays where the event will be inserted. To remove an entire row from the Current Arranger Chain list (which includes all the repetitions of an event), right-click (PC)/Control-click (Mac) over the event in the Current Arranger Chain list and choose Remove Touched from the context menu.
Each project supports multiple Arranger chains, making it easy to try different versions or structures of the same project. You can manage all your Arranger chains from the Arranger Editor window.
When you’re done arranging the events in your project, you should convert the events into a linear project. When you engage the Flatten function, Cubase rebuilds your project according to the order of events indicated in the chain. When the process is complete, all names and settings remain the same, but all of your audio and MIDI tracks are split and rearranged in chain order. (The flattened result includes all automation associated with each part that was in the Arranger chain, as well.)
Note that any section of your original project that was not included in the Arranger chain is erased when the project is flattened. That’s why it is strongly recommended that you save the flattened project under a different name, thus retaining the original project data.
Flatten a play order list
Make sure you’ve saved a copy of the project containing the Arranger chains.
From the Arranger Editor, select the chain you want to flatten.
Click the right arrow next to the Flatten button.
When the flowchart shown in Figure 29.5 appears, go to the Destination panel and select New Project and Append Chain Name.
Go to the Options panel and select the Keep Arranger Track and Open New Projects options.
Click the Flatten button.
Cubase now takes all the different events you’ve created and rearranges them in the event display, as specified in the Arranger chain. The result is a traditional linear project—assembled from all the individual Arranger events. From here you can continue editing the project or proceed directly to mixing and mastering.
