
Here’s a summary of what you will learn in this chapter:
How to add tempo changes using the Tempo Track Editor
How to edit tempo changes or time signature changes using the Tempo Track Editor
How to add a tempo change using the Time Warp tool
How to edit tempo changes using the Time Warp tool
How to lock the audio tempo to the project’s tempo using Warp tabs
The tempo track in Cubase stores project tempo and time signature changes. Adding tempo changes to a project to slow down or speed up the beat is an essential feature in much non-pop music, but DJs using Cubase to create a track also can use this feature to gradually accelerate the tempo from one section to another. Changing the time signature also offers a convenient way to create a break in the rhythm or when adapting a song with multiple time signature changes inside a project.
The tempo track is not visible by default in Cubase’s Project window. Instead, you manage the tempo track from the Tempo Track Editor, shown in Figure 30.1.

There are three ways to open the Tempo Track Editor:
Select Project > Tempo Track.
Ctrl-click (PC)/
 -click (Mac) the Tempo button found in the Transport panel.
Press the Ctrl+T (PC)/
+T (Mac) keyboard shortcut.
The Tempo Track Editor toolbar offers the following tools:
The Activate Tempo Track button is lit when it is enabled, meaning that Cubase will follow any tempo changes found in the tempo track. When the tempo track is disabled, you can manually set a different tempo in the Transport panel’s Tempo field, which is a good way to set a slower tempo for hard-to-play passages when recording in MIDI. When the tempo track is disabled, the word “Fixed” appears next to the Tempo toggle button in the Transport panel, indicating that tempo changes in the tempo track are not in effect. (The default fixed tempo setting is 120 BPM.) Furthermore, whether you are using the tempo track or a fixed tempo setting, the tempo field in the Transport panel will always display the current setting at the playback cursor’s location, both during recording or playback and when the Transport is stopped. The time signature changes in the tempo track will still take place as usual, even if the tempo track is disabled, because you will still need these to record events at the proper bars and beat locations.
The Show Info button, when selected, displays the Info line beneath the toolbar.
The Object Selection, Erase, Zoom, and Draw tools perform the same functions as they do in other editing environments.
The Auto Scroll and Snap buttons offer the same functionality as their Project window counterparts.
The Snap field acts like a quantize grid for tempo changes added with this editor’s pencil tool. The selected value determines how the precise positions of individual tempo events are adjusted when you move them or add new ones, or determines the frequency at which the new tempo changes get created as you drag with the pencil.
The Current Tempo field displays the tempo value of a selected tempo event in the tempo display area below. When a tempo event is selected, use the up and down arrows to the right of the field, type in a new tempo value, or drag any tempo event handle to a new position to change its tempo value or time location.
The Insert Curve field selects how the tempo changes when you insert a new tempo point. There are three options: Jump, Ramp, or Automatic. When a jump is created, the tempo stays the same until the next tempo change, at which point it jumps abruptly to the next specified tempo value. When a ramp is created, the tempo moves gradually from one point to another. Selecting Automatic lets Cubase choose between the two options.
The Tempo Recording slider allows you to record tempo changes in real time by moving the slider to the right to go faster or to the left to go slower while the project is playing. Hold down the Shift key while recording tempo changes to get more accurate (finer) control over this slider’s values.
The Open Process Tempo button opens the Process Tempo dialog box (see Figure 30.2), which lets you specify a time range to let Cubase determine the right tempo setting to fit this range within a given time. Enter a desired length or end time in the appropriate field, depending on whether you need the project to last a certain amount of time or whether you need the project to reach the end point at a certain time. Click the Process button to let Cubase calculate the rest.
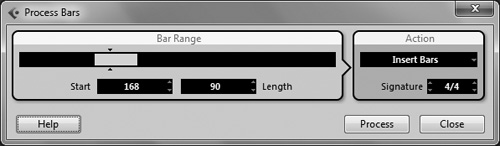
The Open Process Bars button opens the Process Bars dialog box (see Figure 30.3), which lets you add or remove bars (time) by defining a range through the Start and Length fields and then selecting the appropriate action from the Action area.

The Time Signature area displays the time signature events in your project. When you start a new project, by default you will find a single 4/4 time signature event at the beginning of this bar. You can add several other time signature events along the project’s timeline, which will adjust the spacing between bar numbers to reflect how these time signature events affect the number of beats in each bar.
The main part of the Tempo Track Editor is, of course, the tempo display area. This consists of a tempo ruler displayed vertically along the left side of the window and an area where tempo change events appear along the tempo line. Each tempo event is represented by a square handle. When you insert a new tempo event, this line will connect it to existing tempo events on either side of it according to the current Curve and Insert Curve settings.
In the lower-right corner are the horizontal and vertical zoom bars, which enable you to adjust the zoom level for the timeline displayed in the Tempo track, as well as the tempo precision displayed in the tempo ruler, respectively.
If for some reason you change your mind about any tempo change event, you can move one or several selected tempo events to a new tempo value or time location.
The Time Warp feature in the Project window provides a way to match musical (tempo-based) references to linear (time-based) references, such as when you’re recording tempo-based music to a time-based video track. This feature adds special markers where you want both references to align. As a result, warp markers are added with tempo values that make it possible for this match to occur.
For example, you can use the Time Warp tool to add tempo changes based on a track that was recorded freestyle (without a metronome), that will follow the MIDI or audio events within that track. Once the start point is determined, create tempo changes that will make bars in the project match up to the recorded events in the track. Because Time Warp markers are locked to the tempo-based ruler (bars and beats), this ruler “warps” to match the linear or time-based ruler.
When using the Time Warp tool, the tempo value of the last tempo event (before the new tab’s position) is adjusted accordingly. The Ruler bar turns orange when the Time Warp tool is selected, and inserted tempo changes appear as markers along this bar.
There are two Time Warp modes. The default Warp Grid mode transforms the tempo grid into an elastic grid that lets you set the location of bars and beats in relation to absolute time; this is great for matching a tempo grid to an existing audio track with changing tempos. The alternate Warp Grid (Musical Events Follow) mode is better for adjusting tempo-based events to match existing time-based events.
Here are a few additional techniques for working with the Time Warp tool:
To only affect the timing of a specific time range, use the Range Selection tool to define this time selection prior to using the Time Warp tool. Clicking to the left of the selected range only affects the tempo before the start point of the range. Clicking inside the selected range affects the tempo inside the range, adding a tempo change at the start, end, and the point where you click. Clicking to the right of the selected range (or after) only affects the tempo after the end point of the selected range. If no tempo events are present, a new tempo change will be added at that point to reflect the time warp entered.
When using the Time Warp tool inside an editor, a tempo event will also be added at the start of the event or part in the Project window, if there isn’t one there already.
To manually add a tempo event at the current tempo value in order to lock all previous tempo events in place, hold down the Shift key while the Time Warp tool is selected and click where you want the tempo change to occur. The cursor will change into a pencil, and a tempo change will be inserted at the point where you clicked.
After the Time Warp tool is selected, you can see the tempo changes in the Ruler bar and move these tempo changes around by dragging their markers to a new location. You will notice that the cursor changes to a pointing hand as you hover over a tempo change marker.
To change the timing of a recorded audio event, such as a bass that occasionally drifts away from the drummer’s timing or a live recording where the song begins at 109 BPM, and then goes up slightly to 114 BPM and finally ends at 112 BPM, use Cubase’s AudioWarp function. AudioWarp uses the local tempo map to extrapolate the necessary time-stretching so that the sample’s tempo always matches the project’s tempo.
You also can fix rhythmic imperfections or just change the rhythmic content of a drum loop, for example, by adding Warp tabs to a Musical mode-enabled event. Always proceed by defining the audio tempo, enabling the Musical mode, and finally applying the Time Warp tool, as demonstrated here.
Cubase 6 includes a new Tempo Detection feature that automatically detects the tempo of rhythmic musical content, even if the tempo of that content isn’t consistently precise. This is useful for analyzing audio not recorded to a click track, as well as adjusting freely recorded audio to the project tempo. To use the Tempo Detection tool, the audio event has to be at least seven seconds long and have discernable beats; you also have to deactivate Musical mode for the clip.
Automatically analyze the tempo of an event
Select an audio event in the Project window.
Select Project > Tempo Detection.
This opens the Tempo Detection panel (shown in Figure 30.4). Click the Analyze button.

Cubase now creates a rough tempo map for the selected event, and adds tempo and signature tracks to the project. By default, Cubase assigns the project a 1/4 time signature; you can modify this later. In addition, Cubase opens the Time Warp tool for fine-tuning the newly generated tempo map, if necessary.