
FX channel tracks are similar to auxiliary returns on a hardware mixer or console. On hardware mixers, aux returns are often used to incorporate the output from external effect modules into the mix. Although they also can be used this way in Cubase, more often the effects are actually software plug-ins on the FX channel itself.
You can add up to 64 FX channels per project in Cubase, and each of them can hold a chain of up to eight plug-in effects. Audio signals can be routed to FX channels using the send controls available in every audio, instrument, group, or ReWire channel. If there is no source signal routed through it via sends from other channels, an FX channel is silent.
Here’s a summary of what you will learn in this chapter:
How to create an FX channel
How to work with sends
How to use FX channels as a send destination
How to bypass FX channels and send destinations
The main purpose of FX channel tracks is to process audio sent from several channels simultaneously by passing the combined signal through the same audio plug-in. In comparison, audio insert effects on each source channel can only process the audio signal of the channel where they reside, and the options for adjusting the mix level between the source and processed signals are a bit more limited.
The perfect example for an FX channel is when you need to add some reverb to drum tracks, where each instrument in the drum kit has been recorded on a separate track. To make all the drums and cymbals sound like they were recorded in the same room or environment, it makes sense to apply a common reverb to all of these tracks. This is in contrast to loading multiple instances of the same reverb as inserts on each drum channel, which would not only take more time to set up, but it would also reduce the number of insert slots available, increase the resources required to process each signal individually, and force you to update effect levels in every channel whenever a change is required.
At its core, the FX channel track in Cubase is very similar to a group channel or an audio channel. It offers the same volume, pan, mute, and solo controls, but it also offers a few distinct features of its own. You can’t choose the input bus for an FX channel track because it receives its signal exclusively via sends from other audio channels (which include group and instrument channels, but not their MIDI counterpart). This also means that you can’t record any audio into an FX channel track, but you can certainly record the output of an FX channel track. Because the main purpose of an FX channel track is to provide effects to audio from other channels in your project, the sends from an FX channel cannot be routed to another FX (or group) channel.
Add an FX channel track to a project
Select Project > Add Track > FX Channel.
In the Add FX Channel Track dialog box (see Figure 33.1), select a track configuration from the drop-down menu. This determines how the effect will process the signal going through it. Keep in mind that most current plug-ins are configured for stereo audio processing.
Select the desired plug-in from the Effect drop-down menu. If you are not sure which plug-in you want to use at this point, you can leave the plug-in field set to No Effect and change it later. This will simply create an empty FX channel, which can also serve to send an audio signal to an external source.
Click OK.

FX channels receive their input from other channels through the Track Sends feature. The term sends comes from the fact that, in addition to the channel’s main output assignment, you are also “sending” the signal to another destination. Send controls are completely independent from each other and from the main channel controls. That’s why they are so convenient.
With a send effect, the audio stays in the signal path until it reaches the output bus, where it is sent to the selected plug-in. The processed signal is then available to be sent to the monitor mix, or to the final mix-down. Because send effects are added at the very end of the signal path, they are best suited for effects such as reverb and delay.
Before you can send a track’s input to an FX track effect, however, you must first create the FX track, as just discussed. You can then control the sends for an audio or MIDI track from the Sends section of that track’s Inspector, as shown in Figure 33.2.

The Click to Bypass Sends button lights up whenever one of the eight sends in the track is active. When all the sends are bypassed, the button lights up yellow; it lights up blue when the sends are active. Click this button to bypass all sends at once without changing any settings in this section. To bypass a single send, simply deactivate it. Deactivating the track itself will also disable its sends.
For each audio track send, there are three buttons above the Select Send Destination field—the Activate/Deactivate toggle button, the Pre-/Post-Fader toggle button, and the Access Editor button, which (unless the send destination is an output bus for physical outputs on your audio hardware) opens the panel for the plug-in insert in slot 1 of the destination track, where you can change parameter settings. Below these three buttons is the Select Send Destination field, which displays the name of the send destination when one has been assigned. Send destinations can be FX channels, output busses, or group channels.
If a send destination is an output bus to physical audio ports, the Access Editor button is inactive, as it is while the destination FX/Group channel has no plug-ins. The Access Editor button is active only if the destination channel has an insert plug-in effect in slot 1 (that is, if slot 1 is empty, the button is inactive even if the destination channel has active plug-ins in its other slots).
As noted, to assign a send to any destination, this destination has to exist beforehand. Changing the name of the destination track alters the name that appears here. Once a destination has been assigned, sending a signal to this destination is done by dragging the Send Level bar or by entering a numeric value in the Send Level value field. This controls how much signal from this track you want to send to the selected FX channel track. Audio sent to an FX channel track (which then routes the signal through audio plug-in effects inserted into its signal chain) is processed at the level at which it is received. The more signal you send to the effect, the more processed sound you will hear for this audio signal. The idea is to give you control over how much processed signal you want to hear for each individual track without having to load multiple instances of plug-in effects on the source tracks.
You can have only a total of eight send destinations per audio track, but you can create up to 64 FX channels. This means that the send destinations from each channel can be completely different from the others. For example, you might have 10 FX channel tracks in which audio track 1 uses sends 1 through 4, and audio track 2 uses sends 1 through 4 as well, but in both cases, the signal might be sent to different FX channel tracks altogether, with track 1 going to FX channel tracks 1, 2, 3, and 4, and track 2 perhaps sending its signal to FX channel tracks 3, 5, 7, and 9.
To send the signal from one track to more than one send destination, repeat the same steps mentioned earlier in this section for another send destination. Unlike insert effects, each send effect is processed in parallel, not in series. The slot numbers used for each of the eight potential sends from a channel do not affect the resulting sound.
Figure 33.3 shows how a sends signal is routed. (In Post-Fader mode, the signal sent to the effect is taken after the audio track’s channel volume level and volume settings.) As you can see, there are many places where you can bypass an effect. The following list describes the differences between each type of signal bypass and how you can use each one.
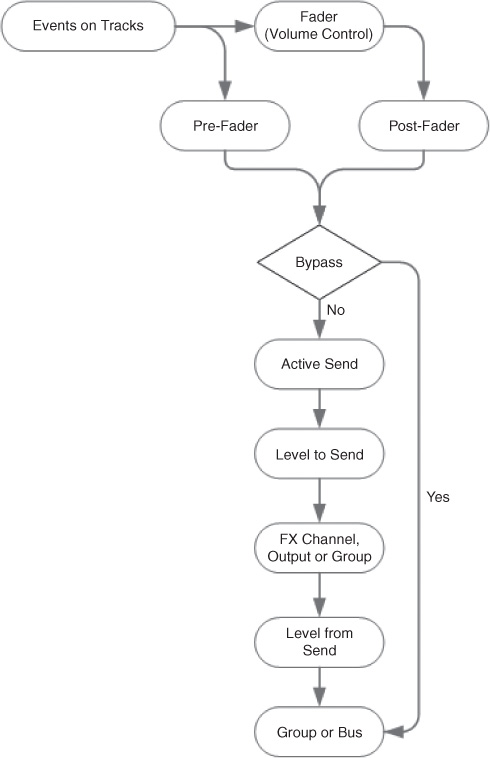
Bypass/activate the signal sent to all send destinations in a track. Use the Click to Bypass Sends button found in the Sends tab’s title bar (in the Inspector area of the audio track).
Bypass/activate the signal sent to one send destination in a track. Use the Activate/ Deactivate button found above the name of that send destination (which in the case of FX channel destinations will display the name of the effect in its first insert slot) in the Track Sends section in the audio track’s Inspector area.
Bypass all the tracks sent to the same effect. Use the Bypass button found on the FX channel Track List or in the FX channel’s settings.
For projects involving many FX channels, adding and managing this type of channel can be performed inside the VST Connections panel, shown in Figure 33.4, which is accessible by selecting Devices > VST Connections. The Group/FX tab of the VST Connections panel provides a few easy ways to create FX channels, rename them, and change their output settings with a few clicks.
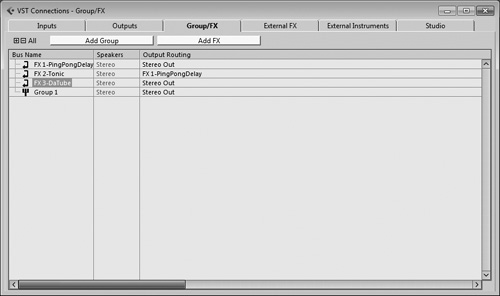
Add an FX channel. Click on the Add FX button or right-click (PC)/Control-click (Mac) in the Bus Name column and choose Add FX Channel from the context menu.
Remove an FX channel. Right-click (PC)/Control-click (Mac) over the bus name and then select Remove Channel from the context menu.
Change the output of an FX channel. Click in the Output Routing column next to the desired FX channel and choose another output bus from the context menu.