
Cubase’s Arranger mode, as discussed in the previous chapter, is an ideal tool for creating drum tracks and loop-based recordings. You don’t have to divide your song into major regions; you can instead create shorter Arranger events and use them to construct a recording in building-block fashion.
With loop recording, you start with a few measures of a drum beat and then repeat those measures over and over in a kind of loop. You build up the rest of the song by adding more loops of other instruments; you put the bass on top of the drums, and then layer on keyboards, guitars, synths, strings, vocals; you name it. When you use audio loops in this fashion, you’re composing as you record, one loop at time.
The key to successful loop recording, then, is the ability to construct interesting drum beats—and then build on those beats with short loops of other instruments. Creating a composition/recording with loops is really like assembling a structure from a series of building blocks. Anyone can do it, and it’s the way that many current recordings are made, especially in the hip hop, techno, electronica, and dance genres.
Here’s a summary of what you will learn in this chapter:
Where to obtain samples and loops for your projects
How to tempo-match and pitch-match loops to your project
Four ways to extend loops
How to enhance a drum loop
How to replace drum hits
How to use the Groove Agent ONE drum machine
How to create drum patterns with the Beat Designer MIDI plug-in
How to create MIDI tracks from Beat Designer patterns
How to create interesting loop patterns using LoopMash2
In recording terms, a loop is a short audio sample, typically repeated multiple times to create a longer track in a recording. A loop-based recording is constructed primarily from repeated audio loops. A loop library is a collection of audio loops or samples, typically distributed on compact disc.
The key thing is that loops are short, they’re repeatable, and they’re capable of being adapted to a given recording in terms of tempo and pitch. Cubase lets you sample and import all types of audio files; once you have your samples in your project, you can work with them as you would any other audio event to create the perfect loop recording.
You can obtain audio loops from a number of different sources. You can sample audio from practically any compact disc. You can also import samples from digital audio files downloaded from the Internet. Other loops are sold as part of loop libraries, created expressly for the purpose of creating loop-based recordings. Still more loops can be created on your own, via traditional audio recording, MIDI recording, or by programming a drum machine.
Ripping samples for loops is common practice in many types of music, especially hip hop and R&B. That’s because it’s relatively easy to sample portions of music available on commercial compact discs. Cubase lets you import entire songs from any CD, or just segments of a song (which are easier to work with if you only want a short sample). The CD tracks are imported as WAV-format audio events, which you can then work with as you would any other event in Cubase.
These days it’s more common to sample music from digitally downloaded files than from CDs; the music industry is migrating online, after all. Fortunately, Cubase lets you import just about any type of digital audio file, including MP3 and WMA files, so you’re good to go with digital downloads.
In addition, many companies (and some professional musicians) offer pre-sampled or specially created loops and samples available for purchase or download. A loop library is likely to contain dozens, if not hundreds, of audio loops that you can use in your recordings; when you purchase a loop library, you’re also purchasing the rights to use those loops in your productions. Using a loop library is a great place to start when you’re creating loop-based recordings, and it’s easy to do; most commercial loops are in WAV format, which is one of the digital audio formats that Cubase imports by default.
I discussed how to import music in all formats in Chapter 7, “Managing Your Media.” Refer to that chapter for detailed instructions.
When you import a sample or loop into a Cubase project, it’s imported just as it was on the original recording—at the original tempo, and in the original key. That isn’t necessarily a good thing, as you need both the tempo and the pitch of the sample to match the tempo and pitch of the rest of your project. It wouldn’t do, for example, to have a drum beat playing at 120 beats per minute (bpm) when the rest of your song is playing at 90 bpm.
In Cubase 6, the Musical mode and AudioWarp tools automatically match the tempo of a loop with the project tempo as best as possible—which is sometimes difficult if the loop itself doesn’t have a solid tempo. (It also helps, of course, to have your loop be a perfect 4 beats or multiple thereof; it’s almost impossible to determine tempo and do the looping thing if you have a loop that runs for 5 beats in 4/4 time.) And, when Musical mode is activated, audio events automatically adapt to any tempo changes you make, just as MIDI events do.
Matching tempo is easy enough to do using Cubase’s Musical mode. Matching the pitch of a sample to the rest of your recording, however, is slightly more complex.
Cubase lets you adjust the pitch of an event in real time, but there’s no way to magically identify the key and match it to the key of the other events in your project. So you’re left with simple transposition—which, of course, occurs without affecting the tempo of the sample. In Cubase 6, you change the pitch of a sample using the Transpose control, found in the Info line for a selected event.
Most loops are relatively short—anywhere from a single measure to four measures long. But four measures do not a song make, which means you need to extend those loops to fill the entire length of the recording.
There are four ways to turn a short loop into a longer one—or, more precisely, a series of shorter loops. The first uses the standard copy-and-paste technique that you’re already familiar with.
The drawback to the copy-and-paste approach is twofold. First, it requires four individual steps. Second, it lets you add only one event at a time. But it’s an easy way to extend a loop.
The next approach uses Cubase’s Duplicate tool, and requires fewer steps than the copy-and-paste approach.
The duplicate approach is easier than using copy and paste, but you’re still working with just one event at a time. If you want to copy more than one instance of an event, a better approach is to use Cubase’s Repeat tool. This tool lets you specify how many copies of the event you want to paste back into your project.
Extend a loop with the Repeat tool
Select the event you want to copy.
Select Edit > Functions > Repeat.
When the Repeat Events dialog box appears, as shown in Figure 31.1, use the Count control to specify how many copies you want to make.
Click OK.

Using the Repeat tool, if you specify two copies, Cubase places two copies of the event, all in a row following the original event.
If you’re not sure how many copies you need to make of your original event, you can let Cubase do the calculation for you via the Fill Loop tool. This tool lets you specify in the ruler the region you want to fill, and then it does the filling for you.
At the heart of most loop-based recordings is the drum track. Whether you use a sampled drum loop, create a drum track with a MIDI drum machine, or record a live drummer, it’s important to get that drum beat just right.
Cubase offers many ways to create and fine-tune your drum tracks. You can use the AudioWarp and Time Warp functions to tempo-match drum loops and adjust individual hits on or off the beat. You can use audio event editing to copy and rearrange different drum loops within your recording. Even better, you can use VST instruments to create your own MIDI drum tracks. Which approach you use depends on the sound you want to achieve and your own temperament.
Perhaps the easiest way to get a perfect drum track is to use a commercially available drum loop. When you go this route, you typically get anywhere from one to four measures of drums, which you can then loop throughout your entire recording.
The problem with using a commercial drum loop is that you’re not the only person in the world using it. Hundreds, if not thousands, of other musicians are using that exact same loop, which means that their recordings will sound similar to yours, at least from the rhythm perspective.
There are ways, however, to add more personality to widely used drum loops. The most obvious method is to edit the loop in the Sample Editor. Add a hit there, take out a hit there, and maybe even alter the feel by moving the snare drum slightly before or after the beat. Any little change you make, no matter how subtle, helps to make that beat your own.
You can create more sophisticated drum patterns by making a long drum groove out of two or more shorter loops. All you have to do is insert one different loop after another, and you end up with a more complex linear groove.
You can also make a simple drum loop sound more sophisticated by stacking a second loop on top of it. Just create two tracks in the project list, and import different audio loops to each track. Make sure the two drum loops sound good together, of course, and that they don’t get in each other’s way. This will require a little trial and error, but the results can be very interesting.
When you’re working with an audio (not MIDI) drum track recorded by a real live drummer, you may not always be satisfied with the sounds of all the drums in the drum kit. Maybe you’d like a punchier bass, or more crack on the snare drum. Short of re-recording the entire drum track, what do you do?
Cubase 6 has the answer to this dilemma, in the form of a new Hitpoint-to-MIDI function. This feature lets you identify specific “hits” in the drum track and replace them with MIDI notes. This way you can slice out a weak live snare drum, for example, and replace it with a perfect-sounding MIDI snare sound.
Replace a drum hit
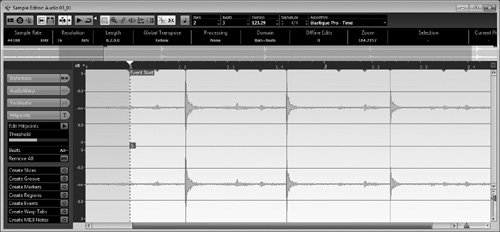
Open the drum track in the Sample Editor. (This works best if you have each drum in the kit recorded on a separate track; you might then open the snare drum track, for example, or the bass drum track.)
Open the Hitpoints tab in the Sample Editor Inspector, as shown in Figure 31.2.
Adjust the Threshold slider to the right to add more hitpoints, or to the left to remove unwanted hitpoints.
Click the Beats control and select which hitpoints you want to use—all, 1/4 notes, 1/8 notes, and so on.
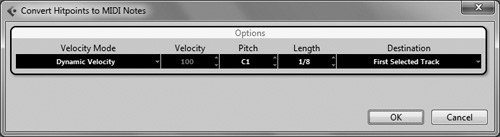
Click the Create MIDI Notes button in the Inspector. This displays the Convert Hitpoints to MIDI Notes dialog box, shown in Figure 31.3.
In the Velocity Mode field, select Dynamic Velocity if you want the volume level of the new notes to track those of the originally recorded notes. Select Fixed Velocity if you want the new drum hits to maintain a constant volume level.
If you selected the Fixed Velocity mode, specify the velocity (volume level) in the Velocity field.
Specify the pitch for the new notes in the Pitch field.
Specify the duration (length) of the new notes in the Length field.
Use the Destination field to determine where the new notes should appear:
First Selected Track. The new MIDI notes are placed on the first selected MIDI or instrument track in your project.
New MIDI Track. Cubase creates a new MIDI track for the replacement notes.
Project Clipboard. The new MIDI part is copied to the clipboard so that you can paste it at the desired location on a MIDI or instrument track.
Click the OK button.
Although many recordists like working with pre-recorded drum loops, others prefer to create their own grooves using either live drums or a synthesized drum machine. To that end, Cubase 6 includes Groove Agent ONE, a VST instrument that functions as a drum machine and sample player. Groove Agent ONE lets you create your own MIDI drum tracks, just by tapping keys on your MIDI keyboard; it also lets you play back drum tracks using your own or any third-party sample library.
Groove Agent ONE works like any other VST instrument. Before you can use it, you have to load it into your project.
In addition to being a standard drum machine, Groove Agent ONE also lets you preload a variety of preset drum kits in order to create different drum sounds.
Load a drum set preset into Groove Agent ONE
Click the Open Device Panels button in the drum track’s Inspector. This opens the Groove Agent ONE control panel, shown in Figure 31.4.
Click the button to the right of the Presets field and select Load Preset. This displays the Results window.
Double-click the drum kit you want from the list.

The individual drums and cymbals in a drum kit are each assigned to their own pads on the control panel. The pads are arranged into eight groups; click a number button to display the pads in that group. As you can see in Figure 31.4, groups 3 and 4 are where you find the typical drum set sounds in the Pop Kit preset. In this example, the Fat Kick bass drum is activated by pressing the E2 pad in group 4; the Good Snare snare drum is activated by pressing the G2 pad in the same group.
You create a drum part by activating recording for this track and then playing the pads in the Groove Agent ONE controller. You can also create a part by pressing the appropriate keys (in time) on your connected MIDI keyboard or input device.
Cubase 6 offers an even easier way to design drum beats, via the new Beat Designer MIDI plug-in. Assign this plug-in to an inserts channel, and then use it to create sophisticated drum beats; the beats are then played via the Groove Agent ONE drum machine.
As you can see in Figure 31.5, the available drums and cymbals are displayed in rows on the left side of the Beat Designer window, whereas measures and subdivisions within a measure are displayed in columns along the bottom. Click in any intersection between a row and column to place a note from that particular instrument on that particular beat, or subsection of the beat.

To help you get started, Beat Designer features a variety of preset beats, from Afrique Latino 133bpm to Vinyl Loops 90bpm. To select a preset, simply click the presets field in the Beat Designer window, select Load Preset, and select a preset from the list.
Of course, you can also use Beat Designer to create your own custom beats. Doing so is as simple as clicking where in the measure you want a particular drum or cymbal to sound.
You can create 12 separate patterns for each of the four individual banks. The banks are selected by clicking the numbered buttons above the keyboard at the bottom of the window; the patterns within a bank are selected by clicking a key on the keyboard.
Once you’ve created a pattern, of course, you should save it as a new pattern in Beat Designer’s Pattern Bank. You can then call up the pattern (load the new preset) for use later in this project or in future projects
Finally, you can convert the drum patterns you create into MIDI or Groove Agent ONE instrument tracks. Doing so creates a new MIDI event, which you can then work with as you would any drum loop.
When you need creative new ways to work with loops in your recordings, turn to Cubase 6’s LoopMash2 VST instrument. It’s a powerful tool for slicing and reassembling rhythmic patterns, in real-time.
LoopMash2 loads the same way as any VST instrument, in its own instrument track.
LoopMash2 comes with a variety of preset patterns. It’s probably good to start experimenting with these presets before you begin importing your own loops into the instrument. To load a present, click the presets field, select Load Preset, and then select a preset from the list.
The LoopMash control panel, shown in Figure 31.6, includes eight tracks of sounds; each track is comprised of multiple sliced loops. Move the slider beside each track to the right to play more slices in the track. Move the slider to the left to play fewer slices.

Along the bottom of the LoopMash window are 24 pads. Each pad activates a predefined selection of tracks. Click a pad to hear the selected rhythmic mix.
Naturally, you can import your own loops into LoopMash. When you import a loop, LoopMash analyzes the audio material and slices the loop into eighth-note segments. Import additional loops to create more complex patterns; LoopMash automatically makes all your loops fit together.