
A typical Cubase recording project incorporates multiple media files. Each track you record is its own file; each preset you apply is also a separate file. You manage all these media files from Cubase’s MediaBay utility; managing MediaBay is essential to efficient Cubase operation.
Here’s a summary of what you will learn in this chapter:
How to use the MediaBay’s browser to locate and manage folders containing media
How to use the MediaBay’s filtering options
How to load and save VST and track presets
How to import different file formats into a Cubase project
The MediaBay represents the core of the Cubase VST Sound system. It’s where you browse and manage all your Cubase-related media files. You open the MediaBay by selecting Media > MediaBay, or by pressing F5.
Figure 7.1 shows what the MediaBay looks like in Cubase 6. (If you’re familiar with MediaBay in previous versions of Cubase, it’s been extensively redesigned.) There are several defined areas of the MediaBay: Define Locations, Locations, Filters, Results, and Previewer.
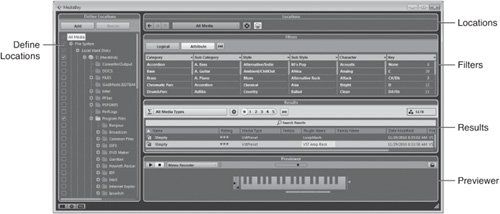
The left panel of the MediaBay window, labeled Define Locations, is where you select the location to browse for media. Disks, folders, and subfolders are displayed in a tree structure, similar to what you find in Windows Explorer or the Mac’s Finder.
There are a few differences between the Define Locations pane and these other file-browsing utilities, however. For example, the Define Locations pane scans only for content that can be used in a Cubase project—in other words, files in compatible formats. These formats include a number of audio and MIDI file formats, as well as track presets (.trackpreset files), VST presets (.vstpreset files), Nuendo or Cubase project files, as well as video files such as QuickTime or MPEG.
The Locations pane is located at the top of the main section of the MediaBay window. This pane essentially displays the location currently selected in the Define Locations pane. You can click the Location button to display a drop-down menu of saved locations.
The Filters pane is located just below the Locations pane in the main part of the MediaBay window. You use this pane to filter the content in the selected location by a variety of parameters.
When you select the Attribute button, you can filter the content based on associated categories—essentially, tags or keywords associated with the VST Sound-compatible media formats described previously. By default, Cubase displays six columns of filters: Category, Sub Category, Style, Sub Style, Character, and Key. Select one or more options from these columns to display media content that matches the filters in the Results pane.
Alternatively, click the Logical button to search for specific media files. By default, Cubase searches all file attributes for the keywords you enter, but you can click the Attribute field to display the Select Filter Attributes dialog box, and then select specific file attributes to search. Enter your keywords into the search field to the right of this row; matching files will appear in the Results pane as you type.
This pane displays the results of your filtering or searching in the Filters pane. That is, all matching files are displayed here.
Instrument tracks provide a quick and convenient way to combine both the creative flexibility MIDI events provide and the power VST instrument plug-ins offer. You will learn more about setting up VST instruments and using external MIDI devices in instrument or MIDI tracks in Chapter 10, “Using VST and MIDI Instruments,” but for now, let’s look at the topic of instrument presets.
As you already learned, you add an instrument track by selecting Project > Add Track > Instrument. By default, the Add Instrument Track window appears. To display available presets while creating the track, click the Browse button.
As you can see in Figure 7.2, the Filters section of the Add Instrument Track window is similar to the Filters pane in the MediaBay, where the selected filter hides all values not corresponding to the current selection. To hear what this preset sounds like before loading the instrument plug-in, select the preset in the Results pane, then click the Play button in the Previewer pane.
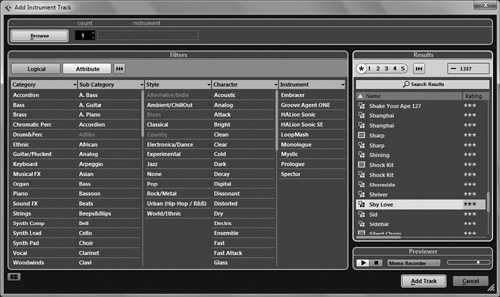
To apply an instrument preset, select the preset in the Results pane, then click the Add Track button. This creates an instrument track, with its MIDI output automatically routed to the VST instrument plug-in; the preset is loaded into the plug-in, and the track is ready to be used in a recording.
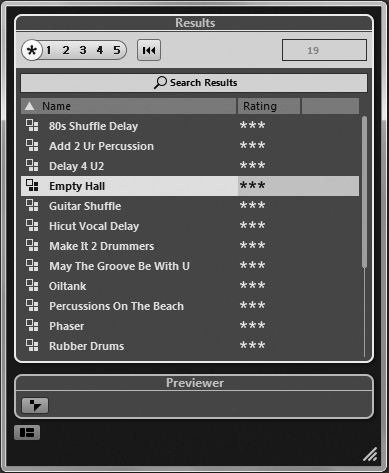
Thanks to Cubase’s VST technology, preset configurations exist for many settings within the Cubase program and for various VST plug-ins. For example, when you load the MonoDelay VST plug-in as an insert on an instrument track, the MonoDelay panel appears by default. Click the VST Sound button next to the Name field and select Load Preset. You’ll see a Results window that displays only the presets for this plug-in, as shown in Figure 7.3. Selecting a preset changes the setting of the plug-in automatically, making it possible to preview the result if the signal is passing through the plug-in as you select presets.
Presets included with Cubase offer a great starting point, but you might want to save your own customized presets as well. You can save presets for VST plug-ins and for the various instrument and audio tracks you create.
Save a custom preset
From any field that allows presets, click the Load/Save Preset button and choose Save Preset from the pop-up menu.
In the Save Preset dialog box, shown in Figure 7.4, enter a file name for the preset.
To associate specific attributes with this custom preset, click the Show Attribute Inspector button; this expands the dialog box to display the Attribute Inspector panel. Enter the appropriate values next to the corresponding attribute.
Click OK when you are finished.

When working on a recording project, not only can you record events, but you also can import audio and MIDI files. All the import functions of Cubase can be found in the File menu under the Import submenu—or you can drag MIDI and audio files from Windows Explorer or the Mac Finder directly into a project.
When importing an audio file, Cubase will prompt you to copy the file into the active project folder. It is recommended that you keep all your audio files inside this project folder and that you accept that a copy of the audio file be created there. You can always work with audio files from different locations on your hard disk, but keep in mind that backing up a project with all its associated files will be easier if you keep all content in one folder.
Cubase supports many of today’s common audio formats: WAV, AIFF, WMA (Windows Media Audio), and MP3 files, for example, can be dragged directly from folders in the Windows Explorer or Macintosh Finder onto a track, or into the empty space below the last track in the Project window’s Event Display area to create a new track. When importing WMA or MP3 files (which use audio data compression to reduce file size), Cubase creates a WAV or AIFF copy on your media drive, rather than using the source WMA or MP3 file directly; the resulting file is of the same audio quality as the original, however. Just remember that WAV and AIFF files can be much larger than their WMA or MP3 counterparts, but they have significantly higher audio quality.
You also can import ReCycle files (which become slices within your Cubase project), and Cubase will recognize any tempo and pitch metadata usually associated with ACID loops. ReCycle files are generated by the software called ReCycle, which was developed by Propellerhead Software. ReCycle cuts drum loops into smaller time slices to be reused as samples at different tempos without changing the pitch. This process is similar to the hit point and music mode processes found in the Sample Editor. Sony applications, such as ACID or Sound Forge, embed this time-slice information into standard WAV files as metadata. This information is interpreted by Cubase, which makes it possible to match the loop’s tempo to the project’s tempo on the fly.
You can also import audio from inside the Pool window by selecting the Import button or by right-clicking (PC)/Control-clicking (Mac) in the Pool and selecting the Import Audio File option. When you import audio into a project, keep a copy of media files inside the audio folder of the project whenever possible to avoid mistakenly changing a sample that you might need for another project later.
You can grab audio tracks directly from an audio CD by using the Import Audio CD option in Cubase. This lets you add samples from your favorite songs, or from CDs that offer drum loops, hits, and the like.
Import audio tracks from an audio CD
Create an empty audio track and select it in the Track List area.
Position the cursor at the location where you want the event to be inserted.
Select File > Import > Import Audio CD.
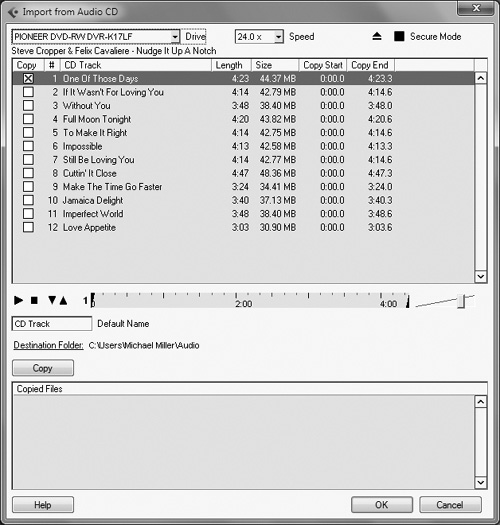
The Import from Audio CD dialog box will appear, as shown in Figure 7.5. Choose the appropriate drive that contains the audio CD.
Select the transfer speed you want to use to import these files. Note that faster speeds result in a faster transfer, but slower speeds limit the potential for errors that can occur during the transfer.
In the Copy column, select the track you want to import. To import more than one track, hold the Ctrl (PC)/
 (Mac) key while you click on nonsequential tracks.
If you don’t want to import an entire track, move the Copy Start and Copy End arrows to the right of the Play button. This changes the values in the Copy Start and End columns, allowing you to import only sections of the audio.
Type a new name in the Default Name field to give a different name to the imported track.
Click the Destination Folder link to change the folder destination, browse your computer’s hard drive, and select a new destination folder.
Click the Copy button at the bottom of the dialog box to begin the extraction process. The files will appear in the Copied Files section when the extraction is completed.
Click the OK button when you are finished.
Alternatively, you can import a CD track from the Pool by right-clicking (PC)/Control-clicking (Mac) inside the window and choosing the Import Audio CD option. In this case, the audio track is imported into the Pool only, and no events appear in the project’s Event Display area. This might be the method of choice when you start building a Pool of good drum loops for your new project.
Cubase lets you either import MIDI files into an existing project or create a new project from the imported MIDI files. In a Type 0 MIDI file, all MIDI events in any channel are contained in one single track; after importing such a file, you need to make sure the MIDI track hosting this imported track is set to play out through any MIDI channels. In contrast, a Type 1 MIDI file contains as many MIDI tracks as there are MIDI channels actually used in the file; Cubase creates a corresponding number of separate MIDI tracks to host the newly imported Type 1 MIDI file. When you import any MIDI file, it is imported at the beginning of the project.
Cubase also offers the option of recording the audio track from a video file. If that’s what you want, the Import Audio from Video File option will create a separate audio file from the selected video and place it in your project. The format of the audio file will be converted to the project’s settings, and a copy of this audio track can be found in the project’s folder. In other words, the original video file will not be used once you’ve imported the audio file from it.