
For years, recordings documented performances played on acoustic or electric instruments. That changed in the 1980s, when MIDI-based synthesizers added a different type of electronic sound to the mix—and defined the sound of that decade. In the 1990s, sampled loops arrived on the scene, and they still remain an important part of the creative set of tools used by many musicians today.
Today, technology has evolved to encompass and move beyond all the previous types of recorded music. The processing power provided by computers makes it practical to use virtual instruments that can be programmed to produce a wide variety of sounds, emulating both physical instruments and classic synths—or creating entirely new sounds. In this aspect, the computer has become the new musical instrument of the 21st century.
This chapter focuses on these software-based virtual instruments. You’ll learn how Cubase communicates with these plug-ins, as well as how to reproduce your favorite MIDI devices inside the Cubase program. Here’s a summary of what you will learn in this chapter:
How to create and set up an instrument track
How to create and set up an instance of a VST instrument
How to load and save presets
How to add a MIDI device in the MIDI Device Manager
How to manage external MIDI device presets
How to use installed devices in the Inspector
How to use filter options to find the desired preset in the Inspector
VST instruments (VSTi) are software-based synthesizers that use the ASIO 2 protocol to generate an audio output through the audio mixing/routing environment of the host program, which then sends this signal to the audio outputs of the computer’s audio interface. These software instruments take the form of special audio plug-ins working within Cubase. They can be used to generate sounds triggered by MIDI events recorded in a project when the MIDI output of a track is routed into a VSTi plug-in that has been loaded in your project.
Using VST instruments opens up a whole world of exciting possibilities for any music enthusiast, as well as for hardcore music veterans. They are activated through the VST Instrument panel, which can be opened via the Devices menu or by pressing F11 on your computer keyboard. The VST Instruments panel (see Figure 10.1) is like an empty rack of instruments in which you load instruments as you need them. Each slot in the panel offers plug-in controls for the loaded instruments. Cubase comes with a number of its own VST instruments, but you also can install others; just follow the instructions provided by the plug-in manufacturer when you do so.

A VSTi can be added to a project in one of two ways—via a new instrument track or by assigning the VSTi to an existing MIDI track.
When a VSTi is loaded into a project through creating an instrument track, it will be checked in the MIDI Output selector for that track in the Inspector (as shown in Figure 10.2), and a stereo instrument channel for that VST instrument’s audio output is added to the Mixer panel.
Create an instrument channel
Select Project > Add Track > Instrument, or right-click (PC)/Control-click (Mac) in the Track List area of the Project window and select Add Track > Add Instrument Track from the context menu.
In the Count field in the Add Instrument Track dialog box, shown in Figure 10.3, enter how many instances of a VSTi you want to create. Each instance loads in its own instrument track, with its corresponding stereo channel in the Mixer.
By default, Cubase 6 enables the Browse Presets option, which displays a number of filter options. These options are discussed in greater detail in Chapter 5, “Creating a New Project.” Here, you’ll set up the instrument without loading any presets into it, so click the Browse button to collapse the bottom half of the window.
From the Instrument drop-down menu, select the appropriate VST instrument. This list contains all compatible VST instrument plug-ins installed on your system, along with external MIDI devices that have been configured through the MIDI Device Manager, discussed later in this chapter.
Click OK.

Cubase automatically creates the instrument track(s) per the number of instances you indicated in the Count field.
It’s really a matter of preference whether you use instrument tracks or MIDI tracks for your VST instruments. Table 10.1 describes a few advantages and disadvantages of creating instrument tracks this way.
Table 10.1. Advantages and Disadvantages of Using VSTi Through Instrument Tracks
Advantages | Disadvantages |
|---|---|
Offers the most convenient way to load a VST instrument plug-in into a project. | No support for multiple MIDI output channels. |
No need to assign a MIDI output channel because it automatically routes MIDI events through the VSTi plug-in and its audio outputs. | No support for multiple audio output channels. |
Creates a single channel in the Mixer instead of separate channels for the MIDI track and VSTi audio output, which makes it easier to manage. | When the plug-in offers multi-timbral support, loading multiple instances of this plug-in through the instrument track will use up more computer resources (both CPU and memory). |
Both MIDI and audio inserts can be added to the same track in the Inspector. |
If you want to use a multi-timbral and/or multi-output instrument, you’ll need to load the instrument in the VST Instruments panel first. By doing so, you can route any number of MIDI tracks to the VSTi.
Furthermore, if the VSTi offers multiple audio outputs, each of its active outputs will be visible in the Mixer panel as well as in the Project window inside the instrument’s folder tracks. In this case, you will deal with separate channels in the Mixer—one MIDI channel for each MIDI track from which MIDI events are routed to the VSTi, and one instrument channel for each active audio output on the VSTi.
Unlike instrument tracks, a VSTi loaded in the VST Instruments panel creates its own folder track where automation events are stored, as shown in Figure 10.4. VSTi folder tracks do not contain any MIDI or audio events, but they contain all the automation associated with a VSTi. (See Chapter 36, “Writing and Reading Automation,” for more on automation.) Table 10.2 offers a few advantages and disadvantages of loading a VSTi in a MIDI track. By comparing this table with Table 10.1, you should get a good idea as to which technique is more convenient for your needs.

Figure 10.4. Instrument track (top) vs. MIDI+VST instruments (below)—with VSTi folder tracks beneath that.
Table 10.2. Advantages and Disadvantages of Using VSTi Through the VST Instruments Panel
Disadvantages | |
|---|---|
Offers support for multiple MIDI output channels. | You must load the VSTi in the VST Instruments panel first, and then create individual MIDI channels that are routed to it. |
Offers support for multiple audio output channels. | You must make the appropriate output settings for MIDI tracks as well as the VSTi channel itself. |
Consumes fewer computer resources than a configuration using multiple instances of a VSTi. | MIDI/audio routing and representation can be confusing for beginners. |
Each audio output from the VSTi can have its own EQ, inserts, and automation. | |
Each MIDI track routed to the VSTi can have its own MIDI inserts, track settings, and modifiers, such as transpose or velocity compression. |
Let’s set up a VSTi so that you can try it out (if you haven’t done so already). The hardest part is choosing the sounds to use in the new project.
Set up a VSTi in a project
Select Devices > VST Instruments, or press F11, to open the VST Instruments panel.
From the VST Instruments panel, select the first available slot in the rack and click anywhere on the drop-down menu where it currently says “no instrument.” This will reveal the installed VST instruments on your computer, as shown in Figure 10.5.
Choose a VSTi from the list to activate it. The blue active button next to the selected instrument reveals that this instrument is ready to be assigned to a MIDI track.
Cubase prompts you to create a new MIDI track to control this instrument. Click Create to create a new MIDI track. Cubase will automatically route this MIDI track’s output to the VSTi and create a stereo audio channel in the Mixer for the audio output from this software instrument.
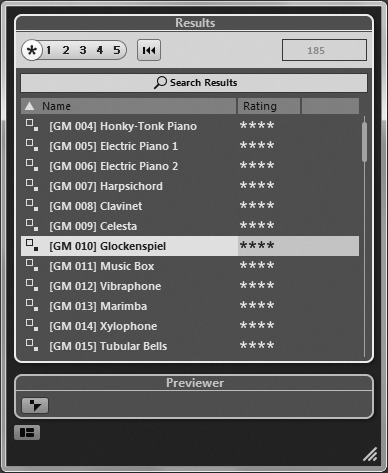
Cubase opens the instrument’s panel, where you can build a patch from scratch or select from a variety of presets. To use a preset, click the Preset selection field and select Load Preset.
From the VST Preset selection window, shown in Figure 10.6, select a preset from the list. As you scroll down the list and select each preset, you can preview the result by playing a few notes on your MIDI keyboard or other controller.
When you have made your selection, close the instrument’s panel to leave the instrument with these preset settings, or click outside the Preset selection box and tweak the instrument’s controls to get the desired sound.

At this point, you should be able to hear the sound of the selected VSTi. If you can’t hear anything, make sure the MIDI track’s MIDI input selector is set to receive MIDI events from the port where your controller is connected, and that the output of the audio hardware is connected to your monitoring system.
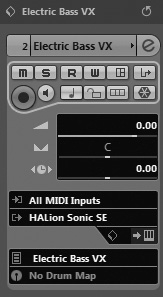
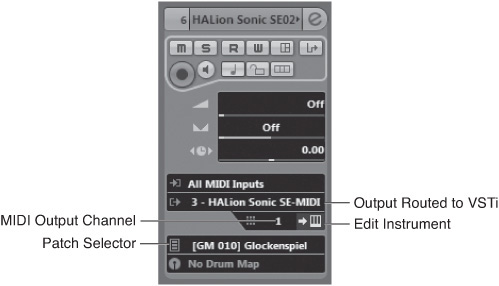
If you change your mind about the preset or sound on a VST instrument that is playing MIDI events received from one or more MIDI tracks, or you want to select a different VSTi preset, you can always use the Patch Selector field in the Inspector, shown in Figure 10.7. Clicking this field redisplays the VSTi Preset selection window; you can make a new patch selection there.
To route MIDI events from additional MIDI tracks to the same VSTi, simply create additional MIDI tracks and select that VSTi in each track’s MIDI output selection field, either in the Inspector or in the Mixer’s routing panel.
Some VST instruments support multiple audio outputs, which makes it possible to set up each of their output channels in the Mixer with different compression settings, EQ, or send effects, among other things. By default, Cubase 6 will enable the first stereo pair for a new VST instrument, but it is possible to enable as many audio channels as the VSTi supports.
With most VST instruments, you also can create your own preset patches and save them for later use. Use the VST Instruments panel’s Save Preset option to store custom presets and the Load Preset option to recall presets that were previously saved. You will also find the same options at the top of the instrument’s editing panel.
All VST instruments play through your audio hardware, which means that latency plays a great role in how effective the instruments are on your system. Because latency introduces a delay between the time a key is played and the time a sound is heard from the VSTi, shorter delays make the experience more realistic.
To reduce latency to an acceptable level, your system needs to be configured properly, as outlined in Chapter 3, and always use the ASIO driver provided by the audio hardware manufacturer. If the latency is greater than about 25 milliseconds, you might find it disconcerting to play a VSTi, especially when you are playing parts with high rhythmic content, because there will always be a delay between the moment you press the keys on your keyboard and when you hear the sound. The smallest theoretical latency is 0 milliseconds, but in reality, you can expect at least a 1.5- to 3-millisecond latency, which is pretty good. For the best experience when playing through a VSTi, try setting your audio hardware driver preferences (if you have a dedicated ASIO driver for your audio hardware) and Cubase to have less than 10 milliseconds of latency.
It is possible to create program changes or tell a MIDI track to play a specific program and bank from the MIDI Settings section of the Inspector and the Track List. When working with a VSTi, this is quite easy to deal with because when you select a VSTi as the MIDI output for the track, the track’s settings display the available parameters for that instrument. So, for example, if you load the Mystic VSTi, the Inspector will display a list of this plug-in’s available presets when you click inside the Inspector’s Programs field.
Working with external MIDI devices is a bit trickier because Cubase can’t see which device is connected to it. To access the functionalities provided by external devices inside Cubase, you should add these devices to the MIDI Device Manager; this enables Cubase to know how and what to communicate with them. Many common MIDI device definitions are provided on Cubase’s installation disc. You do need to install the devices in your personal setup through the MIDI Device Manager, to let Cubase know what is in your studio and how to address it properly.
When you open up the MIDI Device Manager for the first time, it will be empty because you have not defined any devices in your setup yet. You access the MIDI Device Manager by selecting Devices > MIDI Device Manager or by clicking the MIDI Device Manager button on the Devices panel.
In Cubase 6, you also can use the MIDI Device Manager to create or edit existing panels, which are virtual representations of your external device. These panels are called device maps, and they let you control specific parameters on your external device from within each Cubase project, without touching its front panel. Think of these device maps as customizable remote controls.
After you have identified your external MIDI devices, you can proceed with their installation inside the MIDI Device Manager. This section looks at how you can install an existing device definition in the MIDI Device Manager.
Add a MIDI device
Select Devices > MIDI Device Manager to open the MIDI Device Manager panel.
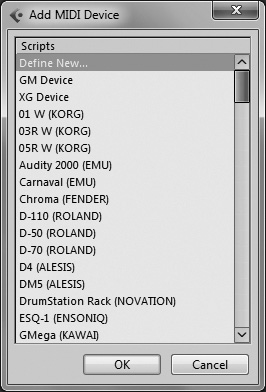
Click the Install Device button. The Add MIDI Device dialog box will appear, displaying a list of existing device definitions (see Figure 10.8).
Select the device you want to install and click OK. Your selected device will now appear in the MIDI Device Manager panel.
The name of each installed device appears in the Inspector’s Output Routing selection menu for any MIDI track, with the MIDI port associated with it on the right.
If your MIDI device is not included in the default list in the Add MIDI Device dialog box, you might have to create a definition for it yourself. Remember, however, that if you are using a MIDI sampler, creating such a device definition in the MIDI Device Manager is pointless because a sampler generally does not have a fixed set of programs it loads by default when turned on. In fact, that might be why your device is not listed in Cubase’s list of devices!
With that said, if you do have a MIDI device with programs and banks that are not defined already in Cubase, or if you want to create a panel that allows you to send parameter change messages to any external device that supports MIDI, you can create your own MIDI device in the Device Manager. Because creating a device from scratch is intricately linked to the device in your setup, you need to refer to your owner’s manual and the online documentation (under the “MIDI Devices and Patches” section) provided with Cubase to find out how to create your own custom device with patches, banks, and specific MIDI messages associated with those, as well as customized panels that appear in the User Panel section of the Inspector.
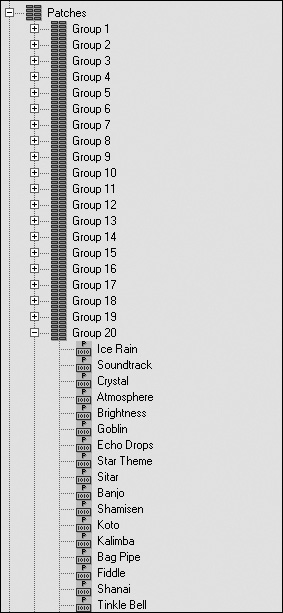
After a device is installed, you can reorganize its Patch Bank list, export or import other devices, and rename items in the patch banks. For example, the Roland JV-1080 patch list is organized in patches, performances, and drums. Inside the Patches folder, there are some 20 groups in which all the actual preset names of this MIDI device are found (see Figure 10.9). However, if you’ve ever used or seen the JV-1080, programs can also be grouped by type of sounds rather than taking programs 0 to 31 and putting them in a group. So, you can start from the original instrument definition and create your own structure to better suit your needs. This makes it easier when you want to find the right sound for your track.
Add a patch bank to your device’s setup
In the MIDI Device Manager panel, select the device in the Installed Devices section for which you want to add the content.
Click the Open Device button.
When the panel for this device opens, click the Options drop-down menu on the toolbar and select Patch Banks, as shown in Figure 10.10.
In the device’s Patch Bank mode, check the Enable Edit box to enable the Commands field to its left.
Select the Create Bank option from the Commands menu.
A new bank will be created, called New Bank. Double-click this new entry and type a new name for this bank.
From the Options drop-down menu in the toolbar, select Bank Assignment. (If your device doesn’t have patch banks, this option will not be available.) The Bank Assignment function associates MIDI channels with specific banks. For example, if you have a drums bank, you might want to assign this to Channel 10. When you select this device as the MIDI output port from a MIDI track and select Channel 10, the programs listed in the Inspector correspond to associated drum banks. Simply select the banks from the drop-down menu next to each channel to associate a bank with a channel.

If you want to add a bit more order in the presets listing, making them easier to find when the time comes, you can create folders for different types of presets, such as by putting all your piano-related sounds under a Piano group.
To create more than one device preset at a time in the Device Manager, select the Add Multiple Presets option in the Commands drop-down menu.
When you select the bank or folder in which you have created multiple presets, you will find a list of preset names. For example, there can be 64 presets numbered from Patch 0-0 to Patch 0-7 for the first bank, and then Patch 1-0 to Patch 1-7 for the second bank, and so on. Selecting any of these presets reveals (in the right side of the MIDI Device Manager panel) the actual MIDI message sent to the device.
If you made a mistake or you are not satisfied with an entry in the patch banks, you can simply click the entry and press the Delete key to remove it from the list. You also can change the order in which items appear and rearrange the list to better suit your needs by clicking and dragging the desired entry to a new location.
If you’ve made some adjustments to your MIDI device listings in the MIDI Device Manager patch banks, Devices panel, or Bank Assignment panel, export these changes to a file so you can retrieve them later if you ever have to reinstall your software or simply use your device setup with Cubase in another studio.
Adding a new device to a setup does not change or influence how existing devices are handled, so you don’t have to worry about messing things up by installing an additional device, even temporarily. You can always remove any device you no longer use or need.
After you’ve installed devices in the MIDI Device Manager, you can use the Program field in the Inspector or the Track List area of a MIDI track to select a program by name. If you have created a panel or imported a device configuration that contains one or several device panels, you also can load these in the User Panel area of the Inspector. When selecting an entry in one of the aforementioned fields or in the Devices panel, Cubase sends the appropriate MIDI message to your external MIDI device in order for you to hear the appropriate sound from that device as it responds to incoming MIDI events.