
One of the major challenges for new Cubase users is getting everything set up and ready to go. This means making sure that your computer’s operating system, audio hardware, and MIDI interface are installed properly and configured for optimal audio operations. Getting all these software and hardware items to work nicely with each other can take a bit of doing.
In addition, running an application such as Cubase requires a stable computer environment and lots of available computer resources, especially when you are using effects and software instruments. Making these resources available to Cubase will help you get the most out of your working session—even if that means changing your computer’s configuration to emphasize performance rather than appearance.
This chapter, then, explores how to set up peripheral devices both inside and outside the Cubase environment. Remember, though, that every system is different; the general advice presented here may need to be tweaked for your particular combination of hardware and software.
Here’s a summary of what you will learn in this chapter:
How to choose and connect audio and MIDI interface devices to your computer
How to choose the right driver for your audio hardware when working in Cubase
The difference between hardware-specific ASIO drivers and generic ASIO drivers
Setting up MIDI interfaces and drivers in your system
Setting up MIDI ports, remote devices, and audio ports inside Cubase
The impact background processes have on Cubase performance
The implications of loading other audio applications when running Cubase
You can run Cubase 6 on any Windows or Mac computer that meets Steinberg’s system requirements for processing power, memory, and hard disk storage. But most computers don’t have inputs to connect microphones, keyboards, MIDI synthesizers, and the like. For this reason, you need to connect an external audio interface device to your computer; this device provides all the inputs and outputs you need to record instruments and vocals.
To record a vocalist singing into a microphone, an acoustic instrument playing into a mic, an electric guitar, an electronic keyboard, or other instruments, you need an audio interface device. This is a box that includes one or more microphone or line audio inputs. You will need to connect your instrument(s) or microphone(s) to the input box, and then connect the input box to your computer via either USB or FireWire.
There are a variety of input boxes available. Some have just a single 1/4-inch or balanced XLR microphone input; others have four, eight, or even 16 different inputs, along with a complement of MIDI inputs and outputs. Obviously, the more inputs that are available, the more instruments and voices you can record simultaneously. (Multiple inputs are also necessary when recording drums, where each drum typically has its own microphone.)
You’ll find audio interface devices from many of the same manufacturers who offer MIDI interface boxes. Figure 3.1 shows Steinberg’s own MR816x interface box, designed specifically to work with Cubase.

To make a MIDI recording, you’ll need some sort of MIDI instrument or input device, such as a MIDI keyboard or synthesizer, as well as some way to connect that instrument to your computer. Most of today’s audio interface devices include MIDI input and output connections in addition to the traditional audio inputs and outputs, which makes this a good all-around solution. In addition, many newer MIDI instruments/ controllers actually connect to your computer via USB, so you don’t have to worry about physical MIDI connections at all.
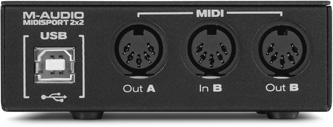
You can also connect MIDI instruments to a freestanding MIDI interface, which is an external device that connects to your computer via either USB or FireWire; the MIDI instrument connects to the MIDI interface, which then connects to your computer. Most of these MIDI interface devices have one or two MIDI inputs and a corresponding number of MIDI outputs (to connect back to your MIDI instrument). These interface devices are available from Cakewalk, M-Audio, MOTU, and other manufacturers. (Figure 3.2 shows the connections on M-Audio’s popular MIDISport 2x2 interface box.)
To better control large numbers of mic and instrument inputs, some recordists prefer to use an external control surface. Most control surfaces blend the functionality of an audio interface with an external mixer. You connect the appropriate instruments and microphones to the control surface, and then connect the control surface to your computer via either USB or FireWire. (Some control surfaces, however, do not contain audio and MIDI inputs and function solely as external mixers for inputs from a separate input device.)
When you use an external control surface, you have the option of adjusting the volume faders and other controls on the external mixer itself or in Cubase’s virtual mixer interface. You can also connect external effects processors directly to the control surface and manage them as Send or Insert effects in Cubase.
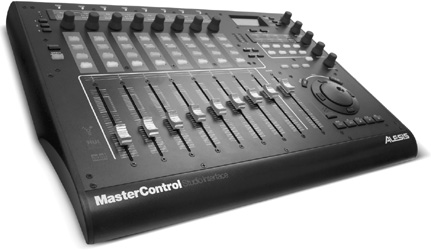
There are a number of different mixer/control surfaces available from M-Audio, Steinberg, TASCAM, Yamaha, and other manufacturers. Figure 3.3 shows the Alesis MasterControl product.
Connecting an audio or MIDI interface to your computer is relatively simple; just connect the appropriate USB or FireWire cable to an open port on your computer. But that’s just part of the process—you also need to make sure you have the proper device driver for the interface installed on your computer.
In general, both Windows and Mac users should always use the ASIO driver provided by the audio hardware manufacturer. Macintosh users can also use the Core Audio driver in order to use the computer’s built-in audio for Cubase—although certain other audio devices can optionally be assigned for audio input/output via the operating system itself, in the Sound section of System Preferences.
Windows users can also choose to use a generic ASIO multimedia driver provided by Cubase; if you’re running Windows Vista or Windows 7, the Generic Low Latency ASIO driver is also a good choice. Know, however, that using such a generic driver will not provide the best performance, as the generic driver has not been specifically optimized to work with your specific hardware device. You can find a list of recommended audio interfaces offering ASIO drivers on Steinberg’s website or by performing a search on Google.
Using the proprietary ASIO driver supplied by the manufacturer of your audio interface device is strongly recommended. That’s because the driver has been optimized for this particular piece of hardware; it’s simply going to work better and faster, with lower latency. Latency measures the amount of time between what you record and what you hear from Cubase after the signal has been processed by your computer. The lower the latency, the shorter the delay between what you record and what you hear. Obviously, low latency is desirable.
High latencies are often troublesome when recording live material. There is always a delay when monitoring audio through software, and the greater the latency time, the more noticeable this delay will be. Better ASIO drivers have a lower latency, which lets you record music while playing back previously recorded tracks without any noticeable differences.
A typical latency for audio hardware using a dedicated ASIO driver should be around or below 10 milliseconds. Note also that latency affects the response time of VST instruments and the output and input monitoring in a channel.
Most audio interfaces today support the ASIO format, but if in doubt, consult both Steinberg’s website and the audio hardware manufacturer’s website for information about ASIO compatibility.
If you’re a Windows user who doesn’t have an audio interface offering a dedicated ASIO driver, you’ll need to use Microsoft’s DirectSound technology, which is part of DirectX. If your audio interface has an ASIO driver, or if you’re using a Mac, you can skip this section.
The DirectX driver is included with your Windows operating system, and you can find free DirectX updates on Microsoft’s website. Steinberg provides the ASIO DirectX Full Duplex driver on the Cubase installation DVD. In the absence of a soundcard-specific ASIO driver, the ASIO DirectX driver provides the next best (but by far not the most desirable) solution. This driver allows Cubase to communicate with DirectX and allows full duplex communication with your audio hardware.
Full duplex means that you can record and play back simultaneously through the audio hardware. In contrast, half duplex allows only one operation at a time: play or record. Because Cubase has to communicate with DirectX through the ASIO DirectX driver, and then DirectX communicates with the audio hardware, expect higher latencies when using this type of driver setup.
To set up this driver, you need to use the ASIO DirectSound Full Duplex Setup window to configure your audio hardware properly. This window lists all DirectSound-compatible input and output ports on your system. Devices that are checked are available inside Cubase. You can find the ASIO DirectX Full Duplex setup utility in a special ASIO folder under the Cubase program folder. To launch it, simply locate its icon or alias and launch it from there.
Most MIDI interfaces available today are installed in two simple steps—physically connect the device (don’t forget the power supply, if required) and then install its drivers on your computer. This is usually quite simple and is explained in the documentation that comes with your MIDI interface. Hardware specifics will not be discussed here because there are too many MIDI and audio interfaces out there to cover them thoroughly. But to make sure everything is set up properly, one good starting point is to verify that your MIDI port appears in your system configuration.
At this point, if you have not seen any question marks or exclamation marks next to your device, and if there are no indications that it is not installed properly, you should be able to use this port in Cubase. If, on the other hand, you have found a problem, you should try reinstalling the driver for this peripheral and following the installation procedure provided by your device’s manufacturer.
At this point, the audio and MIDI devices are properly installed on your system, and you are now ready to tell Cubase which devices to use. The Device Setup dialog box, found under the Devices menu, lets you configure MIDI, Transport controls, remote control devices, video device drivers, and audio hardware, as well as VST System Link settings. VST System Link networks multiple computers through a digital audio connection. In this chapter, I will discuss only the MIDI and audio settings and leave the other settings for later, as they become relevant to the topic under discussion.
When you launch Cubase, it scans all installed peripherals and plug-ins—both audio and MIDI—in order to make them available in a Cubase project. All successfully recognized devices appear in the Device Setup dialog box. Selecting the appropriate entry in the Devices tree (see the left side of the dialog box in Figure 3.4) reveals this device’s setup options on the right side. Here, the MIDI Port Setup is visible.

Because the MIDI devices appear at the top of the list, let’s start there. MIDI ports connect external MIDI devices, such as MIDI keyboards, synthesizers, and multitimbral sound modules, to Cubase through your MIDI interface’s MIDI Input port and transmit MIDI events to these devices through its MIDI Output port. The Device, I/O (input/output), and Port System Name columns display system-related information over which you have no control. However, the Show As, Visible, and In All MIDI Inputs columns let you set up how these ports appear in a project.
The Show As column displays how the MIDI port appears when selecting MIDI ports. To rename a MIDI port, click in the Show As column and type a new name. The Visible option hides a MIDI port from the pop-up selector on MIDI tracks when it is not checked.
By the way, the Inspector’s MIDI Input selector for MIDI tracks offers an All MIDI Inputs choice. When this option is selected, the track records or echoes all MIDI events coming from all currently active MIDI inputs. To filter out an input port from this All MIDI Inputs mode, uncheck that port here in the Device Setup window.
Click the Reset button to make all ports visible and include all ports in the In All MIDI Inputs column.
A remote device is a hardware device that can be programmed to offer a physical, tactile interface for Cubase’s virtual controls. Remote devices come in many shapes, formats, and functions, and the setup options will vary from one device to the next. Without going into detail on how each remote is implemented inside Cubase, here’s a look at how you can set up a remote control surface inside Cubase.
Install a MIDI remote control device
Select Devices > Device Setup.
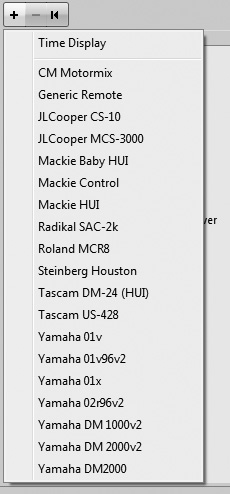
Click the plus sign above the Devices list in the dialog box (see Figure 3.5).
Select the appropriate device from the supported devices list. If your device is not in this list, select the Generic Remote device. The device is added under the Remote Devices folder in the Device Setup dialog box.
Select the device in the list.
Select the appropriate MIDI input and output ports connecting the controller to Cubase, and be sure these ports are well connected to this device.
Enable the Auto Select option if your device supports this option. (A channel is automatically selected when the corresponding fader on the remote is touched.)
Click OK when you are finished.
Once a remote device is installed, its name appears in the Devices menu. Selecting its name brings up the device’s control panel. Use the control panel to determine which Cubase virtual controls are affected by incoming controller messages generated by this device.
The VST Audio System section of the Device Setup window determines how Cubase interfaces with your system’s audio peripheral. You can tell Cubase which drivers to use and which ports should be visible, save these settings, and never worry about it again. On the other hand, you can change any of these settings when needed.
Remember that audio ports correspond to physical inputs or outputs; you will need to associate these ports with input and output busses later. When selecting the source or input for a track, you will be selecting the bus associated with the port, not the port itself.
Set up audio ports in Cubase
Select Devices > Device Setup.
Select VST Audio System in the Devices list to view its properties (see Figure 3.6).
In the ASIO Driver field, select the appropriate driver for your audio interface. If you have a dedicated ASIO driver for your interface, it is strongly recommended that you use it. Cubase uses this driver by default (although on the Macintosh your ASIO Driver selection may default to Built-In Audio), but it’s always good to confirm this the first time you run Cubase after it has been installed.
Click Apply to update the ASIO driver displayed under VST Audio System if you’ve made any changes.
Return to the Devices list and select the ASIO driver under the VST Audio System item; this displays the driver’s settings (see Figure 3.7).

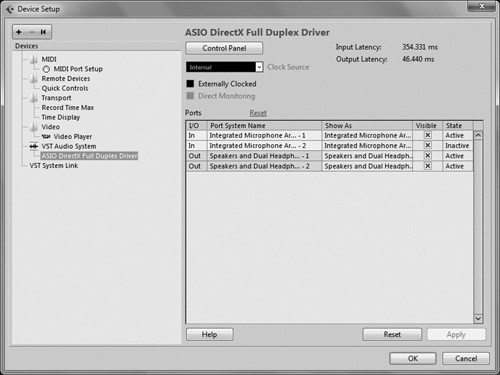
Different ASIO drivers and devices have different numbers of available ports. If you have more than one audio interface with ASIO drivers installed on your system, additional selections will appear under VST Audio System. Each has its own settings page.
As with MIDI ports described earlier in this chapter, the I/O column identifies whether the port is an input or output, whereas the Port System Name column shows all the ports available in this interface. You can also rename the ports in the Show As column to change the way they appear whenever busses are created in the VST Connections panel (select Devices > VST Connections).
To hide certain audio ports when working inside Cubase, uncheck their Visible check boxes. Ports that are not visible will not appear when you are associating ports to busses in the VST Connections panel later. You can change these settings at any time, but hiding ports that are currently used within a project will force Cubase to discard any routing information associated with this port. The State column plays a similar role as described for MIDI ports earlier in this chapter. Whenever an audio port is connected to a bus, its state will become active.
If you are using a dedicated ASIO driver, you can set the clock source of the audio device by clicking on the device’s control panel in Windows, or by using the pop-up Clock Source selector within the Device Setup dialog box on Macintosh computers. The clock source determines whether the sampling frequency of your audio peripheral is controlled by its own internal clock or some other external source. Once again, the number of settings found in this dialog box varies from one device to the next.
You should set the clock source of your audio device to master (internal) when:
You don’t have any other digital audio devices in your studio setup.
You want the clock of your audio device to serve as the master clock reference for other devices.
You should set the clock source of the audio device to slave/external sync or auto-sync when:
You want the digital clock of another device to control your computer’s audio hardware clock.
Most digital audio workstation applications, such as Cubase, require a lot of memory and CPU power. Running other applications simultaneously will prevent Cubase from using these resources. For example, some background applications might start doing a hard drive scan in the middle of a recording—which could interfere with Cubase’s operation. A good example of this is real-time scanning from an anti-virus program or file indexing with a file search utility.
Any background applications that make intensive use of memory or hard drive resources should be disabled when using Cubase. A good rule of thumb for improving your performance is to not run any other nonessential applications while using Cubase.
To find out which background applications are running in Windows, right-click the Taskbar and select Start Task Manager, which opens the Windows Task Manager; select the Processes tab to view how much memory a given application uses. If you’re running OS X on a Macintosh computer, you can view the active processes with the Activity Monitor; open the Finder menu and select Go > Applications > Utilities Folder, then double-click the Activity Monitor icon.
When you find an application using too much background memory, you can then configure the application to not launch automatically or run in the background. It’s important to keep the number of background applications to a minimum. This may mean deleting all non-essential applications. This is why many serious Cubase owners use a dedicated computer for recording, and thus avoid doing office work and Internet browsing on their recording system.
The situation is different if you try to run another audio-related application. When Cubase is loaded, it generally assumes control of the audio hardware, leaving it unusable for other applications that would also need it to run concurrently with Cubase. To run other audio-related applications simultaneously with Cubase, then, you need audio hardware that provides a multi-client driver.
A multi-client driver shares access to the audio hardware between audio applications. Think of it this way: A single-client access is like going to the grocery store and having only one cash register open. Everybody has to line up and wait their turn to pay for their groceries. A multi-client driver is like having two or three cash registers open so people can go to a second or even a third cash register if the first is busy.
Steinberg provides an engine developed by Propellerhead Software, called ReWire. ReWire lets you share audio resources between ReWire-compatible applications, such as Ableton Live, Propellerhead Reason, Cakewalk Sonar, Sony Media Software ACID, and so on. (Working with ReWire applications is discussed in Chapter 12, “Using ReWire.”)
For other types of audio software, you will have to load that software first and set Cubase as your default sequencer from within the application’s environment. After this has been configured, you can launch Cubase from within the other application when needed. If you have problems doing this, try disabling any audio outputs in that application that you intend to use in Cubase (for good measure, keep outputs 1 and 2 available for Cubase) and disabling audio inputs and outputs in Cubase that you want to use in the other application. By doing this, you are effectively assigning certain outputs of your audio hardware to Cubase and the remainder to the other application.
Know, however, that running such a dual-application setup imposes a huge load on your computer resources, and you are also testing many compatibility issues between different software and hardware manufacturers. If you are experiencing difficulties, here are a couple of places to look for information:
Visit Steinberg’s website to see whether there is any additional information on the difficulty you are having.
Visit your other software manufacturer’s website; it also might have some answers for you.
Check on your audio hardware manufacturer’s website to confirm that you have the latest drivers for your audio hardware, and you can take a look at the support, troubleshooting, or FAQ section to find additional help.
Use discussion forums (such as www.cubase.net and others) to share your problems with other users; there is a good chance that someone else has had the same problem and can suggest a workaround for you.
One last thing about setting up an audio system for digital recording—it’s complicated. The reality is, even the pros spend a lot of time hooking up and configuring all the pieces and parts, and things often don’t work the first time around.
The most common question I get from readers is, “How do I get equipment XYZ to work with Cubase?” This is, unfortunately, a question I can’t answer. That’s because every setup is different, and every piece of equipment from every manufacturer has its own requirements and quirks. When a complicated audio system isn’t working—when you’re not getting any sound out of your speakers or not registering any audio input from your other equipment—the cause could be in any individual piece of the chain. It’s simply impossible to troubleshoot, especially from a distance.
With that said, I always recommend taking a step back, taking a deep breath, and rechecking all your connections and configurations. You’d be surprised how many problems are caused by cables that aren’t connected properly—or not connected to where they’re supposed to be connected. To that end, it also helps to revisit all your virtual connections within Cubase and within your computer’s operating system. It’s just possible that something is switched off that should be switched on, or vice versa.
Beyond this basic advice, I have to direct you to the manufacturer’s technical support. That is, you should contact the manufacturer of the equipment in question, or contact Steinberg for Cubase-related issues. Most manufacturers (including Steinberg) have robust online help systems and support communities, which means you can find a lot of answers over the Internet. You can also call most manufacturers to talk to a real live tech support representative. It’s in each company’s best interest to get you up and running so that you can get maximum value out of the products they sell.