
Not every mix is static. Oftentimes you need to increase or decrease the volume of an instrument over the course of a track; for example, you may want to turn up a guitar during a solo section, but then turn it back down when the vocals come back in.
In Cubase, changes you make to volume levels, panning, and other settings over the course of a mix are captured via the Automation feature. That is, the changes you make are automated—and captured in a separate automation subtrack.
Cubase supports two basic automation recording techniques. First, you can create mix automation in real-time by writing the volume, pan, and other parameter changes you make in the Mixer window—or anywhere that real-time controls are available in Cubase. Secondly, you can also create automation by drawing automation curves in the automation subtracks.
Owning a remote control surface definitely makes it more convenient to automate a mix when compared to using a mouse alone, but either way, the automation subtracks are always easy to access and can be edited at any time. Also, if you’re used to the Mixer environment, recording automation may feel more comfortable to you when the Mixer window is visible. On the other hand, editing previously recorded automation might be easier if done through the Project window.
Here’s a summary of what you will learn in this chapter:
How to use the Read and Write buttons to record and play back automation
How to record channel and plug-in parameter automation
How to change the automation mode
How to use the Automation Panel to control automation settings
How to draw channel settings automation values in an automation track
How to add automation using the Line tools
How to hide and remove automation subtracks
You can set the levels and pans of audio channels in the Mixer or Inspector without using automation, just as you would on a normal mixing desk. This enables you to adjust the level and position of your tracks in the mix without adding automation to them. As long as the Write or Read Automation buttons (found in the Common panel on the left of the Channel Mixer window) are not activated (not lit), the faders, pan, and any other effect settings stay at the same position. When the Read Automation button is disabled in the Common panel, Cubase will not read any existing automation in your tracks. However, disabling automation doesn’t mean that you lose the automation you have previously recorded.
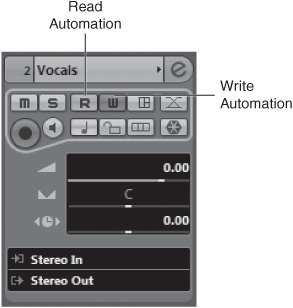
Read and Write Automation buttons are available to record and play back mix automation for each channel in the Mixer window, the Track List, the Channel Settings panel, or the Channel section of the Inspector. Use the Write button to record the automation and the Read button to enable playback of any automation data contained in this track’s automation subtracks (whether created in real time with the Write button, or drawn using the mouse).
To activate the automation writing process, click the Write Automation button of the desired channel, as shown in Figure 36.1. Clicking this button in any of the mentioned areas activates the same function in all subsequent windows where the channel is represented (the Inspector, the Track List, the Channel Settings panel, and the Mixer window).
By clicking the Write Automation button directly in the channel, you activate the writing automation functions for this channel only. If you want to activate the automation writing mode for all channels at once, you can enable the global Write Automation button found both at the top of the Track List and in the Common panel of the Mixer window, shown in Figure 36.2. Whether you enable writing of automation on one or all channels depends on what you want to achieve.

When you activate the Write button on a channel or in the Common panel of the Mixer, Cubase is ready to record any change you make in parameter settings during playback. This includes all channel controls, insert and send effects, VSTi control panels, and Inspector parameters, for example. Bear in mind that writing of automation is completely independent of the recording function on audio or MIDI tracks. If you don’t move a given parameter, Cubase will not record any data for this parameter.
After you have recorded automation, you need to activate or enable the Read Automation button in order for Cubase to read whatever automation you have recorded. Otherwise, the information is present, but your automation is not read during playback. As with the Write Automation button, the Read Automation button is available in several windows inside your project, and enabling it on a channel in one window enables it in all the other windows as well. The global Read Automation button found at the top of the Track List and in the Common panel of the Mixer window also activates the Read option for all channels at once.
This section describes how to record the most common type of automation: track automation. This type of automation is associated with a Mixer channel (also seen as a track in the Project window), as well as MIDI and audio channel settings. Automation is frequently used to change the volume or pan of a track in the course of a project, to alter the parameters of its sends or insert effects, to mute a track or its effects by enabling the Mute button, or bypassing one or several inserts or sends at a time. The actual settings you can write in real time are determined by the track class itself.
After your automation is written into the track, you can use the channels’ automation subtracks to view the automation curves for each setting that was automated. I’ll get into this a little later in the chapter.
Writing real-time parameter changes in a plug-in effect, such as a VSTi or send effect, is quite similar to automating channel settings in a track. However, automation events for VST effects and software instruments are recorded in separate tracks and subtracks, created automatically by Cubase as soon as you move any of the controls of an effect or VSTi when the Write Automation button is activated inside the plug-in’s control panel. (This can be a VSTi or VST effect plug-in.)
This type of automation is normally used to change the parameters of effects or a VSTi, creating dynamic changes in the plug-in over time during playback. For example, you can automate the Cutoff frequency by moving this parameter in the VSTi’s control panel (provided there is such a parameter on the instrument itself).
An automation mode determines how Cubase behaves when you change parameters with the mouse or a remote control surface; different modes can be used depending on the type of automation you want to perform.
Cubase 6 offers three automation modes: Touch (default), Auto-Latch, and Cross-Over. They differ in their “punch out” behavior.
With Touch automation, the program starts writing automation as soon as you press or move any control for a parameter, such as the Volume fader, and stops writing when you release the mouse button.
With Auto-Latch, the program starts writing the automation as soon as you press or move any control, and stops writing when you stop playback or deactivate the Write Automation button. In other words, the last automation value is continuously written until you turn off the Write Automation button within the channel mixer found in the Inspector area or in the Mixer window. This mode is useful if you want to write over a long section containing previously recorded automation that you want to replace. It is also useful when you are using an external control surface to control your mix. Because Cubase has no way of knowing which control you want to rewrite, it starts writing as soon as you move a control and keeps writing the value sent by this control (overwriting any existing automation for the particular parameter) until you stop playback or disable the Write Automation button. Make sure, however, that you don’t touch any other controls when doing this; otherwise, you might end up replacing automation by mistake. Note that this also applies for some VSTi and VST plug-in effects parameters.
Cross-Over automation works much like the Auto-Latch mode, with one exception: As soon as your playback cursor crosses a previously recorded automation curve point, the write process is automatically turned off.
Change the automation mode
In the Project window, click the Global Automation Mode button in the toolbar (see Figure 36.3).
Select the desired automation mode from the drop-down menu.
You can manage most of Cubase’s automation functions with the Automation Panel, new to Cubase 6. You display this panel by clicking the Open Automation Panel button (the down arrow next to the Global Automation Mode button) on the Project window toolbar.
As you can see in Figure 36.4, the Automation Panel consists of a toolbar and four columns. The toolbar contains the following functions:
Activate Read for all tracks enables all Read buttons on all tracks of your project.
Deactivate Read for all tracks disables all Read buttons on all tracks of your project.
Activate Write for all tracks enables all Write buttons on all tracks of your project.
Deactivate Write for all tracks disables all Write buttons on all tracks of your project.
Global Automation Mode lets you select which of the three automation modes (Touch, Auto-Latch, or Cross-Over) to use for your project.
Trim lets you add or remove automation data from a previous pass.
Functions provides access to the following automation-related functions: Delete All Automation in Project, Delete Automation of Selected Tracks, Delete Automation in Range, Freeze All Trim Automation in Project, and Freeze Trim Automation of Selected Tracks.

Actions accessible from the Automation Panel can be applied to selected tracks or ranges in the Project window.
The four columns in the Automation Panel offer quick access to various automation-related options. These columns include the following:
Fill options define what happens in a specific section of your project when you punch out of a running automation pass. Options include To Punch, To Start, To End, and Loop. You can select fill options individually, or combine fill options by selecting multiple options at a single time.
Suspend Read excludes selected parameters from the reading of automation data. Parameters include Volume, Pan, EQ, Sends, Inserts, Mute, Others, and All.
Suspend Write excludes selected parameters from the writing of automation data. The same parameters are available as with the Suspend Read column.
Show opens the automation tracks for the selected parameters.
If working with a remote control surface is not for you, if you need to perform some fine-tuning on your automation, or if you simply want to set a curve to a specific value using a specific curve shape, perhaps drawing the automation is the better approach. By drawing your own automation, you can make much more precise changes than you can by physically riding the sliders in real time.
This section describes how to add automation curves into an automation subtrack for any channel.
Draw channel settings automation curves in an automation subtrack
In the Project window’s Track List area, select the track for which you want to create automation events.
Hover your cursor over the bottom-left corner of the selected track to display the Show/Hide Automation button (small arrow); click this button to reveal the first automation subtrack, shown in Figure 36.5.
Enable the Read Automation button for this track/channel (and/or the particular automation subtrack).
Select the parameter you want to automate from the Parameter field. If the parameter you want to automate doesn’t appear in this list, click the More option to display a dialog box revealing additional automatable parameters available for this track. Select the one you want and click OK to return to the subtrack. At this point, the Parameter field should display the parameter you just selected.
If there is currently no automation for this parameter, a colored flat horizontal line appears within this subtrack in the Event Display area. Select the Draw tool in the Project window toolbar.
To add a curve point, click near the location inside this lane where you want to add an automation value. If you want to create a ramp between two points, release the mouse button. However, if you want to create a curve, drag your mouse to the next desired location and value.
Repeat Steps 5 and 6 to add more automation curve points along this parameter’s subtrack.

Note that an automation curve point is added at each location where you click, as long as you are using the Pencil or Draw tool and stay inside the subtrack’s boundaries.
If you want to add automation events to another parameter for the same channel, you can either select another parameter from the Parameter field to display a new parameter in the same subtrack or hover over the bottom-left corner of the automation subtrack and click the newly visible Append Automation Track button. When the new subtrack is visible, repeat Steps 3–6 from the previous list.
Note that choosing a different parameter in a subtrack that already contains automation does not remove or cancel the automation it holds. When a track contains recorded automation events for a given parameter, an asterisk appears after this parameter’s name in the Parameter selector field for the automation subtrack. These asterisks help you quickly spot which parameters already contain automation, which makes editing and troubleshooting much more efficient.
After you’ve recorded automation on a track, you can select the Show All Used Automation option available in the Track List’s context menu (right-click on PC or Control-click on Mac). You can add automation to several parameters by using a single subtrack, changing the parameter’s name to view, or adding new automation, and after you are done, reveal all automation subtracks containing events. Remember that each parameter has its own subtrack.
Under the Line tool are several drawing shapes: Line, Parabola, Sine, Triangle, and Square. These tools can be used to create specific automation values, such as pan effects. You can also use the Parabola and Line tools to create consistent automation curves instead of drawing curve points freehand-style.
When working with automation, you can hide automation subtracks that you don’t need to see in order to clean up your working area. Hiding automation subtracks does not prevent their automation from being read. If you don’t want to hear the changes made by automation, simply turn off the Read Automation button for this track—or at the top of the Track List if you want to globally disable reading of all automation in this project. At any time, you also can mute only a specific type of automation by clicking the Mute Automation button for the subtrack that is displaying that parameter in the Track List.
After you’ve recorded automation, editing it is not very different. You can use the Mixer window to edit automation in real time through the Write/Read Automation buttons or by editing automation parameters in their respective automation subtracks in the Project window.
You will probably notice that some parameters do not allow intermediate values. This is the case for switch type parameters, such as a Mute, Bypass, or Sustain Pedal MIDI message. Because these parameters are either on or off, there are only two acceptable values: 0 or 127. When editing their automation, you can only enter these values, and the curve points will automatically jump between these minimum and maximum values.
To edit existing automation data using the Write Automation button on a channel, you just need to write over the automation again. If Touch is selected as the automation mode, as soon as you touch a control (by clicking on it and holding it or moving it to a new location), the old automation is replaced by new values, until you release the mouse. At that point, if the Read Automation button is also active, from that point forward Cubase continues reading existing automation on the parameter’s automation subtrack. (To ensure that the transition back to the existing automation values is smooth, the Automation Return Time field allows you to specify how long this transition should be after you release the control.)
When you open a parameter subtrack containing recorded automation, you will notice that curve points (handles) appear along the automation line. Here’s a look at how you can edit the points on this line.
Edit recorded automation in a subtrack
To move an existing curve point. In the Project window, select the Object Selection tool and move the curve point to a new location by clicking it and dragging. Note that the quantize grid settings, if the Snap is active, influence exactly where in time you can move this automation.
To move several automation curve points simultaneously. With the Object Selection tool, drag a selection box over the points you want to move. The selected curve points become red. Click and drag one of the selected points to the new location. You also can Shift-click on several points if you want to edit non-continuous points instead.
To draw over existing automation. In the Project window, select the Draw, Line, Parabola, Sine, Triangle, or Square tool from the toolbar and click where you want to start drawing over the existing automation and drag your tool until the point where you want to stop replacing the existing automation. The first and last points where you draw this automation automatically create a connection to the existing automation line. You can use the different options associated with each tool to create different shapes; for example, use the Ctrl (PC)/
 (Mac) key to invert the parabola curve.
To erase existing curve points. Click on the point or drag a range over several automation curve points using the Object Selection tool. After the desired points are red, press Delete, Backspace on your keyboard, or use the Eraser tool to erase them.
To move or erase all automation curve points on a subtrack. Right-click (PC)/Control-click (Mac) over the desired subtrack’s Track List area and select the Select All Events option from the context menu. After they are selected, you can move or erase these automation curve points. Note that if you want to remove all automation for a parameter, you can also use the Remove Parameter option from the subtrack’s Parameter field.