
The Key Editor is used to edit MIDI events that represent melodic instruments. Editing a MIDI drum part, however, is a slightly different beast—and requires a slightly different editor. To that end, Cubase includes a dedicated Drum Editor, just for editing MIDI drum parts.
Here’s a summary of what you will learn in this chapter:
Recognizing different areas of the Drum Editor
How to edit drum parts
How to load a drum map and assign it to a MIDI drum track
How to create or customize a drum map
How to quantize drum parts
What you read in Chapter 23 about the Key Editor applies for the most part to the Drum Editor, as well. The Drum Editor, however, is optimized for working with MIDI drum parts, where you’re likely to have multiple parts of a drum set or percussion section playing simultaneously—but synced closely to the underlying beat.
You open the Drum Editor by selecting a MIDI event and then selecting MIDI > Open Drum Editor. As you can see in Figure 24.1, the Drum Editor looks a lot like the Key Editor. The big difference is that instead of pitches and a keyboard along the vertical axis, you have a list of drum sounds. In addition, each drum hit is indicated by a single diamond shape instead of a bar of specific length. (That’s because drum hits are just that, hits; they don’t have the sustain that you get when you hold a note on another instrument.)

As with the Key Editor, the Drum Editor is divided into task-specific areas. At the top of the window, of course, is the toolbar; with a few exceptions, the Drum Editor toolbar mirrors that of the Key Editor.
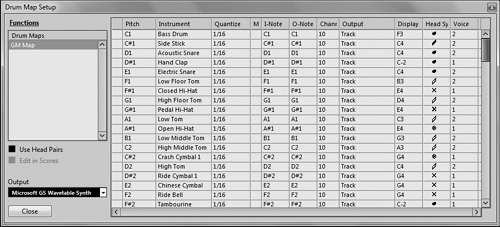
On the left side of the Drum Editor is the Drum Sound list; this replaces the keyboard display of the Key Editor. This list displays all the drum sounds in the current drum map and details which sounds are associated with which notes. The number of columns displayed in the Drum Sound list depends on the drum map associated with the track.
If you drag the vertical divider line that separates the Drum Sound list from the note display area on the right, you will reveal some of the columns that might be hidden in the Drum Sound list. It can have up to nine columns, each representing a control parameter for an instrument. You can reorder these columns by dragging their headers, but I will list them here in their default order.
The first unnamed column lets you select and monitor the instrument associated with this pitch. Selecting an instrument reveals its NoteOn velocity in the Controller Lane.
The Pitch column represents the pitch associated with a particular instrument. This cannot be changed because most instruments are already preprogrammed to play a certain instrument on an assigned pitch value.
The Instrument column represents the name of the sound associated with this row’s pitch. Each drum map has its own set of instruments. These can be renamed or dragged into any order that makes editing more convenient as you work.
The Quantize column represents the quantize value setting for each instrument. You can change this setting by clicking on the current value and selecting a new one. You also can change all the instruments’ quantize value settings simultaneously by holding down the Ctrl (PC)/
 (Mac) key as you make your selection. The list that appears offers the same options as the Drum Editor’s Quantize Grid drop-down menu.
The M column controls whether an instrument is muted. To silence an instrument, click in its instrument row in the M column. To unmute that instrument, click in the M (or Mute) column next to that instrument once again.
The I-Note column stands for the Input Note value or the note as recorded from the controller keyboard or drum machine, which I discuss when I cover the Drum Map feature in the next section. You can use the scroll wheel on your mouse to change this value (or the up/down arrow keys on a Mac), or you can simply click in the field and type in a new value.
The O-Note column stands for Output Note and represents the note at which the sound you want to map will be played back. By default, the O-Note is the same as the I-Note, but the ability to remap each input note to a different output note is an essential aspect of using drum maps. Again, this is discussed in the next section. You can change the value in this column in the same ways as the I-Note column.
The Channel column sets the MIDI channel assigned to the instrument in a specific row. Each row in the drum map can be routed out to a different MIDI channel. You can change the value in this column in the same ways as described for the I-Note and O-Note columns.
The Output column allows assigning each instrument (row) in this drum map to a different MIDI output port. To change the output, click the appropriate row in the Output column and select a new MIDI output from this column’s pop-up menu. Each note in a drum track could be assigned to a different instrument. For example, you could have the kick drum assigned to an external GM device, the snare to an LM-9 VST instrument, and so on.
Below the Drum Sound list, in the left corner, are the Map and Names fields. The Map field selects a map from the Drum Map list or sets up a new drum map if you haven’t already done that. The Names field selects from a drop-down menu the names of instruments associated with different pitch values. So this field is grayed out when a drum map is selected.
To the right of the Drum Sound list is the note display area. The vertical axis represents different instruments or pitches, according to the information found in the drum sound list on the left and the timeline, which appears with smaller divisions per the current quantize settings. The blocks that represent MIDI note events in the Key Editor are replaced by diamonds here in the Drum Editor, each of which represents a NoteOn event. Notes are exactly aligned with the quantize grid when a vertical grid line crosses the diamond in its center.
Below the note display area are the Controller Lanes. Whereas the Key Editor displays the velocity of every note in this area, the Drum Editor only displays velocities for events in the currently selected instrument (row). For every other type of Control Change message, the Drum Editor behaves the same way as the Key Editor described previously.
Editing a drum part is as simple as clicking, dragging, and dropping. For example:
To change a particular hit from one beat to another, grab the note with your mouse and drag it to another location on the same horizontal line.
To reassign a hit from one drum or instrument to another, grab the note with your mouse and drag it to another instrument line; make sure you keep the note at the same horizontal position.
To delete a note, click the Erase button in the toolbar and then click the note.
To add a new note, click the Drumstick button in the toolbar (see Figure 24.2) and then click where you want the note to be—both vertically (which drum/instrument) and horizontally (which part of the measure).
As you can see, the Drum Editor makes it fairly easy to make changes—big or small—to your MIDI drum tracks.
Depending on the manufacturer and model, MIDI instruments may use a wide variety of MIDI note values for similar drum sounds. For example, one device might use C1 and D1 for its basic kick and snare sounds, whereas another might use C1 and F1 for the same purpose. This is fine when you know which note is playing which sound. But what if you want to try a different drum set or drum machine? Do you need to rerecord all your beats because C1 is not the bass drum anymore? That’s when drum mapping becomes very handy.
A drum map is simply a map of all the available percussion sounds on a MIDI device. The individual drums, cymbals, and other sounds are mapped to specific keys on the MIDI keyboard. Play a key and you hear the drum sound mapped to that key.
Cubase comes with its own ready-made drum maps; check the installation disk or the Drum Maps folder on your computer to see what’s available. Other drum maps can be downloaded from the Internet (try the forums at www.cubase.net), or you can create your own custom drum maps.
Only one drum map can be assigned to any specific MIDI track, but you can assign the same drum map to different MIDI tracks. For obvious reasons, if you use two tracks with the same MIDI output and MIDI channel, you can have only one drum map assigned to that MIDI device/VSTi plug-in.
Load a drum map and assign it to a drum track
In the basic track settings section of the Inspector for this MIDI track, click in the Drum Map field and select the Drum Map Setup option.
When the Drum Map Setup window opens, as shown in Figure 24.3, click the Functions drop-down menu and select Load.
Browse to the folder containing the desired drum map file (*.drm), select it, and click the Open button.
Select the newly loaded drum map from the Drum Map list and click Open.
Back in the Drum Map Setup window, click the Output drop-down list and select the default MIDI port associated with this drum map.
Click the Close button.
A drum map is essentially a list of 128 sound names associated with a specific pitch, Note In event, and Note Out event. Each note in a drum map corresponds to a pitch value. Each pitch value (note number) can be associated with an instrument name, such as Kick Drum 1, Snare, Hi-Hat, and so forth. You can then assign the played note to that named instrument, which in turn is associated with a pitch, such as C1 (or note number 36).
As you read earlier in this chapter, the Drum Editor displays note input (I-Note) and output (O-Note) columns. These columns can remap recorded notes. By remapping the recorded kick-drum part from a C1 to a C3, for example, you can keep the recorded performance playing properly without permanently altering the MIDI events it contains.
Figure 24.4 shows how a typical remapping might work. The left side of the figure shows the original drum map as played on your MIDI keyboard. The right side of the figure shows the new drum map, with several sounds remapped to different notes.

The Drum Editor window provides individual control over a set of parameters for up to 127 percussive instruments. One of these parameters is the quantize value, which can be set globally for the entire part or individually for each instrument assigned to a pitch in a drum patch. For example, set a different quantize value for the kick drum and the hi-hat when you step record.
The quantize value determines the spacing between each manually entered event. When the General Quantize button is disabled, the individual quantize settings take over. When the General Quantize button is enabled, the quantize value set in the toolbar dictates the quantize grid for each instrument in the part.
Setting an individual quantize value for each instrument in a drum track replaces the note lengths that will appear for this MIDI part in the Key Editor. Most percussive sounds need to have precise trigger timings rather than precision in their durations, so when using drum maps, you don’t usually extend the length of MIDI note events. With the exception of some samplers, most instruments play drum sounds until the end, and the MIDI NoteOff event’s position has little or no effect, no matter how long you hold the note. Unlike a guitar or keyboard note, the position of the attack, or NoteOn event, is more relevant in this case than the actual end of the event. As a direct result of this, there are no Split or Glue tools in the Drum Editor.