
The Project window represents the main view of a project; it is where most of the editing takes place—or at least where it all begins. Navigating from one part of the project to the other or focusing your attention on the first four bars of a chorus and then on the last eight bars of the second verse is something you will need to do quite frequently. Although repeatedly pressing the G key command to zoom out or the H key command to zoom in will work in some instances, there are more effective and elegant ways to move around in the project, which don’t involve increasing your chances of getting carpal tunnel syndrome!
Here’s a summary of what you will learn in this chapter:
How to navigate using the Overview line
Where to find different navigation menus in the Project window
What the basics of the Project window’s context menus are
How to zoom in to your work using the appropriate tool
How to change the time format of the Transport panel
How to use the jog, nudge, and shuttle features of the Transport panel
How to identify the tools and functions available in the Transport panel
Moving around in a project, finding what you want to edit, focusing on the task at hand, and then looking at the project in a more global perspective are as much a part of your work as is editing audio and MIDI events. Changing your display and opening and closing windows is unfortunately part of the computer-based musician’s reality, even if you use a large widescreen monitor—or even multiple monitors.
With so many items appearing onscreen and with screen space at a premium, it’s important to know how best to get around the Cubase interface. Fortunately, Cubase offers many options in this respect, allowing you to get to what you need in different ways. The idea is not necessarily to use all the techniques presented here, but rather to find out what is possible and to use a working method that makes it easy for you to quickly perform necessary tasks.
Although the Event Display area in the Project window can display a project from start to finish, you will quite often need to zoom in closer to gain greater accuracy for the task at hand, or to focus your attention on the section you’re currently editing. Cubase’s Overview line provides a way to always keep an eye on the entire project and the relation of the current Event Display within the project; this works no matter what your Project window’s zoom level.
Unfortunately, the Overview line is not displayed by default. To display the Overview, click the Set Up Window Layout button on the toolbar, and check the Overview Line box.
The Overview line now appears below the standard toolbar, as shown in Figure 16.1. The amount of the project, in terms of time, displayed in this Overview depends on the project’s Length value, which you can change in the Project Setup dialog box. Inside the Overview area is a shaded box called the track view rectangle, which varies both in size and placement. It essentially reflects the portion of the project that is currently visible in the Event Display area of the Project window. You can use this box to navigate throughout your project.

Cubase provides other tools you can use to control the content displayed on your screen. Here’s a look at these options, as shown in Figure 16.2.
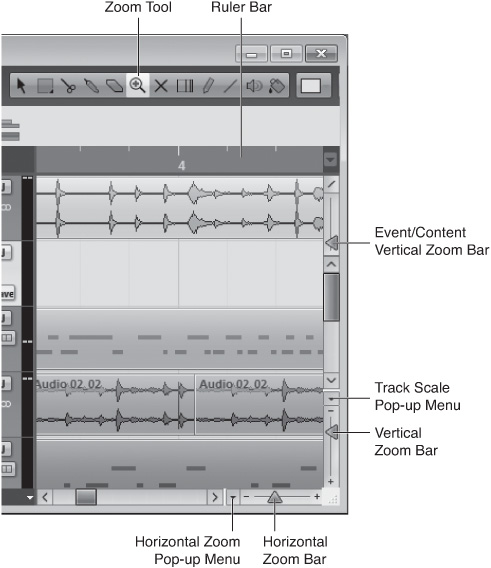
Zoom in to your work using the appropriate tool
Zoom tool. With this tool selected, you can use its “magnifying glass” cursor to zoom in on an area by drawing a rectangle around it. Hold down the Ctrl (PC)/
 (Mac) key while using the Zoom tool to zoom vertically and horizontally at the same time.
Ruler bar. This enables you to zoom in or out by clicking and dragging your mouse. Click in the lower half of the Ruler bar and drag your mouse downward to zoom in or drag your mouse upward to zoom out. Drag your mouse to the left to move back in time or the right to move forward in time. Your zoom always centers on the position of your mouse in the ruler.
Event and Content Vertical Zoom bar. This enables you to scale the vertical axis of the content within events or parts. Drag the handle up to enlarge the events within the event or part’s vertical boundary, or drag the handle down to reduce the vertical scale of this content.
Track Scale pop-up menu. This menu at the lower-right edge of the Project window sets the track height to a preset list of values or lets you enter how wide you want the tracks to be. Selecting the Zoom Tracks N Rows or Zoom N Tracks option brings up a dialog box in which you can type in the number of tracks you want to fit in your Event Display area. This menu is available by clicking on the down arrow found between the vertical scroll bar and the Vertical Zoom bar.
Vertical Zoom bar. This zooms in (move downward) or out (move upward) vertically, affecting the height of tracks in your Event Display area. You can either drag the handle in the Zoom bar to get the desired height for each track or click on the arrows above and below to increase or decrease by one row at a time.
Horizontal Zoom bar. This adjusts the portion of time displayed in the window. You can zoom in (move to the right) or out (move to the left) horizontally. You can either drag the handle in the Zoom bar to get the desired time frame inside the Event Display area or click the left or right arrow to increase or decrease by the time frame one step at a time.
Horizontal Zoom pop-up menu. This enables you to select a preset amount of time, the space between the left and right locators, or any cycle marker and zoom in on it. You can also save a zoom level as a preset that you can recall later. For example, you can create two states—one for a larger perspective and another for a more detailed look at events or parts on your timeline. Then you can use this menu to toggle between the two (or more) zoom settings. Use the Add option to save the current zoom state to memory and the Organize option to manage the items available in this menu. This menu is available by clicking on the down arrow found between the horizontal scroll bar and the Horizontal Zoom bar.
In addition, you can select Edit > Zoom to display a submenu with a variety of zooming options.
As first discussed in Chapter 15, “Navigating the Project Window,” the Transport panel is a multitask floating panel, several areas of which are important to project navigation. To hide or display the Transport panel, select Transport > Transport Panel, or press F2 on your computer keyboard. To display various areas of the Transport panel, right-click (PC)/Control-click (Mac) on the panel itself and check those sections you want to display; uncheck those sections you want to hide.
In the middle of the Transport panel are the main Transport controls (Stop, Play, Record, and so on). Above these controls are the primary (left) and secondary (right) time displays, shown in Figure 16.3. These displays show the current location of the cursor in two customizable formats. Between the two formats is a toggle button, which allows you to switch the position of the two currently displayed formats.
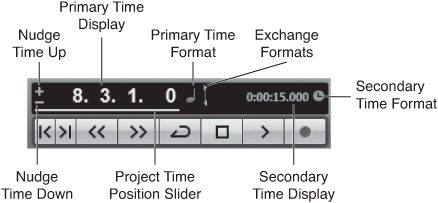
Changing the format of the primary time display also changes the time format in the project’s ruler—although afterward you can also set the ruler’s time format independently without affecting this primary time display in the Transport. The secondary time format on the right does not have the same effect; it is there only to provide information about time and position in an alternate format.
The small plus and minus signs on the left of the time display allow you to nudge the position of the project cursor one unit at a time. Below the time display is a project cursor overview display (blue line), which enables you to monitor the location of the project cursor as your project moves along. You can click within the line to drag its cursor to any location you desire in the project’s timeline, or simply click once anywhere in the line to make your project cursor jump to that location immediately.
Cubase 6’s Shuttle, Jog, and Nudge wheels, shown in Figure 16.4, are useful editing tools that quickly move the cursor within a project while you are listening to the audio/ MIDI. These controls are not displayed by default; make them visible by right-clicking (PC)/Control-clicking (Mac) the Transport panel and selecting Jog/Scrub from the popup menu.

Here’s an overview of these functions:
Shuttle wheel (outside ring). Moving the ring to the right or the left causes the cursor to move forward or backward in time. The farther away from the center position you move the wheel, the faster the playback is. The maximum shuttle speed is indicated by the small markings on the lower half of the shuttle, on each side of the ring itself (see Figure 16.4). You can operate the Shuttle wheel by clicking on the ring and moving your mouse to the left or right.
Jog wheel (middle ring). By holding down the mouse button over the Jog wheel and moving it toward the right or left in a circular motion, the project cursor moves forward or back in time. Unlike the Shuttle wheel, you can turn the Jog wheel as much as you want. This is a great tool to look for specific cues in a project, because you will hear your events under the playback cursor playing back at a speed and direction that’s relative to how fast you rotate the Jog wheel. (This technique is known as scrubbing.) Typically, you would use the Jog wheel when you are looking for something, going slowly over events. When you stop moving the mouse, playback stops.
Nudge Frame buttons (inside the Jog wheel). These two buttons move your project one frame ahead (plus sign) or one frame behind (minus sign), no matter what your time display may be. The number of frames per second, however, is determined by your settings for this project in the Project Setup dialog box. Obviously, if you don’t work with video, nudging the project cursor by a frame at a time may not be especially useful to you if you customarily deal with bars and beats.