
In traditional recording, you apply signal processing—such as compression and equalization—via an insert effect. On a hardware mixing board, an insert is a point in the audio channel strip where the signal can leave the channel, pass through an external effect, and then be re-introduced into the signal path of the channel.
In Cubase, inserts play a very similar role. Most inserts are software-based effects inserted into the signal path, although you can also insert external hardware-based effects. Software-based effects—often called plug-ins—let you do things like apply dynamic compression, add reverb and echo, and even use various filters and modulators to alter recorded events in very distinctive ways—all of which can dramatically change or improve the quality of your final recording. Cubase includes a number of these plug-in effects as part of the Cubase package. Other plug-ins can be downloaded from the Internet or purchased from third parties.
Here’s a summary of what you will learn in this chapter:
How plug-in effects work
The various plug-ins available with Cubase 6
When and where to apply plug-in effects
The signal flow of insert plug-in effects
How to apply insert effects
How to add inserts to Control Room studio and headphone channels
How to add inserts to Control Room talkback and external input channels
How to load insert plug-ins into monitor channels
In old-school tape-based recording, audio effects were added via outboard boxes that literally plugged into the recording console. With computer-based recording, the plug-ins are software programs or utilities that perform the same functions as the traditional outboard boxes.
Cubase follows this paradigm by offering a variety of plug-in effects, from simple reverb to complex filtering and modulation. Each plug-in effect you select is inserted into the audio signal path at a given point and effects the audio signal from that point onward. The effect is applied in real time, which means that the audio processing requires a fair amount of computing horsepower; some effects are more power-hungry than others, of course. But because the processing is in real time and is applied after the original audio signal enters the system, the original audio is not altered by the effect—only the resulting sound is changed.
You can apply plug-in effects at five different points in the recording process:
Input insert effects. These effects are added to the input bus as the recording is being made, so that the recorded track includes the effect processing.
Offline audio processing. These effects are added directly to the recorded audio event—not to the entire track.
Insert effects. These effects are inserted into the signal path just after the original channel input and before equalization and volume are applied. Insert effects are applied to the entire track, not just a single recorded event.
Send effects. These effects are added to the end of the signal path as separate effects tracks; the final audio is routed to the effects track as the final step in the process.
Master insert effects. These effects are inserted into the master output bus during the mastering process, after the individual tracks have been mixed to a stereo signal. These master effects are applied to the entire mix, not individual channels.
To simplify things, just remember that insert effects apply to your inputs, and send effects apply to your outputs. In addition, input insert effects are applied directly to a track when you’re recording, and master insert effects are applied at the end of the process, to your entire recording.
This chapter focuses on the most-used type of effect, the insert effect. Let’s say, for example, that you want to apply some distortion to a guitar track you’ve just recorded.
The audio from the event is routed through the selected plug-in, which adds a distortion effect to the signal. The now-distorted signal comes back into the channel and continues through the path, on to the output bus and ultimately to the monitor mix (or, when you’re ready, the final mix). Note that the original recorded event remains unchanged in the track listing, altered not at all by the process; the effect is applied to the signal after the event is played.
Compare this type of insert effect to a send effect—for example, adding reverb to a vocal track. With a send effect, the audio stays in the signal path until it reaches the output bus, where it is sent to the selected plug-in. The processed signal is then available to be sent to the monitor mix or to the final mix-down.
When, then, should you use a particular type of effect? It all comes down to how much computer horsepower each operation takes—and what type of effect you’re applying.
Let’s start by making a distinction between real-time or “online” processing versus offline processing. Online effects—which include insert, send, and master effects—are calculated and processed by your computer in real time and require tons of processing power. If you apply too many online effects at the same time, your computer will slow down considerably, and might even freeze up. (Naturally, the newer and more powerful your computer, the less of a problem this is.)
In contrast, offline effects, which are applied directly to an audio event (and subsequently change the original event) are processed before you initiate playback or mixing, and thus use up none of your computer’s precious processing power. If you need to reduce the load on your PC, you should choose offline effects over online ones whenever practical.
And, just to confuse things even more, insert effects (including input inserts and master inserts) can require more processing power than send effects. (This is why you can save processing power by using sends instead of inserts.)
Equally important, some types of effects are simply more effective when applied at specific places in the signal path. Here are some guidelines:
Use input insert effects for adding compression when recording vocal tracks.
Use regular insert effects for filters, choruses, phasers, noise gates, compression, and other dynamic effects.
Use send effects for equalization, reverb, delays, and modulation effects.
Use master insert effects for any effects you want to apply to your entire mix—typically compression, reverb, and equalization.
Use offline processing for any of Cubase’s audio processes (on the Audio > Process menu), as well as for those effects you want to apply to only a section of a track.
Cubase 6 includes a number of plug-in effects for audio recording. In addition, plug-ins can be purchased from a variety of third-party manufacturers. For now, however, this chapter focuses on those plug-ins that come in the Cubase 6 box.
Table 13.1 describes the audio effects shipping with Cubase 6—that is, those effects that can be applied to audio recordings.
Table 13.1. Cubase 6 Audio Plug-In Effects
Plug-In | Description |
|---|---|
AmpSimulator | A distortion effect that emulates the sound of various guitar amp and speaker combinations. |
Autopan | Modulates the right and left stereo positions. |
Bitcrusher | Produces a noisy, distorted sound, like that in lower-bitrate recordings. |
Chopper | Produces a combined tremolo and autopan effect. |
Chorus | Adds short delays to the original signal and pitch modulates the delayed signals to create a “doubling” effect. |
Cloner | “Fattens” a track by adding up to four detuned and delayed voices to the original audio. |
Compressor | Compresses the dynamic range of the audio; makes softer sounds louder and louder sounds softer. |
DaTube | Emulates the warm sound of a tube amplifier; typically applied to individual instruments. |
DeEsser | A special type of compressor that reduces sibilance in vocal recordings. |
Distortion | Adds a classic guitar/amp buzz-like distortion to a track. |
DualFilter | Filters out specific frequencies while allowing others to pass through. |
EnvelopeShaper | Cuts or boosts the gain of the attack and release phases of an audio track. |
Expander | Reduces the dynamic range of a recording; also used to reduce noise in quiet passages. |
Flanger | Provides classic stereo flange effects. |
Gate | A traditional noise gate plug-in; silences audio levels below a set threshold level. |
GEQ-10 | A 10-band graphic equalizer. |
GEQ-30 | A 30-band graphic equalizer. |
Grungelizer | Adds noise and static, similar to that found on a worn-out vinyl record. |
Limiter | Limits the output level to make sure it never exceeds a set level. |
Maximizer | Raises the level of audio material without inducing clipping. |
Metalizer | Feeds the audio signal through a variable frequency filter, with feedback control. |
MIDI Gate | An audio noise gate that works in conjunction with a MIDI track. |
Mix6To2 | For surround sound recordings, enables the mixing of up to six surround channels to a stereo output. |
MixerDelay | New to Cubase 6, enables you to adjust and manipulate each individual channel in a surround track, group, or bus. |
ModMachine | Combines various modulation effects, including delay modulation. |
MonoDelay | Adds a simple mono delay effect. |
MonoToStereo | Turns a mono signal into a pseudo-stereo signal. |
MultibandCompressor | Professional-level four-band dynamic compressor. |
MultiScope | Used for viewing the waveform, phase linearity, or frequency content of a signal. |
Octaver | Generates two additional voices that track an octave above and below the pitch of the original. |
Phaser | Produces the classic “swooshing” phasing sound. |
PingPongDelay | A stereo delay that alternates between the left and right channels, for a “ping pong” effect. |
Pitch Correct | Automatically detects, adjusts, and fixes off-pitch vocals and instruments in real time. |
REVerence | Advanced reverb generator; enables you to apply specific room effects to a track. |
Ringmodulator | Produces complex, bell-like enharmonic sounds by multiplying two audio signals. |
RoomWorks | Professional-level reverb plug-in, used to create realistic room ambience and reverb effects in both stereo and surround formats. |
RoomWorks SE | A “lite” version of the RoomWorks plug-in; less CPU-demanding than its older brother. |
Rotary | Simulates the effect of a classic rotary speaker. |
SMPTEGenerator | Not an actual audio effect, but rather a tool that generates SMPTE timecode to an audio output to synchronize other equipment with Cubase. |
SoftClipper | Adds soft overdrive to a track. |
StepFilter | Multimode filter that can create pulsating filter effects and patterns. |
StereoDelay | A sophisticated stereo delay effect; uses a slight delay to expand the stereo effect. |
StereoEnhancer | Expands the width of stereo signals. |
StudioChorus | Two-stage chorus effect, used to “double” audio tracks. |
StudioEQ | A high-quality four-band parametric stereo graphics equalizer. |
TestGenerator | Generates an audio signal for testing purposes. |
ToneBooster | A filter that enables you to increase the gain in a specific frequency range. |
Tonic | Analog modeling filter, based on the design of the Monologue monophonic synthesizer. |
Tranceformer | Produces a ring modulator effect. |
Tremolo | Produces a vibrating tremolo effect via amplitude modulation. |
Tuner | A simple guitar tuner. |
UV22HR | Introduces background noise via dithering for mastering. |
Vibrato | Produces a vibrato effect, via pitch modulation. |
VintageCompressor | Old-school compressor effects. |
VST Amp Rack | A powerful guitar amp simulator, new to Cubase 6, that offers a choice of various amplifiers, speaker cabinets, and stomp box effects. |
VSTDynamics | An advanced dynamics processor, consisting of Gate, Compressor, and Limiter functions. |
WahWah | A variable-slope bandpass filter for the classic guitar “wah wah” effect. |
In Cubase 6, you can apply up to eight insert effects per channel. The signal from an audio track is routed through each active insert effect, one after another—in other words, the output of one insert effect feeds the next one, and so on, from top to bottom in a kind of chain.
The first six effects slots are applied before the fader and the last two after the fader. As you can see in Figure 13.1, the signal enters the first six pre-fader inserts once it enters the channel and passes through the phase and trim control. The output level of the active effect in each insert slot determines the input level of the following insert in this chain; there is no control over the amount of output signal for the insert section as a whole. Some plug-ins, however, do offer their own output level control. After the signal passes by the access points for any sends sent to pre-fader (which are not affected by the track’s main volume fader), EQ section, level, and mute controls, it enters the two post-fader inserts.

By the way, it’s important to note that the order of insert effects matters. That is, inserts work in a chain, one after another. So if you apply a distortion effect before a compression effect, it’s going to sound different than if you apply the compressor before the distortion—in that first instance, the compression is applied to the distorted sound, while in the second instance the distortion is applied to the compressed sound.
Because the first six insert slots are not affected by the track’s main volume fader, this is the best place to apply a compressor and control the peaks of a signal. You can then use the fader to adjust a signal that has already been dynamically controlled, allowing for greater flexibility and presence when needed.
As shown in Figure 13.2, each insert effect slot has six controls:
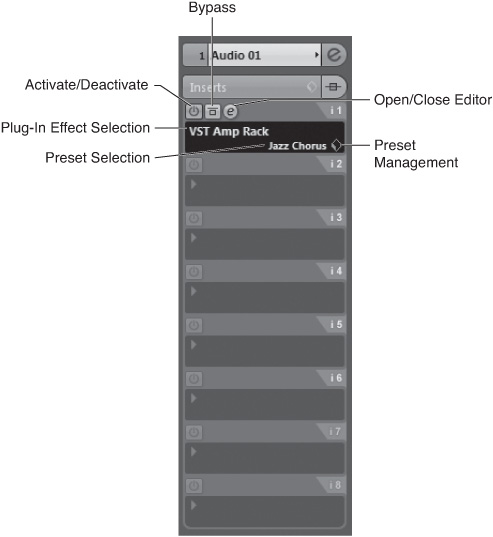
Activate/Deactivate Insert button. The plug-in stops processing the signal when the inserts are turned off, but it retains all of its current settings.
Bypass button. Cubase continues to process the signal as it passes through the plug-in, but the channel’s signal bypasses the plug-in’s output.
Open/Close Editor button. This button will open the control panel for that slot’s active insert plug-in.
Plug-in effect selection field. This field lets you choose from a list of installed plug-ins.
Preset selection field. This field displays the selected preset or lets you access to Cubase’s SoundFrame preset management system.
Cube-shaped preset management button. This button lets you load or store saved plug-in presets.
You also find a number of controls in the Inserts section of the Inspector. These controls affect all inserts within it:
The Bypass Inserts button bypasses the entire Inserts section on this track. As with the Active/Deactivate button for each insert slot, this can be useful for comparing your track (with or without effects), without having to alter each individual effect. When the Inserts section is bypassed, a yellow rectangle appears at the location of the Bypass Inserts button.
The Inserts title bar maximizes or minimizes this section of the Inspector, whereas the Show Active Inserts indicator to the right of the title bar displays whether any inserts are currently active in this track. The default project color means that there are no active inserts on this track (even though some may be selected for the slot but not currently active), blue means there are active inserts, and yellow means there are inserts that are not currently active.
As discussed previously, Cubase lets you apply insert effects either as traditional inserts or as input insert effects. Use input inserts to apply the effect as the track is being recorded.
In other words, input insert effects are added to the beginning of the signal path as a recording is being made. This means that the processed sound is recorded to disk; once added, you can’t remove an input insert effect.
Apply input insert effects while recording
In the Mixer, click the Edit button for the input bus (not the selected track) you’re using to record, as shown in Figure 13.3.
This displays the VST Input Channel Settings dialog box, shown in Figure 13.4.
Click the first Insert Effects slot to display the list of available effects.
Select an effect from the list.
The control panel for that effect now appears in a separate window. Configure the effect as necessary, and then close the window. (You can reopen the effect control panel at any time by clicking the Edit button in the insert effects slot.)
To activate the insert effect, make sure the Inserts State button is clicked on (displays blue).


In contrast, regular insert effects are added to the signal path just after the original channel input, which means that the audio is routed through the effect—affecting everything that comes after that point in the process. Inserts require the most processing power of any type of audio processing or effect.
When working on a mix, it is important to understand that the more effects you have running in real time (online, as opposed to offline), the more processing power is required from your computer. Each instance of an effect loaded into an insert effect slot on an individual channel uses the same processing power and memory as it does if it were loaded into an insert slot on a group or FX channel and used as the common destination for multiple sends from multiple source tracks.
With this in mind, it is highly recommended that you use the send effects (through FX channels) rather than using the inserts, if you’re going to apply the same effect with the same settings to various tracks (typical with delay and reverb effects, for example). If you need to apply the same dynamic process on several channels, route the output from all these channels to the same group channel by setting these channels’ output to an available group channel (or create one if necessary) and add an insert effect to that group channel instead. By doing so, all channels routed to this group channel will be processed through the same plug-in with the same setting, and you will use fewer computer resources, which will allow you to save these resources for when you really need them.
To monitor how your computer is doing in terms of system resources, you can take a look at the VST Performance window (Devices > VST Performance, or F12) or the Transport panel. The VST Performance window provides a tool for monitoring system performance so that, if necessary, you can make changes to your project before your computer starts to become overloaded.
And when you’re finished tweaking the inserts on a track, you can always use the Freeze command to free up some resources by temporarily freezing these settings in place. To find out more on how to use the Freeze command on audio channels, take a look at Chapter 40, “Optimizing Your Project.”
Cubase’s Control Room Mixer (CRM) provides additional monitoring controls, most of which also support the addition of processing through the use of insert plug-in effects. For example, you can add a limiter plug-in effect to a talkback, studio, or headphones channel in order to prevent any strong peaks from damaging monitoring equipment (or the ears of the musicians themselves!).
Add inserts to Control Room studio and headphones channels
In the Control Room Mixer, expand the extended view.
If the meters are currently displayed, click the Show Meters/Inserts button to switch to Inserts view, as shown in Figure 13.5.
Click the first insert selection field in either the Studio 1 or Phones channel and select the insert you want to enable.
The control panel for this plug-in opens by default, so you can choose a preset from its preset menu and adjust its settings as needed.
Close the plug-in’s control panel when you are finished.
