
CHAPTER 9

Freeform Animation
Richard Lapidus
Rule: Squash and stretch
After Completing This Chapter, You Will be Able To:
• Create freeform motion with a biped while using a variety of anchors.
• Animate a character to navigate one or more obstacles.
• Incorporate motion inherent adjusting weight.
One of the very important concepts that you want to consider while animating character is how changes in position occur relative to exaggerated motion. For example, if a character is going to apply excessive orce to another object, there has to be some momentum built up before the forces are applied. Many people think of momentum in terms of velocity of moving objects, but it can also be viewed as a buildup of energy applied prior to a motion. As you’ll see in the image above, I provide you with my classic three obstacles project. In the foreground is a biped facing a fairly odd formed rock. To move the rock up the hill, the biped would simply walk and gingerly push it. You want your character to crouch down and then release the force of a push as it stretches out against the rock. As a biped doesn’t normally squash and stretch like a rubber ball, we’re going to consider the squash as the biped crouching and curling up and then stretching out in order to create the illusion that it is moving a very heavy object. The other two obstacles in the scene, one of which is fairly apparent, is to have a biped ascend a staircase with some missing steps and the other is to have a biped climb out of a well. I’ve included this chapter in the sequence after footsteps, Motion Mixer, and the biped down the well chapters. In my classes, we typically do this exercise first followed by the previous chapters listed above. Because the process of locomotion through walking or jumping can be programmed in I find that many students don’t take the time to really study force and motion relative to human motion. Typically, I will give them five weeks to continue working on this exercise after they’ve had the opportunity to examine motion from footstep driven animations or mocap files. There is always the question of why create animation by hand when you can simply cut and paste captured motion. The answer isn’t very simple. I used to answer the question by referring to Michelangelo’s David. Yes, there are machines today that can scan and manipulate rapid prototype objects, but it is still the hand of the artist that makes a piece significant. Michelangelo created a work of art with a hammer and chisel, quite possibly the perfect piece of work. Imagine what he can do today with modern tools. Quite possibly he might not want to. He envisioned it, drew it, and removed everything that was not the David within a large piece of marble. Working with the latest tools, might possibly have not given us the same work of art. There’s a struggle that occurs in creating art, or animation for that matter. It’s not a simple matter of cut-and-paste. Those are simple tools as part of the larger process of perceiving the world and placing them together in order and in some fashion. It might sound like I’m not a fan of motion captured animation. It is in fact quite the opposite. One of my favorite things to do is view the extras included with DVD movies that shows an inside look of the production process. In a lot of the action scenes that require a character to jump, flip, or fly through the air, the viewer is going to see the actor in some type of harness rigged up in front of a green screen. The motion is typically not caught on film or through motion capture devices the first time. The actor, director, and visual artists are working together through multiple takes to get just the right action to pull into use somewhere else.
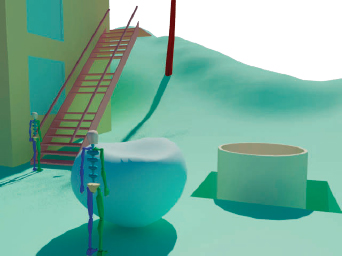
FIG 9.1
I have climbed out and over a few obstacles in my time, some of them not so gracefully. I’m going to show you the mechanics of anchoring the hands and feet in order to position the biped through various positions of squash and stretch. Feel free to apply different concepts of how to maneuver through these obstacles using your own creativity. You could of course use footsteps to maneuver the biped walking up the steps, the hill, or out of the well followed by adding layers to complete any of these obstacles. I think you’ll find that by taking the time to hand animate all of it; this will give you the opportunity to conceptualize a better animation. In addition to the scene and characters, there are several cameras already created within the scene. There are two reasons for this; one is to quickly view the biped that you will work on, and the other is to immerse yourself within the scene from a particular point of view. Think about and try to imagine having to maneuver one of these obstacles before you start.
Visualization is a very important part of the animation process. The camera, which a lot of people typically use in the end process of creating a project, is very important to view your projects during the entire process because it immerses your mind into the 3d space. Here is an example of why immersion is important. One of my students who chose the “well project” had their biped climbing with the butt sticking as far out from the wall as possible. Since many people have not had the opportunity to climb out of a well or up the face of a mountain before, there are several significant factors that may not be considered. The first one is relative to weight and the result of gravity. Take a look at any movie that has a climbing scene in it. The actor is hugging the rock face as closely as possible unless another support is in place like a rope being held by a friend above. Drama is added to a scene when the character slips or the rope breaks. Then what happens, they are hugging that surface for dear life.
1. Let’s start by opening the file called “Chpt9_3_obstacles-start.max”.
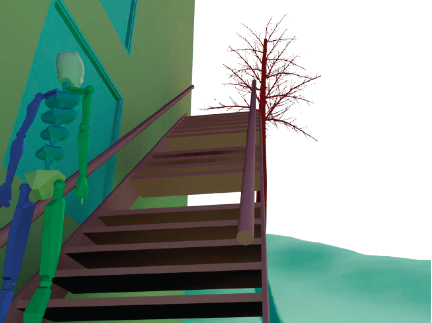
FIG 9.2
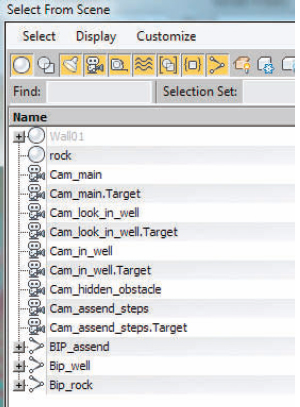
FIG 9.3
2. Click the Edit Name Selection Set icon or drag on the drop-down arrow for Create Selection Set.
You will see that I have already created a selection set for BIP_assend, separate feet, and a set for the back. By creating and naming quick selections for objects, it makes your job easier when trying to reselect an object easily. If you like, select the right hand and make a set for it as well as the left.

FIG 9.4
3. Enable the camera named Cam_assend steps to view the biped called BIP_assend standing in front of the steps.
I have adjusted the view in Fig. 9.4 in order to see the biped’s feet and more of the lower portion of the steps. Note also from the image that the Motion Panel Rollouts have been shuffled around in the following order: Biped, Track Selection, Keyframing Tools, and Key Info. These are the main rollouts we will be using. Under Track Selection, the body horizontal, vertical, and rotation are highlighted with a green ellipse. These three icons allow you to switch quickly to the biped’s COM Object if another biped part is selected. In the Keyframing Tools Rollout, the important icons we will be using are to anchor the hands and feet. The area indicated is the Set Key icon in the Key Info Rollout. Since this structure will not be footstep or mocap driven, whenever the main COM Object is moved or rotated the main parent in this hierarchy structure, there is nothing to anchor the feet or hands by default. The key to having planted hands or feet work properly if you are going to need to turn it on or off is to remember to Set Keys before you turn off. The planted option holds a hand or foot in place but does not create keys when you turn off.
We’re going to animate the biped walking up the steps, stopping at the top, and then bending over and swinging out into space. I’m going to take this series of steps to have my biped not make it and fall into a hanging position at the first series of missing steps. We’re then going to add several layers to control the arm swing, arching back, and any keys that need to be fixed. Because we’re using the smooth tangents to animate these keys, the feet and hands are going to have a tendency to move out of position and through the steps at times. This is an easy thing to fix with layers.
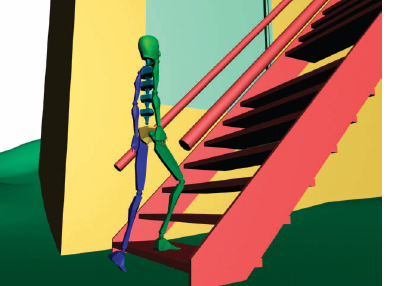
FIG 9.4a
4. Select any part of the Bipd_assend and enter Figure mode.
Notice that the biped does not move. I created it and then positioned it here so that if you wanted to change the structure of the biped, it would not move.
5. Increase the number of fingers to five.
I’m not going to increase the number of finger links at this point because I’m not doing subtle hand animation just the broad motion of the walk up, the steps, and a fall.
6. Select the body vertical and click Set Key. Repeat this for the body horizontal.
Notice how a red and yellow keyframe will show in the timeline for the COM Object.
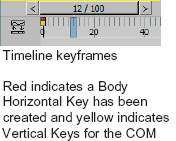
FIG 9.5
7. Make sure the Key Tangent is set to the Default Smooth Interpolation if you changed it in a previous file.
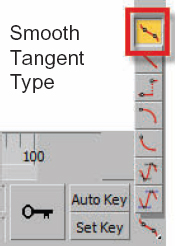
FIG 9.6
8. Now select the right and left foot and click the Set Key button to create keys for them at frame 0. When you animate with the Auto Key off and using the set key method, it will not automatically create keys at the zero key when creating future keys.
Even though we have smooth tangents set, there are so few keys to interpolate a nice move curve at this point. Add a little curve to it so it looks more natural. Finally at around frame 5, add a little rotation to point the foot down. As you scrub the timeline, notice that the foot takes up points down and then rotate back into place to set down on the first step. If you don’t want to add the rotations at this point, those can always be added in later on with a layer. Think of this level of animating to be your base layer to get your biped off the steps and prepared to maneuver over the missing steps.
Note
If you find it difficult to be positioning on the “Z” and “Y” axes as we will be through most of the process of animating the steps, you can drag on the spinners for the axis below the timeline in the status area.
At this point, we could anchor the feet, but that becomes very laborious when you need to have the hands or feet move again in the future. If you had a character holding onto something through a long segment, then an anchor would make sense. Instead we will use planted, sliding, and free keys.
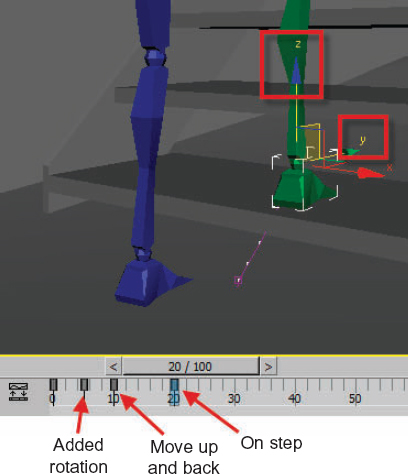
FIG 9.7
9. Select the left foot and create a planted key. Repeat this for the right foot.
If you move the body vertical, you notice that the feet stay stuck in place.
10. Move to frame 20 and position the right foot up on the first step and created key this time with the sliding key icon. If you try to set a planted key, it will stick. You’re going to want to have the foot planted on the first step, but you have to create the key first and then plant later on.
11. Move back to frame 10, adjust the position of the foot a little higher, and set a free key. Move back in time to around frame 5, then rotate the foot down a bit, and set a free key.
12. Select the body horizontal drag to frame 20 and move the body forward. Remember to set a key every time you find a position you like. If you position the biped to high or far forward, you will be pulling the biped off its feet.
13. Move to frame 11 and rotate the left foot a little. Use free keys for setting the positions and rotations. Repeat this at around frame 20. You want to position the left foot so it looks like it’s rotating up off the ground.
14. Drag the Time Slider.
15. Move to frame 40 and select the body vertical. Now position the biped to almost standing straight up on the right leg. Since the legs typically are never completely stiff, make sure you leave some bend in the leg.
16. Add a small adjustment to the body horizontal motion as well.
17. Scrub to frame 60 and then back to 40, select the right foot, and set a planted key at frame 40.
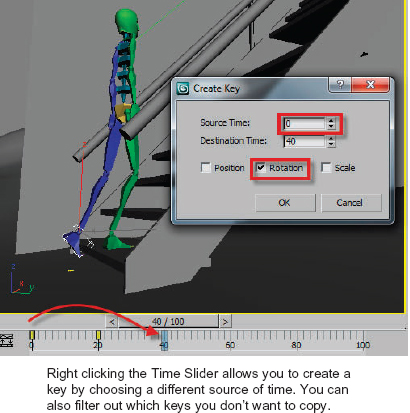
FIG 9.7a
18. Select the left foot and notice that it’s still a little bent. Move to frame 60 and right click the Time Slider. When the Dialog appears turn off position, set the source to be frame 0. This will copy the original rotation from 0 to 60.
19. Now position the left foot up on the second step and create a planted key.
20. Move to frame 40, position the left foot, and set a free key; rotate the left foot and set a free key. Move to frame 50, adjust and rotate the left foot with free keys at frame 60, and then set a planted key.
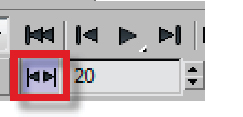
FIG 9.7b
21. When you need to adjust previously created keys, it is always best to use the Key Toggle mode. When enabled, it changes the Next Frame button to a Next Key button so that you are snapping to keys.
The key to making a walk cycle in a freeform mode is to create keys setting the motion into the future like with the step, and then changing it to a planted key before you animate the biped stepping onto it in transferring the weight. You need the planted key when you want the foot to stay in place as you move the bipeds main COM Object.
22. At frame 80, set a body vertical key and then back in time to frame 60, set another body vertical key.
23. Select the right foot and set a planted key at frame 60. Move to frame 70 and set a free rotation key.
24. Scrub the time line and if necessary move the right foot up and set of free key at frame 70 as well.
25. Move to frame 100 where you want to then move the right foot up to the third step. Since you have a Rotation Key at frame 70, the foot will still be bent forward. Right click the Time Slider and copy the rotation from frame 0 to frame 70. Now position the right foot on the third step and set a free key.
26. Move to around frame 90, position the right foot up and back a little bit with a sliding key.
27. Select the body horizontal and at frame 100, try to move the biped forward. Notice how the right foot is sliding. Reselect the right foot and set a planted key.
28. Now position the biped forward and up a little bit setting keys for both.
29. Increase the length of your active time segments because it’s going to take more than 100 keys to walk the biped up the steps to the first hazard it must maneuver.
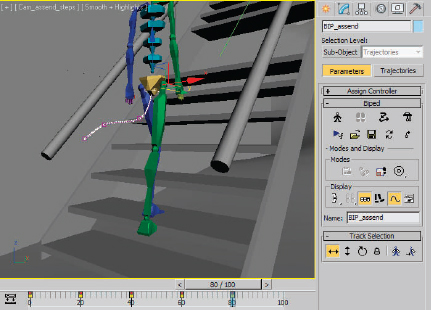
FIG 9.8
Play the animation. As the biped walks up the steps, you’re going to see a nice smooth bouncy curve for the trajectory of the BIP COM Object. If it appears that there is extreme peak or valley in this line, you may have animated the biped too far up or down. Turn on your Key Toggle mode and step through the animation jumping from one keyframe position to other keyframe position. The last thing you want to do is add a new position while creating a new key instead of adjusting a previously created key. That’s why the Key Toggle mode is such a nice feature, it steps you through from keyframe to keyframe.
30. Orbit the camera to a side view of the steps so that you can see the placement of the feet relative to the individual steps. If the foot is too far into the step, it will clip the next step as it moves up. Take a few moments to readjust the positions of the feet on the steps just in case there is too far into the step.
31. Select the left foot and move to frame 60. Now set a planted key.
32. Move to frame 120 and adjust the body horizontal and vertical so the biped is now standing on the third step with all of the weight on the right leg.
33. Select the left foot, move to frame 140, and animate it onto the fourth step. Make sure you set the position with the free key because if you use a planted key, it will snap it back to the same position that was in the frame 60.
34. Move to frame 100, right click the Time Slider, and adjust the source for the create key to be frame 60. Then set a planted key at frame 60. Now scrub the timeline to around frame 120. Move and rotate the foot into a natural lifted position so that the foot misses the step.
35. Move to frame 160 and set a planted key for the right and left foot.
36. At frame 170, create a new body horizontal and vertical position.
37. Move to frame 145 and adjust the body position as necessary.
38. At frame 140, position the left foot and set a planted key at frame 180, and position the body standing with most of the weight on the left foot.
39. Repeat this series of steps until your biped is standing flat foot on the top step.
40. Save the file and call it Chpt9_3_obstacles_assend _steps.max.
After you’ve completed the ascent portion of this chapter, we will continue by having the biped reach out and try and maneuver the missing steps. Continue with your previous file or load Chpt9_3_obstacles_assend _ steps.max.
41. It should take you somewhere between 260 and 400 frames to have your biped ascend up the steps. It just depends on the speed at which you have your character moving.
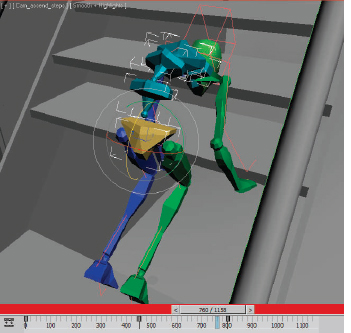
FIG 9.9
42. Move forward about 50 frames beyond the last point that you keyframed the biped to a standing position on the seventh step.
43. From the name selection drop down, choose the selection set called Bip_assend_back that will select all of the bipeds spine objects. This is one of those sets that I created before I saved the first start file.
44. Click the Set Key button to set position rotation keys at this point in time. If you are a starter animating the program, you would interpolate all the way back to frame 0.
45. Move forward about another 30–50 frames and rotate the spine so the biped bends over set a key.
46. Repeat this for the head and neck as well as making sure to offset the range that is used to set the keys.
47. Want the biped disorder look around a little bit as it’s bending down to reach and touch the step that’s there.
48. Scrub your timeline and find a position about 20–30 frames after the bend and set positions for the hands now, move forward in time, and rotate the hands so that they are resting on the next step in front of the biped.
49. You should see your biped bend over and touch the step. Take a few moments to rotate forearms and upper arms to get a natural position.
Up until now, we’ve been doing straight ahead animation. We will continue with that but now we’re going to plant the hands and have the biped swing down through the steps. Alternatively, you could have your character swing up and land the feet on the steps. I tried to make it enough of a gap that a normal person couldn’t hop over the missing steps. I’ve seen this done before and it never ends very well for the biped.
50. Now turn and plant the hands and plant the feet.
51. Position the biped into a crouching posture by moving the body vertically down a bit. Set a key.
52. Move forward in time and move the body vertical up and set the key to as if the biped is going to jump up in the air to move through. The hands will be in same position because they’re planted, but that’s okay because we can fix that later on.
53. Scrub the timeline and you should see your biped bend over touching the step. Crouch down, stand up, and then move through time and pull the body vertically down below the steps and set the key. You should see your biped hanging for dear life below the steps with the feet still stuck there on the last step. Not a very natural position for bipeds or people.
54. Set keys at the time in your animation before the biped jumps and then turn off the anchor for the left and right foot.
55. Scrub your timeline again and add a few rotation keys for the feet as they’re pulled off the step and then further in time, position them through to the next step above or down toward the ground if you’re going to have your biped fall through the opening.
56. Add a new layer for the biped and call it feet. Create new positions for biped in order to fix any problems which occurred in keyframing the feet. Think of layers as an adjustment on top of the basic motion that subtly allows you to enhance what is already there.
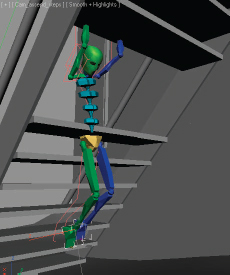
FIG 9.10
57. Create separate layers for the back, head, and even hands. The great thing about layers is that they can be turned off if you don’t like them.

FIG 9.11
The best option for you when you’re starting to work through fixing animation or adding subtle motion on top of the broad strokes is to create separate layers for the various body parts. For example, when I moved my camera around to the front position after creating the sequence of walking and dropping between the steps, I noticed that the biped had swayed a little too far to the right because I must’ve added a little bit of X movement on the COM Object. I also noticed that the legs are rotated a little bit far to the right because of my camera angle not catching it. In this case, I would create a separate layer to fix the legs, one for the arm swing, adjustments of the spine, and finally one to reposition the hands after the other layers were created. It’s important at least in this animation where we are trying to plant the hands and then move the biped in a drastic vertical position to fix those after adjusting everything else. Any change that you make to the COM, swinging the arms, or curving the back is going to apply some force and possibly reposition the hands since these objects are no longer anchored. Of the three obstacles to work a biped through, this is probably the most difficult. Once you get a handle on anchoring hands and feet, then doing a vertical climb out of the well or steps pushing a boulder up the hill will seem relatively easy. I hope you’ve found this chapter to be very challenging but at the same time a lot of fun to work with.
It takes some work to successfully handle keying a skeletal structure like a biped through fairly normal activities. There are several useful resources that you can look to in order to add some realism and understand the biomechanics of motion. The first that comes to mind is using the photography of Eadweard Muybridge. In the history of photography, he was the first to use high-speed film to capture the motion of humans and animals. These are a very good resource not only to study the cadence of the walks, for example, but also to understand the motion and positioning of body parts. With the availability camcorders and DVD players, you can also capture motion on film electronically and then step through it frame by frame to do what is called rotoscoping. Obviously, what’s going to make your animations look more realistic is to focus on the action that you’re trying to capture and then exaggerate a bit.
