Backing Up the Windows Server 2003 Operating System and Services
</objective> <objective> </objective> <objective> </objective> <objective> </objective> <objective> </objective> <objective> </objective> <objective> </objective> <objective>Media Management for Windows Server 2003 Backup and the Remote Storage Service
</objective> <objective> </objective> </feature>Windows Server 2003 is a robust and reliable operating system platform. There are many reasons to introduce Windows Server 2003 systems into a server environment, including distributed file, remote access, directory, print, Web, and network services. This stable platform can support several users, but as with any production implementation of a server, before the product is deployed, IT personnel should know how to install and configure it properly, how to optimize and monitor performance, how to support it, and equally important, how to back up and restore if a system failure is encountered.
When a new computer service, application, or operating system platform is introduced into a network, it always requires attention in the area of backup and disaster recovery planning. Administrators are faced with the task of creating a disaster recovery plan, which can seem to be an intimidating task. Disaster recovery planning is analogous to the age-old question, “What came first: the chicken or the egg?” How does it compare? For a disaster recovery plan, the question may be “What comes first: the backup plan or the recovery plan?” At least in this case, the answer is simple: They complement one another, so they should be planned in parallel.
Before a backup plan can be created, administrators must understand what types of failures or disasters they need to plan for and the recovery requirements for each of these failures. Learning first what is necessary for a recovery gives administrators a list of all the elements they may need to back up for recovery when a particular failure is encountered. When they know what needs to be backed up, they can then create the backup plan. So it is recommended that administrators research each server service and application to understand what is necessary for recovery so that their backup plan will target the correct information.
This chapter covers disaster recovery planning, providing tips, tricks, and best practices on implementing a backup and recovery strategy. In addition, it also provides step-by-step instructions for using tools built into Windows Server 2003.
Disaster recovery planning is an important part of any organization’s business operations. Disaster recovery planning is not just for servers, but is for the entire company. Not only does the organization need a plan to recover the server, but also the network, including helping the users connect if physical access to an office is unavailable.
Disasters come in many shapes and forms. This chapter covers backing up Windows Server 2003, but it would not be complete unless we at least outlined all the different areas that should be investigated and addressed when tasked with creating a disaster recovery plan for a computer and networking infrastructure. Knowing what sorts of disasters to plan for is the first step in disaster recovery planning. The following sections describe a few basic disaster types.
A site disaster is anything that keeps users or customers from reaching their desired office location. Examples include natural disasters such as floods, fires, earthquakes, hurricanes, or tornadoes that can destroy an office. A site disaster also can be a physical limitation, such as a damaged bridge, bomb scare, or building evacuation that would keep the employees from working at their desks. When only physical access is limited or restricted, a remote access solution could re-establish connectivity between users and the corporate network. Refer to Chapter 26, “Remote and Mobile Access,” for more information in this area.
Power outages can occur at any time unexpectedly. Some power outages are caused by bad weather and other natural disasters, but other times they can be caused by high power consumption. In the summer of 2001, many businesses located in northern California in the United States were left without power because the power company could not reroute power from the rural areas to the highly utilized areas such as Silicon Valley. Many businesses were unable to function because the core of their work was conducted on computers.
Organizations that use computer networks internally or externally to the Internet are all susceptible to network outages, causing loss of productivity and possibly revenue. Problems include a network line being mistakenly cut, the Internet service provider being purchased or sold, and a new organization inadvertently disconnecting the main connection for the office. Or, a network router or other network equipment, including hubs, switches, network interface cards, or even network cables, can fail.
Server failures are the type of problem most organizations plan for because they seem to be the most common disaster encountered. Server hardware failures include failed motherboards, processors, memory, network interface cards, disk controllers, power supplies, and, of course, hard disks. Each of these failures can be dealt with differently, but to achieve system-level fault tolerance, a cluster should be implemented using either Windows Server 2003 Cluster Services or network load balancing.
Hard drives have been singled out as a possible cause of server hardware failure. Windows Server 2003 supports hot-swappable hard drives, but only if the server chassis and disk controllers support such a change. Windows Server 2003 supports two types of disks: basic disks, which provide backward compatibility, and dynamic disks, which allow software-level disk arrays to be configured without a separate hardware-based disk array controller. Also, both basic and dynamic disks, when used as data disks, can be moved to other servers easily to provide data or disk capacity elsewhere if a system hardware failure occurs and the data on these disks needs to be made available as soon as possible.
Software corruption can occur at many different levels. There could be software corruption in a file’s access control list (ACL), an operating system’s file, or an application could have mistakenly overwritten files or folders. Systems providing access to databases are also susceptible to database corruption, so special care should be taken to be sure the databases are frequently backed up and that proper backup and restore techniques are understood.
Key to creating a disaster recovery plan is understanding the environment that needs the business continuity process defined. While understanding some of the different failures that can occur, administrators must also understand the servers and systems that they plan to back up and be able to document them from top to bottom. This process involves a discovery that includes mapping out both computer technology systems in place as well as business processes used in the organization. While systems can be recovered and replaced, if any changes occur after the recovery, users need training on or communication about such changes. Therefore, the process of learning about the environment involves understanding the technology and the business processes in use in the organization.
Each server service or server/client application on a network provides a key system function vital to or at least desired by the organization. Server applications that require special backup and restore procedures are especially important when disaster recovery planning is necessary. Each application, service, or technology should be identified and documented so the IT group can have a clear view of the complexity of the environment as the plan is being developed.
A single point of failure is a computer or networking device that provides a particular service exclusively due to application or budget limitations. Every single point of failure should be identified because it is usually a key device such as a very expensive router. Within Windows Server 2003, for instance, Active Directory inherently comes with its own set of single points of failure, with its Flexible Single Master Operations (FSMO) roles. These roles provide an exclusive function to the entire Active Directory forest or just a single domain. For more information on FSMO roles, refer to Chapter 7, “Active Directory Infrastructure.”
After all the computer services and applications used on a network are identified, including the single points of failure, they should be prioritized by order of most importance. To prioritize services and applications, administrators can start by understanding the purpose or need served by a particular application and how much impact it will have on business productivity or revenue if it becomes unavailable.
For example, a company that sells products via telephone or through a Web site may depend heavily on the database server that stores all the shipments, orders, and inventory; but it may not rely so heavily on the email server, which is used to send out marketing and order confirmation email messages. If, in the former example, the database server became unavailable in the middle of the afternoon, impact on the business could be tremendous because Web site orders would not be available. Phone orders would also suffer because orders may be taken for products that are out of stock. If the email server fails, it would need to be repaired and brought back online, but no loss of revenue would come as a direct result.
Every environment is different, so no single answer can be given when it comes to prioritizing the environment. The best advice is to plan carefully. Only the top few services and applications in the prioritized list will become part of the bare minimum services list.
The bare minimum services are the fewest possible services and applications that must be up and running for the business to continue to function. For example, a bare minimum computer service for a retail outlet could be a server that runs the retail software package and manages the register and receipt printer. For an engineering consulting firm, it could be the engineers’ workstations and the CAD/CAM applications, the file server that stores the blueprints, and the network plotter.
When administrators understand what sorts of failures can occur and know which services and applications are most essential, they have gathered almost all the information to create a high-level disaster recovery (D/R) solution. The last piece of the puzzle is finding out what the backup and recovery options are for, if not all the services and applications, at least the bare minimum services. When the process is discovered, the administrators must determine what hardware will be necessary to back up and recover the services locally or remotely if planning for a site disaster. Laying out the different D/R scenarios, only at a high level, and presenting them to the decision makers will allow the staff to view the project from an informed perspective as opposed to thinking of it as just another IT request for additional and unnecessary hardware.
Prioritizing and identifying the bare minimum services are not only the responsibility of the IT staff; these decisions belong to management as well. The IT staff members are responsible for identifying single points of failure, gathering the statistical information of application and service usage, and possibly also understanding how an outage can affect business operations.
Before the executives can make a decision on how they want to fund the IT department for disaster recovery planning, they should have all the pertinent information to make the most informed decision. When a D/R solution or information is proposed to management, the solution should contain costs associated with additional hardware, complex configurations, and a service-level agreement (SLA) estimating how long it will take to recover the service should a failure occur. Also, different options should be presented to show how different failure scenarios can be accommodated. For example, a spare server with the same specs as a production server can be used to test patches and application updates before they are applied on the production server, thus reducing risks associated with untested updates. This spare server can also be used if a component on the production server fails; the exact component can be swapped out with the spare server, if not the entire server itself.
It is a good idea to present the preferred D/R solution but also a few alternative lower-cost solutions as well. Most likely, the lower-cost solutions will also bring longer downtime intervals, but they may seem reasonable to the executives funding the solution. Getting the budget approved for a secondary D/R plan is better than getting no budget for the preferred plan. The staff should always try to be very clear on the service-level agreements and try to document or have a paper trail concerning D/R solutions that have been accepted or denied. If a failure that could have been planned for occurs but budget was denied, IT staff members or IT managers should make sure to have all their facts straight and documentation to prove it. In the end, regardless of who denied the budget and who chose which failure to plan for, IT staff will always take the blame, so they should push to get the best plan approved.
So far, we’ve discussed what computing services make up the environment, what types of failures to plan for, and which services must be made available first when multiple failures occur or when a site disaster is encountered. Now it is time to start actually building the disaster recovery toolkit that a qualified individual will use to recover a failed service, application, or server. To begin creating the toolkit, the current infrastructure must be documented completely and accurately.
Note
For complete information on documenting the Windows Server 2003 environment, refer to Chapter 24, “Documenting a Windows Server 2003 Environment.”
Server configuration documentation is essential for any environment regardless of size, number of servers, or disaster recovery budget. A server configuration document contains a server’s name, network configuration information, hardware and driver information, disk and volume configuration, or information about the applications installed. A complete server configuration document contains all the necessary configuration information a qualified administrator would need if the server needed to be rebuilt from scratch and the operating system could not be restored from backup. A server configuration document also can be used as a reference when server information needs to be collected.
A server build document contains step-by-step instructions on how to build a particular type of server for an organization. The details of this document should be tailored to the skill of the person intended to rebuild the server. For example, if this document was created for disaster recovery purposes, it may be detailed enough that anyone with basic computer skills could rebuild the server. This type of information could also be used to help IT staff follow a particular server build process to ensure that when new servers are added to the network, they all meet company server standards.
Documenting the hardware inventory on an entire network might not always be necessary, but it can be beneficial nonetheless. Many tools are available, such as Microsoft Systems Management Server (SMS), that can assist with hardware inventory by automating much of the process of gathering and recording the necessary information. These tools are especially useful in larger organizations. The amount and type of information the organization collects will vary, and can include every system or device, select network environment components, or specific information such as serial numbers or processor speed.
Network configuration documentation is essential when network outages occur. Current, accurate network configuration documentation and network diagrams can help simplify and isolate network troubleshooting when a failure occurs.
WAN connectivity should be documented for enterprise networks that contain many sites to help IT staff understand the enterprise network topology. This document helps the staff figure out how long an update made in Site A will take to reach Site B. This document should contain information about each WAN link, including circuit numbers, ISP contact names, ISP tech support phone numbers, and the network configuration on each end of the connection. It can be used to troubleshoot and isolate WAN connectivity issues.
Firewalls, routers, and sometimes switches can run proprietary operating systems with a configuration that is exclusive to the device. Information should be collected from these devices, including logon passwords and current configurations. When a configuration change is planned for any one of these devices, the newly proposed configuration should be created using a text or graphical editor, but the change should be approved before it is made on the production device. Also, a rollback plan should be created first to ensure that the device can be restored to the original state if the change does not deliver the desired results.
Recovery documentation, such as the server build document mentioned previously, can become reasonably complex and focused on a particular task. Recovery documentation aids an administrator in recovering from a failure for a particular server, server platform, specific service, or application. Recovery documentation will be covered in Chapter 33, “Recovering from a Disaster.”
One of the most important, yet sometimes overlooked, tasks concerning documentation is the updating of documentation. Documentation is tedious, but outdated documentation can be worthless if many changes have occurred since the document was created. For example, if a server configuration document was used to re-create a server from scratch but many changes were applied to the server after the document was created, the correct security patches may not be applied, applications may be configured incorrectly, or data restore attempts could be unsuccessful. Whenever a change will be made to a network device, printer, or server, documentation outlining the previous configuration, proposed changes, and rollback plan should be created before the change is approved and carried out on the production device. After the change is carried out and the device is functioning as desired, the documentation associated with that device or server should be updated.
Developing the backup strategy involves planning the logistics of backing up the necessary information or data either via backup software and media or documentation, but usually it is a combination of both. Other aspects of a backup strategy include assigning specific tasks to individual IT staff members to make sure the best person is making sure that a particular service or server is being backed up regularly and that documentation is accurate and current.
Creating a master account list is a controversial subject because it contradicts what some security organizations call a best practice; however, many organizations follow this procedure. A master account list contains all the usernames and passwords with root privileges or top-level administrator privileges for network devices, servers, printers, and workstations. This list either should be kept printed in a sealed envelope in a safe at the office or electronically encrypted. This list should be used only when the assigned IT staff members are not available, recovering from a failure is necessary, and only one of the accounts on the list has the necessary access. After the list is used, depending on who needed the temporary access, all the passwords on the list should be changed for security purposes, and another sealed list should be created.
Each particular server or network device in the enterprise has specific requirements for backing up and documenting the device and the service it provides. To make sure that a critical system is being backed up properly, IT staff should designate a single individual to monitor that device to ensure the backup is completed and documentation is accurate and current. Assigning a secondary staff member who has the same set of skills to act as a backup if the primary staff member is out sick or unavailable is a wise decision to ensure that there is no single point of failure among IT staff.
Assigning only primary and secondary resources to specific devices or services can help improve the overall security and reliability of the device. By limiting who can back up and restore data, and possibly who can manage the device, to just the primary and secondary qualified staff members, the organization can rest assured that only competent individuals are working on systems they are trained to manage. Even though the backup and restore responsibilities lie with the primary and secondary resources, the backup and recovery plans should still be documented and available to the remaining IT staff.
Creating a regular backup procedure helps ensure that the entire enterprise is backed up consistently and properly. When a regular procedure is created, the assigned staff members will soon become accustomed to the procedure, and it will become second nature. If there is no documented procedure, certain items may be overlooked and may not be backed up, which can turn out to be a major problem if a failure occurs. For example, a regular backup procedure for a Windows Server 2003 system could back up the user data on the local drives every night, and perform an Automated System Recovery backup once a month and whenever a hardware change is made to a server.
An SLA defines the availability and performance of a particular device or service. This is usually linked to a failure. For example, a generic SLA could state that for the file server FP01, if a failure occurs, it can be recovered and available on the network in four hours or less. SLAs are commonly defined specifically within disaster recovery solutions, or sometimes the SLA is the basis for the disaster recovery solution. For example, if a company cannot be without its database for more than one hour, a disaster recovery solution must be created to meet that SLA.
Before an SLA can be defined, the IT staff member responsible for a device must understand what is necessary to recover that device from any type of failure. Also, that person must limit the SLA to only the failure types planned for in the approved disaster recovery solution. For example, say a site outage is not planned for. The SLA may state that, if the device fails, it can be recovered using spare hardware and be back online in two hours or less. On the other hand, if a site failure occurs, there is no estimated recovery time because offsite backup media may need to be collected from an outside storage provider and hardware may need to be purchased or reallocated to re-create the device. The more specific the SLA is, the better the chance of covering every angle.
An SLA cannot be created until an IT staff member performs test backups and restores to verify that disaster recovery procedures are correct and that the data can be restored in the desired time frame. When an SLA is defined before the disaster recovery solution, the IT staff member needs to see whether a standard recovery procedure will meet the SLA or a creative, sometimes expensive, custom solution may be necessary.
Each device may have specific backup requirements. The assigned IT staff members are responsible for researching and learning the backup and recovery requirements to ensure that the backup will have everything that is necessary to recover from a device failure. As a rule of thumb for network devices, the device configuration should be backed up, and servers, local and shared storage data, operating system files, and operating system configurations should be backed up. Some backups may simply consist of documentation and a few settings in a text file.
In previous versions of Windows, if RAID 1 volumes were created using the operating system as opposed to a hardware-based RAID volume, the administrator needed to create a specific boot disk to point to the remaining disk to boot the server if the primary disk in the volume failed. Windows Server 2003 removes this dependency because it adds an additional line in the Boot.ini file that points to the second disk’s volume, allowing the server to boot properly using the remaining disk. The only caveat is that the administrator needs to select the correct option when the Boot.ini file displays the boot options on the screen. The mirrored volume is referred to as a secondary plex in the following Boot.ini file information:
[boot loader]
timeout=30
default=multi(0)disk(0)rdisk(0)partition(1)WINDOWS
[operating systems]
multi(0)disk(0)rdisk(0)partition(1)WINDOWS="C: Windows Server 2003, Enterprise" /fastdetect
multi(0)disk(0)rdisk(1)partition(1)WINDOWS="Boot Mirror C: - secondary plex"
The preceding example is taken directly from a Boot.ini file from a Windows Server 2003 system using software-level RAID 1 for the system partition. The secondary plex is just a reference, but the disk controller and disk volume information point the boot loader to connect to the correct remaining partition.
Sometimes a boot floppy is necessary, especially if the boot and system volumes are different and the boot files are inaccessible. In a situation like this, a boot floppy is priceless. To create a boot floppy, simply format a floppy disk, and then from the local server console, copy the Boot.ini, NTLDR, and NTDETECT files to the floppy disk. When the BIOS cannot locate the boot loader files, this floppy can be used to boot the system and point the system to the correct volume containing the operating system files.
The Windows Server 2003 operating system contains several features to enhance operating system stability, provide data and service redundancy, and deliver feature-rich client services. To provide the most disaster recovery options, many services have their own backup tools and may require additional attention. This section discusses ways to back up a Windows Server 2003 system to prepare for complete server failure or to be able to recover to a previous state. This section also outlines specific Windows Server 2003 services that have tools to aid in the backup recovery process.
A backup strategy for every Windows Server 2003 system should always include the boot and system disk volumes. On many installations, the boot and system volume are one and the same, but sometimes they are located on completely separate volumes, usually on dual-boot computers. For the rest of this section, we will assume that they are both on the same partition, and we will refer to it as the system volume. This volume contains all the files necessary to start the core operating system. It should be backed up before and after a change is made to the operating system and once every 24 hours if possible.
When applications are installed, they will, by default, install on the system partition unless a different partition is specified during installation. On average, the amount of data on the system volume, with applications and services installed, is anywhere from 1GB to 5GB. System volume usage can be on the high end when administrators forget to purge or archive logs such as the Web and FTP logs, if they are used on the system.
If a server is used as a file server, it is recommended to store user data separate from the operating system to improve overall system and user data access performance. When systems are built with this recommendation in mind, backing up just the system volume does not back up the user data. Backing up data volumes on a system is just as important, if not more important, than backing up the system volume. This volume usually contains user files and folders and application data including Web site data, log files, and databases. Usually, the data volumes end up being the largest volumes. This makes for longer backup intervals and may require more than one tape if a tape device is being used. For many organizations, a full backup of data volumes can be run only once a week, but to capture all new and modified data, incremental or differential backups can be run every day.
Many Windows Server 2003 services store configuration and status data in separate files or databases located in various locations on the system volume. If the service is native to Windows Server 2003, performing a complete server backup on all drives and the system state, the critical data is certainly being backed up. A few services provide alternative backup and restore options. The procedures for backing up these services are outlined in the section titled “Using the Windows Server 2003 Backup Utility (ntbackup.exe)” later in this chapter.
The system state of a Windows Server 2003 system contains, at a minimum, the System Registry, boot files, and the COM+ class registration database. Backing up the system state creates a point-in-time backup that can be used to restore a server to a previous working state. Having a copy of the system state is essential if a server restore is necessary.
How the server is configured determines what else, other than the three items listed previously, will be contained in the system state. On a domain controller, the system state also contains the Active Directory database and the SYSVOL share. On a cluster, it contains the cluster quorum data. When services such as Certificate Server and Internet Information Server, which contain their own service-specific data, are installed, these databases are not listed separately but are backed up with the system state.
Even though the system state contains many subcomponents, using the programs included with Windows Server 2003, the entire system state can be backed up only as a whole. When recovery is necessary, however, there are several different options. Recovering data using a system state backup will be covered in Chapter 33.
The system state should be backed up every night to prepare for several server-related failures. A restore of a system state is very powerful and can return a system to a previous working state if a change needs to be rolled back or if the operating system needs to be restored from scratch after a complete server failure.
When a Windows Server 2003 system is promoted to a domain controller, one of the configurations is to create a Directory Restore Services mode password. This password is used only when booting into Directory Restore Services mode. Restore mode is used when the Active Directory database is in need of maintenance or needs to be restored from backup. Many administrators have found themselves without the ability to log in to Restore mode when necessary and have been forced to rebuild systems from scratch to restore the system state data. Many hours can be saved if this password is stored in a safe place, where it can be accessed by the correct administrators.
The Restore mode password is server-specific and created on each domain controller. If the password is forgotten, and the domain controller is still functional, it can be changed using the command-line tool ntdsutil.exe, as shown in Figure 32.1. The example in Figure 32.1 changes the password on the remote domain controller named dc1.companyabc.com.

Several utilities included with Windows Server 2003 can be used to back up the operating system and server data. Many environments may choose to provide backups using a combination of these utilities, if not at least one. The Windows Server 2003 Backup utility should be used to back up the entire system. For backing up volume data to disk for added data recovery functionality, the Volume Shadow Copy service can be used. Finally, Remote Storage can be used to manage the data on a volume, which really isn’t a backup. The Remote Storage data is stored in a format that can be read by the Windows Server 2003 Backup program, so only the Remote Storage database and the links on the server volume need to be backed up, which can reduce the overall backup time.
The Windows Backup utility, ntbackup.exe, has been included with the server and sometimes workstation versions of the operating system for years. This utility can be used to perform a complete backup of the local server, including local drives, shared drives on cluster nodes, servers connecting to an external storage array, and the system state containing all the operating system configurations. The Windows Backup utility is covered in more detail in the “Using the Windows Server 2003 Backup Utility (ntbackup.exe)” section later in this chapter.
ntbackup.exe utilizes the Volume Shadow Copy service to back up opened files and truly create a complete point-in-time system backup. A new feature to the Backup utility is the Automated System Recovery option, which can be used to restore a server from scratch, including re-creating disk volumes. One major limitation of the utility is that it can back up only open files and the system state, and create an ASR backup of the local server.
The Windows Server 2003 Remote Storage service provides hierarchical storage management for the data stored on volumes. This service can be configured to migrate data from a volume to remote storage media based on when a file was last accessed or when a predetermined free disk space threshold is reached. When a particular file or folder is migrated to remote storage media, the file is replaced with a link called a junction point. When this link is accessed by the system or an end user, the data is migrated from the remote media back to the volume and the file access date is updated.
Remote Storage is not really intended to be a backup solution because the remote storage media can still be the single location of the migrated data; however, if a complete server failure occurs, the data on the remote storage media is recoverable. Windows Server 2003 Backup can be used to read and restore the data on the remote storage media; however, the original location of the data will not be preserved unless the Remote Storage service and database are restored first. For more details on Remote Storage, refer to the “Using Remote Storage” section later in this chapter.
The Volume Shadow Copy Service (VSS) is a new service for the Windows Server 2003 operating system, and it can be used to provide two separate backup strategies. The Volume Shadow Copy Service takes a snapshot of a volume, which can be used to restore data from the shadow copy to a volume without having to use a backup program or restore the data from media. This process is relatively fast and is able to back up open files to ensure a complete volume copy. Shadow copies can be enabled on a per-volume basis, and when the Windows Server 2003 Backup utility is used, it can be leveraged to create a volume copy of the drive and then create the backup using the shadow copy instead of accessing the volume directly. This provides faster backups and can improve server performance. The reads on data volumes can be reduced if shadow copies are stored on alternate disks. Volume Shadow Copy can be used only by Windows Server 2003 Backup for local volumes only. More information on the Volume Shadow Copy is provided later in this chapter in the “Using the Volume Shadow Copy Service” section.
In previous versions of Windows, the operating system had to have special drivers for disk virtualization. Otherwise, it may see storage on a SAN or NAS device that it might not own and consequently try to take over or use the storage when it shouldn’t. This created many problems and often required administrators to work closely with third-party disk vendors to implement a storage solution. In Windows Server 2003, the virtual disk service (VDS) provides a management interface that abstracts disk virtualization.
VDS gives administrators more flexibility and control over the disk subsystem. Specifically, external disks used for disk virtualization can be easily managed and maintained just as easily as if the storage were local to the server.
Although VDS is not considered a backup and restore utility, it is a service that administrators have long awaited for backup and recovery purposes. For instance, administrators can more easily allocate and deallocate storage either through a script or the GUI that can be used for storing backup snapshots.
Note
Many organizations are using VDS to create storage volumes for backup snapshots to disk. These snapshots are then backed up to tape during the nightly backup routine. This allows administrators to easily take snapshots periodically during the day to further safeguard data without sacrificing performance or availability.
By default, Windows Server 2003 incorporates basic and dynamic VDS providers, and many VDS providers can be obtained from hardware vendors. These third-party VDS providers supply LUN discovery and management services.
Windows Server 2003 includes several tools and services to back up and archive user data, but when it comes to backing up the entire operating system and disk volumes, Windows Server 2003 Backup is the program to use. Windows Server 2003 Backup is included on all the different versions of the platform. Some Windows Server 2003 services provide alternative backup utilities, but they still can be backed up using ntbackup.exe.
Windows Server 2003 Backup provides all the necessary functions to completely back up and restore a single file or the entire Windows Server 2003 system. Third-party, or even other Microsoft, applications installed on a Windows Server 2003 system should be researched to ensure that no special backup requirements or add-ons are necessary to back up the application data and configuration.
Windows Server 2003 Backup has been developed, or limited, to primarily backing up the local server, but it can back up remote server volumes as well. In the case of backing up remote server volumes, open files are skipped, and the system state can be backed up only on the local server.
The Windows Backup utility can run in two separate modes: Wizard and Advanced. Wizard mode provides a simple interface that allows a backup to be created in just a few easy steps:
Choose to back up or restore files and settings.
Choose to back up everything or specify what to back up.
Choose what data to back up only if you do not choose the option to back up everything.
Specify the backup media, tape, or file.
That is all it takes to use Wizard mode, but features such as creating a scheduled backup and choosing to disable Volume Shadow Copy can be performed only using Advanced mode.
Advanced mode provides greater granularity when it comes to scheduling and controlling backup media security and other backup options. In the following sections concerning Windows Server 2003 Backup, we will use Advanced mode.
Running the Windows Server 2003 Backup utility in Advanced mode enables administrators to configure all the available options for backups. Scheduled backups can be created; specific wizards can be started; and advanced backup options can be configured, such as verifying backup, using volume shadow copies, backing up data in remote storage, and automatically backing up system-protected files.
To create a backup in Advanced mode, perform the following steps:
Click Start, All Programs, Accessories, System Tools, Backup.
If this is the first time you’ve run Backup, it will open in Wizard mode. Choose to run it in Advanced mode by clicking the Advanced Mode hyperlink. You can optionally uncheck the Always Start in Wizard Mode option to always start in Advanced mode.
Click the Backup Wizard (Advanced) button to start the Backup Wizard.
Click Next on the Backup Wizard Welcome screen to continue.
On the What to Back Up page, select Back Up Selected Files, Drives, or Network Data and click Next to continue.
On the Items to Back Up page, expand DesktopMy Computer in the left pane and choose each of the local drives and the system state, as shown in Figure 32.2. Then click Next to continue.
Choose your backup media type and choose the correct media tape or file. If you’re creating a new file, specify the complete path to the file, and the backup will create the file automatically. Click Next to continue.
If the file you specified resides on a network drive, ensure that there is enough free space to accommodate the backup size.
If you chose tape for the backup, choose the media for the backup and choose to use a new tape.
Click the Advanced button on the Completing the Backup Wizard page to configure advanced options.
Choose the backup type and choose whether to back up migrated remote storage data. The default settings on this page will fit most backups, so click Next to continue.
Choose whether a verify operation will be run on the backup media and click Next. Disabling Volume Shadow Copy would be an option if a backup were just backing up local volumes, not the system state.
Choose the Media Overwrite option of appending or replacing the data on the media and click Next.
On the When to Back Up page, choose to run the backup now or to create a schedule for the backup. If you chose Now, skip to step 18.
If a schedule will be created, enter a job name and click the Set Schedule button.
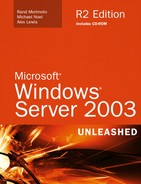
On the Schedule Job page, select the frequency of the backup, start time, and start date, as shown in Figure 32.3, and click OK when completed. You can set additional configurations using the Settings tab.
On the Set Account Information page, enter the user account name and password that should be used to run the scheduled backup and click OK when completed.
Back on the When to Back Up page, click Next to continue.
Click Finish to save the scheduled backup or immediately start the backup job.
When the backup is complete, review the backup log for detailed information and click Close on the Backup Progress window when finished.

Automated System Recovery is a backup option that is used to back up a system to prepare for a complete server failure. An ASR backup contains disk volume information and a copy of all the data on the boot and system volumes, along with the current system state. ASR can be used to restore a system from scratch, and it will even re-create disk volumes and format them as previously recorded during the ASR backup. ASR does not back up the data stored on volumes that are solely used for data storage.
To perform an ASR backup, an administrator needs a blank floppy disk and a backup device; either a tape device or disk will suffice. One point to keep in mind is that an ASR backup will back up each local drive that contains the operating system and any applications installed. For instance, if the operating system is installed on drive C: and MS Office is installed on drive D:, both of these drives will be completely backed up because the Registry has references to files on the D: drive. Although this can greatly simplify restore procedures, it requires additional storage and increases backup time for an ASR backup. Using a basic installation of Windows Server 2003 Enterprise server with only basic services installed, an ASR backup can average 1.3GB to less than 4GB or 5GB.
ASR backups should be created for a server before and after any hardware changes are performed or when a major configuration change occurs with the system. ASR backups contain disk information including basic or dynamic configuration and volume set type. They save volume or partition data so that when an ASR restore is complete, only the data stored on storage volumes needs to be recovered.
An ASR backup can currently be created only from the local server console using the graphic user interface version of the Windows Server 2003 Backup utility.
To create an ASR backup, follow these steps:
Log on to the server using an account that has the right to back up the system. (Any Local Administrator or Domain Administrator has the necessary permissions to complete the operation.)
Click Start, All Programs, Accessories, System Tools, Backup.
If this is the first time you’ve run Backup, it will open in Wizard mode. Choose to run it in Advanced mode by clicking the Advanced mode hyperlink.
Click the Automated System Recovery Wizard button to start the Automated System Recovery Preparation Wizard.
Click Next after reading the Automated System Recovery Preparation Wizard welcome screen.
Choose your backup media type and choose the correct media tape or file. If you’re creating a new file, specify the complete path to the file, and the backup will create the file automatically. Click Next to continue.
If you specified a file as the backup media and it resides on a network drive, click OK at the warning message to continue.
If you chose tape for the backup, choose the media for the backup and choose to use a new tape.
Click Finish to complete the Automated System Recovery Preparation Wizard and start the backup.
After the tape or file backup portion completes, the ASR backup prompts you to insert a floppy disk to hold the recovery information. Insert the disk and click OK to continue.
Remove the floppy disk as requested and label the disk with the appropriate ASR backup information. Click OK to continue.
When the ASR backup is complete, click Close on the Backup Progress windows to return to the backup program or click Report to examine the backup report.
One way to use ASR to ensure proper operations includes performing an ASR backup after the server is built, updated, configured, and secured. Also, an ASR backup should be performed when hardware configurations change and periodically otherwise. On domain controllers, this period should be less than 60 days to ensure that the domain can be up and running again if an Active Directory authoritative restore is necessary.
ASR backs up only the system and boot partitions. ASR backups, on average, are between 1.3GB to 5GB. To prevent ASR backups from getting too large, user data and file shares should be kept off the system and boot volumes.
As mentioned previously, Remote Storage is a Windows Server 2003 filesystem service that is used to automatically archive data to removable media from a managed NTFS volume. Files are migrated by Remote Storage when they have not been accessed for an extended period of time or when a managed disk drops below an administrator-designated percentage of free disk space. When Remote Storage migrates to a file or folder, that file or folder is replaced on the volume with a file link called a junction point. Junction points take up very little room, which reduces the amount of used disk space but leaves a way for this data to be accessed later in the original location. When a junction point is accessed, it spawns the Remote Storage service to restore the remote storage media back to disk.
Although this service does not provide filesystem fault tolerance, using Remote Storage to manage a volume can improve reliability and recoverability by keeping disk space available and by reducing the amount of data that needs to be backed up or restored when a disk failure occurs. To install and configure the Remote Storage service, refer to Chapter 30, “Filesystem Fault Tolerance.”
When volumes are backed up using NTBackup or third-party backup software, a best practice is to not back up remote storage data from remote media. Following this practice will result in only a single copy of the migrated data being stored on the remote storage media.
If only a single copy of the media master set is made, the remote storage media data would be lost if a site failure occurred. To prevent this from happening, all remote storage media master sets should be copied once or up to two times for redundancy and offsite storage. To enable remote storage master media set copies, at least two or more drives enabled for Remote Storage must be available.
To set the number of media copies for Remote Storage, follow these steps:
Log on to the server using an account that has the right to back up the system. (Any Local Administrator or Domain Administrator has the necessary permissions to complete the operation.)
Click Start, All Programs, Administrative Tools, Remote Storage.
In the left pane of the console, right-click Remote Storage and select Properties.
Select the Media Copies tab.
Under the Number of Media Copy Sets, choose 0, 1, or 2 to configure the number of copies. Remember that this option will be enabled only if more than one drive for remote storage media is available on the system.
Click OK to save the option, close the Remote Storage console, and log off the server.
As a new addition to Windows Server 2003, the Volume Shadow Copy Service (VSS) adds the ability to quickly restore data that was deleted from a volume locally or through a network-mapped drive or network file share. Over time, there will be several add-ons to Windows Server 2003 that will extend the functionality of VSS; however, what is built into the operating system already provides a series of data recovery functions. If an organization has available disk capacity, VSS should be enabled as a standard setting for a Client Services–focused networking environment.
Enabling shadow copies for a volume can be a simple task. Because shadow copies are created on local disks, shadow copy performance is enhanced if a volume’s shadow copy is written to a separate disk. This way, each disk mostly performs either a read or write operation, but not both. The Volume Shadow Copy Service is already installed and is automatically available on NTFS-formatted volumes.
To enable and configure shadow copies, follow these steps:
Log on to the desired server using an account with Local Administrator access.
Click Start, All Programs, Administrative Tools, Computer Management.
In the left pane, if it is not already expanded, double-click Computer Management (local).
Click the plus sign next to Storage.
Select Disk Management.
Right-click Disk Management, select All Tasks, and click Configure Shadow Copies.
On the Shadow Copies page, select a single volume for which you want to enable shadow copies and click Settings.
The Settings page allows you to choose an alternate volume to store the shadow copies. Select the desired volume for the shadow copy.
Configure the maximum amount of disk space that will be allocated to shadow copies.
The default schedule for shadow copies is twice a day at 7:00 a.m. and 12:00 p.m. If this does not meet your business requirements, click the Schedule button and configure a custom schedule.
Click OK to enable shadow copies on that volume and return to the Shadow Copies page.
If necessary, select the next volume and enable shadow copying; otherwise, select the enabled volume and immediately create a shadow copy by clicking the Create Now button.
If necessary, select the next volume and immediately create a shadow copy by clicking the Create Now button.
After the shadow copies are created, click OK to close the Shadow Copies page, close the Computer Management console, and log off the server.
If volume shadow copies will be enabled on a volume, a few best practices and maintenance tasks should be followed. An appropriate size limit should be set for the shadow copies. Volumes that have many files changed daily should have larger limits than volumes whose data does not change very often. Also, shadow copies should be scheduled to run more often on heavily used drives—at least twice a day. Shadow copies should be stored on separate volumes if possible. This gives an administrator better performance backing up and restoring data to and from shadow copies. Lastly, the number of stored volume shadow copies should be monitored to keep management simple.
The Volume Shadow Copy service should not be considered a tool for backing up and restoring servers to previous states. The Windows Server 2003 Backup utility should be used to back up the system volume and system state. Volume Shadow Copy works well for data volumes, and that is what Volume Shadow Copy backups should be focused toward. For system drives, Volume Shadow Copy may be used to restore some of the files on the system to a previous state, but Windows File Protection does a reasonably good job of protecting operating system files without volume shadow copies.
The command-line tool vssadmin.exe can be used to enable shadow copies on a volume. This tool can be used to configure most of the configuration settings, including deleting previous shadow copies. Combining vssadmin.exe with a scheduled task and a batch file, shadow copy management can be somewhat automated. For example, vssadmin.exe commands can be added to a batch script and configured to delete the oldest shadow copy on a volume at 12:00 p.m. every day.
To use vssadmin.exe to delete the oldest shadow copy on a volume, perform the following steps:
Log on to the desired server using an account with Local Administrator access.
Click Start, Run.
Type
vssadmin.exe delete shadows /For=C: /Oldest /Quietand then press Enter to delete the oldest shadow copy for the C volume.Type
exitand press Enter to close the command prompt and log off the server.
To schedule this operation, create a text document using Notepad, type the command in step 4, and then press Enter. Save the file with a .bat or .cmd extension. Finally, open the Control Panel, select Scheduled Tasks, and create a new task to execute this file during the desired schedule.
Most Windows Server 2003 services that contain a database or local files are backed up with the system state but also provide alternate backup and restore options. Because the system state restore is usually an all-or-nothing proposition except when it comes to cluster nodes and domain controllers, restoring an entire system state may deliver undesired results if only a specific service database restore is required. This section outlines services that either have separate backup/restore utilities or require special attention to ensure a successful backup.
Disk configuration is not a service but should be backed up to ensure that proper partition assignments can be restored. When dynamic disks are used to create complex volumes such as mirrored, striped, spanned, or RAID 5 volumes, the disk configuration should be saved. This way, if the operating system is corrupted and needs to be rebuilt from scratch, the complex volumes will need to have only their configuration restored, which could greatly reduce the recovery time. Only an automated system recovery backup can back up disk and volume configuration.
Installing Certificate Services creates a Certificate Authority (CA) on the Windows Server 2003 system. The CA is used to manage and allocate certificates to users, servers, and workstations when files, folders, email, or network communication needs to be secured or encrypted.
When the CA allocates a certificate to a machine or user, that information is recorded in the certificate database on the local drive of the CA. If this database is corrupted or deleted, all certificates allocated from this server become invalid or unusable. To avoid this problem, the certificates and Certificate Services database should be backed up frequently. Even if certificates are rarely allocated to new users or machines, backups should still be performed regularly.
Certificate Services can be backed up in three ways: by backing up the CA server’s system state, using the Certificate Authority Microsoft Management Console (MMC) snap-in, or using the command-line utility Certutil.exe. Backing up Certificate Services by backing up the system state is the preferred method because it can be easily automated and scheduled. But using the graphic console or command-line utility adds the benefit of being able to restore Certificate Services to a previous state without restoring the entire server system state or taking down the entire server for the restore.
To create a backup of the Certificate Authority using the graphic console, follow these steps:
Log on to the Certificate Authority server using an account with Local Administrator rights.
Open Windows Explorer and create a folder named CaBackup on the C: drive.
Click Start, All Programs, Administrative Tools, Certification Authority.
Expand the Certificate Authority icon and select the desired CA server.
From the console window, select the Action pull–down menu and select All Tasks, BackUp CA.
Click Next on the Certification Authority Backup Wizard Welcome screen.
On the Items to Back Up page, check the Private Key and CA Certificate box and the Certificate Database and Certificate Database Log box, as shown in Figure 32.4.
Specify the location to store the CA backup files. Use the folder created in the beginning of this process. Click Next to continue.
When the CA certificate and private key are backed up, this data file must be protected with a password. Enter a password for this file, confirm it, and click Next to continue.
Click Finish to create the CA backup.

Domain Name Service (DNS) configuration data is stored in the Registry and is backed up with the system state backup. For each DNS zone that is hosted on the Windows Server 2003 system, a backup zone file is created and stored in the %systemroot%DNSBackup folder. These files can be backed up and used to restore a DNS zone to the same server after a restore or to a completely different server. For information on how to create a DNS zone from an existing file, refer to Chapter 33 on restoring DNS data.
Windows Internet Naming Service (WINS) is a database composed of NetBIOS names and their corresponding IP addresses. The NetBIOS names include domain, server, and workstation names, along with other records used to identify services such as the master browser. The WINS database is backed up by performing a system state backup of the WINS server or by initiating a backup using the WINS console.
Because the WINS database is populated by servers and workstations dynamically, in some cases backing up may not be necessary. When WINS contains several static mappings, a WINS backup is essential because records will not be re-created automatically if the WINS database is corrupted or rebuilt from scratch. Also, even if only dynamic records populate the database, each device registers with WINS only on startup and then periodically, so the record may not be re-created in time. This results in NetBIOS-dependent clients failing to locate the proper server or workstation.
To create a backup using the WINS console, perform the following steps:
Log on to the WINS server using an account with Local Administrator access.
Click Start, All Programs, Administrative Tools, WINS.
If the local WINS server does not appear in the window, right-click WINS in the left pane and select Add Server.
Type in the NetBIOS or fully qualified domain name of the WINS server and click OK.
Select the WINS server in the left pane.
Right-click the WINS server and select Properties.
In the lower section of the General tab, type in the path where the WINS backup should be stored. Check the box to enable WINS database backup during server shutdown, as shown in Figure 32.5.
Click OK to close the WINS server property pages.
Right-click the WINS server in the left pane and select Back Up Database.
When the Browse for Folder window opens, select the appropriate folder to back up the WINS database and click OK to perform the backup.
A pop-up window appears stating whether the backup was successful. If it was, click OK, close the WINS console, and log off the WINS server.
If the backup failed, check Permissions in the specified directory to ensure that the logged-on user and system account have at least Modify privileges. Then attempt the backup again.

The Dynamic Host Configuration Protocol (DHCP) server is responsible for assigning IP addresses and options to devices on the network in need of network configuration. DHCP allocates IP configurations, including IP addresses, subnet masks, default gateways, DNS servers, WINS servers, and for RIS servers, TFTP servers and boot filenames. Other IP options can be configured, depending on the organization’s needs.
These IP address scope properties and options are stored in the DHCP database. This database also stores the information concerning IP address leases and reservations. The DHCP database is backed up with a server system state backup, but it can also be backed up using the DHCP console.
To back up the DHCP database from the console, follow these steps:
Log on to the DHCP server using an account with Local Administrator access.
Click Start, All Programs, Administrative Tools, DHCP.
If the local DHCP server does not appear in the window, right-click DHCP in the left pane and select Add Server.
Type in the fully qualified domain name for the DHCP server and click OK.
Right-click the DHCP server in the left pane and select Properties.
Select the Advanced tab.
In the Backup Path field, the default location for the DHCP database is already populated. If this location is acceptable, click OK. If it is not the correct location, type in or browse for the appropriate backup folder.
Right-click the DHCP server in the left pane and choose Backup.
Select the folder specified in the DHCP Backup Location field in the DHCP Server Advanced property page.
When the backup is complete, no confirmation pop-up window will appear. If it fails, an error will be displayed. Close the DHCP console and log off the server.
The Distributed File System (DFS) is a Windows Server 2003 service that improves file share availability by providing a single unified namespace to access shared folders hosted across different servers. When domain DFS roots are used, DFS targets can be configured to replicate with one another using the File Replication Service. Domain DFS stores the DFS root, link, target, and replication information in Active Directory. When a standalone DFS root is used, the configuration is stored in the DFS root server’s Registry. Backing up the system state of a standalone DFS root server backs up the DFS configuration. For domain DFS roots, backing up the system state of a domain controller accomplishes this task. More information on DFS can be found in Chapter 30.
A command-line utility called Dfscmd.exe can be used to list standalone or domain DFS root information, including root targets, links, and link targets. This information can be saved to a file and be used to restore this information if the DFS configuration is lost. This utility does not list, record, or re-create replication connections for domain DFS roots and targets that are configured for replication.
To create a file containing DFS root configurations, perform the following steps:
Log on to either the standalone DFS root server or a server in the domain using an account with privileges to create domain DFS roots and links.
Click Start, Run and then type
cmd.exe. Press Enter when you’re done to open the command prompt.To create a file containing all the root and link targets associated with a domain DFS root called \Companyabc.comApps, type
Dfscmd.exe /View \Companyabc.comApps /Batchrestore > DFSrestore.batand press Enter. This will create a file that can be used to restore additional root targets and create links and link targets when the initial DFS root target is re-created.
Note
Dfscmd.exe is a great tool because it can be used to back up DFS configuration information, but it cannot create the initial DFS root target, nor can it copy replication information for domain DFS targets that are configured for replication. To back up domain DFS completely, perform a backup of the Active Directory database by backing up the system state of a domain controller in the appropriate domain.
Internet Information Services (IIS) is Windows Server 2003’s Web and FTP server. It is included on every version of the Windows Server 2003 platform but is not installed by default. IIS stores configuration information for Web and FTP site configurations and security in the IIS metabase. The IIS metabase can be backed up by performing a system state backup of the server running IIS, but it can also be backed up using the IIS console. The IIS metabase should be backed up separately before and after an IIS configuration change is made to ensure a successful rollback and to have the latest IIS configuration data backed up after the update.
To back up the IIS metabase using the IIS console, perform the following steps:
Log on to the IIS server using an account with Local Administrator access.
Click Start, All Programs, Administrative Tools, Internet Information Services (IIS) Manager.
If the local IIS server does not appear in the window, right-click Internet Information Services in the left pane and select Connect.
Type in the fully qualified domain name for the IIS server and click OK.
Right-click the IIS server in the left pane and select All Tasks, Backup/Restore Configuration.
The Configuration Backup/Restore window lists all the automatic IIS backups that have been created. Click the Create Backup button.
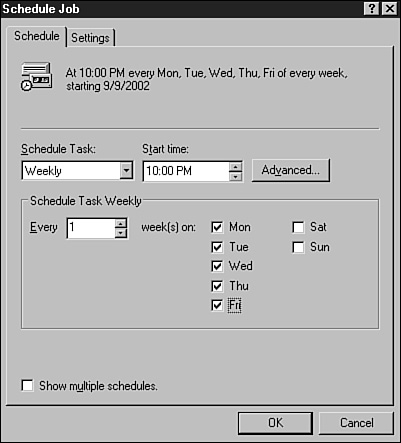
Enter the backup name and, if necessary, check the Encrypt Backup Using Password box. Enter and confirm the password, and click OK when you’re finished, as shown in Figure 32.6.
When the backup is complete, it is listed in the Configuration Backup/Restore window. Click Close to return to the IIS console.
Before a change is made to the IIS configuration, a backup should be manually created first. When the change is completed, the administrator should either perform another backup or choose the option to save the configuration to disk. The administrator can save new IIS configuration changes to disk by right-clicking the IIS server, selecting All Tasks, and then choosing Save Configuration to Disk. This option works correctly only after a change has been made that has not yet been recorded in the IIS metabase.
The Remote Storage service keeps track of managed volume configurations and migrated data using the Remote Storage database. To back up the Remote Storage database, the administrator needs to back up the information in the system state.
If the Remote Storage service is installed, the administrator can back up the data associated with the remote storage media and migrated data by simply backing up the data contained in the following directories:
%systemroot%System32Ntmsdata
%systemroot%System32Remotestorage
If the Remote Storage service is running, the data in the Remote Storage folder cannot be backed up unless the system state is backed up.
The two services Remote Storage and Removable Storage sound similar and sometimes are mixed up with one another. The Remote Storage service is used to manage a volume. The Removable Storage service is used to manage removable media, such as tapes and optical media.
To back up the Removable Storage media information, back up the following directory:
%systemroot%System32Ntmsdata
Remote Storage and Windows Server 2003 Backup use the Removable Storage service to allocate and deallocate media. The media can be managed using the Removable Storage console in the Computer Management Administrative Tools. The Removable Storage service allocates and deallocates media for these services by allowing each service to access media in media sets created for the respective program.
The Windows Server 2003 Removable Storage service organizes media within media pools so that policies and permissions can be applied and different functions can be performed. For example, the backup media pool is allocated for media created using Windows Server 2003 Backup. Only users granted the privilege to back up or restore the system, or administer the removable media service, have access to this media pool.
The free pool contains media that can be used by any backup or archiving software that utilizes the Windows Server 2003 Removable Storage service. Media in this pool are usually blank media or media marked as clean, and can be overwritten and reallocated.
The remote storage pool is used on a server only if the Remote Storage server has been installed. This pool stores media allocated for the Remote Storage service. If no tape is found, the device reallocates media from the free pool.
When media are inserted into a tape device and inventory is run, if the media are not blank and not already allocated to the remote storage pool or backup media pool, they are stored in the imported media pool. If the media are known to have been created with Windows Server 2003 Backup, opening the backup program and performing a catalog should be sufficient to reallocate this media to the backup pool set.
The backup pool contains all the media allocated to the Windows Server 2003 Backup program.
When a Windows Server 2003 system has startup issues, a few different startup options can be used to troubleshoot the problem. On every server, when the boot loader is shown, the administrator can choose to start the server in Safe mode. This can be a command-prompt window or a graphical interface that can be used to disable a driver or reconfigure a software setting. Other options include enabling Windows to boot up into a recovery console or using a new service called Emergency Management Services. Each of the services or startup options just mentioned does not back up the server but may require previous configuration information to make its services available when recovery is necessary.
The Recovery Console provides an alternative bootup method when Safe mode and normal boot does not work. The Recovery Console can be installed after the operating system has already been loaded, or it can be called while booting a system from the Windows Server 2003 setup CD.
To install the Recovery Console on an existing system, follow these steps:
Log on to the desired server using an account with Local Administrator access.
Insert the Windows Server 2003 CD in the local CD-ROM drive.
Type cmd.exe in the Start, Run dialog box and click OK to open a command prompt.
Change the drive focus in the command prompt to the drive letter of the CD-ROM drive.
Change the directory to the I386 directory.
Type winnt32.exe /cmdcons and press Enter. This command will start the Recovery Console setup, as shown in Figure 32.7.
Click Yes to begin the installation of the Recovery Console. After the installation is finished, click OK. When the installation is complete, the boot.ini file will contain an option to boot into the Recovery Console when the system is starting up.

Windows Server 2003 enables administrators to remotely manage or troubleshoot a system when normal operating system functionality is not available. Using out-of-band connections, such as a serial COM port, information can be redirected to other servers to resolve startup or operating system problems. Emergency Management Services can be used when physical access to a server is not available, and remote administrative options through network connections are not working properly.
Some hardware requirements must be met before Emergency Management Services console redirection can be used. For example, the system motherboard BIOS must support Serial Port Console Redirection (SPCR). Emergency Management Services is enabled and installed on servers during operating system installation if the motherboard supports SPCR. Refer to the Windows Server 2003 Help and Support for overview information.
When it comes to disaster recovery planning and backing up a Windows Server 2003 system, there are many issues to consider. Specialized utilities can be leveraged for specific backup tasks, but for complete server backup, the command-line utility ntbackup.exe can take care of most of the Windows Server 2003 backup requirements.
Make sure that disaster recovery planning includes considerations for the physical site, power, entire system failure, server component failure, and software corruption.
Identify the different services and technologies, points of failure, and critical areas; then prioritize in order of importance.
Make sure that the D/R solution contains costs associated with additional hardware, complex configurations, and a service-level agreement estimating how long it will take to recover the service should a failure occur. Different options should also be presented.
Document the server configuration for any environment regardless of size, number of servers, or disaster recovery budget.
Back up system volumes and the system state at the same time to simplify recovery if a server needs to be rebuilt from scratch.
Perform an ASR backup after the server is built, updated, configured, and secured. Also, perform an ASR backup when hardware configurations change and periodically otherwise.
Perform an ASR backup on domain controllers every 60 days to ensure that if an Active Directory authoritative restore is necessary, you can get the domain up and running again.
Set an appropriate size limit for the shadow copies. Volumes that have many files changed daily should have larger limits than volumes whose data does not change very often.
Schedule shadow copies to run more often on heavily used drives, at least twice a day.
Keep the number of stored volume shadow copies to a minimum to keep management simple.
Don’t restore Active Directory–integrated zones using a backup file. Instead, the zones should be created empty and the domain controller should re-create the records.
Ensure that the Remote Storage database will be backed up by backing up the system state.