Years ago, content meant word processing files, spreadsheet documents, or other text-based documents. However, more recently content can include formats such as video and audio files. Unlike text-based files that are relatively small at 100KB or 250KB, audio and video files run from 3–5MB or even into the hundreds of megabytes in size. With the amount of storage demanded by these types of files, organizations can no longer simply place these files on file servers for users to access and save. The files need to be stored and managed by media servers, where the bandwidth demands are controlled to minimize overtaxing the bandwidth availability of the organization’s network.
Microsoft provides a series of tools to help users and administrators manage video and audio content. For the server component, the Microsoft Windows Media Service that comes with Windows Server 2003 provides an organization with the capability to capture and publish video and audio content. Microsoft provides two major tools, both of which are freely downloadable, that perform media conversion (Windows Media Encoder) as well as content customization for presentations (Microsoft Producer for PowerPoint 2003).
This chapter covers both the server component of Windows Media Services, as well as the downloadable tools that provide editing and publishing support for users and administrators.
Windows Media Services is a built-in component to the Windows Server 2003 operating system. Windows Media Services enables the administrators of an organization to organize video and audio files to be published to other users. The publishing function sets the bandwidth that will be used during the file distribution, controls the number of users accessing audio and video files at the same time, and manages the overall bandwidth demands of the Windows Media Services functions.
By properly configuring and optimizing media services functions, an organization can minimize the excessive demands of media services distribution over the network. The decisions that need to be made include whether distribution will be
Real-time live broadcasts
Single broadcasts at a time
Multiple files combined to a single broadcast
Multiple files in a single directory for selective broadcasting
The various publishing options are highlighted throughout this chapter on best practices, tips, and tricks on configuring and implementing the publishing services to meet various organizational publishing needs.
Besides requiring a Windows Server 2003 system (Standard Edition, Enterprise Edition, or Datacenter Edition), the basic requirements for Windows Media Services are as follows:
550MHz processor
1GB RAM memory
Ethernet network adapter running TCP/IP
521MB of free disk space (6MB for system files, 15MB for installation files, and 500MB minimum for content storage)
Note
Some features, such as the Multicast Content Delivery functionality, require the Windows Media Services to be installed on a Windows Server 2003 Enterprise Edition or Datacenter Edition to operate.
The key to the Windows Media Services system is having enough processing speed to handle the media streaming requests, enough RAM to cache the media streams, and enough disk space to store the video files being shared and published.
Tip
To improve the performance of a Windows Media Services system, placing the operating system and program files on one drive and placing the video files on another drive set will distribute the normal server processes from the read/write access of the video files. Additionally, placing striped drive sets with ample hard drive controller cache can improve both the sequential and parallel read/write requests of the video files.
For organizations that want to test the performance load of actual video read/write requests to a Windows Media Server, Microsoft provides a load simulation tool called the Windows Media Load Simulator for Windows Media Services 9 Series. This tool can be downloaded free from the Microsoft Web site at http://www.microsoft.com/windows/windowsmedia/9series/server/loadsim.aspx.
After downloading the load simulation tool, you can install it by running the wmloadsetup.exe program. You will be prompted to agree to the licensing of the tool. After you click Yes, the tool installs. After installation, you will be asked if you would like to start the load simulation program. If you click Yes, the simulator will begin. If you choose to launch the simulator at a later date, the program can be accessed by choosing Start, Programs, Windows Media Load Simulator, and then selecting the Windows Media Load Simulator application icon.
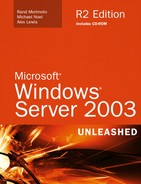
Once in the Load Simulator screen, click Properties to enter the selected options to test video load on a Windows Media server. The settings for the property configuration should be similar to the ones shown in Figure 37.1. After the properties have been selected, click the Start Test button to begin the simulation process.
Note
Although the simulation program is called a load simulator, the reading and writing of information is actually being transacted against a live Windows Media server. Unlike some load simulators that simulate even a server operation, the Windows Media Load Simulator for Windows Media Services 9 Series is actually running against a fully operational server. This provides real-world transactions to test hardware, software, and LAN/WAN traffic patterns for testing purposes.
Because Windows Media Services comes as part of the Windows Server 2003 operating system, the installation process is merely adding in the Windows Media Services component. To install the component on an existing Windows Server 2003 system, do the following:
Click Start, Settings, Control Panel and then double-click Add/Remove Programs.
Click the Add/Remove Windows Components option and then scroll down to the Windows Media Services section and select the check box for the desired option. Click Next to continue installing components, and then click Finished when done.
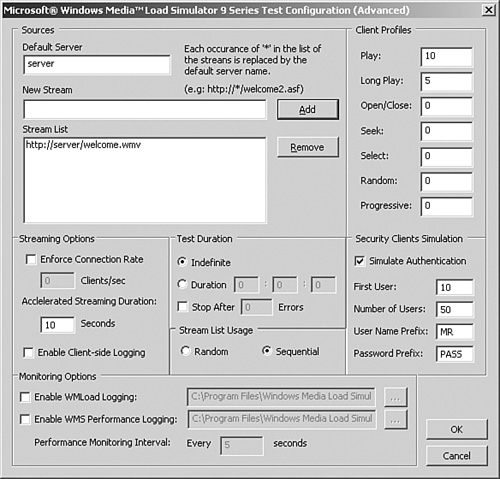
Once installed, the services for Windows Media Services are set to run automatically. The next step is to configure Windows Media Services to meet the video and audio publishing requirements of the organization. To do so, launch the Windows Media Services MMC administration tool by selecting Start, Programs, Administrative Tools, Windows Media Services. You will see a screen similar to the one in Figure 37.2.

A Windows Media Services server can be used as the host to broadcast real-time videos. With a camera attached to the broadcasting server, video can be captured and published to multiple users. Real-time live broadcast videos are commonly used for organizational press releases or announcements, distributed broadcasting of conference sessions or training classes, or video-published company meetings.
To configure a Windows Media Server for real-time live broadcasts, a publishing point needs to be configured for live communications. The configuration process is as follows:
In the Windows Media Services MMC, right-click on Publishing Points in the navigation tree and select Add Publishing Point (Wizard).
Click Next to move past the Welcome screen.
Enter a publishing point name that describes the function. In the case of this live broadcast, you might choose something like
Live Company Mtg 7-12-04. Click Next to continue.Select Encoder (A Live Stream) and click Next.
Select Broadcast Publishing Point and click Next.
Select Unicast or Multicast as the delivery option for the broadcasting publishing point and then click Next.
Enter the URL for the encoder. This is typically the name of the Windows Media Server, such as
http://serveror http://media.companyabc.com, depending on whether the server has been added to DNS for naming. Click Next to continue.Select the Enable Logging option if you want to log media events and then click Next.
The next screen shows a summary of the created publishing point, similar to the one shown in Figure 37.3. You can choose to start the publishing point when the wizard is finished, and if you want to capture and archive the live event, select the Start Archiving When Publishing Point Starts option. Click Next.
Before finishing with the Publishing Wizard, you are prompted to choose between three file creation options:
Create an Announcement File (.asx) or Web Page (.htm)—. An announcement file is similar to an invitation file that can be used to notify users of a pending live broadcast or the availability of an on-demand video playback session.
Create a Wrapper Playlist (.wsx)—. A wrapper playlist is content that can be added to either the start or end of a broadcast. An example of wrapper content might be a welcome or closing message, advertisements, or broadcast identification.
Create a Wrapper Playlist (.wsx) and Announcement File (.asx) or Web Page (.htm)—. Choosing this option launches both the Announcement File and Wrapper Playlist Wizards to create the invitation announcement, as well as the capability to add content at the start or end of a broadcast.
Choose one of these three options or deselect the After the Wizard Finishes box if you don’t want to choose any of the options. Click Finished when complete.

A live broadcast can be started immediately or at a later time. Many organizations create the live broadcast publishing point and test the session to ensure that the session process is working properly. Some key aspects to test include making sure the camera and lighting are acceptable for view, and ensuring that the microphone is working and the audio quality and volume are acceptable.
After the live broadcast is tested, the session can be stopped and started at the time of the live broadcast. To start a broadcast, right-click on the publishing point and select Start, as shown in Figure 37.4. When the broadcast is complete, clicking the Stop button stops the broadcast session.
A Windows Media Services system can be set up to host the broadcasting of a single video file. A single video file broadcast is typically set up on-demand, meaning that a user requests the playback of the video file on request. On-demand video playbacks are commonly used for replays of video files such as on-demand training classes, or viewing captured meetings or presentations.
To configure a Windows Media Server for on-demand video playback broadcasts, a publishing point needs to be configured for on-demand communications. The configuration process is as follows:
In the Windows Media Services MMC, right-click on Publishing Points in the navigation tree and select Add Publishing Point (Wizard).
Click Next to move past the Welcome screen.
Enter a publishing point name that describes the function. In the case of this on-demand single file broadcast, you might choose something like
Company Mtg 6-9-04. Click Next to continue.Select One File (Useful for a Broadcast of an Archived File) and click Next.
Choose either Broadcast Publishing Point or On-Demand Publishing Point and click Next.
At this point, whether you selected Broadcast Publishing Point or On-Demand Publishing Point in step 5 will determine what options are available in the remaining steps of the wizard.
If you selected On-Demand Publishing Point in step 5, you will be prompted to either add a new publishing point (which will start the wizard over back at step 2), or you can select Use an Existing Publishing Point and then click Next to finish the on-demand file publishing point.
If you selected Broadcast Publishing Point in step 5, you will be prompted with several other options.
Select Unicast or Multicast as the delivery option for the broadcasting publishing point and then click Next.
You will then be prompted for the name of the file that you want to publish. Select the file and then click Next.
Select the Enable Logging option if you want to log media events and then click Next.
The next screen shows a summary of the created publishing point. You can choose to start the publishing point when the wizard is finished, and if you want to capture and archive the live event, select the Start Archiving When Publishing Point Starts option. Click Next to continue.
Before finishing the Publishing Wizard, you are prompted to choose between three file creation options:
Create an Announcement File (.asx) or Web Page (.htm)—. An announcement file is similar to an invitation file that can be used to notify users of a pending live broadcast or the availability of an on-demand video playback session.
Create a Wrapper Playlist (.wsx)—. A wrapper playlist is content that can be added to either the start or end of a broadcast. An example of wrapper content might be a welcome or closing message, advertisements, or broadcast identification.
Create a Wrapper Playlist (.wsx) and Announcement File (.asx) or Web Page (.htm)—. Choosing this option launches both the Announcement File and Wrapper Playlist Wizards to create the invitation announcement, as well as the capability to add content at the start or end of a broadcast.
Choose one of these three options or deselect the After the Wizard Finishes box if you don’t want to choose any of the options. Click Finished when complete.
A single file publishing point can be started immediately or at a later time. Unless the broadcast is to be scheduled at a different time, usually single file publishing points are started immediately so that they can be accessed at any time. Testing a file publishing point ensures that the session process is working properly. Some key aspects to test include making sure the Multicast delivery broadcasting is working properly, and that the video and audio quality and volume are acceptable.
If the organization wants to publish an entire directory of files, the Windows Media Server can be configured to publish a number of video files. The hosting of a directory of videos is typically set up on an on-demand basis to provide users with access to a number of videos. Whereas the single file broadcast has a single file associated to a publishing point, the hosting of a directory eliminates the need to selectively publish each file. Instead, the directory is published and files can simply be copied to the directory, where users can then request them.
To configure a Windows Media Server for on-demand video playback of any file in a directory on the server, a publishing point needs to be configured for publishing a directory of files. The configuration process is as follows:
In the Windows Media Services MMC, right-click on Publishing Points in the navigation tree and select Add Publishing Point (Wizard).
Click Next to move past the Welcome screen.
Enter a publishing point name that describes the function. When broadcasting a directory of files, you might choose something like
Company Training Files. Click Next to continue.Select the Files (Digital Media Playlists) in a Directory (Useful for Providing Access for On-Demand Playback Through a Single Publishing Point) option and click Next.
Choose either Broadcast Publishing Point or On-Demand Publishing Point. Refer to the “Broadcast Publishing Versus On-Demand Publishing” sidebar for decisions on publishing points. Click Next to continue.
At this point, whether you selected Broadcast Publishing Point or On-Demand Publishing Point in step 5 will determine what options are available in the remaining steps of the wizard.
If you selected On-Demand Publishing Point in step 5, you will be prompted with a series of questions:
You will be prompted to add the name of the directory where the published files will be stored. You can also choose to allow access to the subdirectory using wildcards. Click Next to continue.
A choice to select content playback gives you the option to loop videos, shuffle videos, both, or none. Make your choices and click Next to continue.
Select the Enable Logging option if you want to log media events and then click Next.
The next screen shows a summary of the created publishing point. You can choose to start the publishing point when the wizard is finished, and if you want to capture and archive the live event, select the Start Archiving When Publishing Point Starts option. Click Next to continue.
If you selected Broadcast Publishing Point in step 5, you will be prompted with several other options:
Select Unicast or Multicast as the delivery option for the broadcasting publishing point and then click Next.
You will then be prompted for the name of the directory that you want to publish. Select the directory and then click Next.
A choice to select content playback gives you the option to loop videos, shuffle videos, both, or none. Make your choices and click Next to continue.
Select the Enable Logging option if you want to log media events and then click Next.
The next screen shows a summary of the created publishing point, as shown in Figure 37.5. You can choose to start the publishing point when the wizard is finished, and if you want to capture and archive the live event, select the Start Archiving When Publishing Point Starts option. Click Next to continue.

For either the broadcast or on-demand publishing options, before finishing the Publishing Wizard, you are prompted to choose between three file creation options:
Create an Announcement File (.asx) or Web Page (.htm)—. An announcement file is similar to an invitation file that can be used to notify users of a pending live broadcast or the availability of an on-demand video playback session.
Create a Wrapper Playlist (.wsx)—. A wrapper playlist is content that can be added to either the start or end of a broadcast. An example of wrapper content might be a welcome or closing message, advertisements, or broadcast identification.
Create a Wrapper Playlist (.wsx) and Announcement File (.asx) or Web Page (.htm)—. Choosing this option launches both the Announcement File and Wrapper Playlist Wizards to create the invitation announcement, as well as the capability to add content at the start or end of a broadcast.
Choose one of these three options or deselect the After the Wizard Finishes box if you don’t want to choose any of the options. Click Finished when complete.
A single file can be viewed from within the directory publishing point. Depending on the option selected, a user simply enters the URL of the directory publishing point (such as mms://media.companyabc.com/pubpoint/) followed by the name of the individual file in the directory (like Training-Jan-21st.wmv). The full URL would be mms://media. companyabc.com/pubpoint/training-jan-21.wmv. The advantage of the directory publishing point is that a media administrator can simply copy more files to the directory and the initial publishing point directory URL remains the same—only the filename changes for each file being accessed. A single publishing point can also be created without the need of individually publishing files one by one.
There are times when a broadcast administrator wants to combine several media files but only has the ability to publish just one video stream. The individual media files are added to a playlist, and the playlist is then published so that a single publishing point will play back the entire playlist of files. The playlist concept is frequently used for audio files where a playlist of music files are combined, yet only a single stream is distributed. Or the playlist file may be constantly updated to include new media files that are needed for publishing and distribution. The benefit of creating a playlist and combining the content into a single broadcast is the ability to have just a single broadcast point that brings to users multiple files.
To configure a Windows Media Server for broadcasting multiple files into a single stream, a publishing point needs to be configured for playlist broadcasting. The configuration process is as follows:
In the Windows Media Services MMC, right-click on Publishing Points in the navigation tree and select Add Publishing Point (Wizard).
Click Next to move past the Welcome screen.
Enter a publishing point name that describes the function. When playlist broadcasting of multiple files, you might choose something like
Playlist of Conf Content. Click Next to continue.Select the Playlist (a Mix of Files and/or Live Streams That You Combine into a Continuous Stream) option and click Next.
Choose either Broadcast Publishing Point or On-Demand Publishing Point. Refer to the “Broadcast Publishing Versus On-Demand Publishing” sidebar for decisions on publishing points. Click Next.
At this point, whether you selected Broadcast Publishing Point or On-Demand Publishing Point in step 5 will determine what options are available in the remaining steps of the wizard.
If you selected On-Demand Publishing Point in step 5, you will be prompted with a series of questions:
You will be prompted whether you want to add a new publishing point (or playlist), which you will typically want to do. Select Add a New Publishing Point and click Next.
You will be prompted to add the name of a playlist where the published files will be listed and stored. Enter the name of an existing playlist, or select the Create a New Playlist option. Click Next to continue.
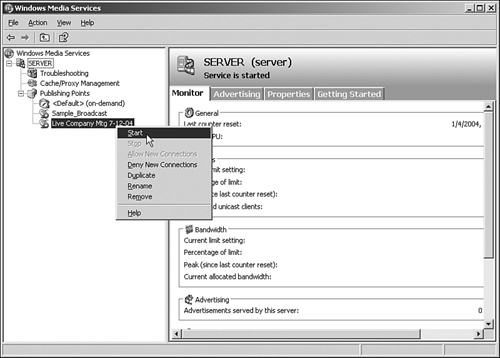
If you choose to create a new playlist, you will be prompted to add media and add advertisements into your playlist file, as shown in Figure 37.6. Click Next.
A choice to select content playback gives you the option to loop videos, shuffle videos, both, or none. For more information on these options, see the “Loop, Shuffle, Both, or None” sidebar earlier in this chapter. Click Next to continue.
Select the Enable Logging option if you want to log media events and then click Next.
The next screen shows a summary of the created publishing point. You can choose to start the publishing point when the wizard is finished, and if you want to capture and archive the live event, select the Start Archiving When Publishing Point Starts option. Click Next to continue.
If you selected the Broadcast Publishing Point option earlier in this sequence, you will be prompted with several other options:
Select Unicast or Multicast as the delivery option for the broadcasting publishing point and then click Next.
If you choose to create a new playlist, you will be prompted to add media and add advertisements into your playlist file. Click Next.
Enter a name of your playlist and then click Next.
A choice to select content playback gives you the option to loop videos, shuffle videos, both, or none. For more information on these options, see the “Loop, Shuffle, Both, or None” sidebar earlier in this chapter. Click Next to continue.
Select the Enable Logging option if you want to log media events and then click Next.
The next screen shows a summary of the created publishing point. You can choose to start the publishing point when the wizard is finished, and if you want to capture and archive the live event, select the Start Archiving When Publishing Point Starts option. Click Next to continue.
For either the broadcast or on-demand publishing options, before finishing the Publishing Wizard, you are prompted to choose between three file creation options:
Create an Announcement File (.asx) or Web Page (.htm)—. An announcement file is similar to an invitation file that can be used to notify users of a pending live broadcast or the availability of an on-demand video playback session.
Create a Wrapper Playlist (.wsx)—. A wrapper playlist is content that can be added to either the start or end of a broadcast. An example of wrapper content might be a welcome or closing message, advertisements, or broadcast identification.
Create a Wrapper Playlist (.wsx) and Announcement File (.asx) or Web Page (.htm)—. Choosing this option launches both the Announcement File and Wrapper Playlist Wizards to create the invitation announcement, as well as the capability to add content at the start or end of a broadcast.
Choose one of these three options or deselect the After the Wizard Finishes box if you don’t want to choose any of the options. Click Finished when complete.
A playlist can be launched to initiate the playback of media contained within the playlist file. Depending on the option selected, a user simply enters the URL of the directory publishing point (such as mms://media.companyabc.com/Corp Playlist). The playlist of files will begin to publish the first of the media clips and will continue through the entire playlist until the list is complete. If the loop option was selected in the publishing point configuration settings, the playlist will continuously loop the media content of the playlist. If shuffle was selected, the files within the playlist will be played randomly.
Any of the options selected from within the configuration setting can be modified at any time to change or reconfigure settings initially created in the wizard installation process.
For any media content producer that is working with audio and video content, the Microsoft free Windows Media Encoder is a must-have tool for capturing and converting media content. Although the Windows Media Server can be used to capture and publish video files, it’s unlikely that a content producer will want to travel around with a Media Server everywhere. Instead, by downloading the Windows Media Encoder and installing it on any Windows 2000 or XP laptop or workstation, the producer can travel with the mobile system instead of a server.
Note
The Windows Media Encoder can be downloaded at http://www.microsoft.com/downloads/details.aspx?FamilyID=5691ba02-e496-465a-bba9-b2f1182cdf24&DisplayLang=en.
Additionally, the Windows Media Encoder provides tools to convert files from one video format to another, such as from AVI format to MPG format. One of the biggest limitations of the Windows Media Encoder is its inability to perform simple edits to the media files. For this, you need to download and use third-party tools.
The Windows Media Encoder runs on Windows 2000 and Windows XP desktops, as well as on Windows 2000 and Windows 2003 servers. The basic configuration of the system depends on the task being performed by the Windows Media Encoder software. Microsoft recommends the system configurations shown in Table 37.1.
Table 37.1. Requirements for Windows Media Encoder
As with most video processing applications, there is high demand for memory, processing speed, and disk space. The faster the system, the faster the capture and processing of information. If the system is not fast enough, in many cases frames are dropped, thus causing jitter or skips in the video being processed. It is recommended that you test the performance of a system to ensure that it meets the quality requirements of the organization.
After downloading the Windows Media Encoder from the Microsoft Web site, the software can be installed on any system meeting the requirements noted in Table 37.1. The installation process is as follows:
Run the WMENCODER.EXE file to begin the installation process.
Click Next to move past the Welcome screen.
After accepting the licensing agreement, click the I Accept the Terms of the License Agreement option and click Next.
Select a custom installation folder or just click Next to choose the default folder. Then click Install to begin the installation.
Click Finish when prompted.
Once installed, the Windows Media Encoder can be launched by selecting Start, Programs, Windows Media, Windows Media Encoder. Upon launching the Windows Media Encoder, you will see a New Session screen similar to the one shown in Figure 37.7.

The Windows Media Encoder can be used in conjunction with a Windows Media Server to broadcast a live event. This gives an organization the capability to use the Windows Media Server as the back-end server to publish the live content to multiple users. Also, a laptop or some other mobile or portable device can then act as the system capturing the video/audio content that will be published by the Windows Media Server.
To prepare for a live broadcast, a Windows 2000/Windows XP workstation, a Windows 2000/Windows 2003 server with compatible camera and microphone, or a system with a video/audio capture card must be configured and tested for basic functionality. The camera and audio devices should be able to capture and record video and audio content at the desired level of quality. Once the remote system is working properly, the live broadcast can be initiated.
To start a live broadcast, Windows Media Encoder should be launched on the broadcasting system. Once launched, follow these steps:
Select Broadcast a New Event and then click OK.
Select the video and audio device source that will be capturing the event. Click Next when ready.
Note
For systems with only a single video and audio source, the options should default to the only devices in the system. However, for systems with an audio and video capture card installed, the onboard audio might also be an option, so be certain that the right video and audio devices are selected.
When choosing the audio device, you might want to click Configure and confirm that the microphone has been enabled. Many systems automatically have the microphone disabled, so although the correct device has been selected, no sound will be captured.
The next setting allows the Windows Media Encoder system to either push the video/audio stream to a Windows Media Server on the network, or allows the Windows Media Server to initiate a pull from the encoder system. Make the choice and then click Next to continue.
Note
The choice of whether to push or pull media content depends on what you are closer to. If you are closest to the Windows Media Encoder system (you are in the room where the event is taking place), you’d probably want to push the video/audio stream to the Windows Media Server. A push from the encoder system causes the Windows Media Server to automatically start publishing the session.
If the Windows Media Encoder system is set up in a room and you are with the server, but not necessarily where the encoder system is located, you can initiate the capture remotely by choosing to have the Windows Media Server initiate the session.
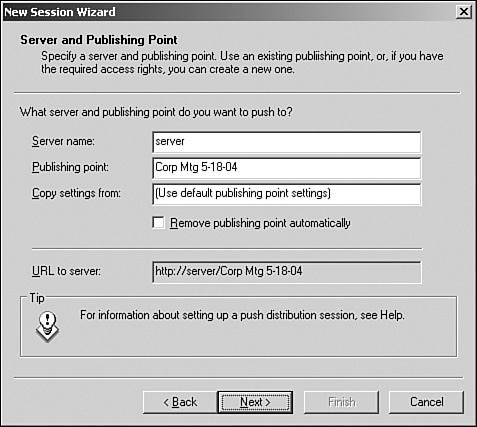
If you choose to push to the Windows Media Server, you will be prompted with the following steps:
You will be prompted to enter the name of the Windows Media Server and the publishing point, and you have the option of copying the publishing point settings from another configuration. When completely filled out, the form looks similar to Figure 37.8. Click Next when ready.
The next screen will prompt for the encoding options. The various bit rate for encoding will be shown, displaying Total Bit Rate, Frame Rate, and Output Size. Choose the desired bit rate or bit rates and then click Next to continue.
For live broadcasts, an archive copy of the broadcast file can be captured and saved to disk. This allows for future playback of the session. Select the check box to archive the file and enter a filename to capture the session. Click Next to continue.
Information can be added to the broadcast file, such as title, author, copyright information, rating, and description. This information is optional. Enter the desired information and click Next to continue.
The next screen gives you the option to begin the broadcast when the Finish button is clicked, or to simply finish the configuration and start the session later. Make the appropriate selection and click Finish.
If you choose to pull where the session is initiated by the Windows Media Server from the encoder, you will be prompted with the following steps:
You will be prompted to enter a free HTTP port that can be used to communicate between the Windows Media Server and the Windows Media Encoder system. Port 8080 is the default, but by clicking the Find Free Port button, you can search for an open port. Click Next to continue.
The next screen prompts you for the encoding options. The various bit rate for encoding will be shown, displaying Total Bit Rate, Frame Rate, and Output Size. Choose the desired bit rate or bit rates. Refer to the “Choosing the Bit Rate(s)” sidebar for more details. Click Next to continue.
For live broadcasts, an archive copy of the broadcast file can be captured and saved to disk. This allows for future playback of the session. Select the check box to archive the file and enter a filename to capture the session. Click Next to continue.
Information can be added to the broadcast file, such as title, author, copyright information, rating, and description. This information is optional. Enter the desired information and click Next to continue.
The next screen gives you the option to begin the broadcast when the Finish button is clicked, or to simply finish the configuration and start the session later. Make the appropriate selection and click Finish.
For live broadcasts, it’s usually preferable to test the broadcast process to make sure that the lighting, sound quality, and video quality are at the desired level. Playing around with the different bit rates can provide better results based on the needs of the organization. Although a producer may choose a higher bit rate to get better quality, the results might not be better than those obtained at a lower bit rate and with presumably lower-quality published media. If the lower bit rate produces results that are still acceptable, lowering the bit rate can minimize bandwidth demands on the network, creating less demand on the network and allowing the organization to have more simultaneous media streams.
If you want to capture a session but there is no need for an immediate live broadcast, choosing the Capture Audio or Video option enables the Windows Media Encoder to capture and encode the session for future playback. This option can be used to capture training or conference sessions, press releases that will be broadcast at a later time and date, or organizational activities such as parties. The captured content can be stored and played back either on a scheduled broadcast basis or on demand.
To prepare for a captured broadcast, a Windows 2000/Windows XP workstation, a Windows 2000/Windows 2003 server with compatible camera and microphone, or a system with a video/audio capture card must be configured and tested for basic functionality. The camera and audio devices should be able to capture and record video and audio content at the desired level of quality. Once the remote system is working properly, a session can be captured.
To capture a session, Windows Media Encoder should be launched on a system that has a camera, microphone, and enough disk space to capture the content. Once launched, follow these steps:
Select Capture Audio or Video and then click OK.
Select the video and audio device source that will be capturing the event. Refer to the “Choosing the Bit Rate(s)” sidebar for more details on choosing the capture options. Click Next.
Enter a name for the file to be saved. Click Next to continue.
Choose how you want to distribute your content. Your choices are Windows Media Server (Streaming), Web Server (Progressive Download), Windows Media Hardware Profiles, PocketPC, or File Archive. Click Next to continue.
Optional information can be added to the captured file, such as title, author, copyright, rating, and description information. Enter the desired information and click Next to continue.
The next screen gives you the option to begin the capture when the Finish button is clicked, or to simply finish the configuration and start the session later. Make the appropriate selection and click Finish.
Because a live session is not being viewed, sometimes it’s hard to know what the resulting quality of the captured video and audio will be. Testing the various capture methods and fiddling with the bit rates can confirm whether the resulting video and distribution of the video content will be acceptable.
The Windows Media Encoder can also convert videos as well as capture screen content from a video session. These functions are useful utility features that give media producers some basic tools for editing and publishing content.
Capturing screen content from video is not as simple as you might think. Simply pressing Ctrl+Print Screen does not capture video content. This usually results in a grayed-out box where the video was being played. Third-party screen capture tools also typically do not capture video screens—they typically capture bit images of a video screen, and the DirectX video or streaming video caches video content that does not show up on the active screen.
A tool like the one built in to the Windows Media Encoder allows users to capture video screens. The screen capture function in the Windows Media Encoder can capture an entire streaming video session. This is useful if you are watching a Webcast, a video stream, or some other session that you might not otherwise be able to download for replay later. By capturing the entire video and audio session using the Windows Media Encoder, you can bypass any access limitations to the streaming information.
To capture a screen using the Windows Media Encoder, do the following:
Click the Capture a Screen option and then click OK.
On the Screen Capture Session window, choose to capture a specific window, a region of the screen, or the entire screen. Choose to capture audio from the default audio device by selecting the appropriate check box and then click Next.
Depending on the option selected in step 2, choose the window or region you want to capture and then click Next.
Enter the name of the file to which you want to capture the file and then click Next.
Choose the quality setting: low, medium, or high. Click Next to continue.
Optional information can be added to the captured file, such as title, author, copyright information, rating, and description. Enter the desired information and click Next to continue.
The next screen gives you the option to begin the capture when the Finish button is clicked, or to simply finish the configuration and start the session later. Make the appropriate selection and click Finish.
After the session has been captured, it can be played back by opening the file with Windows Media Player or another video playback tool.
Converting a file might be necessary for the producer of media content. Many times, a video file is stored in a format or has been encoded with a codec that is not widely or easily distributed. A video file might also be stored in a format that does not support the Windows Media Server publishing capabilities. One way to convert the file is to use the screen-capturing capability of Windows Media Encoder as covered in the section “Capturing Screen Content with the Windows Media Encoder Software.” The other way to convert the video is to use the conversion functionality built in to the Windows Media Encoder.
The Windows Media Encoder can convert files from the ASF, AVI, BMP, JPG, MPG, MP3, WAV, WMA, and WMV formats to a WMV video format supported by the Windows Media Server. To initiate a file conversion, do the following:
Click the Convert a File option in the Windows Media Encoder software and then click OK.
Select the source file of the file you want to convert. Choose the directory and filename where you want the output written. Click Next to continue.
Choose how you want to distribute your content. Your choices are File Download, Hardware Devices (CD, DVD, Portable), Windows Media Server (Streaming), Web Server (Progressive Download), Windows Media Hardware Profiles, PocketPC, or File Archive. Refer to the “Choosing the Distribution Content Method” sidebar for more details. Click Next to continue.
The next screen will prompt you for the encoding options. The various bit rate for encoding will be shown, displaying Total Bit Rate, Frame Rate, and Output Size. Choose the desired bit rate or bit rates and click Next to continue.
Optional information can be added to the captured file, such as title, author, copyright information, rating, and description. Enter the desired information and click Next to continue.
The next screen gives you the option to begin the capture when the Finish button is clicked, or to simply finish the configuration and start the session later. Make the appropriate selection and click Finish.
After the file has been converted, it can be played back by opening the file with Windows Media Player or another video playback tool.
You can use Microsoft Producer to create automated PowerPoint presentations with audio and video content. Slide presentations can be linked to a video of the presenter, as well as audio of the presentation with synchronization between slides and rich content.
Microsoft Producer for Microsoft Office PowerPoint 2003 can be downloaded free at http://www.microsoft.com/downloads/details.aspx?familyid=1B3C76D5-FC75-4F99-94BC-784919468E73&displaylang=en. The program works with PowerPoint 2003 or PowerPoint XP (2002).
Once downloaded, run the MSPROD2.EXE file to install the software. The installation options are as follows:
Click Next to continue past the Welcome page.
Enter the user and organization names, and then choose whether you want to install the software for anyone who uses the computer or for just the user of the current session. Click Next.
Upon reading and accepting the licensing agreement, click the I Accept the Terms pf This Agreement check box and click Next.
Choose either a Typical Installation or Custom Installation. The Typical Installation option installs the two components that come with the tool, so there is usually no reason to choose Custom Installation. Click Next to continue.
Click Install to complete the installation. Click Finish when prompted.
Once installed, you can launch Microsoft Producer and create a media-integrated presentation file. Do the following:
To launch Microsoft Producer, select Start, Programs, Microsoft Office, Microsoft Producer.
Choose Use the New Presentation Wizard to begin a Microsoft Producer project.
Click Next at the Welcome screen.
Choose one of the presentation templates. If you’re unsure which to use, start with the default template and then try some of the other options. Click Next to continue.
Note
If you just want audio with a PowerPoint presentation deck, the Standard Audio - Resizable Slides template option provides a left pane where the audio can be controlled, and a right pane where the slide size can be changed based on the resolution of the user’s monitor.
The Standard Video (320×240) - Resizable Slides template option provides a video section in the upper-left corner, session controls also in the left pane, and a resizable slide area on the right side.
Select the font, size, color, and background for the table of contents, as well as any slide area background file. Click Next to continue.
Enter the title for the presentation, along with any information about the presenter, introduction page image, and description. Click Preview to see what the intro page will look like, and click Next to continue.
Select the path and slides that will be part of this project. This can be in the PPT and PPS presentation formats, or in the JPG, JPEG, JPE, GIF, PNG, BMP, TIF, DIB, WMF, or EMF image formats. You can select multiple files and images. Click Next to continue.
Select the path and files for the audio and video files that will be part of this project. The files can be in the AVI, MPG, M1V, MP2, MP2V, MPEG, MPE, MPV2, WM, WMV, and ASF video formats, or in the WAV, AIF, AIFF, AIFC, SND, MP3, AU, MPA, WMA, and ASF audio formats. You can select multiple audio and video files, and you can even click the Capture button to capture real-time content. Click Next to continue.
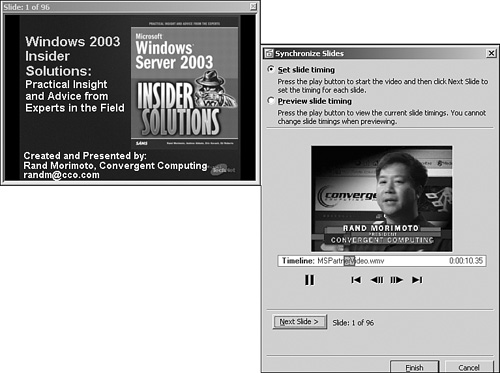
You are prompted with an option to synchronize your presentation slides and audio/video content. Typically, you will select Yes so you can organize the content with the appropriate rich media and slides. Click Next. Click Finish to begin importing presentation decks, slides, audio, and video content.
On the Synchronize Slide page, click the Play button to start the video/audio content. Click the Next Slide button when the video/audio connects with the desired slide. The Microsoft Producer interface is shown in Figure 37.9.
After the project has been completed, the project can be saved as a Microsoft Producer file for future modifications or changes. Additionally, one of the major functions of Microsoft Producer is to publish the integrated presentation. The published presentation is saved in JPEG and WMV files that can be viewed using a standard browser.
To publish the presentation file, do the following:
From the Microsoft Producer screen, select File, Publish.
For the playback site, choose either My Computer, My Network Places, or Web Server. Click Next.
Note
Choose My Computer to publish the presentation to a file that can then be burned to CD or DVD, or accessed from a standard file server.
Choose My Network Places to publish the presentation to a network share or a SharePoint Portal, or Windows SharePoint Services share.
Choose Web Server to publish the presentation to a Web server, so that Microsoft Publisher content can be stored on a Web server, and the media content is stored on a Windows Media Server system.
Enter the filename and the location where the files are to be published. Click Next.
Confirm the title, presenter, introduction page image, and description for the Presentation Information page. Click Next.
For published settings, select the Choose Publish Settings for Different Audiences option instead of the recommended Use Suggested Settings option so you can select the quality and transfer speed of the content. Click Next to continue.
Note
As noted in the “Choosing the Bit Rate(s)” sidebar, select the bit rate that meets the available bandwidth being used for the playback. If you plan to burn the presentation to CD-ROM, keep the content small enough to fit on a CD-ROM disc. If you plan to publish the session over the Internet, you need to choose the bandwidth available for your remote client connections.
Click Next on the Publish Your Presentation screen to process the presentation.
Windows Media Services is a combination of server components and tools that help organizations go beyond text-based communications to include audio and video communications. Windows Media Services is a component that comes with Windows Server 2003 and can easily be enabled on a server system. However, the server component is predominantly a publishing and distribution function—it relies on add-ins such as the Windows Media Encoder to provide capture and conversion functionality.
Even with what Microsoft provides in the Windows Media Services server function and the Windows Media Encoder download tools, there’s still a need for third-party editing and cropping tools. And with add-ons like Microsoft Producer, captured video and audio content can be integrated with Microsoft PowerPoint presentations.
Windows Media Services provides a new way for organizations to conduct employee training and broadcast live meetings, and integrate audio and video content into normal PowerPoint presentations.
For faster performance on a Windows Media Services system, place the system and application files on one hard drive set, and place the data files stored on a separate hard drive set.
Use the Windows Media Load Simulator to test the real-time performance capabilities of a Windows Media Services system.
To run Multicast broadcasting, a Windows Media Services system needs to run the Enterprise Edition of Windows Server 2003.
Use standard DNS characters (A–Z, a–z, 0–9, and the minus sign) for publishing point names so that when you need to access the published access, you can access it over the Internet.
If you are publishing a broadcast to dozens of users over a network infrastructure that supports Multicast broadcasting, use the Multicast function of Windows Media Services to minimize system bandwidth demands.
Use the loop function in the video playback options if the video you are publishing should run continuously, such as in public kiosks or advertising systems.
Combine files for publishing by using the playlist function in the Windows Media Services MMC Publishing Point Configuration option.
Download the Windows Media Encoder to access freely available file capture and conversion tools.
Run the Windows Media Encoder on a system with as much RAM memory, processing speed, and disk space as possible. When a system is underpowered, a video capture or conversion might be forced to drop frames and ultimately lower the quality of the video.
When capturing content using the Windows Media Encoder, ensure that the microphone has been turned on to properly capture audio content because the microphone is normally disabled by default.
Select a bit rate for capture and conversion that matches the needs of the users. Although the highest quality may be preferable, the bandwidth demands of multiple users accessing the content at high quality may saturate the available network bandwidth.
Use the Microsoft Producer add-in to Microsoft PowerPoint to synchronize audio and video content with slides and PowerPoint presentations for high-quality automatic presentation playback sessions.