
Preparing Windows NT4 Domains to Migrate to Windows Server 2003
</objective> <objective> </objective> <objective>Migrating Existing NT4 Domains to a New Windows Server 2003 Forest
</objective> <objective> </objective> <objective> </objective> </feature>When you’re migrating directly to Windows Server 2003 from Windows NT4, you must consider many factors while preparing and performing the migration. This chapter outlines the detailed tasks and reviews the different options to perform such a migration.
Before you begin, make sure that all preparation tasks such as your Active Directory design and pre-migration requirements covered in the “Preparing Windows NT4 Domains to Migrate to Windows Server 2003” section of this chapter have been identified and documented. Complete these areas to determine which migration path best fits your organization’s migration needs.
The first decision to be made when migrating is to determine which type of migration strategy best fits your requirements and Active Directory design. Three migration paths are outlined in this chapter. Each migration path, described in the following list, is unique in characteristics and requires different tasks to complete. Therefore, each migration path should be planned in detail, scripted, and tested before you actually perform any migration tasks.
The first migration option is an inplace upgrade. This migration path is a direct upgrade of the Windows NT4 server operating system and domain to Windows Server 2003 and Active Directory.
The second option is to migrate the NT4 objects from an existing NT4 domain to a brand-new Windows Server 2003 forest and Active Directory.
The third option is to consolidate multiple existing Windows NT4 domains into a single Active Directory domain configuration.
Each domain migration path offers different characteristics and functionality. Before you continue, review each migration path and perform all preparation tasks to prepare your Windows NT4 environment to be migrated to Active Directory. Begin by determining the specific criteria for your migration, such as the time frame in which to complete the migration and your final Active Directory design. Understanding these key areas will assist you in determining which migration path is best for your organization.
With each specific migration path, there are different tasks and methods in which to prepare and complete a migration. There are also key business decisions and technical factors that can determine which path is best for your migration. Each of these paths and the benefits associated with them are outlined in the following sections.
An inplace upgrade is very effective for organizations that want to maintain their existing Windows NT4 domain or multidomain models. Using this method allows you to effectively migrate from an existing domain or domains to Windows Server 2003 and Active Directory by upgrading the NT4 domain as it exists today into a Windows Server 2003 Active Directory domain. Because you are performing an inplace upgrade of the server operating system, each server system setting such as domain trusts and service accounts is preserved when the upgrade is complete.
The most compelling reasons for organizations to use this method are as follows: After the server operating system is upgraded to Windows Server 2003, the Active Directory Installation Wizard will also migrate and upgrade all existing Windows NT4 domain security principles such as domain users, groups, and permissions to Active Directory. This is considered the simplest model because no additional tools or third-party software is required to complete the migration. Also, after the inplace migration, desktops and laptops in the organization do not need to be touched because they will effectively remain in the same Windows domain as they were in NT4. This factor is significant for organizations that want to migrate but do not want to touch every single desktop after the migration. After proper planning and testing, some organizations have actually conducted an upgrade from Windows NT4 to Windows Server 2003 on a Friday night, with no dramatic impact on users or operation of the network.
Note
The inplace upgrade method of migration from Windows NT4 to Windows 2003 has proven to be the preferred method of migration for most migrations from NT4. Because the inplace upgrade migration maintains user accounts, computer accounts, security principles, user profiles, and other key network information, this migration method has the least (if any) impact on users, thus making it the cleanest migration method. Inplace upgrades do not require existing domain controller hardware to be upgraded, however, it only implies that the domain itself can be upgraded inplace.
As organizations grow or business needs change, many companies are looking for an effective method of changing their existing Windows NT4 domain model. Migrating an existing Windows NT4 domain to a new Windows Server 2003 forest allows administrators to design and install a new Windows Server 2003 Active Directory forest without interrupting existing Windows NT4 network connectivity.
When you use the Active Directory Migration Tool (ADMT) to migrate Windows NT4 domain security principles and resources to Active Directory, existing Windows NT4 security principles can then be migrated to organizational units and child domains within the newly structured Active Directory forest, as shown in Figure 16.1.

By taking advantage of the enhanced functionality of Windows Server 2003, Active Directory can be integrated with Windows NT4 domains by using domain trusts and permissions. This functionality makes this option very effective for larger organizations and enables administrators to migrate security principles incrementally over time while still maintaining connectivity to the same shared network resources. This means users in the Windows NT4 domain can access the same resources as users who have been migrated to Active Directory without interruption to day-to-day operations.
This migration path also allows administrators to further organize and structure a new domain by allowing objects to be moved between Active Directory domains and organizational units after they have been migrated. All these tasks can be completed while still maintaining connectivity between Windows NT4 and Windows Server 2003, further enhancing your ability to build a new domain model without the need to create new users and computer accounts as well as new network resources.
The third migration path allows an organization to migrate to Windows Server 2003 and Active Directory using all the functionality and integration capabilities of the first and second migration paths. When you consolidate domains, your organization can perform an inplace upgrade while maintaining selected existing Windows NT4 domains. Other existing NT domains can then be consolidated into the new Active Directory domain or domains within the forest. Domains can even be migrated and consolidated into organizational units, allowing for more granular administration. When security principles are migrated using the Active Directory Migration Tool, this option allows organizations to consolidate and migrate additional domains incrementally while maintaining selected existing domain infrastructures.
This option is effective for organizations that have acquired other companies and their networks and still want to maintain their original domain model. When you consolidate domains, effectively you are upgrading a domain or domains within the existing domain model. After the upgrades are completed, you can then begin consolidating and restructuring domains by migrating security principles into new organizational units with the forest root or child domains in the new Active Directory forest. Additional account and resource domains can then also be consolidated within the newly structured Active Directory forest.
Now that you have an understanding of the migration requirements and the path in which you are going to migrate to Windows Server 2003 and Active Directory, the next step is to begin preparing your existing network infrastructure and Windows NT4 domain to be migrated to Windows Server 2003 and Active Directory.
Whether you are implanting a new Windows Server 2003 Active Directory domain or upgrading existing Windows NT4 server operating systems and domains to Windows Server 2003, you must consider several steps regarding hardware and software before you begin your migration. Performing these steps will prevent avoidable problems in areas such as meeting Windows Server 2003 family hardware requirements, ensuring Windows Server 2003 hardware and software compatibility, and planning server hardware configuration to optimize server performance. The following section addresses these specific areas and identifies the tools available to help prepare your server hardware and software for a successful migration to Windows Server 2003.
Before migrating servers to Windows Server 2003, you must determine whether your Windows NT4 server hardware and Windows NT4 server–based applications are compatible with the Windows Server 2003 family operating systems. To test each server for compatibility, use the Microsoft Compatibility Check tool available on your Windows Server 2003 installation CD-ROM.
Note
You can also review the Windows Server 2003 family hardware and software compatibility list on the Microsoft Web site. Windows 2003 compatibility information can be found at http://www.microsoft.com/hcl.
The Compatibility Check tool can be run from the Windows Server 2003 setup CD-ROM. It does not require you to begin installing or upgrading the server operating system to run the tool.
You can choose from two methods to run the Compatibility Check tool. You can use the autorun feature built into your server system to launch the Windows Server 2003 Setup screen. If your server system does not support the autorun feature, or it has been disabled, you can run the utility from a command prompt or Windows Run option. To run the Compatibility Check tool at the prompt, type d:i386winnt32/checkupgradeonly, where d: represents the CD-ROM drive letter.
Each method allows you to launch the Windows Server 2003 Compatibility Check tool. Be sure to run this tool before upgrading or installing Windows Server 2003 and Active Directory. Replace any incompatible hardware and upgrade any software as required to ensure proper functionality when your migration is complete.
One of the most important steps before migrating is to ensure that the existing server hardware and server operating systems that you plan to migrate meet the minimum requirements for installing the Windows Server 2003 family products. Ensuring that the server hardware meets these requirements and planning for the addition of server hardware resources such as memory can assist you in ensuring that server performance will be adequate when your migration is complete. The following sections list the minimum requirements and recommended hardware and software requirements for performing an upgrade or clean installation of Windows Server 2003 family products.
Most Windows NT4 network installations contain multiple versions of the NT4 operating system. Each operating system type must meet the minimum requirements for upgrading or migrating to the Windows Server 2003 family.
The server operating system requirements include the following:
Windows NT 4.0 Service Pack 5 or higher
Windows NT 4.0 Terminal Server Edition with Service Pack 5 or higher
Windows NT 4.0 Enterprise Edition with Service Pack 5 or higher
Before you install Windows Server 2003, review your existing server hardware to ensure each system meets the minimum requirements for installing the Windows Server 2003 family server operating system. Also, plan your server hardware configurations and upgrades based on server roles. Be sure to plan for adequate hardware resources to ensure optimal performance based on each server role:
For x86-based systems—. Windows Server 2003 supports Intel’s Pentium and Celeron, AMD K6, Athlon, and Duron processors at 133MHz and higher. For best performance, Microsoft recommends a minimum speed of 550MHz. The minimum supported memory for installing Windows Server 2003 is 128MB of RAM. Review each server role and plan memory requirements to ensure best performance. Microsoft recommends 256MB of memory.
For Itanium-based systems—. A minimum processor speed of 733MHz is recommended, as is a minimum of 1GB of RAM.
Often when Windows NT4 servers were installed without hardware fault-tolerant equipment, the Windows NT4 Disk Manager was used to create volume sets, mirrored sets, stripe sets, and stripe sets with parity. Because the Windows Server 2003 operating system does not support Windows NT4 Disk Manager configurations, you must modify software-based disk configurations before performing an inplace upgrade to Windows Server 2003. Perform the tasks described in the following sections for each configuration before continuing to upgrade any Windows NT servers.
If you used Windows NT4 to create a mirrored set, before upgrading to Windows Server 2003, you must break the Windows NT4 mirrored set.
If the server you are going to upgrade has been configured using Windows NT4 volume sets, stripe sets, or stripe sets with parity, you must delete the sets and configure new drive configurations with fault tolerance before you can conduct an inplace upgrade.
Caution
Deleting a volume set, stripe set, or stripe set with parity deletes all the data from the volume. Be sure to back up all server data before deleting any type of volume or stripe sets.
Because the inplace migration from Windows NT4 to Windows Server 2003 of a volume set, stripe set, or stripe set with parity requires the server hardware to be reconfigured, it is recommended that you build a brand-new Windows NT4 primary domain controller (PDC) and conduct the inplace upgrade on the new system. By adding a new domain controller on the network that does not have unsupported volume and stripe sets, you can conduct the inplace upgrade on this new system without having to bring the old system offline. When the new system is promoted to become a Windows NT4 primary domain controller, the old server will become a backup domain controller (BDC), and all the information stored on the old system will remain intact.
Migrating network services has always been one of the most challenging areas for administrators during any type of migration. When a Windows NT4 domain controller is upgraded in place, all network services are also upgraded to Active Directory, and Windows Server 2003 eliminates the need to install new network services to maintain connectivity during a migration. However, network services such as Dynamic Host Configuration Protocol (DHCP), Windows Internet Naming Service (WINS), and Domain Name System (DNS) must be considered before you upgrade or migrate to Windows Server 2003 and Active Directory regardless of which migration method you use.
The area to focus on is planning, creating your migration script, and planning for a move or installation of services so that your migration is uninterrupted by failure of server-to-server connectivity as well as client-to-server connectivity. If you are migrating to Windows Server 2003 and Active Directory, network services such as DNS and DHCP must be used to maintain coexistence between domains. Ensure that your migration plan includes migrating these network services and avoids interruptions by migrating vital network services in the first phases of your migration.
The preparation of a Windows NT 4.0 SAM database is a relatively simple, two-step process. To prepare a Windows NT4 SAM database for a migration to Windows Server 2003, perform the following steps:
Remove unused security principles before upgrading a domain or migrating Windows NT4 security principles to Windows Server 2003 and Active Directory. It is a good practice to remove unwanted user, group, and computer accounts from the Window NT4 SAM database. By cleaning up the SAM database, you can then focus your migration on actual accounts.
Address duplicate and similar account names when you are consolidating domains. Review each Windows NT4 domain for similar or duplicate account names, group names, and resources. As you begin migrating Windows NT4 security principles to Windows Server 2003 and Active Directory, understand that these potential conflicts will assist you in configuring the Active Directory Migration Tool to resolve these naming conflicts.
After you remove unwanted Windows NT accounts and review each existing domain, it is a good practice to replicate the clean SAM database to all domain controllers with the Windows NT domain. Use the Server Manager console in your Windows NT Administrator Tools to replicate the domain’s primary domain controller and SAM database to all backup domain controllers within the domain.
This section will guide you through the steps to migrate a Windows NT4 domain directly to Windows Server 2003 and Active Directory.
Three areas will be covered in this section:
Upgrading primary domain controllers—. When you perform an inplace upgrade, the first server in the Windows NT domain to upgrade is the primary domain controller. When you upgrade the primary domain controller, all Windows NT domain security principles such as user accounts, domain groups, permissions, and network services are also upgraded to Windows Server 2003 and Active Directory.
Note
Before you begin an inplace upgrade of a domain, it is a good practice to synchronize the primary domain controller and backup domain controllers. After the SAM database is copied to all backup domain controllers, you should remove one of the backup domain controllers from the domain in case you need to roll back to Windows NT. This BDC will contain a copy of the domain’s SAM database and can be promoted to a primary domain controller as a means of recovering the original Windows NT4 domain and SAM database.
Upgrading backup domain controllers—. After the primary domain controller is upgraded, the next step is to complete an upgrade of the remaining backup domain controllers. As a migration process, a Windows NT4 backup domain controller does not need to be upgraded in place. The system that will be a Windows 2003 domain controller should just be installed from scratch and then promoted with the
DCPROMOcommand to become a Windows Server 2003 domain controller.Upgrading domain member servers—. Each of the domain member servers can be upgraded at any time. As with domain controllers, migrate each member sever based on importance and network role. When you’re performing an inplace upgrade to Windows Server 2003 and Active Directory, you must install Microsoft’s DNS. Each server’s TCP/IP property should be modified to include the TCP/IP address of the Active Directory–integrated DNS.
To begin performing an inplace upgrade, do the following:
Insert the Windows Server 2003 installation CD-ROM into the CD-ROM drive of the domain’s primary domain controller. If your server has autorun enabled, the Windows Server 2003 Setup Wizard screen will appear. If your server does not have autorun enabled, you can launch the Windows Server 2003 Setup Wizard by running the Setup.exe program from the Windows Server 2003 CD-ROM.
On the Welcome to Windows Server 2003 Family page, select Install Windows Server 2003 to begin upgrading the primary domain controller to Windows Server 2003 and Active Directory. This step will launch the Windows Setup Wizard, which will guide you through the setup process.
On the Welcome to Windows Setup page, select the installation type you want to perform; in this case, select Upgrade (Recommended). This will begin the upgrade of the Windows NT4 server operating system to Windows Server 2003 and Active Directory. Click Next to continue.
On the Licensing Agreement page, use the scrollbar to read the Microsoft licensing agreement. This page requires you to select one of the options. After reading the Licensing Agreement page, select I Accept This Agreement and click Next to continue.
Your copy of Windows Server 2003 should have a license key that came with the Windows Server 2003 CD-ROM Software. Enter the 25-character product code and click Next.
Review the Report System Compatibility to identify any issues with the inplace upgrade by clicking the details button. Select Next to continue.
The Windows Server 2003 Setup Wizard will now begin the installation of Windows Server 2003. The wizard will begin copying necessary files to your computer’s hard drive. You can monitor the upgrade progress from the progress bar in the lower-left corner of the installation screen. After the Windows Server 2003 Setup Wizard copies the files, the server will automatically restart.
After the Windows Server 2003 Setup Wizard upgrades the operating system to Windows Server 2003, the system will restart automatically and begin running the Active Directory Installation Wizard, as shown in Figure 16.2.

To install Microsoft’s Active Directory, do the following:
At the Welcome screen, click Next. This will upgrade the existing Windows NT4 domain and domain security principles to Active Directory.
Review the Operating System Compatibility screen; if you agree, select Next to continue.
At the Create New Domain page, select the option to create a new domain in a new forest and then click Next.
As mentioned earlier, Active Directory requires that the domain name system be installed before the AD installation can continue. Because this is an upgrade from an existing NT domain, you can assume that Microsoft DNS has not been installed on your network.
If your network has a DNS server compatible with Windows Server 2003 and Active Directory, select Yes, I Will Configure the DNS Client.
If there is no DNS server on your network and you intend this server to be the first DNS server within the new Active Directory domain, select No, Just Install and Configure DNS on This Computer. Then click Next to continue.
On the New Domain page, type your domain’s DNS name. This should be the domain name you selected in Chapter 5, “Designing a Windows Server 2003 Active Directory,” as your Active Directory fully qualified DNS name. Click Next to continue. For a continuation of this process, refer to the next section.
After the installation of Active Directory is complete, review the Active Directory Users and Computers MMC snap-in to ensure that all security principles have been upgraded properly.
Forest functionality levels deal with the integration of Windows NT4 and Windows 2000 domain controllers into Windows Server 2003 environments. The option that you select depends on whether you are planning to install additional Windows NT4 or Windows 2000 domain controllers in your new domain. The option Windows Server 2003 Interim Forest is used for additional Windows NT4 domain controller interoperability, whereas the Windows 2000 Domain option allows for Windows 2000 domain controllers to be added in the future.
For this installation, assume that no Windows 2000 server will be installed in the new Windows Server 2003 domain. Now pick up where you left off in the preceding section:
Select the Windows Server 2003 option and click Next.
On the Database and Log Folders page, you can select the location paths for the Active Directory database and database log files. Unless your design requires the Active Directory database and log files to be placed in a different location, choose the default path and click Next. Ensure that the server you are upgrading has sufficient disk space to host Active Directory databases.
If your server configuration does not call for you to move the SYSVOL folder, select the default location and click Next to continue. The SYSVOL folder is the location for storing a copy of the domain’s public files. These public files are replicated and used for domain information on all domain controllers within the Active Directory domain.
On the Permissions page, select Permissions Compatible Only with Windows 2000 or Windows Server 2003 Operating Systems and click Next. You select this option because this migration path is an upgrade from Windows NT4. Therefore, you don’t need to configure Active Directory with permissions that are compatible with Windows NT domains.
The following section provides the next steps in the Windows Server 2003 inplace upgrade.
As a continuation from the preceding section, the next steps in the process are the following:
Apply security to the Directory Services Restore Mode by assigning a password to the Directory Service Restore Mode account. This password should be documented in a secure location in case a recovery of the server is required. When you’re configuring the account name and password, keep in mind that each Windows Server 2003 server within Active Directory will have its own unique Directory Services Restore Mode account. This account is not associated with the Domain Administrator account or any other Enterprise Administrator account in Active Directory. Enter the account name and password and then click Next.
Use the scrollbar to review the server configuration summary page before you complete the installation. Ensure that the configuration information is correct. If changes are required, use the Back button to modify the server configuration. If the installation summary is correct, click Next to continue.
Caution
When you click Next to continue, the installation of Active Directory and Microsoft DNS will begin, and no modifications can be made thereafter.
Before choosing Finish and completing the inplace upgrade, review the Windows Server 2003 Setup Wizard information. This information can identify whether your installation experienced any errors.
Note
It is a good practice to review the server event and system logs after completing any upgrade. Review each log and identify errors and warnings that can potentially affect the stability of the server you are upgrading and that can cause problems with domain authentication.
Also review the Active Directory Users and Computers MMC snap-in to ensure that all security principles have migrated successfully to Windows Server 2003 and Active Directory.
After the domain’s primary domain controller upgrade is complete, the next step is to upgrade the remaining network backup domain controllers and member servers to Windows Server 2003 and Active Directory.
Note
Before you begin, review the backup domain controller’s and member server’s application and system logs to identify issues that can affect the progress of your migration.
When you’re performing an upgrade of Windows NT4 backup domain controllers and domain member servers, the Active Directory Installation Wizard allows you to change the server’s domain membership type or server roles.
For example, an existing NT BDC can be migrated to Windows Server 2003 and Active Directory as a member server or a domain controller. The same is true for Windows NT4 domain member servers.
When you begin this phase of the upgrade, determining which servers to upgrade first is important. Your migration script should include the order in which each BDC and member server will be migrated as well as the server role in which the BDC or member server will play after it is upgraded.
As a rule, you should first consider upgrading backup domain controllers that host network services such as DHCP and WINS. When you migrate vital network services, network downtime and interruption of server-to-server communications are minimized.
The first step in this phase is to insert the Windows Server 2003 installation CD into the CD-ROM drive of the backup domain controller. If your server has autorun enabled, the Windows Server 2003 Setup screen will appear. The procedure assumes that the upgrade is being performed on a domain member server.
If your server does not have autorun enabled, you can launch the Windows Server 2003 Setup Wizard by running the Setup.exe program from the Windows Server 2003 CD-ROM. Then follow these steps:
On the Welcome to Windows Server 2003 Family page, select Install Windows Server 2003. This step will launch the Windows Setup Wizard, which will guide you through the setup process.
On the Welcome to Windows Setup page, select the installation type; in this case, select Upgrade (Recommended). This will begin the upgrade of the Windows NT4 operating system to Windows Server 2003. Click Next to continue.
On the Licensing Agreement page, use the scrollbar to read the Microsoft licensing agreement. This page requires you to select one of the options. To continue, select I Accept This License Agreement and then click Next.
Each copy of Windows Server 2003 comes with its own 25-character license key. Enter the 25-character product code and click Next.
The Setup Wizard will begin upgrading the Windows NT4 operating system to Windows Server 2003 by copying necessary files to the server’s hard drive. You can monitor the inplace upgrade progress from the progress bar in the lower-left corner of the screen. After the wizard copies files, the server will automatically restart.
Installing Microsoft’s Active Directory on a Windows NT4 backup domain controller or member server differs from upgrading the primary domain controller. The installation of Active Directory on BDCs and member servers requires only that you configure the server role in which each server will play after the upgrade is complete.
After the Server Installation Wizard finishes upgrading the operating system to Windows Server 2003, the system will restart automatically and begin running the Active Directory Installation Wizard. To continue the upgrade process, do the following:
At the Welcome screen, click Next to begin the installation of Active Directory.
Select Member Server as the server role, as depicted in Figure 16.3, and then click Next to continue. The Active Directory Installation Wizard will install the domain controller or member server into the new Active Directory domain.
Add the TCP/IP address of the Active Directory DNS server in the Network Connections property page of Windows Server 2003. After you add the DNS server address, click Next to continue. This scenario assumes that no DNS server address has been configured prior to performing an inplace upgrade of the organization’s primary domain controller. If the BDC being upgraded has not been configured with the TCP/IP address of the new domain’s DNS server, the Configure Domain Name Service Client configuration page will open.
On the Network Credentials page, enter the name and password of the Domain Administrator account with permissions to join new computer accounts to the domain. Click Next to continue.
On the Administrator Password page, you can assign a new local administrator password to the new Active Directory server. Enter a new password and click Next.
Use the scrollbar to review your server configuration summary and ensure that the configuration you have selected is correct. Click Finish to close the Active Directory Installation Wizard and finish the inplace upgrade.
After the server joins the Active Directory domain, restart the server to complete the inplace upgrade and apply changes to the new Active Directory member server.

Review the server’s Event Viewer application and system logs to identify any errors with your upgrade. Resolve any issues identified to maintain server health and network connectivity before continuing the upgrade of any additional domain servers.
The second migration option allows an organization to migrate the objects (users, computers, groups, and so on) from an existing Windows NT4 domain or domains into a brand-new Active Directory forest.
After installing and configuring a new Windows Server 2003 Active Directory domain with pre-Windows 2000 permissions and creating a domain trust to integrate Windows NT4 domains with Active Directory domains, you can then use the Active Directory Migration Tool to migrate any and all Windows NT4 security principles to Active Directory domains and organizational units. By using domain trusts to provide coexistence between Windows Server 2003 and Windows NT4 resources, organizations can then migrate security principles incrementally over time and still maintain shared resources located on each domain.
When you use the Active Directory Migration Tool to restructure domains, all NT4 security principles are copied or cloned from the Windows NT4 domain and placed into Active Directory. When NT4 security principles are cloned, the source domain is left completely in place and uninterrupted, allowing you to easily roll back to the previous domain if required.
Installing a new domain requires the installation of a new domain controller and Microsoft’s Active Directory. After you install a new Windows Server 2003 system, you can then use the DCPROMO command to begin installing AD. To begin the Active Directory Installation Wizard, do the following:
Choose Start, Run and then type
DCPROMO. This will open the Welcome to the Active Directory Installation Wizard screen and guide you through the installation of a new Windows Server 2003 forest. Review the Operating System Compatibility screen; if you agree, select Next to continue.Note
A migration to a brand-new forest allows organizations to upgrade domain hardware and install Windows Server 2003 on brand-new server equipment. Before beginning the installation of Windows Server 2003 and Active Directory, run the Compatibility Check tool to review the server hardware requirements. Then review your Active Directory design and complete the installation and configuration of all domain hardware and domain objects before beginning the migration of Windows NT4 security principles.
You can use the Active Directory Installation Wizard to install the first domain controller in the new Active Directory forest. You can also use it to install additional domain controllers as well as child domains after the first domain controller installation is complete.
At the Welcome screen, click Next to begin installing the new Active Directory domain. Because this installation is a new domain and it is the first server in the domain, on the Domain Controller Type page, select Domain Controller for a New Domain. This option will create a new Active Directory forest and configure the first domain controller in the new domain.
To create the new domain forest, on the Create New Domain page, select Domain in a New Forest and click Next to continue.
On the Install and Configure DNS page, you can determine how DNS will be installed within the new Active Directory domain. This page can be used to install DNS on the server or configure the upgrade to use a different DNS server on the network. Because this is the first domain controller in the new forest, select No, Just Install and Configure the DNS Server on This Computer. Choosing this option will install Microsoft DNS on the new domain controller and modify the server’s TCP/IP properties to use the new DNS installation for name resolution.
Enter the fully qualified DNS name of your new Active Directory domain. This DNS name is not the same as the existing Windows NT domain name and must be unique to any domain names on your network. Click Next to continue.
Enter the NetBIOS name information and then click Next. The NetBIOS Domain Name is the name you want Windows NT4 domains to use when identifying your new Active Directory domain. It is usually the same name as your new domain.
Depending on your server configuration design, select the location where the Active Directory databases will be located.
Note
When you’re configuring Active Directory database locations, make sure that your server hardware configuration plan takes recoverability and performance into account.
For best performance, install the Active Directory databases on a separate hard disk than the server operating system and server page file. Use the Browse buttons to select the disks where you want to store the Active Directory databases.
For best recoverability, use disk fault tolerance such as RAID or disk mirroring for the Active Directory databases.
Use the Browse button to select the location where the SYSVOL folder will be installed or use the default location, and click Next. The SYSVOL folder contains the new Active Directory domain’s data files. This information is replicated to all domain controllers in the domain and can be installed only on an NTFS volume. Your server design should account for the placement of the domain controller’s SYSVOL folder. When you configure Active Directory permissions, the forest functionality must be configured for compatibility with other Windows Server family operating systems.
If the new domain installation will contain only Windows Server 2003 domain controllers, select permissions compatible with Windows 2000 or Windows Server 2003 operating systems. This option is applicable only when you’re adding new domain controllers to your domain. This does not affect backward compatibility when migrating existing Windows NT4 domains to Active Directory. For this example, select Permissions Compatible Only with Windows 2000 or Windows Server 2003 Operating Systems and click Next to continue.
Assign a username and password to the Directory Services Restore Mode account. The Directory Services Restore Mode password is used to recover a server in case of server failure. This password should be documented in a secure location in case a recovery of the server is required. When you’re configuring the account name and password, keep in mind that each Windows Server 2003 server with Active Directory in the domain has its own unique Directory Services Restore Mode account. This account is not associated with the Domain Administrator account or any other Enterprise Administrator accounts in Active Directory. Enter the Directory Services Restore Password and click Next.
Review the server configuration and click Finish. This step will complete the installation of Active Directory.
Restart the domain controller by selecting Restart Now. Log in after the server restarts and review the server’s Event Viewer application and system logs to identify any errors or potential problems with your installation before continuing.
Install and configure any additional domain controllers as planned in your Active Directory design and configure security as well as create all organizational units before migrating Windows NT4 security principles to Active Directory.
When you’re migrating existing NT4 domains to a new Active Directory forest root or child domain, you must create trust relationships between the existing Windows NT4 domains. The existing Windows NT4 domains are called the source domains, and the newly created Windows Server 2003 Active Directory domains are target domains.
Begin by configuring a trust on the target domain. On the Windows Server 2003 domain controller, open the Administrator Tools and launch Active Directory Domains and Trust Manager. From the Action menu, open the property page for your Active Directory domain and select the Trust tab.
Windows Server 2003 and Active Directory trusts are created using the New Trust Wizard. Select New Trust to start the wizard, which will guide you through the creation of a domain trust. Click Next at the Welcome screen.
On the Trust Name page, type in the name of the Windows NT4 source domain with which you would like to create a trust. You can use both the source domain’s NetBIOS and fully qualified DNS name in this configuration. This will allow Active Directory to establish connectivity with the source Windows NT4 domain. Click Next to continue.
Note
When you’re configuring a domain trust, each domain must have the capability to resolve the domain name to a domain controller’s TCP/IP address. Install the Windows Internet Naming Service (WINS) on the target domain controller and configure the TCP/IP properties on the target and source domain controllers to use the newly installed WINS service.
The Windows Server 2003 forest functionality must be in Native mode to establish trust between Active Directory and Windows NT4. If you are experiencing problems creating a trust, raise the forest functional levels using the property page of the Active Directory domain.
Select the type of trust you want to establish. On the Direction of Trust page, select Two-Way, which will allow connectivity and access to resources in both the target and source domains when migrating. Then click Next to continue.
To configure outgoing trust properties, select Domain-wide Authentication. This option will allow Windows NT4 security principles access to all resources within the Active Directory target domain. Windows Server 2003 will automatically authenticate existing NT4 security principles within the target domain. This will allow required Administrator accounts access to each domain and domain group membership when you are ready to install the Active Directory Migration Tool and migrate security principles. Click Next to continue.
The trust password is a password other than the domain administrator password. It is unique to the trust being created and will be used by both the source and target domains to authenticate the trust. The same trust password must be used on both the Windows NT4 target domain and Windows Server 2003 source domain trust configurations. Enter a password for this trust to use and click Next to continue.
Review your trust configuration, select Back to modify any setting you want to change, or click Next to finish creating the trust and view the configuration changes created by the New Trust Wizard. Click Next to continue.
A dialog box will appear asking for confirmation of the outgoing trust. You cannot confirm the domain trust until a successful trust has been created on the Windows NT4 source domain. Before continuing, create and establish a trust relationship on the Windows NT4 source domain’s primary domain controller. At the Confirm Outgoing Trust page, select the No, Do Not Confirm the Outgoing Trust option and click Next to continue.
Choose the No, Do Not Confirm the Incoming Trust option on the Confirm Incoming Trust page. Click Next to complete the trust configuration. Next, review the trust configuration and click Finish to close the New Trust Wizard.
To successfully establish a trust on the Windows NT source domain, you must first configure the trusted domain. To add the target domain to the Windows NT4 trusted domains, open the User Manager for Domains on the Windows NT4 primary domain controller. Choose Policies, Trust Relationships to open the Windows NT4 Trust Relationship page.
Begin by selecting the Add button under Trusted Domains. Enter the name of the target domain and a password that will be used by both domains to authenticate the trust. As mentioned earlier, this password is unique to the trust configuration and should be different from the Domain Administrator account password. This password will be used only to authenticate the domain trust between the source and target domains.
After the trusted domain is established successfully, select Add under the Trusting Domain section of the page. Enter the name of the target domain and the password used to establish the trust. This will add the target domain to the Windows NT4 trusting domains and complete the configuration of the Windows NT4 trust. Click Close to close the Trust Relationships page.
After you successfully create the trust between the source and target domain, the New Trust Wizard can confirm the trust for both outgoing and incoming trusts. If you choose to validate the trust, use the Administrator account name and password of the source domain to test access for both incoming and outgoing connectivity of the domain trust. Click OK to close the open dialog box.
Using the option to migrate account and resource domains to Windows Server 2003 and Active Directory allows you to restructure existing Windows NT4 accounts and resources into newly created Windows Server 2003 Active Directory domains and organizational units.
Before beginning your migration to Windows Server 2003, review the Active Directory design decisions you made in Chapter 5 of this book. The design decisions such as organizational unit configuration and group definition make up the framework of the Active Directory structure. When you use the Active Directory Users and Computers MMC snap-in, the creation of OUs and groups should match the OU and Group design.
Migrating account domains and resource domains to Active Directory organizational units allows for enhanced security and ease of delegation within the Active Directory domain tree. After you finish configuring the Active Directory domain’s organizational unit structure, you can begin migrating domain resources and security principles using the Active Directory Migration Tool, as shown in Figure 16.4. Review the “Using Microsoft Active Directory Migration Tool” section at the end of this chapter to step through the migration process.

When security principles are created in a Windows NT4 domain, each individual object is assigned a unique security identifier (SID). Each security principle’s SID is unique and contains information about that specific security principle’s group and domain membership.
When these types of security principles are migrated to Windows Server 2003 and Active Directory, each security principle is assigned a new SID with information about its new domain and group membership. Because the new SID does not contain information about the security principle’s previous domain membership, when users or groups access domain resources on the old Windows NT4 domain, such as files, they may find that they no longer have permission to specific resources.
To avoid these problems during and after your migration, use the Microsoft Active Directory Migration Tool to migrate the security principles’ SID history. The SID history is a record of each specific security principle’s previous Windows NT4 group and domain membership. The Active Directory Migration Tool can migrate the security principles’ SID history for each object maintaining previous information and preventing permissions problems later in the migration.
In the past, when organizations acquired new companies, additional Windows NT4 domains were often added into their existing domain environment using Windows NT4 trust relationships. With these additions, the manageability of domains, domain trusts, and domain resources became difficult. Consolidating Windows NT4 domains into Windows Server 2003 and Active Directory allows organizations to maintain the original Windows NT4 domain structure or domain name. Additional domain structures can be consolidated into organizational units within the Active Directory forest as well. By upgrading domains and migrating additional domains into organizational units, administrators can further enhance security and manageability of Active Directory objects.
Note
Before you begin the domain consolidation process, make sure that all preparation tasks have been completed and your migration script is prepared and tested in a separate lab environment. Using this migration path will copy or clone all Windows NT security principles rather than modify them on the original Windows NT domains.
If you incorporate both an inplace upgrade along with the Active Directory Migration Tool, you can consolidate Windows NT4 domains into Active Directory domains and organizational units within each domain, as shown in Figure 16.5.
This option is designed to allow administrators to downsize any existing Windows NT4 model while increasing administrative functionality by using Active Directory organizational units to maintain old Window NT4 domains.
You begin the domain consolidation process by selecting and upgrading an existing Windows NT4 domain or multiple domains to an Active Directory forest. Depending on your Active Directory design, this inplace upgrade can become the first domain in a new forest or a child domain of a new Active Directory forest root.
Whether you are upgrading a single domain or multiple domains, begin by performing an inplace upgrade of the Windows NT4 domain that will become the Active Directory forest root or a child domain of a new Active Directory forest root. Use the same procedures outlined in the “Performing an Inplace Upgrade” section earlier in this chapter.
The primary purpose for using the domain consolidation migration process is to enable administrators to consolidate Windows NT4 domains into new Active Directory domains and organizational units. When the Active Directory forest is in place, any additional Windows NT4 domains can then be migrated to organizational units within the new Active Directory forest.
Because the original domains have been upgraded, all trust relationships are maintained, and the new Active Directory forest is ready to migrate security principles from Windows NT4. Before you begin, complete any restructuring tasks needed on the upgraded domain structure and create any additional organizational units needed. Use the procedures defined in the “Using Microsoft Active Directory Migration Tool” section to consolidate Windows NT domains to Active Directory organizational units and child domains.
The Active Directory Migration Tool, also known as ADMT, is a powerful utility provided with the Windows Server 2003 operating system. ADMT allows Windows NT4 domain security principles to be migrated directly to Windows Server 2003 and Active Directory. The Active Directory Migration Tool provides wizards that enable you to perform the following:
Test migrations to identify any potential issues before you perform any actual migrations
User migrations to migrate user accounts from domain to domain, or forest to forest
User profile migrations to migrate user profile information from source to destination user account
Group migrations to move group and group membership information between source and destination domains or forests
Computer account migrations to migrate computer accounts from one domain or forest to another
Service account migrations to migrate the service account from one system or domain to another
Domain trust migrations to relink domain trusts from one domain to another domain
Password migrations to move user passwords when a user account is migrated from one domain or forest to another
After security principles are migrated to Active Directory, the ADMT also allows administrators to perform intraforest migrations of Active Directory objects. Objects can then also be moved between Active Directory domains and child domains as well as organizational units within the new Active Directory forest.
Before you install the Active Directory Migration Tool, make sure that your network meets the following requirements:
Domain trusts are established between Windows NT and Active Directory domains.
The Active Directory Administrator account is a member of the Windows NT4 Domain Administrators group.
The Windows NT4 Administrator account is a member of the Windows Server 2003 Local Administrators group.
The Active Directory Migration Tool can be installed from the Windows Server 2003 operating system CD-ROM. Use Windows Explorer to view the contents under the I386 directory of your installation CD. Launch the ADMIGRATION.MSI package file located in the ADMT folder to run the Active Directory Migration Tool Installation Wizard.
At the Welcome screen, click Next to continue. Accept the End User License Agreement and click Next to begin the installation of the ADMT. Click Next to accept the default folder for installation. Complete the installation and click Finish to close the Active Directory Migration Tool Installation Wizard.
Note
It is a good practice to install the ADMT utility on a domain controller located in the target domain. During the installation of the ADMT, the Setup Wizard will also make additional configuration changes within each domain being migrated. Review the README.DOC file in the ADMT installation directory to identify additional ADMT installation tasks and prerequisites.
Using the Active Directory Migration Tool to migrate accounts and groups to Active Directory requires that you configure several options. The following steps will guide you through the migration process for cloning user accounts, service accounts, and Windows NT domain groups to Active Directory:
To run the Active Directory Migration Tool, launch ADMT from the program group on the Active Directory domain controller. Choose Start, Administration Tools, Active Directory Migration Tool.
Choose Action, ADMT User Account Migration Wizard and then click Next. The Migration Wizard will then begin to migrate users to Active Directory.
To begin migrating user accounts, select the Migrate Now option and click Next to begin migrating users to Active Directory.
The Domain Selection page allows you to choose the source and target domains for your migration. Use the drop-down box to select the domains for this migration and then click Next to continue.
Select the user account or accounts for this migration by clicking the Add button. You can enter the names manually or select multiple users at one time by clicking the Advanced button and searching for users. When you’re done selecting, click OK to close the Advanced Select Users screen and return to the User Selection page. Ensure that all users have been selected and then click Next to continue.
Use the Organizational Unit Selection page to identify the target OU location where the user accounts will be cloned. This is the organizational unit that will house the user’s account for this migration. Select the Browse button to navigate to the proper OU in the target domain. Click OK to close the Browse the Container screen and return to the Organizational Unit Selection page. Click Next to continue.
To enable the migration of user passwords from the NT Source domain, you must install an ADMT password export server. If no password server exists, review the ADMT help for information on password migrations for more info.
Select the specific account options for each account being migrated. You can choose from the following Target Account State options:
Enable Target Account—. This option enables users to immediately log on to the new Active Directory domain after their accounts have been migrated.
Disable Target Account—. This option disables the newly created account, not allowing any users to log in to the new Active Directory domain.
Target Same As Source—. This option compares and sets the newly created account to whatever state the account is in the target domain.
Enable Target Account—. This option activates the target account after the migration process is completed.
Disable Source Account—. This option allows administrators to disable the migrated account in the source domain after the account is cloned to Active Directory. This option can also be used to set limits to the number of days an account should stay active after the migration is complete.
Days Until Server Accounts Expires—. Use this option to prevent users from accessing the source domain after an account has been migrated. This will prevent any account access in the source domain once the allotted time has expired.
Select the Disable Source Account option for this migration. This will disable all accounts being migrated in the source domain.
To migrate SID history for the account being migrated, select Migrate Users SID to Target Domain. This will migrate the account’s SID attributes from the source domain to the new target domain.
The ADMT requires configuration changes be made before it can continue migrating users. When the error dialog boxes appear, follow the installation instructions in the following sections to perform additional tasks on both the source and target domains.
Migrating SID history requires auditing be enabled on the source and target domains. If auditing has not been enabled, an error dialog box will appear for both the source and target domain auditing.
Select Yes to enable auditing on the source and target domain and continue with the migration.
If you want to migrate a user’s SID history, the local group NTDomain must exist on the source domain. If the group has not already been created, you can make the Migration Wizard create the group by selecting Yes when the error dialog box appears.
Select Yes to add the TcpipClientSupport Registry key to the source domain.
After the Registry change is made, select Yes to reboot the source domain PDC. Click OK and wait for the Windows NT domain PDC to finish rebooting before continuing.
If your migration requires you to maintain a user’s SID history, you must enter the username and password of an account with Administrator rights in the source domain. Enter the name of the source domain administrator and administrator password as well as the name of the Windows NT source domain.
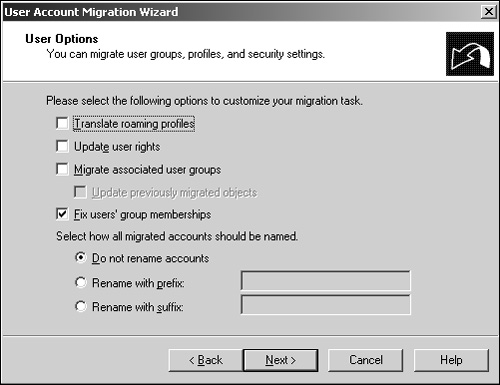
By using the User Options described in Table 16.1, you can select and customize the user attributes of each user account being migrated.
Table 16.1. User Options
After reviewing the selections on the User Options page, make sure that the proper selections have been made and click Next to continue.
On the Naming Conflicts page, select the action that ADMT should perform to resolve naming conflicts if accounts in the target domain exist with the same name as accounts being migrated from the source domain.
When duplicate account names exist in both the target and source domain, using the Ignore Conflicting Accounts and Don’t Migrate option leaves accounts in the target domain intact and does not migrate any accounts that conflict from the source domain to the target domain.
When you replace existing accounts, each conflicting user account in the target domain will inherit the permissions and properties of the conflicting account name in the source domain. Essentially, any duplicate name being migrated will replace the duplicate account within Active Directory and also apply any SID changes configured for the source account domain.
If you choose to replace an existing account, you must decide whether the user rights to the conflicting account should be maintained. This option will ensure that conflicting accounts in the target domain do not have more user rights than the account being migrated from the target domain.
If you select Replace Conflicting Accounts, the Remove Existing Members of Groups Being Replaced option is enabled. This option compares and ensures members of migrated groups in the target domain are identical to group memberships in the source domain.
Similar to the Prefix and Suffix options on the User Options page, you should use the Rename Conflicting Accounts option to add a prefix or suffix to user accounts being migrated that conflict with accounts in the target domain. Adding a prefix to accounts that conflict can help you easily identify accounts that need correction after they are migrated.
Ensure that all options have been selected and are correct before continuing. Then click Next to continue. Use the scrollbar to review the Migration Wizard’s task descriptions. Ensure that all options you have selected are identified before continuing. Click Finish to close the wizard and complete the migration. On the Migration Progress screen, you can view the results of your user migration. Select the View Log button to review the migration log and identify any errors. When you’re done reviewing, click Close to shut the User Account Migration Wizard.
This section describes the options for merging or migrating Windows NT4 groups to Windows Server 2003 and Active Directory. This section also addresses options available when you’re using ADMT to perform these task as well as the steps involved.
It is always a good practice to test any migration and review the results before actually migrating NT domain security principles. You can test the migration by selecting the Test the Migration Setting and Migrate Later from the Test or Make Changes page of the Group Migration Wizard. Launch the Group Account Migration Wizard from the Action menu to first test a group migration and then later perform the actual migration.
To perform an actual group account migration, do the following:
From the Action menu, launch the Group Account Migration Wizard to begin the actual migration of Windows NT4 Groups.
At the Welcome screen, click Next to continue. Select the Migrate Now option from the Test or Make Changes page and then click Next.
On the Domain Selection page, use the drop-down box to select the source and target domains for this migration. Then click Next to continue.
On the Group Selection page, enter the name or names of the groups in the source domain you want to migrate. Select the Add button to enter the group name and select Check Name to validate the group name. Click OK to add the group to the Group Selection page and then click Next to continue migrating.
On the Organizational Unit Selection page, select the target OU to indicate where the group will be migrated. Use the Browse button to view the Active Directory tree and select the target domain and organizational unit that will host the migrated group. Click OK to finish the selection and then click Next to continue.
When you’re migrating Windows NT4 groups, options such as user rights and group membership can also be migrated. Review the group migration options on the Group Options page, as described in the following list, and choose the selections that best fit your migration needs:
Update User Right—. The Update User Right option copies a group’s NT4 permission in the source domain to the new group in the target domain.
Copy Group Membership—. The Copy Group Membership option is essentially for organizations wanting to migrate to Windows Server 2003 one group at a time. This option allows ADMT to copy Windows NT source domain accounts that are members of the groups being migrated. Each account is then copied to the target domain and associated with the proper group membership. If you select Update Previously Migrated Objects, any existing accounts in the target domain will be updated with the proper group membership if those accounts existed within the target domain.
Fix Group Membership—. If members of the group being migrated exist in the source domain, the Fix Group Membership option will add migrated user accounts to the migrated group if they were members of the group in the target domain.
Migrate Group SID to Target Domain—. If your migration strategy requires access to resources in the target domain, select Migrate Group SID to Target Domain. This option adds the SID history to cloned users’ accounts and groups after they are migrated to the target domain.
Do Not Rename Accounts—. The ADMT also migrates groups using the same group name as in the source domain. Use the Do Not Rename Accounts option if there are groups with the same group name that can conflict with the Windows NT4 groups being migrated. Groups are consolidated within the target domain if this option is selected.
Rename with Prefix—. Use the Rename with Prefix option to add a prefix to group names being migrated. This option can be used to avoid group name conflicts in the target domain.
Rename with Suffix—. The Rename with Suffix option adds the specified suffix to the group name being migrated. As with the Rename with Prefix option, you should use this option if your target domain contains group names that could conflict with the groups being migrated.
Review the migration selection and ensure that the proper options have been checked. Click Next to continue migrating groups.
If ADMT has not already been authenticated to the source domain, a login dialog box will appear.
Use the Naming Conflicts page to configure actions ADMT should take to resolve conflicts with group names and group memberships. Review each of the following options before continuing the migration:
Ignore Conflicting Accounts and Don’t Migrate—. The Ignore Conflicting Accounts and Don’t Migrate option leaves accounts in the target domain unchanged and does not migrate any groups already existing in the target domain.
Replace Conflicting Accounts—. When you choose the Replace Conflicting Accounts option, each conflicting account in the target domain inherits the permissions and properties of the account being migrated from the source domain.
Remove Existing User Rights—. If you choose to replace an existing account, you must decide whether the user rights to conflicting accounts should be maintained. Selecting the Remove Existing User Rights option ensures that conflicting accounts in the target domain do not have more user rights than the account being migrated for the target domain.
Remove Existing Members of Groups Being Replaced—. If the Remove Existing Members of Groups Being Replaced option is selected, ADMT will compare and ensure that members of migrated groups in the target domain are identical to group memberships in the source domain. To enable this option, select Replace Conflicting Accounts.
Move Replaced Accounts to Specified Target Organizational Unit—. This option removes any existing account in the target domain that is the same as accounts being migrated.
Rename Conflicting Accounts by Adding the Following—. Similar to the prefix and suffix options, the Rename Conflicting Accounts options can be used to avoid conflicts with existing accounts in the target domain. You can add a prefix or suffix that the ADMT should use if conflicting group names are encountered. Then click Next to continue after options are set properly.
Use the scrollbar to review the Migration Wizard task description. Ensure that all options you have selected are identified in the summary before clicking Finish to continue. The Migration Progress screen allows you to view the results of your group migration. You also can select the View Log button to review the migration log details for any errors. Exit the migration log and click Close to complete the Group Account Migration Wizard.
As well as migrating users and groups, you must migrate computer accounts for users to be able to authenticate to the new Windows Server 2003 Active Directory domain. Use the following steps to guide you through the Computer Migration Wizard for both testing and migrating computer accounts.
Note
When you’re migrating computer accounts using the ADMT Computer Migration Wizard, ADMT will install an agent on each system in the source domain being migrated. This agent will restart the system after the Migration Wizard joins the computer account to the target domain.
From the ADMT MMC, choose Action, Computer Migration Wizard to begin migrating computer accounts to Active Directory. Click Next to proceed past the Computer Migration Wizard Welcome screen.
Select the Migrate Now option from the Test or Make Changes page and click Next to continue.
On the Domain Selection page, use the drop-down box to select the source domain from which the computer accounts reside and the target domain where the computer accounts will be migrated to. After you select the domains, click Next to continue.
On the Computer Selection page, enter the name or names of the computer accounts in the source domain you want to migrate. Click the Add button to enter and check the computer account names that will be migrated. Click Next to continue.
On the Organizational Unit Selection page, select the target OU where the computer accounts will be migrated to. Use the Browse button to view the Active Directory tree and select the target domain and organizational unit that will host the computer accounts being migrated; then click Next to continue.
Define the computer security associations to migrate on the Translate Objects page from the following list of options:
Files and Folders—. This option allows all local computer files and folder permissions to be translated to Active Directory after the computer accounts are migrated. If the computer being migrated hosts files accessed through Windows NT permissions, select this option to translate local security on files to Active Directory.
Local Groups—. ADMT can also migrate local security, and the computer local groups are migrated to Active Directory when you select this option.
Printers—. If there are shared printers located on the computer being migrated, this option translates all local rights to printer resources from Local Windows permission to Active Directory.
Registry—. This option migrates all security information from the local computer Registry being migrated.
Shares—. When you select this option, any configured shares and share permissions will be migrated to Active Directory.
User Profiles—. This option migrates all user profile security located on the local computer.
User Rights—. This option translates local user rights to Active Directory.
For this computer migration, select the User Profiles option to translate the security of user profiles on the computers being migrated. Then click Next to continue.
In the Security Translation Options window, define the security option for migrating computer accounts from one of the following options:
Replace—. This option replaces all account SID information with new SID information from the target domain. This option gives the computer account in the target domain the same permissions and access to resources as the account was configured in the source domain.
Add—. This option combines the SID information of the computer account in the target domain to all ACLs in the source domain, thus allowing the computer account to access resources within the Windows NT domain.
Remove—. This option removes all SID information for the computer account from all ACLs in the source domain. This option does not allow the computer account to access resources in the Windows NT4 domain after it has been migrated.
Validate the action or actions you have selected on the Security Translation page and select Next to continue the computer migration process.
On the Computer Options page, configure the restart time of the computer being migrated as well as the prefix and suffix to add to the computer name being migrated. Click Next to continue migrating computer accounts.
Use the Naming Conflicts page to configure actions ADMT should take to resolve conflicts with computer accounts and membership in the target domain. Review each of the following options before continuing the migration:
Ignore Conflicting Accounts and Don’t Migrate—. The Ignore Conflicting Accounts and Don’t Migrate option leaves computer accounts in the target domain unchanged and does not migrate any computer accounts that already exist in the target domain.
Replace Conflicting Accounts—. When you replace existing computer accounts, each conflicting account in the target domain will inherit the permissions and properties of the computer account being migrated from the source domain.
Remove Existing User Rights—. If you choose to replace an existing account, you must decide whether the user rights to conflicting accounts should be maintained. Selecting this option ensures that conflicting computer accounts in the target domain do not have more user rights than the computer accounts being migrated from the target domain.
Remove Existing Members of Groups Being Replaced—. By selecting this option, you can compare and ensure members of migrated groups in the target domain are identical to computer group memberships in the source domain.
Move Replaced Accounts to Specified Target Organizational Units—. If you select this option, any existing computer accounts will be replaced by accounts being migrated to the target OU.
The Rename with Prefix and Rename with Suffix options can be used to avoid conflicts with existing computer accounts in the target domain. You can add the prefix or suffix that ADMT should use if conflicting computer names are encountered.
Review the Task Descriptions page to determine whether all your migration options are accurate. Use the scrollbar to see each option configured. Changes can be made before you continue by selecting the Back button. To use the settings shown and continue with the selected tasks, click Finish.
When you need to perform an inplace upgrade as well as support applications that require service accounts such as Microsoft Exchange and other third-party products, the ADMT Service Account Migration Wizard can assist you in moving this account information to Active Directory.
From the ADMT MMC, launch the Service Account Migration Wizard by choosing Action, Service Account Migration Wizard.
Select the source domain from which the service accounts reside and the target domain where the service accounts will be migrated. Click Next when you are ready to continue.
The Update Service Account Information page will gather service account information for the selected source’s domain. If this is the first time you’re using the Service Account Migration Wizard, select Yes, Update the Information. The No, Use Previously Collected Information option is not available if the wizard has not been run previously. This option allows you to migrate service accounts without collecting service account information each time the wizard is run.
On the Service Account Selection page, enter the computer to host the service accounts you want to migrate. Click the Add button to enter and check the computer account names that host the service accounts being migrated. Click OK to continue.
The Active Directory Migration Tool Monitor will appear. Review the status as the ADMT installs the agent on the computers selected.
On the Service Account Information page, review the service accounts being migrated. Use the Skip/Include button to select or deselect accounts for this migration. You can choose the Update CSM Now option to update the service control entry. After you select the proper accounts, click Next to continue.
The Service Account Migration Wizard summary will verify the tasks and results of the migration. Use the scrollbar to review the tasks of the service account migration. Click Finish to close the Service Account Migration Wizard.
The Active Directory Migration Tool can be used to migrate additional Windows NT4 domain resources to Active Directory. Always review the results of each migration and test permissions and functionality before continuing with any of these types of migrations.
When migrating directly to Windows Server 2003 from Windows NT4, you must consider many factors while preparing and performing the migration. This chapter covered the three main migration methods as well as the tools available from Microsoft to assist with the migrations.
The inplace upgrade is by far the easiest method for migration and retains security principles and configuration settings that minimize interruption of the network. However, for some organizations that want to start with a completely clean structure, the second option of migrating Windows NT4 objects such as user accounts, computer accounts, and the like to a new Active Directory forest allows organizations to start completely from scratch. The third option is to consolidate multiple existing Windows NT4 domains into a single Active Directory domain configuration. This consolidation method is frequently used by organizations that want to minimize the number of domains they have. All three options serve their purpose for various migration needs. Organizations that want to migrate will find one of these options will best fit their needs.
Before migrating servers to Windows Server 2003, determine whether your Windows NT4 server hardware and Windows NT4 server-based applications are compatible with the Windows Server 2003 family operating system.
Use the Microsoft Compatibility Check Tool available on the Windows Server 2003 installation CD-ROM to test application compatibility.
Before you begin an inplace upgrade of a domain, it is a good practice to force synchronize the primary domain controller and backup domain controllers.
Seriously consider performing an inplace upgrade from Windows NT4 to Windows 2003 instead of building a brand-new forest and moving objects to minimize the time, effort, cost, and user interruption involved in a clean forest migration process.
Review the server event and system logs upon completing any upgrade.
Review the Active Directory Users and Computers snap-in to ensure that all security principles have been migrated successfully to Window Server 2003 and Active Directory.
Before migrating BDCs, review the backup domain controller and member server’s application and system logs to identify issues that can affect the progress of your migration.
When configuring the Active Directory database locations, ensure that your server hardware configuration plan takes recoverability and performance into account.
For best performance, install the Active Directory databases on a separate hard disk than the server operating system and server page file.
For best recoverability, use disk fault tolerance such as RAID or disk mirroring for the Active Directory databases.
If you are experiencing problems creating a trust, raise the forest functional levels using the Properties page of the Active Directory domain.
Install the ADMT utility on a domain controller located in the target domain when possible.
Test any (ADMT) migration before performing an actual migration of user accounts.