Modern businesses rely heavily on their computing infrastructure, especially when it comes to accessing data. Users access databases and files on a regular basis, and when the necessary data is unavailable, productivity can suffer and money can be lost. Also, when new file servers are added to the environment to replace old file servers or just to accommodate additional load, administrators must change user login scripts and mapped drive designations but may also need to manually copy large amounts of data from one server to another. Keeping heavily used file servers optimized by regularly checking disks for errors or file fragmentation and archiving data to create additional free disk space can take considerable time. In most cases, such tasks require taking the server offline, leaving the data inaccessible.
In this chapter, we highlight the technologies built into Windows Server 2003 that help improve reliable file system access. This chapter also covers best practices on ways to implement these technologies as well as ways to maintain and support the file system services to keep information access reliable and recoverable.
There are many ways to create fault tolerance for a file system using services and file system features included in the Windows Server 2003 family of operating systems. Depending on whether security, automated data archival, simplified file server namespaces, data replication, or faster data recovery is the goal, Windows Server 2003 provides file system features and services that can enhance any computing environment.
In an effort to create highly available file services that reduce user configuration changes and file system downtime, Windows Server 2003 includes the Distributed File System (DFS) service. DFS provides access to file data from a unified namespace that redirects users from a single network name to shared data hosted across various servers. For example, \companyabc.comhome could redirect users to \server3home$ and \server2users. Users benefit from DFS because they need to remember only a single server or domain name to locate all the necessary file shares. When deployed in a domain configuration, DFS can be configured to replicate data between servers using the File Replication Service.
With the release of Windows 2003 R2, Microsoft updated DFS to a new revision called Distributed File System Replication, or DFSR. DFSR uses the core technology from which DFS was built, and adds more functionality for better replication processes, algorithms, and capabilities. DFSR commonly is simply called DFS because most organizations that have been using DFS since Windows 2000 and the original release of Windows 2003 have been calling the service DFS. In terms of this book, the reference to DFS and DFSR is interchangeable, with updated references to DFSR being noted throughout this chapter.
The File Replication Service (FRS) is automatically enabled on all Windows 2000 and Windows Server 2003 systems but is configured to automatically start only on domain controllers. On Windows 2000 and Windows Server 2003 domain controllers, FRS is used to automatically replicate the data contained in the SYSVOL file share, including system policies, Group Policies, login scripts, login applications, and other files that administrators place in the SYSVOL or the Netlogon shares. When a domain controller is added to a domain, FRS creates a connection or multiple connections between this server and other domain controllers. This connection manages replication using a defined schedule. The default schedule for domain controller SYSVOL replication is always on. In other words, when a file is added to a SYSVOL share on a single domain controller, replication is triggered immediately with the other domain controllers it has a connection with. When domain controllers are in separate Active Directory sites, the FRS connection for the SYSVOL share follows the same schedule as Active Directory. The SYSVOL FRS connection schedule is the same as the site link. Domain-based DFS hierarchies can also use FRS connections to replicate file share data for user-defined shares.
Although FRS and domain DFS provide multi-master automated data replication, the Volume Shadow Copy service can be used to manage the actual content or data contained within the shares.
The Volume Shadow Copy service (VSS) is new to Windows Server 2003 and provides file recoverability and data fault tolerance never previously included with Windows. VSS can enable administrators and end users alike to recover data deleted from a network share without having to restore from backup. In previous versions of Windows, if a user mistakenly deleted data in a network shared folder, it was immediately deleted from the server and the data had to be restored from backup. A Windows Server 2003 volume that has VSS enabled allows a user with the correct permissions to restore that data from a previously stored VSS backup. Using VSS on a volume containing a shared folder, the administrator can simply restore an entire volume or share to a previous state, or just restore a single file.
To provide hierarchical storage management services, including automated data archiving, Windows Server 2003 includes the Remote Storage service first introduced in Windows 2000 Server. This service can be configured to migrate data from a disk volume to remote storage media based on last file access date, or when a managed disk reaches a predetermined free disk space threshold, data can be migrated to remote media automatically. Although this service does not provide file system fault tolerance, using Remote Storage to manage a volume can improve reliability and recoverability by keeping disk space available and by reducing the amount of data that needs to be backed up or restored when a disk failure occurs.
Note
Do not configure Remote Storage to manage volumes that contain FRS replicas because doing so can cause unnecessary data migration. Periodically, FRS may need to access an entire volume to send a complete volume copy to a new server replica, and this can create several requests to migrate data back to a disk from remote storage media. This process can be lengthy because all the managed volumes’ migrated data may need to be restored to the server’s physical disk.
Windows Server 2003 supports both hardware- and software-based RAID volumes to create fault tolerance for disk failures. Redundant Array of Inexpensive Disks (RAID) provides different levels of configuration that deliver disk fault tolerance, and formatting such volumes using the NT File System (NTFS) also allows directory- and file-based security, data compression, and data encryption to be enabled. Hardware-based RAID is preferred because the disk management tasks are offloaded to the RAID controller, reducing the load on the operating system. When a disk is available to Windows Server 2003, it can be configured as a basic disk or a dynamic disk.
Windows Server 2003 can access disks connected directly to the server from an IDE controller, SCSI controller, or an external RAID controller. RAID disks can provide faster disk access times but also can provide fault tolerance for disk failures.
Hardware-based RAID is achieved when a separate RAID disk controller is used to configure and manage the RAID array. The RAID controller stores the information on the array configuration, including disk membership and status. Hardware-based RAID is preferred over Windows Server 2003 software-based RAID because the disk management processing is offloaded to the RAID card, reducing processor utilization.
As mentioned previously, Windows Server 2003 supports two types of disks: basic and dynamic. Basic disks are backward compatible, meaning that basic partitions can be accessed by previous Microsoft operating systems such as MS-DOS and Windows 95 when formatted using FAT; and when formatted using NTFS, Windows NT, Windows 2000, and Windows Server 2003 can access them. Dynamic disks are managed by the operating system and provide several configuration options, including software-based RAID sets and the ability to extend volumes across multiple disks.
Basic disks can be accessed by Microsoft Windows Server 2003 and all previous Microsoft Windows or MS-DOS operating systems. These disks can be segmented into as many as four partitions. The combination of partitions can include up to four primary partitions or three primary partitions and one extended partition. Primary partitions can be used to start legacy operating systems and are treated as a single volume. An extended partition can be broken into multiple logical drives. Each logical drive is managed as a separate volume, allowing administrators to create as many volumes on a basic disk as necessary. Basic partitions and logical drives can be formatted as either FAT, FAT32, or NTFS disks. Basic partitions are also referred to as basic volumes.
Dynamic disks can be segmented into several logical drives referred to as dynamic volumes. Dynamic disks are managed by the operating system using the Virtual Disk Service (VDS). Many volumes can be defined on a dynamic disk, but limiting the number of volumes to 32 or fewer is recommended. After a disk is converted to a dynamic disk, it can be mounted only by Windows Server 2003 systems, but the data can still be accessed by other operating systems using Windows Server 2003 file services, including Web services, FTP services, file shares, and other client/server-based applications.
In some configurations, dynamic volumes can span two or more disks and provide disk fault tolerance. Dynamic volume types provided in Windows Server 2003 include the following:
Simple volume—. A simple volume is similar to a basic partition in that the entire volume is treated as a single drive and it does not span multiple disks.
Spanned volume—. A spanned volume is treated as a single drive, but the volume spans two or more disks. Spanned volumes provide no disk fault tolerance but can be used to meet disk storage needs that exceed the capacity of a single disk. Spanned volumes are slowest when it comes to reading and writing data and are recommended only when the space of more than a single disk is necessary or an existing simple partition needs to be extended to add disk space. For instance, if an application does not support the moving of data or system files to another drive and the current drive is nearly full, a simple volume can be extended with unallocated space on the same or another disk to add additional disk space. A simple volume that has been extended with unallocated space on the same disk is still considered a simple volume. The allocated space on each of the disks can be of different sizes.
Striped volume—. A striped volume or RAID 0–compatible volume requires two or more disks and provides the fastest of all disk configurations. Striped volumes read and write data from each of the disks simultaneously, which improves disk access time. Striped volumes utilize all the space allocated for data storage but provide no disk fault tolerance. If one of the disks should fail, the data would be inaccessible. Stripe sets require the exact amount of disk space on each of the allocated disks. For example, to create a 4GB stripe set array with two disks, 2GB of unallocated space would be required on each disk.
RAID 5 volume—. Software-based RAID 5 volumes require three or more disks and provide faster read/write disk access than a single disk. The space or volume provided on each disk of the RAID set must be equal. RAID 5 sets can withstand a single disk failure and can continue to provide access to data using only the remaining disks. This capability is achieved by reserving a small portion of each disk’s allocated space to store data parity information that can be used to rebuild a failed disk or to continue to provide data access. RAID 5 parity information requires the space of a single disk in the array or can be computed using the formula
(N–1)*S = T
where N is the number of disks, S is the size of the allocated space on each disk, and T is the total available space for storage. For example, if five disks allocate 10GB each for a RAID 5 array, the total available disk space available for storage will be (5–1)*10GB = 40GB. The 10GB are reserved for parity information.
Mirrored volume—. Mirrored or RAID 1–compatible volumes require two separate disks, and the space allocated on each disk must be equal. Mirrored sets duplicate data across both disks and can withstand a single disk failure. Because the mirrored volume is an exact replica of the first disk, the space capacity of a mirrored set is limited to half of the total allocated disk space.
Tip
As a best practice, try to provide disk fault tolerance for your operating system and data drives, preferably using hardware-based RAID sets.
For the rest of this chapter, both basic partitions and dynamic volumes will be referred to as volumes.
Windows Server 2003 supports formatting basic and dynamic volumes using the NTFS, FAT, or FAT32 file system. FAT volumes are supported by MS-DOS and all Microsoft Windows operating systems, but should be limited to 2GB if MS-DOS access is necessary. FAT32 was first supported by Microsoft with Windows 95, but these partitions cannot be read by MS-DOS, Windows for Workgroups, or Windows NT. Windows Server 2003 NTFS volumes are supported by Windows NT 4.0 with Service Pack 6a or higher and all versions of Windows 2000, Windows XP, and Windows Server 2003. File shares can be created on each type of disk format, but NTFS volumes provide extended features such as volume storage quotas, shadow copies, data compression, file- and folder-level security, and encryption.
Disks in Windows Server 2003 can be managed using a variety of tools included with the operating system. Disk tasks can be performed using the Disk Management Microsoft Management Console (MMC) snap-in from a local or remote server console or using a command-line utility called diskpart.exe.
Most disk-related administrative tasks can be performed using the Disk Management MMC snap-in. This tool is located in the Computer Management console, but the stand-alone snap-in can also be added in a separate Microsoft Management Console window. Disk Management is used to identify disks, define disk volumes, and format the volumes. Starting in Windows Server 2003, the Disk Management console can be used to manage disks on remote machines. If a disk is partitioned and formatted during the Windows Server 2003 setup process, when installation is complete, the disk will be identified as a basic disk. After Windows Server 2003 is loaded and disk management can be accessed, this disk can be converted to a dynamic disk, giving server administrators more disk configuration options.
Diskpart.exe is a functional and flexible command-line disk management utility. Most disk tasks that can be performed using the Disk Management console can also be performed using this command-line utility. Using diskpart.exe, both basic volumes and dynamic volumes can be extended, but Disk Management can extend only dynamic volumes. Diskpart.exe can be run with a script to automate volume management.
As a sample of scripting diskpart.exe, using a filename like c:drive info.txt, the following information can be used to extend a volume using unallocated space on the same disk:
Select Volume 2
Extend
Exit
When you’re creating the command script file, be sure to press Enter at the end of each command so that when the script is called out, the Enter keystroke is executed.
At the command prompt, run
Diskpart.exe /s c:drive_info.txt
Now volume 2 will be extended with all the remaining unallocated disk space on the same disk.
Windows Server 2003 supports fault-tolerant disk arrays configured and managed on a RAID disk controller or configured within the operating system using dynamic disks. To create arrays using a RAID controller, refer to the manufacturer’s documentation and use the appropriate disk utilities. Software-based RAID can be configured using the Disk Management console or the command-line utility diskpart.exe.
Before an administrator can create software-based fault-tolerant volumes, the necessary disk must be converted to a dynamic disk. To convert a basic disk to a dynamic disk, follow these steps:
Log on to the desired server using an account with Local Administrator access.
Click Start, All Programs, Administrative Tools, Computer Management.
In the left pane, if it is not already expanded, double-click Computer Management (local).
Click the plus sign next to Storage.
Select Disk Management.
In the right pane, verify that the disk containing the system volume is marked as dynamic.
If each of the necessary disks is already dynamic, close Computer Management by selecting File, Exit.
If the drive is marked as basic, right-click the drive and select Convert to Dynamic Disk. Select the appropriate disk, press OK, verify the information in the dialog box, and then click Convert.
Repeat the preceding steps for each disk that will participate in a spanned, mirrored, striped, or RAID 5 volume.
If the disk containing the system drive is converted, the operating system may request multiple system reboots to first unmount the drive and then to convert it to a dynamic disk. After you restart, the disk will be recognized as a new disk, and another reboot will be necessary. Reboot the system as requested.
After all necessary disks are converted to dynamic, use Disk Management in the Computer Management console to verify that the conversion was successful and the disks can still be accessed.
Creating a fault-tolerant disk volume in Windows Server 2003 requires having two disks available for a mirrored volume and at least three disks for a RAID 5 volume. To create a mirrored system volume, follow these steps:
Log on to the desired server using an account with Local Administrator access.
Click Start, All Programs, Administrative Tools, Computer Management.
In the left pane, if it is not already expanded, double-click Computer Management (local).
Click the plus sign next to Storage.
Select Disk Management.
In the right pane, right-click the system volume and choose Add Mirror.
If more than one additional dynamic disk is available, choose the disk on which to create the mirror for the system volume and click Add Mirror.
The volumes on each disk start a synchronization process that may take a few minutes or longer, depending on the size of the system volume and the types of disks being used. When the mirrored volume’s status changes from Resynching to Healthy, select File, Exit in the Computer Management console to close the window.
Log off the server console.
A Windows Server 2003 RAID 5 volume requires three separate dynamic disks, each containing an equal amount of unallocated disk space for the volume. To create a RAID 5 volume using Disk Management, follow these steps:
Log on to the desired server using an account with Local Administrator access.
Click Start, All Programs, Administrative Tools, Computer Management.
In the left pane, if it is not already expanded, double-click Computer Management (local).
Click the plus sign next to Storage.
Select Disk Management.
Click Next on the New Volume Wizard Welcome screen.
On the Select Volume Type page, select the RAID 5 radio button and click Next to continue.
On the Select Disks page, select a disk that will participate in the RAID 5 volume from the Available pane and click the Add button.
Repeat the preceding steps for the two or more remaining disks until all the participating disks are in the Selected pane.
After all the disks are in the Selected pane, the maximum available volume size is automatically calculated, as displayed in Figure 30.1. Click Next to continue, or enter the correct size in megabytes and then click Next.
On the Assign Drive Letter or Path page, choose the drive letter to assign this volume. Other options include not assigning a drive letter to the volume and mounting the volume in an empty NTFS folder in a separate volume. Choose the option that meets your requirements and click Next to continue.
On the Format Volume page, choose whether to format the volume and enable data compression. Click Next to continue.
Click Finish on the Completing the New Volume Wizard page to create the volume and start the format.
The volume is then formatted, which can take a few minutes. When the formatting starts, you can close the Computer Management console and log off the server.
When prompted to restart your server, choose whether you want to restart the system now by selecting Yes or restart the system at a different time by selecting No.

Managing access to file shares and data can be relatively simple if the administrator understands each of the options available in Windows Server 2003. Windows Server 2003 provides several tools and services that can make securing data access simple. The security options for files and folders on a volume are directly related to the file system format of that volume and the method by which the data is accessed. For example, a FAT- or FAT32-formatted volume cannot secure data at the file and folder level, but an NTFS volume can.
Using a FAT volume, administrators do not have many options when it comes to managing data access from the network. The only option that can be configured is setting permissions on the file share. The end user’s access is granted or denied using only the file share permissions that apply to every file and folder within.
NTFS volumes provide several data access options such as share permissions just like FAT volumes, but also file- and folder-level security; and to manage data usage, user-based quotas can be configured on a volume. The user quota determines how much data a single end user can store on a volume. NTFS volumes can also be managed by Remote Storage to automatically archive data to remote media when it hasn’t been accessed for an extended period of time or when a drive reaches a capacity threshold that triggers file migration or archiving.
File shares can be created on FAT, FAT32, and NTFS volumes. When a file share is created, share options—including the share name, description, share permissions limiting the number of simultaneous connections, and the default offline file settings—can be configured. There are many ways to create a share, but in the following example, you will use the Share a Folder Wizard.
To create and configure a file share, follow these steps:
Log on to the desired server using an account with Local Administrator access.
Click Start, All Programs, Administrative Tools, Computer Management.
In the left pane, if it is not already expanded, double-click Computer Management (local).
Click the plus sign next to System Tools and then click the plus sign next to Shared Folders.
Right-click the Shares icon and choose New Share.
After the Share a Folder Wizard opens, click Next on the Welcome screen.
Enter the path of the folder you want to share and click Next to continue.
If you don’t know the folder path or it does not exist, click the Browse button to locate the correct drive letter and select or create the folder. Then click OK to create the path and click Next on the Folder Path page to continue.
On the Name, Description, and Settings page, enter the share name, description, and offline settings, as displayed in Figure 30.2.
The default offline settings allow the end users to designate whether to synchronize share data locally. Accept the default settings or change the offline settings option by clicking the Change button, selecting the appropriate radio button, and clicking OK. Click Next to continue.
On the Permissions page, specify which permissions configuration option suits the needs of the share. The default is to allow read-only access to everyone. Select the correct radio button and click Finish. If custom share permissions are required, click the Customize button, create the permissions, and click Finish on the Permissions page when you’re done.
If sharing was successful, the next page displays the summary. Click the Close button.
Back in Computer Management, right-click the new share in the right pane and select Properties.
On the General tab, configure the user limit.
If the server is a member of an Active Directory domain, you can select the Publish page and publish the share in Active Directory. To do so, use a description and keywords to locate the share by querying Active Directory.
If the shared folder resides on an NTFS volume, a Security page is displayed. Set the permissions appropriately for the shared directory.
After all the pages are configured, click OK on the Share Properties page to save changes.
Close Computer Management and log off the server.

As a best practice, always define share permissions for every share regardless of the volume format type. When a share is first created, the default permission is set to grant the Everyone group read permissions. This may meet some share requirements for general software repositories, but it is not acceptable for user home directories, public or shared data folders, or shares that contain service logs that will be updated by remote systems.
The level of permission set at the share level must grant enough access to enable users to access their data and modify or add more data when appropriate.
Tip
As a general guideline, when shares are created on domain servers and anonymous or guest access is not required, replace the Everyone group with the Domain Users group and set the share permissions accordingly.
To improve the reliability and availability of shared folders, NTFS partitions allow users to create local offline copies of files and folders contained within a file share. The feature is called client-side caching (CSC), but the common name for such files is offline files. Offline files are stored on a local user’s machine and are used when the server copy is not available. The offline files synchronize with the server at logon, logoff, and when a file is opened or saved.
Offline files can be configured on a per-share basis using the shared folder’s share property page. To configure client-side caching or offline file options, perform the following steps:
Log on to the desired file server with Local Administrator access.
Click Start, My Computer.
Double-click the drive containing the shared folder.
Locate the shared folder, right-click it, and select Sharing and Security.
Click the Offline Settings button at the bottom of the page.
Select the appropriate offline settings, as displayed in Figure 30.3, and click OK to close the Offline Settings window.
Click OK in the Folder window to apply the changes, close the window, and log off the server.

Caution
If roaming user profiles are used on a network, do not enable client-side caching on the file share because doing so may corrupt the end user’s profile. By default, roaming user profiles are already copied down to the local server or workstation when the user logs on. Forcing the folder to synchronize with the server may cause user settings to be lost. User profile management can be configured using Group Policy. The settings are located in Computer Configuration Administrative TemplatesSystemUser Profiles.
With the release of Windows 2003 R2, Microsoft added a new component that provides better quota and storage management of files in a Windows 2003 environment. File Server Resource Manager, or FSRM, is a technology that enables administrators to set storage quota limits as well as identify and enforce data storage policies.
Unlike quota functions in other operating systems that allow administrators to set quotas for the storage of just file data on servers, FSRM provides more flexibility in the way it allows files to be managed. For example, in typical file quota processes, an administrator may set the storage limit for users to be 100MB. That’s fine for the typical user who commonly writes memos or small documents; however, in a highly collaborative environment, a manager may be responsible for viewing and editing all documents created in the organization. As the final editor of all documents, the manager will exceed his 100MB limit because he will frequently open and save files that he edits. So the organization changes the manager’s quota, typically to an unlimited storage amount. This violates the company policy of limiting storage because this manager now no longer has a storage limit.
FSRM allows administrators to still enforce the 100MB limit on the manager for personal files, but can waive storage limits for all files the manager opens and saves to a specific branch of the filesystem, such as a shared folder or a data directory to which edited documents are commonly saved. This allows the manager to continue to perform his job of editing and saving shared documents, but still enforces the organizational 100MB limit on all other files.
However, this too creates a hole in the organization’s file storage limit process. Therefore, FSRM includes yet another feature that prevents this manager from potentially overstepping his rights of unlimited shared storage, by allowing administrators to add a file type limit. If the users are storing only shared Word documents and Excel spreadsheets for review and edits, then the administrator can specify an unlimited storage of *.doc and *.xls file types in the shared folder, and block the saving of files that are not .doc or .xls files, such as MP3 audio files or MPG video files.
Multiple policies and filters can be added to folders, users, and groups of users to allow, disallow, enable, or disable the users’ abilities to store files, certain file types, or other designations to help the administrator best manage and administer the environment.
When administrators are initially introduced to File Server Resource Manager, they immediately think about setting and enforcing storage quotas to limit users on the amount of disk space they can access. However, in production environments, several practice uses of FSRM functionality have drastically simplified administration and management functions for a network. The most common uses of FSRM are as follows:
Setting Limits on User Storage—. An administrator can set the limit on how much disk space a user or group of users can store on a system. This is the traditional quota limit item that can limit users to store, say, 100MB of files on the network.
Providing Flexibility of Group Storage—. When a user or group of users need to have different storage limits, instead of allowing these users unlimited access, FSRM can be configured to allow the extension of storage usage beyond the default for specific file types (that is, *.doc or *.xls files) or file locations (for example, shared storage locations or public posting areas of the network).
Enforcing Storage Policies—. FSRM does more than just define storage policies; it helps administrators enforce the policies by creating reports and generating notifications of policy violations on a real-time basis.
The File Server Resource Manager is a component within the Windows 2003 R2 update. To install the File Server Resource Manager component, the Windows 2003 R2 components must be installed on the system (see the section, “Preparing a System and Installing the Windows 2003 R2 Components,” in Chapter 3 for installation instructions). Perform the following steps to enable the File Server Resource Manager component option on the system:
Log on to the desired server using an account with Local Administrator access.
Select Start, Settings, Control Panel, Add/Remove Programs.
Click Add/Remove Windows Components, and double-click the Management and Monitoring Tools folder. Select the File Server Resource Manager component and click Next.
Click Next to install the component, and then click Finished when you’re done. Typically, you will be required to restart the server in order for FSRM to be enabled.
After the File Server Resource Manager component has been enabled on a server, an administrator can launch the utility and begin creating FSRM policies. To open the FSRM utility, do the following:
Select Start, Settings, Control Panel.
Open the Administrative Tools folder and double-click File Server Resource Manager to launch the FSRM Component.
When you open the FSRM component, a screen will appear similar to the one shown in Figure 30.4.

To create a simple quota within the File Server Resource Manager utility, do the following:
Click the Create Quota action item in the far right pane of the FSRM utility, or click Action, Create Quota from the menu bar.
Specify the path for the quota, such as c:Home Directory.
Choose the option Create Quota on Path to create a new quota, or choose Auto Apply Template and Create Quotas on Existing and New Subfolders if you have created a quota template (more on quota templates in the next section, “Creating a Quota Template”).
Specify the storage limit quota from one of the quota property templates, or create a custom quota limit.
View the quota designation in the Summary screen, as shown in Figure 30.5, and click Create to create the quota.

After the quota has been created, the quota shows up on the Quotas folder in the Quota Management section of the FSRM utility. An administrator can choose to view, edit, or delete the defined quota.
When working with quotas, rather than defining the storage limits on each folder being issued a quota, an administrator can create a quota template and apply the template to the folder, simplifying the quota policy creation process. Within the quota template, the administrator can define the following:
Amount of Disk Space of the Quota—. The administrator can define in KB, MB, GB, or TB the amount of space to be set as the quota for the template.
Hard Limit or Soft Limit—. A hard limit does not allow a user to extend beyond the hard limit for storage, whereas a soft limit gives the user a warning that they have exceeded the policy limit. However, it allows the user to continue to save files beyond the limit.
Notification Thresholds—. When the storage limit nears or reaches the quota limit, a series of events can occur. For example, an automatic email warning, event log, or script can be generated and executed. The various nofication threshold options are shown in Figure 30.6.

To create a template, click the Quota Templates item of the Quota Management section of the FSRM utility, and then follow these steps:
Click the Create Quota Template action item in the far right pane of the FSRM utility, or click Action, Create Quota Template from the menu bar.
Give the quota template a name, such as 250MB Limit for Execs.
Specify the storage limit for the quota in KB, MB, GB, or TB. In this example, you would enter 250 and choose MB from the list.
Pick whether you want a hard limit or soft limit for the quota.
Note
To properly create a storage policy, hard limits should be used as the default. This will ensure the policy is being enforced. However, many organizations choose to identify certain quota policies with soft limits based on organizational politics (for example, allow executives in the organization, or the legal department, to exceed the limit through the use of soft quota limits).
Create notification thresholds by clicking the Add button and defining limits. Some of the common thresholds are an 85% limit that notifies users when they have achieved 85% of their limits and to consider deleting files so they do not exceed their limits.
The quota limit will look something like Figure 30.7. Click OK when you’re satisfied with your settings.

The administrator can now create quotas and apply this template or other templates to the quota settings.
Another function of the File Server Resource Manager is the capability to create file screens. A file screen is a form of storage limit that looks at the file type being stored and either allows or disallows a user from saving certain file types. As an example, an organization can allow the storage of *.doc Word documents and *.xls Excel spreadsheets and deny the storage of *.mp3 audio files and *.mpg video files to a given storage area.
To create a file screen within the File Server Resource Manager utility, click the File Screens option in the File Screen Management section of the FSRM utility. Then do the following:
Click the Create File Screen action item in the far right pane of the FSRM utility, or click Action, Create File Screen from the menu bar.
Specify the path for the file screen, such as c:Home Directory.
Choose the option Derive Properties from the File Screen Template, or choose Define Custom File Screen Properties depending on whether you want to apply a template or create a custom screen (more on file screen templates in the following section, “Creating a File Screen Template”).
View the file screen designation in the summary screen, as shown in Figure 30.8, and click Create to create the file screen.

After the file screen has been created, it shows up on the File Screens folder in the File Screens Management section of the FSRM utility. An administrator can choose to view, edit, or delete the defined file screen.
When working with file screens, rather than defining the file type limits on each folder being issued a file screen, an administrator can create a file screen template and apply the template to the folder, simplifying the file screen creation policy process. Within the file screen template, the administrator can define the following:
File Groups—. The administrator can define the file types into groups, such as an Office files group containing *.doc Word files and *.xls spreadsheet files, or a Audio and Video files group containing *.wav and *.mp3 audio files and *.mpg and *.vob video files.
Active Screening and Passive Screening—. An active screen does not allow a user to save the file types designated. A passive screen will notify the user that the file type storage is not permitted but allows the user to proceed with saving the file type.
Notification—. When a user attempts to save a file that matches the file screen designation, a notification can be generated. The notification can be the automatic generation of an email warning or an event log, or a script can be executed.
To create a file screen template, click the File Screen Templates item of the File Screen Management section of the FSRM utility, and then do the following:
Click the Create File Screen Template action item in the far right pane of the FSRM utility, or click Action, Create File Screen Template from the menu bar.
Give the file screen template a name, such as No Video Files.
Pick whether you want an active screen or a passive screen for the quota.
Note
To properly create a file screen policy, active screens should be used as the default. This will ensure that the policy is being enforced. However, many organizations choose to identify certain file screen policies with passive filtering based on organizational politics (that is, allow executives in the organization, or the marketing department, to store files that otherwise violate the file screen policy).
Create email message, event log, command, and report notification settings to alert those who want to be alerted when a file screen policy has been violated.
Click OK to create the file screen template.
The administrator can now create file screen policies and apply this template or other templates to the file screen settings.
The File Server Resource Manager provides the capability to create or automatically generate reports for quota and file screen activity. The various reports that can be generated include
Duplicate Files
File Screening Audit
Files by File Group
Files by Owner
Large Files
Least Recently Accessed Files
Most Recently Accessed Files
Quota Usage
Reports can be generated on a real-time basis to view the file storage information on demand. To generate a report, right-click the Storage Reports Management option of the FSRM utility and choose Generate Report Now. Then do the following:
Click Add to choose the volume or file share that you want to generate a report, such as c:Home Directory.
Choose what you want to report on, such as duplicate files, file screening audit, or files by file group.
Choose the report format you want to generate the report, whether it is DHTML, HTML, XML, CSV, or Text.
Note
Typically, reports are generated in HTML format so the administrator can view the report out of any browser. However, if the report will be posted on a web server so others can view it, the DHTML or XML format will provide a more versatile report-viewing format. Additionally, the CSV file format can generate a report that can be imported into a spreadsheet or database for data or trend analysis. And text format is commonly used when a unformatted display of information is desired.
Click OK when finished.
The report or reports specified will be generated and displayed onscreen. The reports can be printed, or the reports can be saved for view or analysis at a later date.
Reports can be generated on a regular basis (such as weekly or monthly), typically for the purpose of reporting file storage information to management. To schedule a report, right-click the Storage Reports Management option of the FSRM utility and choose Schedule a New Report Task. Then do the following:
Click Add to choose the volume or file share that you want to generate a report, such as c:Home Directory.
Choose what you want to report on, such as duplicate files, file screening audit, or files by file group.
Choose the report format you want to generate the report, whether it is DHTML, HTML, XML, CSV, or Text.
Choose Delivery and specify the user name of the individual to whom you want the report to be delivered. This may be the administrator account or an auditor’s account.
Define a schedule if you want the report to be automatically generated and sent. This option is commonly used by organizations that want to generate weekly or monthly reports that are analyzed and reported regularly to management.
Click OK when finished.
The report or reports specified will be generated at the scheduled time and the individual designated in the report form will be notified when the report has been completed.
If a server administrator can monitor only a handful of resources on a server, disks and volumes should be included. Using System Monitor in the Performance console, both physical disks and logical disks (volumes) can be monitored.
On NTFS volumes only, quotas can be enabled to manage the amount of data a user can store on a single volume. This capability can be useful for volumes that contain user home directories and when space is limited. Quota usage is calculated by the amount of data a particular user created or owns on a volume. For example, if a user creates a new file or copies data to his home directory, he is configured as the owner of that data, and the size is added to the quota entry for that user. If the system or the administrator adds data to the home directory for a user, that data is added to the administrator’s quota entry, which cannot be limited. This is usually where administrators get confused because a user’s folder may be 700MB on a quota-managed volume, but the quota entry for that user reports only 500MB used. The key to a successful implementation of quotas on a volume is setting the correct file permissions for the entire volume and folders.
As explained in the earlier section titled “Leveraging the Capabilities of File Server Resource Manager,” FSRM also provides the capability to set quotas on storage limits. The difference between FSRM quotas and NTFS quotas are shown in Table 30.1.
Table 30.1. FSRM and NTFS Quota Differences
Quota Capabilities | FSRM Quotas | NTFS Quotas |
|---|---|---|
Quota tracking | By folder or by volume | Per user on a specific volume only |
Calculation of storage usage | By actual disk space used | By the logical file size on the volume |
Notification Method | By email, custom reports, reports, and event log entries | By event log only |
Note
Prior to the release of FSRM, organizations used to depend on NTFS quotas for their quota storage management capabilities. However, FSRM has effectively replaced the use of NTFS quotas. The coverage of NTFS quotas in this section is merely to describe the process and use of NTFS quotas. Most organizations should consider using FSRM quotas in the Windows 2003 R2 update as the best practice method of creating and enforcing storage quotas.
To enable quotas for an NTFS volume, follow these steps:
Log on to the desired server using an account with Local Administrator access.
Click Start, My Computer.
Locate the NTFS volume on which the quota will be enabled.
Set the appropriate permission to ensure that users have the right to write data only where it is necessary and in no other location. For example, a user can write only to her home directory and cannot read or write to any other directory.
Right-click the appropriate NTFS volume and select Properties.
Select the Quota tab and check the Enable Quota Management box.
Enter the appropriate quota limit and warning thresholds and decide whether users will be denied write access when the limit is reached, as shown in Figure 30.9.
Click OK to complete the quota configuration for the NTFS volume.
When prompted whether you want to enable the quota system, select Yes; otherwise, to cancel the configuration, click Cancel.
After you configure quotas on all the desired NTFS volumes, close the My Computer window and log off the server.

To review quota entries or to generate quota reports, you can use the Quota Entries button on the Quota tab of the desired NTFS volume. Also, as a best practice, try to enable quotas on volumes before users begin storing data in their respective folders.
Using the Performance console from the Administrative Tools menu, a server administrator can monitor both physical disks for percent of read and write times as well as logical disks for read and write times, percent of free space, and more. Using performance logs and alerts, an administrator can configure a script to run or a network notification to be sent out when a logical disk nears a free space threshold.
The Fsutil.exe tool can be used to query local drives and volumes to extract configuration data such as the amount of free space on a volume, quota enforcement, and several other options. In many environments, this tool is not used much, but it can be useful when managing disks from a command-line interface if necessary. For example, Fsutil.exe may be a great tool for checking volume status when managing the server through a remote shell, remote command prompt window, or a Telnet window.
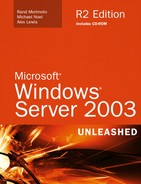
Auditing allows an administrator to configure the system to log specified events in the security event log. Auditing can be configured to monitor and record logon/logoff events, privileged use, object access, and other tasks. Before a folder can be audited, auditing must be enabled for the server.
Audit settings for a server can be configured using the Local Security Settings console, or in an Active Directory domain, the audit settings can be configured and applied to a server from a Group Policy. To enable file and folder auditing for a server, the administrator should enable the Audit Object Access setting using Group Policy or the local security policy, as shown in Figure 30.10.
When object access auditing is enabled for a server, the administrator can then configure the audit settings for a particular file or folder object. To enable auditing on a folder, follow these steps:
Log on to the desired server using an account with Local Administrator access.
Click Start, My Computer.
Locate the folder, right-click it, and select Properties.
Select the Security tab and click the Advanced button.
Select the Auditing tab and click Add to create a new audit entry.
Enter the name of the user or group for which you will audit events and click OK. For example, enter
Everyoneto audit object access for this folder for anyone belonging to the Everyone group.Select the object access to audit and whether to audit successful attempts, failed attempts, or both.
Click OK when you’re finished.
Add any additional users or groups, and when you’re finished, click OK to close the Advanced Security Settings page.
Click OK to close the Folder Properties page.
Access settings commonly audited include failed read attempts and successful and failed deletion of files, folders, and subfolders.
When an NTFS volume has quotas enabled, the server administrator should periodically check the volume’s quota usage statistics. This can be accomplished using the Quota Entries console, which is accessible through the Quota Entries button on the Quota tab of the volume’s property page.
To review NTFS quotas, follow these steps:
Log on to the desired server using an account with Local Administrator access.
Click Start, My Computer.
Right-click the appropriate NTFS volume and select Properties.
Select the Quota tab and click the Quota Entries button.
In the Quota Entries window, review or modify a particular user’s or group’s quota settings as necessary.
Close the Quota Entries window when you’re finished.
Close the volume’s property page, close the My Computer window, and log off the server when you’re finished reviewing quota information from the desired quota-enabled volumes.
Microsoft has made great strides in the reliability and performance associated with its Windows-based server and workstation platforms. This holds true today for Windows Server 2003. When servers are built using only hardware displaying the Designed for Windows Server 2003 logo, server failures due to driver conflicts or overwritten system files are relatively rare. To produce a reliable operating system that does not tolerate attempts to overwrite system files or allow the installation of hardware drivers that have not been certified to work with Windows Server 2003, Microsoft has created Windows File Protection to provide system file and hardware driver fault tolerance.
Windows File Protection has been designed to protect essential system files from being overwritten by third-party software manufacturers or by viruses. Each original system file has a unique Microsoft digital signature that is recognized by Windows File Protection. When a program attempts to overwrite a protected system file, the new file is checked for a Microsoft digital signature, version, and content; then either it is rejected or the existing file is replaced.
Windows File Protection runs silently in the background and is used when an attempt to overwrite a system file is detected or when a system file has already been overwritten and needs to be replaced by a cached copy of the original system file. Windows File Protection restores the file from a DLL cache, if one has been created, or a pop-up window asking for the Windows Server 2003 CD will appear on the local server console. Currently, only the original operating system files, Microsoft service packs, and Microsoft patches and hotfixes contain a Microsoft digital signature. Hardware vendors who certify their hardware after a platform release date may offer certified drivers on their Web sites.
Windows File Protection uses digital signatures or driver signing to identify and validate system files. When the system files need to be scanned or have a file replaced, the task can be carried out by using the File Signature Verification tool and the System File Checker tool. When the level of driver security needs to be configured, administrators can use the driver signing options of the server’s system property pages.
Windows Server 2003 allows an administrator to control the level of security associated with hardware drivers. Because Microsoft works closely with Independent Hardware Vendors (IHVs), Windows Server 2003 and Windows XP support extensive brands of hardware and server peripherals. When an IHV tests its hardware and passes certain Microsoft requirements, its hardware driver is certified, digitally signed by Microsoft, and in most cases, added to the Hardware Compatibility List (HCL) for the particular platform or operating system.
To configure the security level of driver signing, perform the following steps:
Log on to the desired server using an account with Local Administrator access.
Click Start, Control Panel, System. If the Control Panel does not expand in the Start menu, double-click the Control Panel icon and double-click the System icon.
On the System Properties page, select the Hardware tab.
In the Device Manager section of the Hardware tab, click the Driver Signing button.
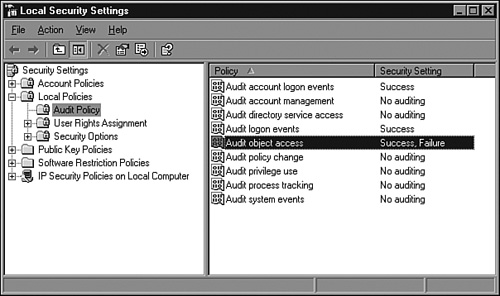
Select the driver signing option that best suits your hardware and reliability needs, as shown in Figure 30.11.
Click OK to exit the Driver Signing Options page and click OK again to exit the System Properties page.
The Windows Hardware Quality Lab is the place where hardware is tested before it can receive the Designed for Windows logo. IHVs can send their hardware or actually go to the lab to test their hardware to have it certified and have the driver digitally signed by Microsoft. With Microsoft providing the environment for IHVs to test and certify their hardware, organizations can expect more dependable service from Microsoft servers running on several different hardware platforms. This gives organizations many options when they need to choose a server vendor or a specific hardware configuration. A Windows Server 2003 system that uses only certified hardware will be fully supported by Microsoft when hardware or software support is needed.
File Signature Verification is a graphic-based utility that can be used when it is suspected that original, protected system files have been replaced or overwritten after an application installation. This tool checks the system files and drivers to verify that all the files have a Microsoft digital signature. When unsigned or incorrect version files are found, the information, including filename, location, file date, and version number, is saved in a log file and displayed on the screen.
To run this tool, choose Start, Run, and then type Sigverif.exe. When the window is open, click Start to build the current file list and check the system files.
The System File Checker is a command-line tool that is similar in function to the File Signature Verification tool, but incorrect files are automatically replaced. Also, this command-line tool can be run from the command line, through a script, or from defined settings in Group Policy. The options include setting it to scan a system at startup, to scan only on the next startup, or to scan immediately. The default is that files are scanned during setup. The first time Sfc.exe is run after setup, it may prompt for the Windows Server 2003 CD to copy Windows system files to the DLL cache it creates. The cache is used to replace incorrect files without requiring the Windows Server 2003 CD.
Note
Sfc.exe scans and replaces any system files that it detects are incorrect. If any unsigned drivers are necessary for operation, do not run this utility; otherwise, the files may be replaced and cause your hardware to operate in ways you do not want.
Sfc.exe options are configurable using Group Policy with settings found in Computer ConfigurationAdministrative TemplatesSystemWindows File Protection.
To improve the reliability and availability of file shares in an enterprise network, Microsoft has developed the Distributed File System. DFS improves file share availability by providing a single, unified namespace to access shared folders hosted across different servers. A user needs to remember only a single server or domain name and share name to connect to a DFS shared folder.
Note
As noted earlier in this chapter, with the release of Windows 2003 R2, Distributed File System is now called Distributed File System Replication, or DFSR. Because DFS and DFSR are commonly referenced interchangeably, this section of the chapter will also use the references DFS and DFSR interchangeably.
DFSR has many benefits and features that can simplify data access and management from both the administrator and user perspective. DFS inherently creates a unified namespace that connects file shares on different servers to a single server or domain name and DFS link name, as shown in Figure 30.12. Using Figure 30.12 as an example, when a user connects to \SERVER2UserData, he will see the software folder contained within. Upon opening this folder, the user’s DFS client will redirect the network connection to \Server99downloads, and the user will remain unaware of this redirection.

Because end users never connect to the actual server name, administrators can move shared folders to new servers, and user logon scripts and mapped drive designations that point to the DFS root or link do not need to be changed. In fact, a single DFS link can target multiple servers’ file shares to provide redundancy for a file share. This provides file share fault tolerance; because clients will be redirected to another server, the current server becomes unavailable. The DFS client will frequently poll the connected server and can redirect the user connection if the current server becomes unavailable.
When a domain-based DFS root is created, the file shares associated with a link can be automatically replicated with each other. When users attempt to access a replicated DFS share, they will usually be connected to a server in the local Active Directory site but can connect to remote sites as needed. Before we discuss DFS any further, we should define some key terms used by the Distributed File System and the File Replication Service.
To properly understand DFS, you must understand certain terms that are commonly used in referencing DFS configurations. These terms, described next, are frequently used to refer to the structure of a DFS configuration, and at times, the terms are actually part of the DFS configuration.
DFS root—. The top level of the DFS tree that defines the namespace for DFS and the functionality available. DFS roots come in two flavors: standalone root and domain root. A standalone root can be accessed by the server name on which the root was created. The domain root can be accessed by the domain name that was specified when the root was created. A domain-based root adds fault-tolerant capabilities to DFS by allowing several servers to host a replica of a DFS link. See more detailed explanations later in this chapter.
DFS link—. The name by which a user connects to a share. You can think of a link as the DFS share name because this is the name users will connect to. DFS links redirect users to targets.
Target—. The actual file share that is hosted on a server. Multiple targets can be assigned to a single DFS link to provide fault tolerance. If a single target is unavailable, users will be connected to another available target. When domain-based DFS links are created with multiple targets, replication can be configured using the File Replication Service to keep the data across the targets in sync.
DFS tree—. The hierarchy of the namespace. For example, the DFS tree begins with the DFS root name and contains all the defined links below the root.
Referral—. A redirection that allows a DFS client to connect to a specified target. Disabling a target’s referral keeps it from being used by clients. Target referral can be disabled when maintenance will be performed on a server.
DFS uses the File Replication Service to automatically replicate data contained in DFS targets associated with a single root or link on which replication has been configured. To understand the replication concepts, you must understand some key FRS terminology. Here are some important terms:
Replication—. The process of copying data from a source server file share to a destination server file share. The file shares are replicated through replication connections.
Replication connection—. The object that manages the replication between a source and destination server. The replication connection defines the replication schedule and the source and destination replication partners, for example. Each replication connection has only a single source and destination replication partner.
Replication partner—. A server that shares a common replication connection. The inbound replication partner receives data from a server specified in the replication connection. The outbound replication partner sends data to the replication partner specified in the replication connections.
Replica—. A server that hosts a file share in which FRS replication is configured.
Replica set—. All the servers that replicate a given file share or folder with one another.
Multimaster replication—. The process that occurs when any replica in a replica set updates the contents of a replicated shared folder. Every replica can be the master, and every replica can be a slave. FRS replication defaults to multimaster, but replication connections can be configured to provide master-slave replication.
Planning for a DFS implementation requires an administrator to understand the different types of Distributed File Systems and the features and limitations of each type. Also, the administrator must understand what tasks can be automated using DFS and what must be configured manually. For instance, DFS can create the file share for a root folder through a DFS Wizard, but it cannot configure file share options such as share permissions, user connection limits, and offline file settings. Also, DFS cannot manage the NTFS permissions set at the root or link target NTFS folder.
When an organization wants automated file replication, domain-based DFS can utilize Windows Server 2003 FRS to replicate shared folders. The administrator does not need to understand all the technical aspects of FRS to configure DFS replication, but he should understand how initial replication will handle existing data in a target folder.
DFS is not currently capable of managing or creating share or NTFS permissions for root targets and link targets. This means that to ensure proper folder access, administrators should first configure the appropriate permissions and, if multiple targets exist, manually re-create the permissions on the additional targets. If multiple targets are used and the permissions are not exact, administrators may inadvertently grant users elevated privileges or deny users access completely. To prevent this problem, administrators should create the target file share and configure the share and NTFS permissions manually at the shared folder level before defining the share as a DFS target.
As mentioned previously, DFS comes in two flavors: standalone and domain. Both provide a single namespace, but domain DFS provides several additional features that are not available in standalone DFS. The DFS features available in a DFS tree depend on the DFS root type.
A standalone DFS root provides the characteristic DFS single namespace. The namespace is defined by the server that hosts the root target. Standalone roots can support only a single root target, but an administrator can configure multiple link targets. Multiple link targets must be kept in sync manually because FRS replication is not an option. Standalone roots are normally deployed in environments that do not contain Active Directory domains.
For an administrator to create a domain DFS root, the initial root target must be a member of an Active Directory domain. A domain DFS provides a single namespace that is based on the domain name specified when the root was created. Domain DFS can utilize FRS to replicate data between multiple root or link targets.
When an organization wants to replicate file share data, administrators should create a domain-based DFS root. Within a domain-based DFS tree, replication can be configured between multiple targets on a single root or link. When multiple targets are defined for a root or link, DFS can utilize the FRS to create replication connection objects to automatically synchronize data between each target.
Tip
As a best practice, it’s recommended not to replicate domain DFS roots; instead, replicate DFS links between link targets. To provide fault tolerance for the DFS root, simply define additional root targets that can each provide access to the DFS links.
Note
With Windows 2003 R2, DFS now provides the capability to perform automatic namespace fallback. This means that if a DFS server fails, the namespace will automatically redirect the user request to data to the nearest replica of the data. When a server that is closer to the user becomes available, the user will fall back to the copy of the data that is closest to him or her.
When replication is first configured using the DFS console and the Replication Wizard, the administrator can choose which target server will be the initial master. The data contained on the initial master is replicated to the remaining targets. For targets on servers other than the initial master, existing data is moved to a hidden directory, and the current folder is filled with the data contained only in the initial master shared folder. After initial replication is complete, the administrator can restore data moved to the hidden folder back to the working directory, where it can trigger replication outbound to all the other replicas in the replica set. As a best practice, when adding additional targets to a replica set, try to start with empty folders.
When replication is configured for DFS links, the File Replication Service (FRS) performs the work. Each server configured for replication is called a replica. Each replica has replication connections to one or many targets in the replica set. The replication connections are one way, either inbound or outbound, and are used to send updates of changed files on a target to other replicas, and if the change is accepted, the data is sent.
In a two-server replica set, server1 and server2, let’s assume that server1 has an outbound connection to server2 and a separate inbound connection from server2. Each server uses these two connections to send updated data and to receive and process changes and file updates. When a file is changed on server1, the file change is recorded in the NTFS volume journal. FRS on server1 monitors the journal for changes, and when one is detected, a change order is sent to server2, including the updated filename, file ID, and last saved date. The ID of the file is created by FRS before initial replication or when a file is added to a replica share. When the change order is received by server2, it either accepts the change order and requests the changed file, or it denies the change and notifies server1. The changed file is imported into the staging directory when the change order is created. The file is compressed and prepared to send to the outbound partner, and a staging file is created. When the replication schedule next allows replication to occur, the staging file is sent to the staging folder on server2, where it is decompressed and copied into the target folder.
The staging folder is the location where an FRS-replicated share stores the data that will be replicated to other replicas with direct FRS connections. When replication is configured using the Configure Replication Wizard in DFS, the system defaults to creating the staging folder on a drive other than the target share drive. Because replication data will travel through this folder, the drive hosting the staging folder must have sufficient free space to accommodate the maximum size of the staging folder and should be able to handle the additional disk load.
When replication is initiated, the source server sends a change order to the destination server and creates staging files in the local staging folder. If the destination server accepts the change order, the staging files are copied from the source server staging folder to the hidden folder called Do_NOT_REMOVE_NrFrs_PreInstall_Directory in the target directory.
Windows Server 2003 DFS provides a number of built-in replication topologies to choose from when an administrator is configuring replication between DFS links; they’re described next. As a general guideline, it may be prudent to configure DFS replication connections and a schedule to follow current Active Directory site replication topology connections or the existing network topology when the organization wants true multi-master replication.
A hub-and-spoke topology is somewhat self-descriptive. A single target is designated as the replication hub server, and every other target (spoke target) replicates exclusively with it. The hub target has two replication connections with each spoke target: inbound and outbound. When the hub target is unavailable, all replication updates stop.
Using a full mesh topology, each target has a connection to every other target in the replica set. This enables replication to continue between available targets when a particular target becomes unavailable. Because each target has a connection to every other target, replication can continue with as few as two targets.
In a ring topology, each server has only two connections: one inbound from a target and one outbound to a different target. Using this topology, replication can be slow because a replication update must complete on a target before the next target receives the replication data. When a target becomes unavailable, the ring is essentially broken, and replication may never reach other available targets.
Custom replication allows an administrator to define specific replication connections for each target. This option can be useful if an organization wants a hub-and-spoke topology, but with multiple hub targets, as shown in Figure 30.8.
Latency is the longest amount of time required for a replication update to reach a destination target. When replication is enabled, a schedule should be defined to manage replication traffic. Using Figure 30.13 as an example, if the replication connection between each target server is 15 minutes, the replication latency is 30 minutes. The longest replication interval—spoke target to spoke target, such as replication from server A to server C—needs to hop two connections that replicate every 15 minutes, totaling a maximum of 30 minutes for the update to reach server C.

To install DFS, an administrator of a fileserver on the network needs to install the DFS component of Windows 2003 R2 onto a server. The component installation is as follows:
Log on to the desired server using an account with Local Administrator access.
Select Start, Settings, Control Panel, Add/Remove Programs.
Click Add/Remove Windows Components, and select the Distributed File System component.
Note
When you select the Distributed File System component, if you click the Details button, you will notice there are subcomponents that can be selected or deselected individually. The subcomponents are DFS Management, DFS Diagnostic and Configuration Tools, and DFS Replication Service. To take advantage of all the capabilities of DFS, keep all three components enabled as part of the installation process.
Click Next to install the component, and then click Finished when done.
In creating DFS in a Windows 2003 environment, the administrator must start by creating a DFS root. To create the root, the administrator requires Local Administrator access on the server hosting the root. If a domain root is being created, Domain Administrator permissions are also necessary.
A DFS root requires a file share. When the DFS root is created, the name is matched to a file share name. The wizard searches the specified server for an existing file share matching the DFS root name; if it does not locate one, the wizard will create the share.
As a best practice, the file share should be created and have permissions configured properly before the DFS root is created. Doing so ensures that the intended permissions are already in place. Because share and NTFS permissions are not managed through the DFS console, using the wizard to create the share is fine as long as the share and NTFS permissions are configured immediately following the DFS root creation.
To create a file share for a DFS root, follow the steps outlined in the “Managing File Shares” section earlier in this chapter.
To create a DFS root, follow these steps:
Click Start, All Programs, Administrative Tools, Distributed File System.
Right-click Distributed File System in the left pane and select New Root.
Click Next on the New Root Wizard Welcome screen to continue.
Select the root type and click Next.
If you chose a domain root, select the correct domain from the list, or type it in and click Next. (If you chose a standalone root, skip this step.)
On the Host Server page, type in the fully qualified domain name of the server that will host the DFS root and click Next to continue. If necessary, click the Browse button to search for the server.
On the Root Name page, enter the desired name for the root, enter a comment describing the root, and click Next.
Note
The initial DFS root name must match the name of the file share created previously. If the share does not exist, the wizard will prompt you to create a file share from an existing folder or a new folder. Although the wizard can simplify the process by automating this task, it does not provide a method of configuring permissions.
Click Finish on the Completing the New Root Wizard page to create the root and complete the process.
Creating a DFS link is similar to creating the DFS root. A link can be created only to target already-existing shares. The recommendation is to create the file share on an NTFS folder, if possible, to enable file and folder security.
To create a file share for a DFS link, follow the steps outlined previously in “Managing File Shares.” To create the link, follow these steps:
Click Start, All Programs, Administrative Tools, Distributed File System.
If the root you want to host the link is not already shown in the left pane, right-click Distributed File System and select Show Root.
In the Show Root window, expand the domain and select the DFS root. Or, for a standalone root, type in the server and share name of the DFS root. Then click OK to open the DFS root.
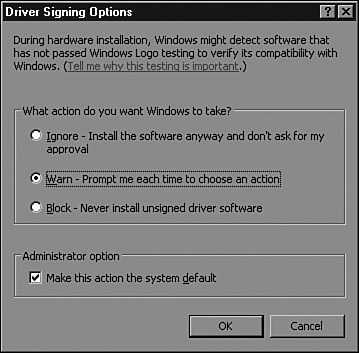
In the left pane, right-click the DFS root and select New Link.
On the New Link page, enter the link name, path (UNC server and share name), any comments, and the caching interval and click OK to create the link. A sample configuration is shown in Figure 30.14.
The caching interval is the amount of time a client will assume the target is available before the DFS client verifies that the target server is online.
Domain-based DFS supports adding multiple targets at the root and link levels. Standalone DFS supports only multiple link targets. To create additional root targets, follow these steps:
Click Start, All Programs, Administrative Tools, Distributed File System.
If the root you want is not already shown in the left pane, right-click Distributed File System and select Show Root.
In the Show Root window, expand the domain and select the DFS root. Or, for a standalone root, type in the server and share name of the DFS root. Then click OK to open the DFS root.
In the left pane, right-click the DFS root and select New Root Target.
Enter the host server with the additional target file share and click Next. When you’re creating additional root targets, the file share must already exist on the host server with the same name as the root.
Click Finish in the Completing the New Root Wizard page to create the additional root target.
To create an additional link target, follow these steps:
Open the DFS console and connect to the root you want, as outlined in the first step of the preceding section.
Click the plus sign next to the DFS root shown and select the DFS link you want.
Right-click the DFS link and select New Target.
On the New Target page, enter the path to the server and share.
The New Target page contains a check box labeled Add This Target to the Replication Set. Leaving this box checked will simply start the Configure Replication Wizard immediately after creating the target. Uncheck this box because replication will be handled next.
Click OK to create the target.
Domain-based DFS roots can be published in Active Directory to make locating the root much easier. After the root is published, it can be located by querying Active Directory for files and folders.
To publish a root in Active Directory, follow these steps:
Open the DFS console and locate the root you want.
Right-click the root and select Properties.
Select the Publish tab and check the Publish This Root in Active Directory box.
Enter the description, owner account name, and keywords used to locate the root and click OK when completed.
Click OK to close the Properties page.
Following best practices for DFS replication can help ensure that replication occurs as expected. Because file replication is triggered by a file version change or last-saved or modified time stamp, a standard file share may generate many replication changes, which can saturate the network bandwidth. To avoid such scenarios, follow as many of these suggestions as possible:
Start with an empty DFS root folder to keep from having to replicate any data at the root level. Also, this can simplify the restore process of a DFS root folder because it contains only links that are managed by DFS.
Do not replicate DFS roots because the roots will try to replicate the data in the root folders plus the data contained within the link targets. Replication is not necessary if the links are already replicating. Because the roots will not replicate for redundancy, deploy domain DFS roots and add additional root targets.
If possible, use DFS for read-only data. When data is being replicated, FRS always chooses the last-saved version of a file. If a group share is provided through a replicated DFS link and two employees are working on the same file, each on different replica targets, the last user who closes and saves the file will have his change(s) saved and replicated over the changes of other previously saved edits.
Replicate only during nonpeak hours to reduce network congestion. For replicating links that contain frequently changing data, this may not be possible, so to provide data redundancy in the unified namespace, create only a single target for that link and deploy it on a cluster file share. This provides server-level redundancy for your file share data.
Back up at least one DFS link target and configure the backup to not update the archive bit. Changing the archive bit may trigger unnecessary replication.
Thoroughly test server operating system antivirus programs to ensure that no adverse effects are caused by the scanning of files on a replicated DFS target.
Verify that the drive that will contain the staging folder for a replication connection contains ample space to accept the amount of replicated data inbound and outbound to this server.
Having a high number of read-write operations is not desirable because it causes heavy replication, and in a scenario like this, DFS replication should be performed during nonpeak hours.
DFS should be tuned on each replica server using the DFS console. Using the DFS console, the administrator can optimize the replication schedules and connections for DFS targets. On each server, certain existing Registry settings can be optimized, or new settings can be added to change the characteristics or default values of file replication settings, to accommodate the data that is being replicated. These Registry entries include the maximum size of the staging folder. The default setting is 660MB; this value can be increased to 4.2GB.
To increase the staging folder size, update the value data of the Staging Space Limit in KB value in the HKEY_Local_MachineSYSTEMCurrentControlSetServicesNtFrs Parameters Registry key. The value entered represents kilobytes. When calculating your limit, remember that 1MB is equal to 1,024KB, not 1,000.
The Windows Server 2003 Resource Kit contains additional tools to optimize FRS connections, and it also includes some DFS and FRS troubleshooting utilities.
Windows Server 2003 supports the prestaging of a new target for a replicating DFS link. This provides the ability to restore a copy of an existing replica to this target before replication is enabled. Consider this option when adding existing DFS replicas containing large amounts of data because performing a full replication could severely impact network performance. This process is fairly straightforward if the right tools are used.
To prestage a DFS replica, follow these steps:
Back up a single target of a replicating DFS link using the Windows Server 2003 Backup utility (ntbackup.exe).
On the new target server, create the folder and file share for the new DFS target and set permissions accordingly. Most likely, the share and root folder NTFS permissions on an existing target are correct, so the permissions for this new target should mimic the existing targets.
Using the Windows Server 2003 Backup utility, restore the previously backed-up target data to the target folder on the new server using the Restore to Alternate Location option. For more information regarding restoring data to an alternate location using Windows Server 2003 Backup, refer to Chapter 33, “Recovering from a Disaster.”
Using the DFS console logged in with an account with the proper permissions, add this target to the link if it has not already been added.
If one of the predefined replication topology choices has been configured for this link (for example, hub-and-spoke, ring, or full mesh), the new target will be added to the replication immediately. If a customized replication topology was previously created, you must add the new target to the replication manually by creating new replication connections for it.
This process currently works only if the data is backed up and restored using Windows Server 2003 Backup. When the new target is added to the replication, all the restored files are moved into the pre-existing folder within the target. FRS then compares the files in the pre-existing directory with the information provided by the existing targets. When a file is identified to be the same file as on the existing target, it is moved out of the preexisting folder to the proper location in the target. Only files that have changed or been created since the backup are replicated across the network.
DFS can be managed through the DFS console included in the Windows Server 2003 Administrative Tools program group. DFS standalone and domain roots can be shown and managed in a single DFS console window. The administrator can check DFS root and link targets for availability by checking the status of all targets for a particular link, as shown in Figure 30.15.

DFS and FRS can be monitored using the System Monitor. Windows Server 2003 includes two performance objects to monitor the File Replication Service. These counters are
FileReplicaConn—. This object can be used to monitor the amount of network usage that file replication connections are utilizing. Also, this object can be used to monitor the number of connections FRS is opening and supporting at any given time.
FileReplicaSet—. This performance object can be used to monitor statistical information about a particular replica. Some counters include staging files generated, packets received in bytes, and kilobytes of staging space in use and available.
SONAR is a GUI-based tool used to monitor FRS. It provides key statistics on the SYSVOL such as traffic levels, backlogs, and free space without modifying any settings on the computers it monitors. Before installing SONAR, ensure that the latest .NET Framework is installed. SONAR can be downloaded from http://www.microsoft.com/windows2000/techinfo/reskit/tools/new/sonar-o.asp, and it is also a part of the Windows Server 2003 Resource Kit.
Note
It is recommended to run SONAR from a domain controller, but it can also be run from a Windows 2000 or higher member server. If you plan on running Sonar from a member server, copy the Ntfrsapi.dll file located in the %SystemRoot%System32 directory from a domain controller. This file is required for SONAR to execute properly.
After downloading and installing the Sonar executable or running the executable from the Windows Server 2003 Resource Kit, select the domain, replica set, and refresh rates as shown in Figure 30.16. You can then begin the monitoring by selecting View Results or optionally load a predefined query to run. More information on SONAR and troubleshooting FRS can be found in the Windows Server 2003 Resource Kit as well as the troubleshooting FRS whitepaper included with the download.

Monitoring for DFS does not provide as many options as FRS. To monitor DFS, make sure the Process Performance object is selected; then select the dfssvr counter in the Select Instances list box. Some counters include total processor time, virtual bytes, private bytes, and page faults.
When a target needs to be rebooted or just taken offline for a short maintenance window, the connected users must be gracefully referred to another replica, or they must be disconnected from the DFS server.
To take a server offline for maintenance, follow these steps:
Open the DFS console and locate the root you want.
Select the DFS root or link that contains the target on the server you will be taking down for maintenance.
Right-click the appropriate target and select Enable or Disable Referrals, as shown in Figure 30.17. This option changes the current referral status of a target.
Repeat the preceding steps for any additional DFS root or link targets on the server on which you are disabling referrals.
Wait long enough for all the existing connections to close. Usually, after you make the referral change, all users should be disconnected after the cache interval has been exceeded. Start counting after the referral is disabled.
When all users are off the server, perform the necessary tasks and enable referrals from the DFS console when maintenance is completed and server functionality has been restored.
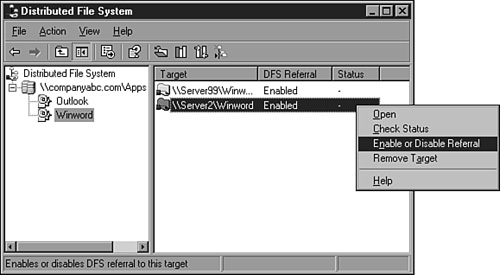
When a server containing a replicated target folder will be offline for an extended period of time—for upgrades or because of unexpected network downtime—removing that server’s targets from replica sets is recommended, especially when a lot of replication data is transferred each day. Doing this relieves the available replica servers from having to build and store change orders and staging files for this offline server. Because the staging folder has a capacity limit, an offline server may cause the active server’s staging folders to reach their limit, essentially shutting down all replication. When a staging folder reaches its limit, new change orders and staging files are not created until existing change orders are processed. Even though a replica server is offline, available replicas containing outbound connections to this server are still populating their staging folders with data to send to this server. If replica data changes frequently, the staging folders may fill up inadvertently, halting all replication on servers with outbound connections to the offline server. To avoid this problem, removing the replica from the set is the easiest method.
When the server is once again available, the administrator can add this server back to the list of targets and configure replication. The data will be moved to the pre-existing folder where it can be compared to file IDs sent over on the change orders from the initial master. If the file ID is the same, it will be pulled from the pre-existing folder instead of across the WAN.
The Enable button can be deselected on a replication connection, but this is not desired for maintenance because this server will not get the correct data change orders after replication is enabled.
When the File Replication Service is enabled on a server such as a Windows Server 2003 domain controller or a server hosting a replicated DFS target, event logging is enabled. Using the Event Viewer console, administrators can review the history and status of the File Replication Service by reading through the events in the FRS event log.
Currently, there is no separate backup tool or strategy for backing up in DFS. The following elements should be backed up:
Target data—. This is the actual data that is being accessed by end users. With a true multi-master replication topology, only one target needs to be backed up.
DFS hierarchy—. For standalone DFS, the system state of the root server and system state of all servers containing DFS targets should be backed up. For domain-based DFS, the system states of domain controllers and all other servers containing DFS targets should be backed up. Active Directory stores all the DFS hierarchy and FRS replication connection information. Active Directory is backed up with the domain controller system state.
DFScmd.exe is a command-line administrative utility for DFS. Using this tool, administrators can create roots and links and define replication between targets. This tool can be used to perform a quick backup of the DFS hierarchy of any particular DFS roots.
To perform a backup of a current domain root named Apps, for example, you can run this command and then press Enter:
DFScmd.exe /View \domainApps /Batch /Batchrestore > DFSrestore.bat
This file can be run to re-create a lost or deleted link and targets. This tool cannot recreate the DFS root or replication, but after the root has been manually re-created, the rest of the DFS tree hierarchy can be restored by running the batch file created using DFScmd.exe and a console redirection to a batch file. Replication needs to be configured using the DFS console.
For more detailed information on the uses of DFScmd.exe, you can access the built-in help commands at the command prompt by typing DFScmd.exe /? and pressing Enter.
Remote Storage is a Windows Server 2003 file system service that is used to automatically archive data to removable media from a managed NTFS volume. Files are migrated by Remote Storage when they haven’t been accessed for an extended period of time or when a managed disk drops below a certain percent of free disk space. When Remote Storage migrates to a file or folder, it is replaced on the volume with a file link called a junction point. Junction points take up very little room, which reduces the amount of used disk space but leaves a way for this data to be accessed later in the original location. When a junction point is accessed, it spawns the Remote Storage service to retrieve the file that was migrated to tape.
On volumes managed by Remote Storage, antivirus software should be limited to scanning files only upon access. If the antivirus software scans the volume on a regular schedule, all the data previously migrated by Remote Storage may be requested and need to be migrated back to disk. Also, Windows Server 2003–compatible backup programs have options to allow the backup to follow junction points and back up data stored on Remote Storage. This may seem like a great feature, but it can cause several requests to be sent to the backup devices for data that is stored across several disks. This can extend a nightly backup window for many hours more than expected, and the performance of the Remote Storage server may be severely impacted during this operation.
Also, if a volume contains a DFS target configured for replication, Remote Storage should not be enabled on that volume. If a new target is added to a replicating DFS link, the entire contents of that DFS target folder will be read by the File Replication Service. This read operation is necessary to generate the staging files in preparation of synchronizing the target data. This operation causes all the migrated files to be restored back to the volume.
Installing the Remote Storage service takes only a few minutes and requires the Windows Server 2003 installation media. To install and configure Remote Storage, follow these steps:
Log on to the desired server using an account with Local Administrator access.
Ensure that a Windows Server 2003 remote storage–compatible tape or optical media device or library has been installed and configured on the desired server. Review the Windows Server 2003 Hardware Compatibility List on the Microsoft Web site to verify that the device works with the Remote Storage service.
Click Start, Control Panel, Add or Remove Programs.
Select Add/Remove Windows Components from the left pane.
Scroll down the list, check the box next to Remote Storage, and click Next to begin installation.
If the Windows Server 2003 media are not located, you will be prompted to locate the media. Perform this step when necessary.
Click Finish on the Completing the Windows Components Wizard and click Yes to restart the computer.
One of the real beauties of Remote Storage is that there are very few options to configure, making implementation almost a snap. Configuring Remote Storage consists of only a few primary tasks:
Remote Storage requires a backup device to migrate the data from the managed volume. If third-party backup software will be installed on a server running Remote Storage, it is recommended to install at least two separate backup devices and enable the Removable Storage service to access only one. This will prevent any conflicts with backup devices when both Remote Storage and the backup software want to simultaneously access the device. If only one backup device is available, try to avoid third-party backup products, unless it is certain that conflicts will not be encountered. Third-party backup agents running backups to remote servers and backup devices do not affect Remote Storage and local backup devices. All backup devices, such as tape drives, robotic tape libraries, and CD-ROMs are enabled by default to be managed by the Removable Storage service. Because Remote Storage uses this service to access the backup devices, a backup device for Remote Storage is configured by enabling the device to the Removable Storage service.
To enable a device, follow these steps:
Install the backup device or library on the Windows Server 2003 system. Use the backup device manufacturer’s documentation to accomplish this process.
After the backup device is connected, boot up the server and log on using an account with Local Administrator access.
Click Start, All Programs, Administrative Tools, Computer Management.
In the left pane, if it is not already expanded, double-click Computer Management (local).
Click the plus sign next to Storage.
Click the plus sign next to Removable Storage.
Click the plus sign next to Libraries.
Right-click the library (backup device) you want and select Properties.
On the General tab of the Device Properties page, check the Enable Drive box, as shown in Figure 30.18, and click OK. To prevent the Removable Storage service from using this device, uncheck this box and click OK.

Note
In Figure 30.18, the backup device selected is a single DLT tape device. Remote Storage can work with a single-tape device, but using it with robotic tape libraries that can change a tape is recommended to locate and restore data that is stored on multiple pieces of media automatically. A single-tape device requires administrator intervention when a file migrated by Remote Storage needs to be restored.
After a device is configured for Remote Storage, you must allocate media for Remote Storage to use. When new or blank media are inserted in a device, upon device inventory, this media will be placed in the free media pool. If media were previously used by a different server or backup software, they are placed in the import, unrecognized, or backup media pools upon device inventory. The backup media pool is for media used by the local server’s Windows Server 2003 Backup application.
To inventory a backup device and allocate media for remote storage, follow these steps:
Locate the desired device, as outlined in the preceding section. Then right-click the device and choose Inventory.
After the device completes the inventory process, select the backup device in the left pane. The media will then be listed in the right pane.
Right-click the media listed in the right pane and select Properties.
On the Media tab of the Media Properties page, note the media pool membership in the Location section. Figure 30.19 shows media that are part of the ImportDLT media pool.
Click Cancel to close the Media Properties page.

If the media are not in the free or remote storage media pool, they must be placed there before Remote Storage can use them. The Remote Storage service uses the remote storage media pool for locating and storing media for file migration or archival purposes. The remote storage media pool is configured by default to look for media in the free pool if media in the backup device are not already in the remote storage media pool.
If the media are not in the free or remote storage media pool and can be overwritten, right-click the media and select Free. A warning message pops up stating that this media will be moved to the free pool and any data currently on the media will be lost. If that is okay, click Yes; otherwise, click No, insert a different piece of media into the backup device, and restart the backup process.
When the backup devices and removable media have been configured properly, a volume for remote storage management can be configured. To configure a managed volume, follow these steps:
Log on to the desired Remote Storage server using an account with Local Administrator access.
Click Start, All Programs, Administrative Tools, Remote Storage.
If this is the first time the Remote Storage console has been opened or no volumes on the server have been configured for remote storage management, the Remote Storage Wizard will begin. Click Next on the Welcome screen to continue.
On the Volume Management page, choose whether to manage all volumes or manage only selected volumes by selecting the correct radio button. If you selected Manage All Volumes, click Next.
If you chose Manage Selected Volumes, check the volume you want to manage and click Next.
On the Volume Settings page, enter the amount of free space you want for the managed volume.
On the same page, configure the minimum file size before it will be migrated by Remote Storage; then configure the number of days a file must remain unaccessed before Remote Storage will make it a possible candidate for migration. Then click Next. Figure 30.20 shows a volume setting that will migrate data to Remote Storage when a volume has 10% free space remaining, and the file that will be migrated must be larger than 12KB and must remain unaccessed for 120 days.
On the Media Type page, choose the media type associated with the backup device enabled for Remote Storage to use. Choose a media type from the Media Types pulldown menu.
On the next page, you can configure a schedule to perform the file copy. The default is to run at 2 a.m. seven days a week. Click the Change Schedule button to configure a custom schedule or click Next to accept the default schedule.
Click Finish on the Completing the Remote Storage Wizard page to complete the process.
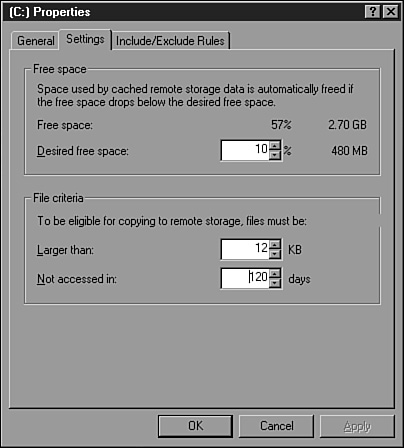
When the process is complete, the Remote Storage console opens. This console can be used to manually initiate Remote Storage tasks on managed volumes, such as starting a file copy based on last file access time, to validate files or to create free space if the drive is below the free space threshold. This console can also be used to manage removable media. For more information on Remote Storage, refer to Chapter 32, “Backing Up a Windows Server 2003 Environment,” and Chapter 33, “Recovering from a Disaster.”
The Windows Server 2003 Volume Shadow Copy service (VSS) is a new feature available for volumes using NTFS. VSS is used to perform a point-in-time backup of an entire volume to the local disk. This backup can be used to quickly restore data that was deleted from the volume locally or through a network mapped drive or network file share. VSS is also used by the Windows Server 2003 Backup program to back up local and shared NTFS volumes. If the volume is not NTFS, Volume Shadow Copy will not work.
VSS can make a point-in-time backup of a volume, including backing up open files. This entire process is completed in a very short period of time but is powerful enough to be used to restore an entire volume, if necessary. VSS can be scheduled to automatically back up a volume once, twice, or several times a day. This service can be enabled on a volume that contains DFS targets and standard Windows Server 2003 file shares.
When the Windows Server 2003 Backup program runs a backup of a local NTFS volume, VSS is used by default to create a snapshot or shadow copy of the volume’s current data. This data is saved to the same or another local volume or disk. The Backup program then uses the shadow copy to back up data, leaving the disk free to support users and the operating system. When the backup is complete, the shadow copy is automatically deleted from the local disk. For more information on VSS and Windows Server 2003 Backup, refer to Chapters 32 and 33.
Enabling shadow copies for a volume can be very simple. Administrators have more options when it comes to recovering lost or deleted data and, in many cases, can entirely avoid restoring data to disk from a backup tape device or tape library. In addition, select users can be given the necessary rights to restore files that they’ve accidentally deleted.
From a performance standpoint, it is best to configure shadow copies on separate disks or fast, hardware-based RAID volumes (for example, RAID 1+0). This way, each disk performs either a read or write operation for the most part, not both. Volume Shadow Copy is already installed and is automatically available using NTFS-formatted volumes.
To enable and configure shadow copies, follow these steps:
Log on to the desired server using an account with Local Administrator access.
Click Start, All Programs, Administrative Tools, Computer Management.
In the left pane, if it is not already expanded, double-click Computer Management (Local).
Click the plus sign next to Storage.
Select Disk Management.
Right-click Disk Management, select All Tasks, and select Configure Shadow Copies.
On the Shadow Copies page, select a single volume for which you want to enable shadow copies and click Settings.
The Settings page allows you to choose an alternate volume to store the shadow copies. Select the desired volume for the shadow copy, as shown in Figure 30.21.
Configure the maximum amount of disk space that will be allocated to shadow copies.
The default schedule for shadow copies is twice a day at 7 a.m. and 12 p.m. If this does not meet your business requirements, click the Schedule button and configure a custom schedule.
Click OK to enable shadow copies on that volume and to return to the Shadow Copies page.
If necessary, select the next volume and enable shadow copying; otherwise, select the enabled volume and immediately create a shadow copy by clicking the Create Now button.
If necessary, select the next volume and immediately create a shadow copy by clicking the Create Now button.
After the shadow copies are created, click OK to close the Shadow Copies page, close the Computer Management console, and log off the server.

For more detailed information concerning the Volume Shadow Copy service, refer to Chapters 32 and 33.
The server administrator or a standard user who has been granted permissions can recover data using previously created shadow copies. The files stored in the shadow copy cannot be accessed directly, but they can be accessed by connecting the volume that has had a shadow copy created.
Note
The Shadow Copies for Shared Folders Restore Tool (VolRest), located in the Windows Server 2003 Resource Kit, is a command-line tool that can be used to restore previous file versions. The Shadow Copies for Shared Folders feature must be enabled to use this tool to restore previous versions of files.
To recover data from a file share, follow these steps:
Log on to a Windows Server 2003 system or Windows XP SP1 workstation with either Administrator rights or with a user account that has permissions to restore the files from the shadow copy.
Click Start, Run.
At the Run prompt, type
\servernamesharename, whereservernamerepresents the NetBIOS or fully qualified domain name of the server hosting the file share. The share must exist on a volume in which a shadow copy has already been created.In the File and Folder Tasks window, select View Previous Versions, as shown in Figure 30.22.
When the window opens to the Previous Versions property page for the share, select the shadow copy from which you want to restore and click View.
An Explorer window then opens, displaying the contents of the share when the shadow copy was made. If you want to restore only a single file, locate the file, right-click it, and select Copy.
Close the Explorer window.
Close the Share Property pages by clicking OK at the bottom of the window.
Back in the actual file share window, browse to the original location of the file, right-click on a blank spot in the window, and select Paste.
Close the file share window.

Volume shadow copies do not require heavy management, but if shadow copies are on a schedule, the old copies need to be manually removed. You can use the Shadow Copies windows available through Disk Manager or automate this task by using a batch script and the utility Vssadmin.exe.
To delete a shadow copy using Disk Manager, follow these steps:
Log on to the desired server using an account with Local Administrator access.
Click Start, All Programs, Administrative Tools, Computer Management.
In the left pane, if it is not already expanded, double-click Computer Management (Local).
Click the plus sign next to Storage.
Select Disk Management.
Right-click Disk Management, select All Tasks, and click Configure Shadow Copies.
Select the desired volume in the Select a Volume section.
In the Shadow Copies of Selected Volume section, select the shadow copy you want to delete and click the Delete Now button.
Click OK to close the Shadow Copies window, close the Computer Management console, and log off the server.
To delete the oldest shadow copy from the D: volume, at a command prompt, type the following command and then press Enter:
Vssadmin.exe can be used to create, delete, and manage shadow copies. For more information on this tool, refer to Chapter 32.
Windows Server 2003 file services give administrators several options when it comes to building fault-tolerant servers and data storage as well as fault-tolerant file shares. Through services such as Windows File Protection and Volume Shadow Copy, deleted or overwritten files can be restored automatically or by an administrator without restoring from backup. Using services such as the Distributed File System and the File Replication Service, administrators have more flexibility when it comes to deploying, securing, and providing high-availability file services. Using just one or a combination of these file system services, organizations can truly make their file systems fault tolerant.
Use the Volume Shadow Copy service to provide file recoverability and data fault tolerance to minimize the number of times you have to restore from backup.
Use Remote Storage to migrate data from a disk volume to remote storage media based on when a file was last accessed or when a managed disk reaches a predetermined free disk space threshold.
Do not configure Remote Storage to manage volumes that contain FRS replicas because doing so can cause unnecessary data migration.
Try to provide disk fault tolerance for your operating system and data drives, preferably using hardware-based RAID sets.
Completely format RAID 5 volumes to avoid loss of disk performance later when data is being first copied to the volumes.
Use NTFS whenever possible on all volumes.
Always define share permissions for every share regardless of the volume format type.
Replace the Everyone group with the Domain Users group when shares are created on domain servers and anonymous or guest access is not required, and set the share permissions accordingly.
Do not enable client-side caching on the file share if roaming user profiles are used on a network because this may cause corruption to the end user’s profile.
Use File Server Resource Manager (FSRM) quotas as part of the Windows 2003 R2 update, instead of NTFS quotas, for better quota management capabilities.
Monitor disk performance using utilities such as System Monitor and fsutil.
Audit file and folder security.
Require that only certified hardware drivers be installed on the system.
Install and use DFS that comes with the Windows 2003 R2 update to get better DFS operation and replication functionality.
Use domain-based DFS roots whenever possible.
Use DFS to provide a unified namespace to file data.
Use NTFS volumes for DFS root and link target file shares to enable file- and folder-level security. Also, domain DFS links can be replicated only between file shares on NTFS volumes.
Start with an empty DFS root folder to keep from having to replicate any data at the root level.
Do not replicate DFS roots because the root will try to replicate the data in the root folders plus the data contained within the link targets. Replication is not necessary if the links are already replicating. Because the roots do not replicate for redundancy, deploy domain DFS roots and add additional root targets.
Use DFS for read-only data, if possible.
Replicate DFS data only during nonpeak hours to reduce network congestion.
Back up at least one DFS link target and configure the backup to not update the archive bit. Changing the archive bit may trigger unnecessary replication.
Test antivirus programs thoroughly to ensure that no adverse effects are caused by the scanning of files on a replicated DFS target.
Verify that the drive containing the staging folder for a replication connection contains ample space to accept the amount of replicated data inbound and outbound to this server.