
Painting Textures Directly on a Mesh
If you followed the earlier sections in this chapter, you have an unwrapped mesh and a texture on it that doesn't stretch. Woohoo! But say that, for some crazy reason, you don't want your object to have a checkerboard as a texture, and you want to actually use this UV layout to paint a texture for your mesh. You can either paint directly on the mesh from within Blender or export the UV layout to paint in an external program like GIMP or Photoshop. I actually prefer to use a combination of these methods. I normally paint directly on the mesh in Blender to rough out the color scheme and perhaps create some bump and specularity maps. Then I export that image along with an image of the UV layout to get more detailed painting done in an external program.
After you have an unwrapped mesh, the starting point for painting textures on it is Blender's Texture Paint mode. Activate Texture Paint mode by left-clicking the mode button in the 3D View's header. From here, things are pretty similar to Vertex Paint mode, with a few exceptions. The Tool Shelf updates with an array of paint options, but the specific content of the Tool Shelf has some differences from Vertex Paint. The Brush datablock is largely the same, though with a few more preset brushes and a Jitter slider. There's also a Texture panel in the Tool Shelf where you can actually define a texture for your brush, so you're not just painting flat colors. You define the brush texture in the Texture like you set up any other texture. Using Blender textures to paint UV textures gives your painting quite a bit more flexibility.
When you're in Texture Paint mode, start painting directly on your mesh by left-clicking and dragging your mouse cursor on it. If you have a test grid image already loaded on the image, you will begin painting directly on this image. In fact, if you still have the UV/Image Editor open, you can watch the test grid image get updated as you paint your mesh. And actually, you can paint directly on the UV image itself by enabling painting in the UV/Image Editor (Image![]() Image Painting). With Image Painting enabled in the UV/Image Editor, the Properties region in that editor has the same painting controls that are available in the Tool Shelf of the 3D View.
Image Painting). With Image Painting enabled in the UV/Image Editor, the Properties region in that editor has the same painting controls that are available in the Tool Shelf of the 3D View.
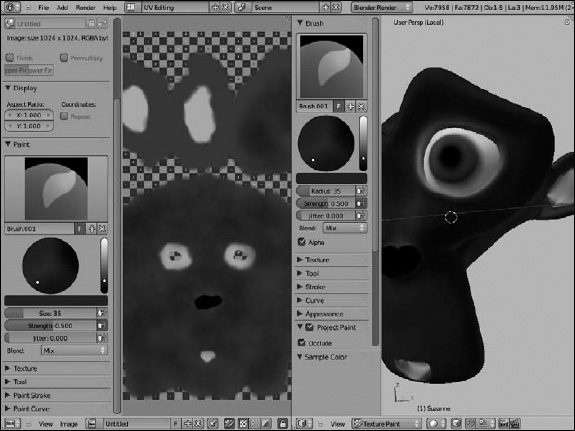
Because of this cool ability to paint in both the 3D View and the UV/Image Editor, when I paint textures in Blender, I like to have my screen laid out like Figure 8-10. I have the 3D View and UV/Image Editor both in Texture Paint mode. If I need to tweak a texture for my brush, I temporarily switch one of the areas to a Properties editor (Shift+F7) and make adjustments from Texture Properties. This layout and workflow is a pretty effective way to get work done.
Figure 8-10: A good screen layout for texture painting directly on your mesh.
Of course, despite the cool things that you can do with Blender's Texture Paint mode, you're better off doing some things in a full-blown 2D graphics program like GIMP or Photoshop. To work on your image in another program, you need to save the texture you already painted as an external image. You should also export your UV layout as an image so that you have a frame of reference to work from while painting.
To save your painted texture, go to the UV/Image Editor and choose Image![]() Save As. A File Browser appears, allowing you to save the image to your hard drive in any format you like. I prefer to use PNG because it has small file sizes and lossless compression.
Save As. A File Browser appears, allowing you to save the image to your hard drive in any format you like. I prefer to use PNG because it has small file sizes and lossless compression.
With your image saved, the next thing you probably want out of Blender for your 2D image editor is the UV layout of your object. To export the UV layout, you need to be in the UV/Image Editor while in Edit mode (Tab). Navigate to UVs![]() Export UV Face Layout. This brings up a File Browser where you can choose where to save your UV layout on your hard drive.
Export UV Face Layout. This brings up a File Browser where you can choose where to save your UV layout on your hard drive.
This UV export feature gives you the option to save in the familiar PNG format as well as two other formats: SVG and EPS. Both SVG (Scalable Vector Graphics) and EPS (Encapsulated PostScript) are vector image formats. If your UV layout is in a vector format, you can scale it to fit any image size you need without losing any resolution. So you can use the same UV layout file to paint both low-resolution and high-resolution textures.
![]() Most graphics applications should be able to read SVG files just fine. If you run into a problem, though, I recommend opening the SVG in GIMP (www.gimp.org) or Inkscape (www.inkscape.org). Both applications are powerful open-source graphics programs, and they're included on this book's DVD. You can edit your UV texture directly in these programs, or you can use them to convert the SVG file to a raster format that your graphics application of choice recognizes, such as PNG or TIFF.
Most graphics applications should be able to read SVG files just fine. If you run into a problem, though, I recommend opening the SVG in GIMP (www.gimp.org) or Inkscape (www.inkscape.org). Both applications are powerful open-source graphics programs, and they're included on this book's DVD. You can edit your UV texture directly in these programs, or you can use them to convert the SVG file to a raster format that your graphics application of choice recognizes, such as PNG or TIFF.