
Doing Nonlinear Animation
Animation is hard work, really hard work. So any time you can cut down the amount of work you have to do without detracting from the quality of the final animation, it's a good thing. Computer animation has given you another cool way to effectively and efficiently cut corners: nonlinear animation. Nonlinear animation, or NLA, is a way of animating that you can really do only with computers. The process of animating is typically very linear and straightforward (see preceding section). You may animate in passes, but you're still generally working forward in time with the full start-to-finish of your animation already planned out.
What if you didn't have to work this way? What if you could animate little chunks of character motion and then mix and match as you like? Imagine mixing a simple hand-waving motion with a simple jumping animation so that your character is both jumping and waving his arm? This is the basic concept behind nonlinear animation. Nonlinear animation takes many of the same principles used in nonlinear video editing and applies them to 3D computer animation. The idea is that you create a library of simple motions or poses and then combine them any way you like to create much more complex animated sequences. Using a library of motions is useful for background characters in larger productions and is also very handy for video game developers. Instead of trying to pull a specific set of frames from a single unified timeline, video game developers can now just make a call to one or more of these library animations and let the computer do the rest of the work.
In Blender, the basic building blocks for this library are Actions. Actions are collections of f-curves, and they are really cool because they have their own datablock. You can create multiple actions within a single .blend file, share the actions between armatures, and basically build up a library of movements.
![]() To create a new action, first change the Dopesheet from the default DopeSheet editing context to the Action Editor context from the drop-down menu in the header. Then you can use the Action datablock, also in the header of the Dopesheet, to add a new action, as highlighted in Figure 12-7. This datablock widget is just like the one used for materials, textures, and even objects in other parts of Blender's interface. Create a new action by left-clicking the plus (+) icon on the right side of the datablock. After adding a new action, you can (and should) give it a custom name.
To create a new action, first change the Dopesheet from the default DopeSheet editing context to the Action Editor context from the drop-down menu in the header. Then you can use the Action datablock, also in the header of the Dopesheet, to add a new action, as highlighted in Figure 12-7. This datablock widget is just like the one used for materials, textures, and even objects in other parts of Blender's interface. Create a new action by left-clicking the plus (+) icon on the right side of the datablock. After adding a new action, you can (and should) give it a custom name.
Figure 12-7: Using the Action datablock in the Dopesheet to create a new action for your armature.

With the new action created, you can create another core animation and start building up your character's action library. Animate waving each arm, a walk cycle, various facial expressions, a standing idle animation, and any other simple action that comes to mind. Ultimately, your library will be populated enough that you'll want to start mixing and matching them together. To do this, you're going to want to use the NLA Editor. Add the NLA Editor to the Animation screen layout with the following steps:
- In the Animation screen layout, left-click the seam at the top of the Timeline and drag it up, making more room for that editor.
Because the NLA Editor is covering the entire animation, it makes sense to forsake the Timeline and use the NLA Editor exclusively. But if you'd still like to use the Timeline, you can split it off of another area.
- Change the Timeline to a NLA Editor.
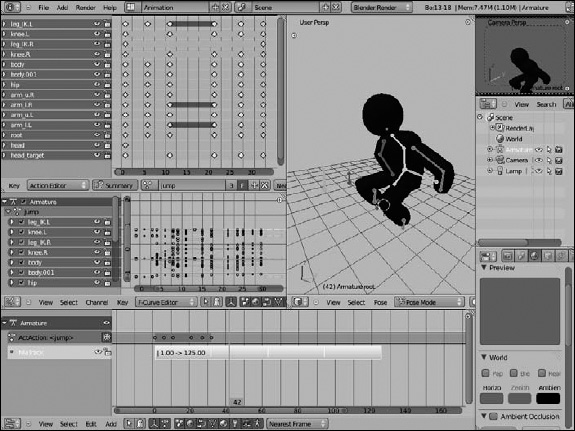
Your screen layout may look something like Figure 12-8.
 The NLA is a very cool feature of Blender, but don't rely on it too much for animation. Blender has had the NLA Editor for a long time, but it could still use some refinement to be a truly effective tool. The good news is that the NLA is still being developed, and while it's likely to go through design iterations in future releases of Blender, the principles that I explain here should still apply.
Mixing actions to create complex animation
When you have an action loaded in the Dopesheet's Action Editor, you should notice a bright orange bar in the NLA Editor. This orange bar is a track, and you can populate it with one or more actions.
Figure 12-8: An animation screen layout with the NLA Editor added to it.
To add one of your other actions to the NLA Editor:
- Activate the track by left-clicking the snowflake-looking icon in the channel region on the left of the NLA.
The track expands, and you should see your current action as a bright yellow strip.
- Add a new strip in the graph area of the NLA Editor (Shift+A).
You see a menu of all the actions you created.
- Choose the action you'd like to add to the NLA Editor.
The action is placed in the NLA Editor as a strip, and its start position is wherever the time cursor is located.
- Continue to add actions to the NLA.
Of course, unless you make the last frame of one Action strip match the pose at the head of the next frame, the animation looks pretty erratic.
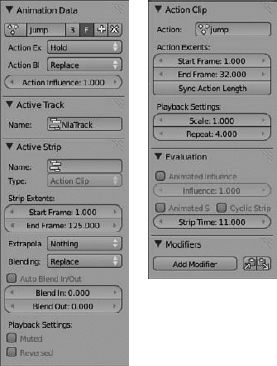
The way to smooth out the animation is with the Properties region (N) in the NLA Editor. Figure 12-9 shows the Properties region of the NLA Editor. To make the transition from one strip to the next smoother, either make sure that the Auto Blend In/Out check box in the Active Strip panel for each strip is enabled (it should be by default) and let them overlap a bit or manually set the Blend In and Blend Out values in this panel.
Figure 12-9: Using the Properties region in the NLA Editor.
Taking advantage of looped animation
Another benefit of using the NLA is the ability to easily loop any action strip and rescale its timing. You can loop and rescale the timing in the NLA Editor from within the Properties region. In the Action Clip panel under the Playback Settings label are a pair of values: Scale and Repeat. The very first of these options is Scale. By default, this option is set to 1.0. However, you can increase or decrease this value as much as you like to adjust the timing on your action, speeding it up or slowing it down as necessary.
Below the Scale value is Repeat. Like Scale, the default value is Repeat, and you can increase or decrease the value to taste. As you do, you should see the strip increase in length proportional to the increase of the Repeat value. Now, to have an effective looping animation, it's definitely in your best interest to make the first and last poses in the action identical. The easiest way to do so is to use the copy and paste pose buttons in the 3D View:
- In the Dopesheet, select (right-click) the action strip you want to loop from the Actions datablock.
- While still in the Dopesheet, move the time cursor to the first pose in the action (left-click and drag).
- In the 3D View, select all bones (A) and left-click the Copy Pose button in the header.
- Back in the Dopesheet, move the time cursor to some place after the last keyframe.
- In the 3D View, left-click the Paste Pose button in the header.
- Insert a new keyframe (I
 Available).
When you get to this step, all the bones should still be selected, so you don't need to reselect anything.
When you return to the NLA Editor, the action strip should automatically be longer to account for the additional frame at the end. Furthermore, the action strip should also loop seamlessly upon playback (Alt+A).
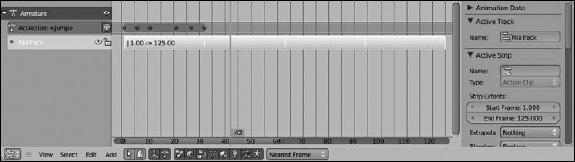
Figure 12-10 shows the NLA Editor with looped strips that have varied scales.
Figure 12-10: Action strips in the NLA Editor, looped and rescaled.
Be careful when changing the scale of Action strips. More often than not, changing the scale results in a keyframe being placed at what's called a fractional frame or intraframe, a spot on the timeline that isn't a nicely rounded frame number. Fractional frames aren't necessarily a bad thing, but animations do tend to look a little bit better if the keyframes fall on full frames so that the audience has the chance to “read” the pose.
![]() Many of these animation concepts, especially ones involving the NLA, are much easier to grasp if you can see them in motion. After all, this is animation, the art of motion. Have a look at the .blend files that accompany this book to get a stronger notion of how these things work together.
Many of these animation concepts, especially ones involving the NLA, are much easier to grasp if you can see them in motion. After all, this is animation, the art of motion. Have a look at the .blend files that accompany this book to get a stronger notion of how these things work together.