
Using Procedural Textures
Blender offers basically two kinds of textures: image-based textures and procedural textures. Unlike image-based textures, where you explicitly create and load an image as a texture, procedural textures are created in software with a specific pattern algorithm.
The advantage of procedural textures is that you can quickly add a level of detail to your objects without worrying about the unwrapping described later in this chapter in the section “Unwrapping a Mesh.” The software handles mapping the texture to the mesh for you. Of course, procedurals can be a bit more difficult to control than image-based textures. For example, if you have a character with dark circles under his eyes, getting those circles to show up only where you want can be pretty tough, maybe even impossible. So the ideal use for procedural textures is as broad strokes where you don't need fine control. Procedural textures are great for creating a foundation or a base to start with, such as providing the rough texture of an orange rind's surface.
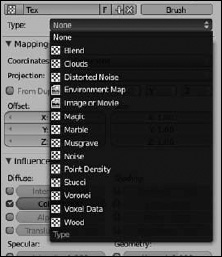
Besides the None texture type, Blender has 13 procedural texture types that you can work with, accessible through the Type drop-down menu in Texture Properties. In addition to these procedurals, you can also choose Image as a texture type. Figure 8-3 shows all available texture types.
Noise basis option
Roughly half of all the procedural textures share an option labeled Basis, short for noise basis. The noise basis is a specific type of pseudorandom pattern that influences the appearance of a procedural texture. Noise basis has two controls:
- Basis: The Basis menu allows you to choose one of several algorithms for generating noise. The available choices are shown in the figure.
- Nabla value: The Nabla value offers more advanced control of the sharpness or smoothness of the texture when it's applied to the material.
The types of noise basis fall roughly into three different kinds of noise:
- Cell noise: A blocky, pixelated type of noise, cell noise stands apart from the other noise basis types because it's the least organic-looking. If you're interested in a very digital-looking texture, this type is the one to choose.
- Voronoi family: These noise types include Crackle, F2-F1, F4, F3, F2, and F1 and are all roughly based on the same algorithm. A primary attribute of Voronoi noise is a somewhat distinct partitioning throughout the texture with generally straight lines. This partitioning is most apparent in the Voronoi Crackle noise basis. These noise types are good for hammered metal, scales, veins, and that dry desert floor look.
- Cloudy noise: Cloudy is my own terminology, but it includes the Improved Perlin, Original Perlin, and Blender Original noise basis types. These types of noise tend to have a more organic feel to them and work well for generic bump textures and clouds or mist.
Figure 8-3: The available textures you can use that are built into Blender.
The following are brief descriptions of each type of procedural texture:
- Blend texture: The Blend texture is one of the unsung heroes in Blender's procedural texture arsenal. This texture may seem like a simple gradient, but with the right mapping, it's really quite versatile. I use Blend textures for mixing two other textures together, creating simple toonlike outlines for meshes, and adjusting the color along the length of hair strands. You can see the real power of the Blend texture when you use it with a ramp that you define in the Colors panel.
- Clouds texture: The Clouds texture is a good general-purpose texture. You can treat the Clouds texture as a go-to texture for general bumps, smoke, and (of course) clouds.
- Distorted Noise texture: The Distorted Noise texture is pretty slick. Actually, strike that; this type of texture is best suited to very rough, complex surfaces. The way the Distorted Noise texture works is pretty cool, though. You use one procedural noise texture, specified by the Noise Distortion menu, to distort and influence the texture of your noise basis. With this combination, you can get some really unique textures.
- Environment Map texture: An environment map is a way of using a texture to fake reflections on your object. It works by taking the position of a given object and rendering an image in six directions around that object: up, down, left, right, forward, and back. These images are then mapped to the surface of your object. So, an environment map isn't exactly a procedural texture in the traditional sense, but because the environment images are taken automatically, I say it's part procedural and part image-based. Environment maps aren't as accurate as using ray traced reflection (see Chapter 7), but they can be quite a bit faster. So if you need a generically reflective surface that doesn't need to be accurate, environment maps are a handy tool that keeps your render times short. In the Environment Map panel, the Viewpoint Object field is set, by default, to be the object that you intend on mapping the texture to. However, sometimes you can get a better reflective effect by using the location of a different object, such as an Empty. Using an Empty as a Viewpoint Object is particularly useful when applying an environment map to an irregular surface.
 When using environment maps, make sure that you do two things. First, choose the Reflection option from the Coordinates drop-down menu in the Mapping panel of Texture Properties. Second, enable the Environment Map check box in the Shading panel of Render Properties. Unless you do both of these things, your environment map won't work properly.
 - Magic texture: At first glance, the Magic texture may seem to be completely useless — or at the very least, too weird to be useful. However, I've found quite a few cool uses for this eccentric little texture. If you treat the Magic texture as a bump map, it works well for creating a knit texture for blankets and other types of cloth. If you stretch the texture with your mapping controls, you can use it to re-create the thin filmy look that occurs when oil mixes with water. And, of course, you can use it to make a wacky wild-colored shirt.
- Marble texture: This texture has a lot of similarities with the Wood texture covered later in this section. However, the Marble texture is a lot more turbulent. You can use the Marble texture to create the look of polished marble, but the turbulent nature of the texture also lends itself nicely to be used as a fire texture and, to a lesser extent, the small ripples you get in ponds, lakes, and smaller pools of water.
- Musgrave texture: This procedural texture is extremely flexible and well suited for organic materials. You can use the Musgrave texture for rock cracks, generic noise, clouds, and even as a mask for rust patterns. As a matter of fact, with enough tweaking, you can probably get a Musgrave texture to look like nearly any other procedural texture. Of course, the trade-off is that this texture takes a bit longer to render than most of the other textures.
- Noise texture: Noise is the simplest procedural texture in Blender. (Well, the None texture type is probably simpler, but it's not very useful.) This texture has no custom controls of its own; it's simply raw noise, which means that you'll never get the same results twice using this texture. Each time you render, the noise pattern is different. This lack of predictability may be annoying if you're looking to do a bump map. However, if you're looking to have white noise on a TV screen, this texture is perfect.
- Point Density texture: The Point Density texture is used primarily with Blender's particle system to generate volumetric textures. These kinds of materials are well suited for creating smoke and clouds. (See Chapter 13 for more on Blender's particle system.)
- Stucci texture: Stucci is a nice organic texture that's most useful for creating bump maps. The Stucci texture is great for industrial and architectural materials like stucco, concrete, and asphalt. This texture is also handy if you just want to give your object's surface a little variety and roughen it up a bit.
- Voronoi texture: The Voronoi procedural texture doesn't have a noise basis because it's a more detailed control over the same algorithm that is used for the Voronoi noise basis options. It may be helpful to think of those basis options as presets, whereas this texture gives you full control over what you can do with the Voronoi algorithm. The Voronoi texture is pretty versatile, too. You can use it to create scales, veins, stained glass, textured metals, or colorful mosaics.
- Voxel Data texture: A voxel, short for volumetric pixel, is the three-dimensional equivalent to a pixel. The Voxel Data texture type is primarily used in Blender for smoke simulations, but you can also use it for other forms of volumetric data, such as the image slices provided by medical CT scans.
- Wood texture: The Wood texture is a bit of a misnomer. Sure, you can use it to create textures that are pretty close to what you see on cut planks of wood. However, the Wood texture has a lot more versatile uses. You can use the Wood texture to create nearly any sort of striped texture. I've actually even used it to fake the look of mini-blinds in a window.
Behold the power of the ramp!
A powerful and under-recognized tool in Blender is the ramp. A ramp is basically a gradient, and its editor interface is used in procedural textures, ramp materials, the material node editor, and even the node compositor. For materials, you can enable ramps by clicking the Ramp check box tab in the Diffuse and Specular panels of Material Properties. For procedural textures, the Ramp check box appears in the Colors panel. Ramps are a great way, for example, to adjust the color of the stripes in the Wood texture or determine which colors you want to use for your Blend texture. You can even use ramps to have a more controlled custom toon coloring than you can get with the diffuse or specular Toon shaders. The ramp editor works much like gradient editors in other programs. By default, it starts with a color positioned at either end of a colorband bar, and the color smoothly transitions from one side to the other. The color can be any value in the RGB spectrum, and, using the color picker, you also can control its transparency with the alpha value.
To change a color, first select it by either left-clicking its position in the colorband or adjusting the position value in the number field above the colorband. Color positions count up from left to right, starting at 0. So with the default arrangement, the transparent black color on the left is 0, and the white color on the right is 1. After you select the color, you can change its value by left-clicking the color swatch and using the color picker. To move the color position, you can left-click and drag it along the colorband, or you can adjust the Pos, or Position, value after you've selected it.
To add a new color position, left-click the Add button. A color position appears at the halfway point in the colorband. You can delete any position by selecting it and left-clicking the Delete button.
It may not seem like much, but mastering ramps and knowing when to use them makes your workflow for adding materials and textures much faster.