
Understanding Texture Mapping
After you create your texture, be it procedural or image-based, you're going to have to relate that texture to your material and, by extension, the surface of your object. This process is called mapping. Mapping basically consists of relating a location on a texture to a location on the surface of an object. Mapping controls are located in Texture Properties in the Mapping and Influence panels, as shown in Figure 8-4.
The Mapping panel
The Mapping panel controls how the texture is mapped to the object, defining how the texture coordinates are projected on it. The most important button is the drop-down menu labeled Coordinates. The following list explains the types of coordinate mapping available:
Figure 8-4: The Mapping and Influence panels in Texture Properties.

- Global: Choosing this option uses the scene's coordinates to define the texture space. So if you have an animated object with a texture mapped this way, the texture will seem to be locked in place as the object moves across it. Global coordinates produce kind of a strange effect, but it's helpful in a few situations, such as faking shadows on a moving character.
- Object: This neat option allows you to use a different object's location as a means of placing a texture on your object. To tell Blender which object you want to use, pick or type its name in the Object field. For example, you can load an image texture of a logo and place that logo on a model of a car by using the location, size, and orientation of an Empty.
- Generated: This option is the default, and it generates texture coordinates based on the object's local coordinates. The Generated option works fine for most situations, especially when you're using procedural coordinates.
- UV: UV coordinates are probably the most precise way of mapping a texture to an object. NURBS surfaces have UV coordinates by default. For meshes, however, getting UV coordinates requires you to go through a process called unwrapping, covered later in this chapter in the “Unwrapping a Mesh” section.
- Strand: This option is useful only when your object has a particle system with the Strand render option enabled. As the name indicates, the Strand option is intended specifically for particle strands. When activated, the texture is mapped along the length of the strand.
- Sticky (Camera coordinates): Sticky coordinates are a way of getting a somewhat precise mapping based on the location and orientation of the camera.
- Window: This option is similar to the Global coordinates option, but instead of using the scene's global coordinates, it uses the coordinates from the finished render window. In other words, it uses the camera's coordinates. But unlike Sticky coordinates, which use the camera's coordinates just once, this option always uses them. So if the object is animated, the texture is not stuck to it. It remains in place.
- Normal: Choosing this option causes the texture to be mapped according to the normal vectors along the surface of the object. This option is helpful for effects that require textures to react to the viewing angle of the camera.
- Reflection: The Reflection option uses the direction of a reflection vector to map your texture to the object. Basically, you want to use this option with an environment map texture to get fake reflections when you don't need the accuracy of ray tracing.
- Stress: Stress maps are a pretty cool option that's intended for use with dynamic or simulated geometry. The stress value is the difference between the location of an original texture coordinate and location of the coordinate when rendered. As an example, say that you have a character with stretchy arms. You can use stress mapping as a mask to make the arms more translucent the more they stretch.
- Tangent: In some ways, this option is similar to Normal coordinates. However, instead of using the surface normal, it uses an optional tangent vector to map the texture coordinates. Notice that I wrote optional tangent vector. By default, no tangent vector is on the material, so choosing this option by itself doesn't do much to it. However, if you left-click the Tangent Shading check box in the Shading panel of Material Properties, you have a tangent vector for your texture to work with.
In addition to these map inputs, you can also control what's called the texture projection. Texture projection, along with the map input, controls how the texture is applied to the mesh for everything except UV textures. Because UV textures explicitly map a texture coordinate to a coordinate on the surface of your object, changing projection doesn't have an effect on anything.
Blender has four different types of projection:
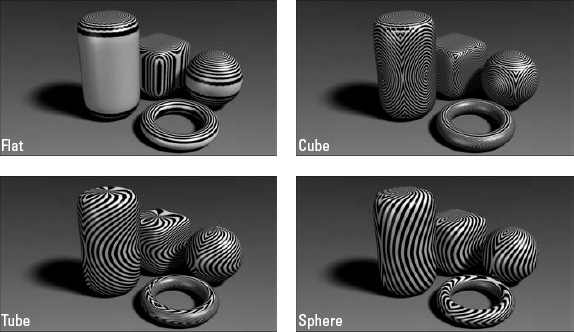
- Flat: This type of projection is the easiest to visualize. Imagine that you have your texture loaded in a slide projector. When you point the projector at a wall, you get the best results. However, if you point the slide projector at a curved or uneven surface, you get a little bit of distortion. This behavior is basically what happens with Flat projection.
- Cube: Cube projection uses the same idea as Flat projection, but instead of having just one projector, imagine that you have one pointing at the front, left, and top of your object (and shining through to the other side). The texture appears on all six sides of the cube. Of course, when you try to project on a more curved surface, you still get some seams and distortion.
- Tube: Tube projection is where the slide projector metaphor kind of stops making sense. Imagine that you have the unique ability to project on a curved surface without the distortion — of course, pretty close to impossible in the real world, but pretty trivial in computer graphics. Using Tube projection is ideal for putting labels on bottles or applying other sorts of textures to tubular objects.
- Sphere: Spherical projection is best suited for spherical objects, such as planets and balls, and it's also the cleanest way to apply a texture to an arbitrary three-dimensional surface because it usually doesn't leave any noticeable seams like Cube projection does.
Figure 8-5 shows a set of primitive objects with Flat, Cube, Tube, and Sphere projection.
Figure 8-5: Projecting textures in different ways on the same set of 3D objects.
At the bottom of the Mapping panel are fields that give you finer control over how your texture is positioned on your object. The Offset values define an offset in the X, Y, and Z directions. And the Size values scale the texture in each of those directions.
 The Offset and Size values aren't relative to the global or local coordinates in the 3D View. They're actually relative to the texture image itself. The X and Y values are horizontal and vertical, whereas the Z value is a depth value into the texture. The Z values don't have a lot of influence unless the texture is a procedural texture with a noise basis because many of those textures actually have 3D depth information.
The Influence panel
Not only do you control how a texture is mapped to an object, but you also control how that texture affects the material, thanks to the controls in the Influence panel.
![]() Each Influence value is enabled using a check box to the left of each slider. After you enable a check box, you can adjust its slider to dictate the level of influence. Most sliders span both positive and negative values, typically from -1 to 1. Using this range, values greater than 0 enables the option and increases its effect, but negative values indicate that the texture's effect on the material is inverted.
Each Influence value is enabled using a check box to the left of each slider. After you enable a check box, you can adjust its slider to dictate the level of influence. Most sliders span both positive and negative values, typically from -1 to 1. Using this range, values greater than 0 enables the option and increases its effect, but negative values indicate that the texture's effect on the material is inverted.
You can use any combination of the following options:
- Diffuse controls: Use these values to dictate how your texture influences various attributes of your material's diffuse shader. You have four options:
- Intensity: Influences the intensity value in the material's diffuse shader, controlling how much light the material reflects.
- Color: Affects the material's diffuse color.
- Alpha: Controls the transparency and opacity of the material.
- Translucency: Affects the amount of translucency in the material.
- Specular controls: These controls are like the Diffuse values, but they relate specifically to the material's specularity. You have three options:
- Intensity: Influences the strength in the material's specular shader.
- Color: Affects the material's specular color.
- Hardness: Affects the specular hardness values for the specular shaders that support it.
- Shading controls: The values here dictate how your textures influence corresponding values in the Shading panel of the Material Properties. You have four options:
- Ambient: Affects the amount of ambient light the material gets.
- Emit: Affects the material's emit value for radiosity.
- Mirror Color: Affects the material's mirror color.
- Ray Mirror: Influences the amount of ray traced reflection that the material has.
- Geometry controls: With the values in this section, your textures can actually deform geometric elements of your object, be they the face normals or the location of faces themselves. You have three options:
- Normal: Influences the direction of the surface normals on the material. Enabling this check box enables bump mapping. This option can give your object much more detail without the computational slowdown of additional geometry.
- Warp: This value actually controls how one texture in the list of textures affects the next one in the stack. Higher Warp values cause this texture to influence the coordinates of the next texture in the stack.
- Displace: This option is similar to the Normal option, except that it actually moves the geometry of the object based on the texture map. Whereas bump mapping only makes it look like geometry is added and moved around by tricking out the surface normal, displacement actually moves the geometry around. The downside to Blender's displacement is that you have to have the vertices already in place to move around. Blender won't create the vertices for you on the fly. You can use the Subdivision Surface modifier to get around this a bit, but creating your additional vertices with that tool definitely increases your render times.