
Working with the Video Sequence Editor
The default Video Editing screen layout in Blender is accessible through the Screens datablock in the header or by pressing Ctrl+← three times from the Default screen layout. The large editor across the middle of the layout is a Video Sequence Editor (VSE) in Sequencer view. In this view, you can add and modify sequences, called strips, in time. The numbers across the bottom of the Sequencer correspond to time in the VSE in seconds. The numbers to the left are labels for each of the tracks, or channels, that the strips live in. The upper left area is a Graph Editor, used in this case for tweaking the influence or timing of individual strips' properties. To the right of the Graph Editor is a VSE in Preview view. When you're editing, the footage under the time cursor appears here. At the bottom is a Timeline, which, at first, may seem odd. However, as when animating, the benefit of having the Timeline around all the time is that you can use the Sequencer to edit a specific portion of your production, while still having the ability to scrub the full piece. The playback controls are also handy to have onscreen.
![]() As with the Animation layout (see Chapter 10), I like to make a few tweaks to the Video Editing layout. When I first start editing in Blender's VSE, I'm usually more concerned with importing image sequences and movie clips than I am with tweaking the timing of edits. So one of the first changes I make is swapping the Graph Editor for a File Browser with files set to display thumbnails. This way, you can easily drag and drop footage from the File Browser directly onto the Sequencer. You may also note that you're missing the Properties editor. While you're in the process of editing, the Properties editor isn't critical to have open, but it's useful when you're doing your initial setup. For that reason, I often split the Sequencer and make a narrow strip on the right a Properties editor (Shift+F7). Figure 15-1 shows my modified Video Editing layout.
As with the Animation layout (see Chapter 10), I like to make a few tweaks to the Video Editing layout. When I first start editing in Blender's VSE, I'm usually more concerned with importing image sequences and movie clips than I am with tweaking the timing of edits. So one of the first changes I make is swapping the Graph Editor for a File Browser with files set to display thumbnails. This way, you can easily drag and drop footage from the File Browser directly onto the Sequencer. You may also note that you're missing the Properties editor. While you're in the process of editing, the Properties editor isn't critical to have open, but it's useful when you're doing your initial setup. For that reason, I often split the Sequencer and make a narrow strip on the right a Properties editor (Shift+F7). Figure 15-1 shows my modified Video Editing layout.
The settings in the Dimensions panel amid the Render Properties are important for editing in Blender because that's where you set the frame rate, measured in frames per second (fps), and resolution for the project. If you're editing footage that runs at a different frame rate or resolution than the one that is set here, that footage is adjusted to fit. So if your project is at standard HD settings (24 fps and 1920 x 1080 pixels in size), but you import an animation rendered at 50 fps and at a size of 640 x 480 pixels, the footage appears stretched and in slow motion.
Figure 15-1: A customized Video Editing layout for when you start a project.

Besides your Render Properties, the Properties region of the Sequencer is relevant to your editing process. Because the default layout doesn't have any strips loaded, this region appears as a blank section on the right side of the Sequencer. However, if you have a strip in the Sequencer and you have it selected, this region is populated and appears like the image in Figure 15-2.
Figure 15-2: The Sequencer's Properties region gives you controls on a selected strip.

As you may guess, the Properties region has the most relevant options for working in the VSE. Five panels are available: Edit Strip, Strip Input, Effect Strip, Filter, and Proxy. For most strip types, the Edit Strip, Strip Input, and Filter panels are available. The Effect Strip and Proxy panels are available only for certain types of strips. For example, audio strips can't have proxies, so that panel doesn't show up when you select a strip of that type.
Following are descriptions for the most commonly used panels:
- Edit Strip: The buttons in this panel pertain to where a selected strip appears in the VSE and how it interacts with other strips. You can name individual strips, control how a strip blends with lower channels, mute or lock a strip, set the strip's start frame, and change the strip's channel.
- Strip Input: The buttons in this panel allow you to crop and move the strip around the frame, as well as control which portion of the strip shows up in the Sequencer. When you have an audio strip selected, this panel has a few different controls and is labeled Sound.
- Effect Strip: This panel only appears for certain effect strips that have editable attributes. I give more detail on some effects that use this panel in the section “Adding effects,” later in this chapter. The Timeline at the bottom of the screen controls how Blender plays your sequence. However, the most relevant button for the VSE is the Sync drop-down menu. To ensure that your audio plays back in sync with your video while editing, make sure that this drop-down menu is either set to AV-sync or Frame Dropping. Of the two, I tend to get better performance when I choose the latter. Nothing is worse than doing a ton of work to get something edited only to find out that none of the audio lines up with the visuals after you render. Figure 15-3 shows the options in the Sync drop-down menu of the Timeline.
Figure 15-3: Choose Frame Dropping or AV-sync to ensure that your audio plays back in sync with your video.

 Before I get heavily into using the VSE, let me first say that Blender's VSE is not a complete replacement for a traditional NLE. Although it is a very powerful tool, the VSE is best suited for animators who want to create a quick edit of their work. Professional video editors may have trouble because VSE is missing a number of expected features, such as a listing of available footage, sometimes called a clip library or bin. You can use the File Browser in thumbnail view to partially emulate the behavior of a bin, but it's still not quite the same. That said, all three of the open movie projects — Elephants Dream, Big Buck Bunny, and Sintel — were successfully edited using Blender's VSE. I find the VSE more than sufficient for quite a few of my own projects, so you ultimately have to decide for yourself.
Adding and editing strips
![]() If you want to use the VSE to edit footage, you have to bring that footage into Blender. If you're using the modified Video Editing screen layout I describe in the preceding section in this chapter, you can use the File Browser and navigate to where your footage is. Then you can just drag and drop that file from the File Browser directly into the Sequencer. The ability to drag and drop from the File Browser is one of the handy new features added in the Blender 2.5 overhaul. Alternatively, you can add a strip by hovering your mouse cursor in the Sequencer and pressing Shift+A (just like adding objects in the 3D View). Figure 15-4 shows the menu of options that appears.
If you want to use the VSE to edit footage, you have to bring that footage into Blender. If you're using the modified Video Editing screen layout I describe in the preceding section in this chapter, you can use the File Browser and navigate to where your footage is. Then you can just drag and drop that file from the File Browser directly into the Sequencer. The ability to drag and drop from the File Browser is one of the handy new features added in the Blender 2.5 overhaul. Alternatively, you can add a strip by hovering your mouse cursor in the Sequencer and pressing Shift+A (just like adding objects in the 3D View). Figure 15-4 shows the menu of options that appears.
Figure 15-4: The Add Sequence Strip menu.

Generally speaking, you can import five primary kinds of strips: scenes, movies, still images, audio, and effects. These strips are represented by the following options in the menu:
- Scene: Scene strips are an extremely cool feature unique to Blender. When you select this option, a secondary menu pops up that allows you to select a scene from the .blend file you're working in. If you use a single .blend file with multiple scenes in it, you can edit those scenes together to a final output sequence without ever rendering out those scenes first! This handy feature allows you to create a complete and complex animation entirely within a single file. Scene strips are also a great way to use Blender for overlaying graphics, like titles, on video.
- Movie: When you select this option, the File Browser that comes up allows you to select a video file in one of the many formats Blender supports. On files with both audio and video, Blender loads the audio along with the video file as separate strips in the sequencer.
- Image: Selecting this option brings up a File Browser that allows you to select one or more images in any of the formats that Blender recognizes. If you select just one image, the VSE displays a strip for that one image that you can arbitrarily resize in time. If you select multiple images, the VSE interprets them as a sequence and places them all in the same strip with a fixed length that matches the number of images you selected.
- Sound: This option gives you a File Browser for loading an audio file into the VSE. When importing audio, you definitely want to import sound files in WAV format, which gives you the best quality sound. Although Blender supports other audio formats like MP3, they're often compressed and sometimes sound bad when played.
- Effect Strip: This option pops out a secondary, somewhat lengthy, menu of options. These strips are used mostly for effects and transitions. I cover them in more depth in the next section.
When you load a strip, it's brought into the VSE under your mouse cursor. Table 15-1 shows helpful mouse actions for working efficiently in the VSE.
Table 15-1 Helpful Mouse Actions in the VSE
| Mouse Action | Description |
| Right-click | Select strip to modify. Right-clicking the arrow at either end of the strip selects that end of the strip and allows you to trim or extend the strip from that point. |
| Shift+right-click | Select multiple strips. |
| Middle-click | Pan the VSE workspace. |
| Ctrl+middle-click | Zoom height and width of the VSE workspace. |
| Scroll wheel | Zoom the width in and out of the VSE workspace. |
| Left-click | Move the time cursor in the VSE. Left-clicking and dragging scrubs the time cursor, allowing you to view and hear the contents of the Sequencer as fast or slow as you move your mouse. |
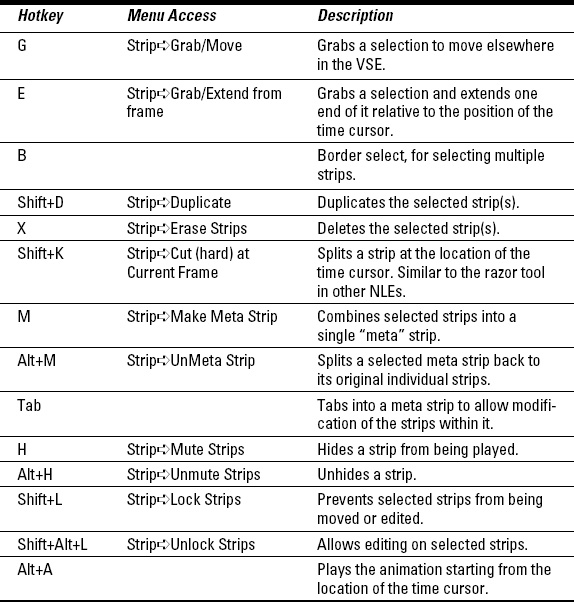
One thing you may notice is that quite a few of the controls are very similar to those present in other parts of Blender, such as the 3D View and Graph Editor. This similarity is also true when it comes to the hotkeys that the VSE recognizes, although a few differences are worth mentioning. Table 15-2 lists some the most common hotkeys used for editing.
Table 15-2 Common Features/Hotkeys in the VSE
Editing in the Sequencer is pretty straightforward. If you have two strips stacked in two channels, one above the other, when the timeline cursor gets to them, the strip that's in the higher channel takes priority. By default, that strip simply overrides, or replaces, any of the strips below it. You can, however, change this behavior in the Edit Strip panel of the Sequencer's Properties region. The drop-down menu labeled Blend controls the blend mode of the selected strip. You can see that the default setting is Replace, but if you left-click this button, you get a short list of modes similar to the layer blending options you see in a program like Photoshop or GIMP. Besides Replace, the ones I use the most are Alpha Over and Add.
The Graph Editor is useful for animating all kinds of values in Blender, and it's quite useful for strips in the Sequencer. One of the primary animated values for strips is the Opacity slider in the Edit Strip panel. This slider controls the influence factor that the strip has on the rest of the sequence. For example, on an image strip — say, of a solid black image — you can use the Graph Editor to animate the overall opacity of that strip. Values less than 1.0 make the image more transparent, thereby giving you a nice way to create a controlled fade to black. The same principle works for sound strips, using the Volume slider in the Sound panel of the Sequencer's Properties region. A value of 1.0 is the sound clip's original loudness and it gradually fades away the lower you get. Values greater than 1.0 amplify the sound to a level greater than the original volume.
By combining the Graph Editor with Blending modes, you can create some very cool results. Say that you have a logo graphic with an alpha channel defining the background as transparent, and you want to make the logo flicker as if it's being seen through poor television reception. To make the logo flicker, follow these steps:
- Add a logo image to the Sequencer (Shift+A
 Image).
 - Make sure that the logo's strip is selected (right-click) and, in the Edit Strip panel, change the strip's blend mode to Alpha Over.
- Insert a keyframe for the strip's opacity (right-click Opacity in the Edit Strip panel and choose Insert Keyframe).
- In the Graph Editor, tweak the Opacity f-curve so that it randomly bounces many times between 1.0 and 0.0 (Ctrl+left-click).
After tweaking the curve to your taste, you should now have your flickering logo effect.
Adding effects
Pressing Shift+A in the VSE provides you with quite a few options other than importing audio and video elements. A large portion of these options are effects, and many typically require that you select two strips that are stacked on top of each other in the VSE. When necessary, I point out which effects these are.
![]() Pay close attention to the order in which you select your strips because it often has a dramatic influence on how the effect is applied. The second strip you select is the active strip and the primary controller of the effect.
Pay close attention to the order in which you select your strips because it often has a dramatic influence on how the effect is applied. The second strip you select is the active strip and the primary controller of the effect.
Here's a list of the available options:
- Add/Subtract/Multiply: These effects are the same as the blend mode settings in the Edit Strip panel of the Properties region. Unless you really need some special control, I recommend using those blend modes rather than adding these as effects sequences. It works just as well and keeps your Sequencer from getting too cluttered. Using these effects requires that you select two strips before pressing Shift+A and adding any of them. As an example of how to use them, select the strip you want to start with and then Shift+right-click the strip you want to transition to. Next press Shift+AEffect StripAdd. A new red strip is created that's the length of the overlap between your two selected strips. On playback (Alt+A), the bright parts of the upper strip amplify the overlaying bright parts of the lower strip.
- Alpha Over/Alpha Under/Over Drop: These effect strips control how one strip's alpha channel relates to another. They're also available as Blending modes, and I suggest that you apply these effects that way in most cases. One example of a time where it makes sense to use these as strips is if you need to stack more than one of these effects together or if you need to use an f-curve to individually control the effect. Otherwise, stick with the blend mode.
- Cross/Gamma Cross: These effects are crossfades or dissolves between overlapping strips. The Cross effect also works in audio to smoothly transition from one sound to another. Gamma Cross works the same as Cross, but takes the additional step of correcting the color in the transition for a smoother dissolve.
- Plugin: Some people in the Blender community have written plug-ins for the VSE. Choosing this option opens a File Browser so that you can select the plug-in on your hard drive and load it into Blender. Please note that as of this writing, the plug-ins for the VSE weren't working. Hopefully, the kind Blender developers have fixed the problem by the time this book hits shelves.
- Wipe: Wipe is a transition effect like Cross and Gamma Cross. It transitions from one strip to another like a sliding door, à la the Star Wars movies. This effect also uses the Effect Strip panel in the Properties region to let you choose the type of wipe you want, including single, double, iris, and clock wipe. Also, you can adjust the blurriness of the wiping edge and the direction the wipe moves.
- Glow: The Glow effect works on a single strip. It takes a given image and makes the bright points in it glow a bit brighter. Ever wonder how some 3D renders get that glowing, almost ethereal quality? Glow is one way to do it. The Effect Strip panel in the Properties region lets you adjust the amount of glow you have and the quality of that glow.
- Transform: This effect provides very basic controls for the location, scale, and rotation of a strip. The effect works on a single strip, and you can find its controls on the Effect Strip panel of the Properties region. You can use f-curves on this effect strip to animate the transform values.
- Color: This handy little option creates an infinitely sized color strip. You can use this effect to do fades or set a solid background color for scenes.
- Speed Control: With the Speed Control effect, you can adjust the playback speed of individual strips. In the Effect Strip panel of the Properties region, you can choose to influence the Global Speed (1.0 is regular speed; setting it to 0.50 makes the strip play half as fast; setting it to 2.0 makes it play twice as fast). You can also have more custom control using the Graph Editor.
- Multicam Selector: If you're using Scene strips in the Sequencer and you have multiple cameras in your scene, you can use this effect strip to dictate which camera you're using from that scene. As with most things in Blender, you can animate that camera choice, allowing you to easily do camera switching in your scene.
Rendering from the Video Sequence Editor
To render your complete edited sequence from the VSE, the steps are largely identical to the ones outlined for creating a finished animation in Chapter 14. Actually, you must do only one additional thing.
In the Render Properties, have a look in the Post Processing panel. Make sure that the Sequencer check box is enabled. Activating this check box lets Blender know that you want to use the strips in the Sequencer for your final output rather than anything that's in front of the 3D camera. If you don't enable this check box, Blender just renders whatever the camera sees, which may be just the default cube that starts with Blender, or whatever else you might place in front of the 3D camera.