
Practical Example: Coloring the Eye
If you follow the practical example in Chapter 5, you should have a model of an eye that has the boring, plastic default gray material. If you haven't modeled that eye, don't worry; it's on the companion DVD for this book as well as the companion Web site. The purpose of this practical example is to make that eye look more like an actual eye and less like a gray ball.
Setting up a Materials screen
When working with materials in Blender, you find out very quickly that you often have to scroll the Properties editor or you frequently have to switch between different sections of the Properties editor. This fact is even more apparent when you start working with textures (see Chapter 8). What it comes down to is that the default screen layout is inadequate for working with materials. The best way to alleviate that problem is to create your own screen layout that shows you all the information you need all at once.
To start, I recommend that you set up this new screen from a fresh Blender scene, so either open Blender now or reload the startup file by pressing Ctrl+N. This way, after you set up this new screen, you can include it with your startup file and it will be available for you in all your future Blender sessions.
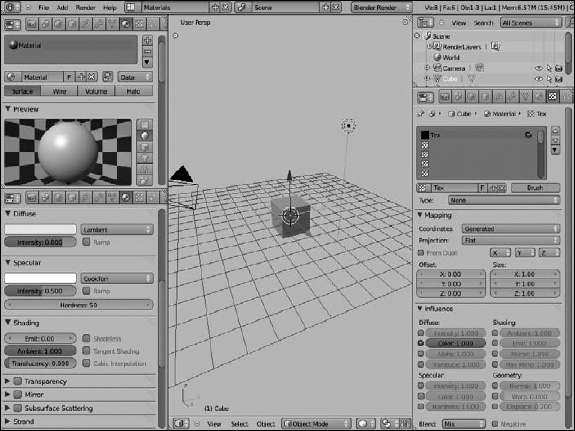
With your new scene loaded, go to the header at the top of the Blender window and use the Plus (+) button on the right of the screen datablock to add a new screen. When you do so, not much will appear to change, aside from the screen name now showing as Default.001. Left-click the text field in the screen datablock and change the name of this new screen to"Materials. Now you can actually edit the screen layout to suit your needs. I tend to like the layout shown in Figure 7-14.
Figure 7-14: A new screen layout for working with materials in Blender.
To get this screen layout, use the following steps:
- Remove the Timeline at the bottom of the screen.
If you're not sure how to split and join areas in Blender, see Chapter 2.
- Vertically split the 3D View so that you have a narrow column on the left side of the window.
- Change your new area to a Properties editor (Shift+F7).
- Flip the header of your new Properties editor to the top of the area.
To do so, hover your mouse over the header and press F5 or right-click the header and choose Flip to Top.
- Set your new Properties editor to display Material Properties.
- Split this new Properties editor horizontally, showing just enough space to see the material preview panel in the upper area.
This way, you can always see what your materials look like as you make adjustments in the lower Properties editor.
- Change the right-side Properties editor to show Texture Properties.
This step isn't really necessary at this point, but it will be useful down the road.
- Switch back to the Default screen layout (Ctrl+←
 Ctrl+←) and save user settings to your startup file (Ctrl+U).
Now, whenever you start Blender, you have a Materials screen that you can jump to for editing materials on a model.
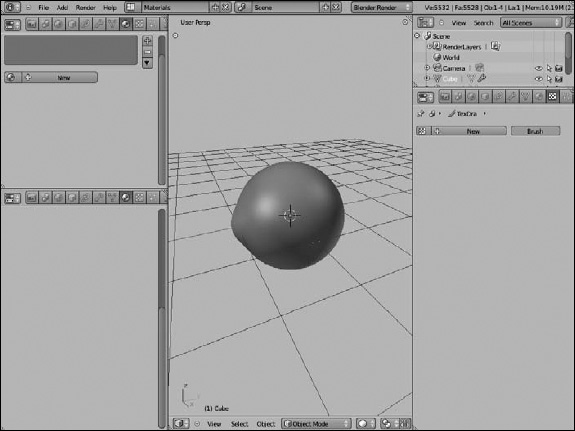
At this point, you can load the eye .blend file (F1) and begin working on its materials. One note: Because the eye model was created before you made your custom Materials screen, if you simply double-click the .blend file and load it outright, you won't see your Materials screen in the screens datablock. To get around this issue, look to the left region on the side of Blender's File Browser. Disable the Load UI check box near the bottom of that region. After you do that, you can double-click the eye .blend file you want to load. Now you should be able to look in the screens datablock and choose your custom Materials screen. Your Blender window should now appear something like the window shown in Figure 7-15.
The easy part: Material slots
Now to play with materials! Specifically speaking, you need to create two materials for the eye: one for the cornea/sclera around the eye and another for the eye interior.
Creating the cornea material
To create the cornea material:
- Left-click the New button in the material datablock of Material Properties and name this material cornea.
The cornea and sclera wrap around the eye, so the layer is transparent.
Figure 7-15: The eye model loaded in a custom Materials screen layout.
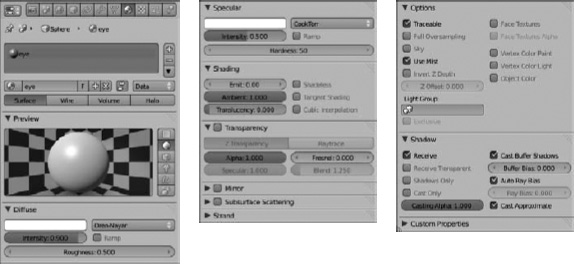
- Enable the Transparency check box in Material Properties and reduce the Alpha setting down to 0.500.
The material preview updates, but the 3D View has no apparent effect.
- Go to Object Properties and enable the Transparency check box in the Display panel.
I like doing this in the right-hand Properties editor in the custom Materials screen created in the preceding section. Figure 7-16 highlights the controls for enabling transparency in the 3D View.
- Return to Material Properties and make the following adjustments to your cornea material:
- Diffuse Shader: Oren-Nayer
- Diffuse Roughness: 0.300
- Specular Shader: WardIso
- Transparency Fresnel: 3.000
- OptionsTraceable: Disabled
- ShadowCast Buffer Shadows: Disabled
The last two settings are particularly useful because by disabling them, you prevent your cornea from casting a shadow upon the interior of the eye. If later, when you render a character with these eyes, the eyes render in all black, chances are good that you forgot to disable these material settings.
Figure 7-16: Enabling transparency in the 3D View.

Building a base material for the eye interior
After the cornea material is complete, you can work on the interior elements. Currently, the entire eye is the same transparent material as the cornea; that's not likely what you want. In that case, you need to create a new material:
- Return to the top of Material Properties and add a new material slot by left-clicking the plus (+) button next to the material list box.
This step creates a duplicate of your cornea material, named cornea.001.
- Rename this material eye.
Your new material still has the same settings as the cornea material.
- Make the following adjustments to the settings in the Material Properties:
At this point, you've created a base texture for the interior of the eye that looks something like the preview image shown in Figure 7-17.
Figure 7-17: A base material for the eye's interior components.
Assigning the base material to interior faces
Of course, although you created a new material for the eye's interior, that material has not yet been assigned to any faces of your model.
- Tab into Edit mode and make sure that no faces are selected.
You can do so by pressing A until nothing is selected.
- Select all the linked faces for the cornea/sclera by hovering your mouse on the exterior faces of the mesh and pressing L.
- Hide the selected faces (H) and then select all visible faces (A).
- In the Context section of Material Properties, click the Assign button to assign the eye material to the selected faces.
- Tab back into Object mode.
Your results should appear like the image in Figure 7-18.
Figure 7-18: The eye model with a transparent material wrapped around a solid white interior material.

Creating a pupil
Now you need to create a material slot for the eye's pupil. Using the same basic steps described in the earlier section, “Building a base material for the eye interior,” create a new material slot for your pupil.
- Left-click the plus (+) button next to the material list box in Material Properties.
- Rename your new material pupil.
- Make the following adjustments to Material Properties:
- Diffuse Color: Black
- ShadingShadeless: Enable
- Use the same basic steps described earlier in the “Assigning the base material to interior faces” section to assign your new pupil material to the central faces of the eye.
When you finish, your result should appear like Figure 7-19.
Figure 7-19: The eye now has a pupil.

From here, you have two options. The easiest thing would be to create another material slot for the eye's iris. And if you're not too worried about detail, that could very easily be enough. However, if you want a bit more detail, you may want to use Blender's Vertex Paint feature to give you colors with more subtle variations than just straight material slots can get you.
Getting more detailed with Vertex Paint
In this section, you can get more detailed and subtle color results for the main body of the eye. Before you bolt face-first into Vertex Paint mode, you should first make sure that your painting gets rendered:
- Select the eye material in the list box at the top of Material Properties.
- Enable the Vertex Color Paint check box in the Options panel.
Now you're ready to start painting.
Painting the iris and the back of the eye
If you go to Vertex Paint mode (V) right now, the eye model changes into a solid white blob. This setup isn't a particularly nice way to paint your vertices. Not only can you not determine what parts of the eye you're looking at, you also only have access to painting the exterior cornea/sclera of the eye. The interior parts of the eye model are completely obscured and inaccessible. Fortunately, there's a way around this issue. Left-click the Face Selection for Masking button in the 3D View's header. Upon doing so, you see a shaded version of your interior eye model with light wireframe lines drawn over the surface.
![]() You may be wondering why the exterior faces of the eye model disappeared. Well, earlier in this practical example, you went into Edit mode, selected the external faces (L), and hid them (H). When you're in Vertex Paint mode and you enable the Face Selection Masking button, Blender shows only the faces that are visible in Edit mode. It's a pretty handy trick for Blender's various paint modes in the 3D View.
You may be wondering why the exterior faces of the eye model disappeared. Well, earlier in this practical example, you went into Edit mode, selected the external faces (L), and hid them (H). When you're in Vertex Paint mode and you enable the Face Selection Masking button, Blender shows only the faces that are visible in Edit mode. It's a pretty handy trick for Blender's various paint modes in the 3D View.
![]() Another handy tip to keep in mind is that any faces you selected in Edit mode persist in Vertex Paint mode when you have the Face Selection Masking button enabled. Although most of Blender's selection tools (right-click, border select, circle select, lasso select) work in Vertex Paint mode with Face Selection Masking, some of the useful selection operations, like loop select (Alt+right-click), don't work. If you need to select a loop, you can quickly tab into Edit mode, do your loop selection, and tab back out to Vertex Paint mode.
Another handy tip to keep in mind is that any faces you selected in Edit mode persist in Vertex Paint mode when you have the Face Selection Masking button enabled. Although most of Blender's selection tools (right-click, border select, circle select, lasso select) work in Vertex Paint mode with Face Selection Masking, some of the useful selection operations, like loop select (Alt+right-click), don't work. If you need to select a loop, you can quickly tab into Edit mode, do your loop selection, and tab back out to Vertex Paint mode.
In fact, to select the faces that make up the eye's iris, loop selecting is exactly what I recommend you do:
- From Vertex Paint mode with Face Selection Masking, tab to Edit mode.
- Use Blender's loop select operation (Alt+right-click) to select the faces that make up the eye's iris.
- Tab back into Vertex Paint mode and paint your iris using the vertex paint tools.
When you do your vertex painting, it affects only the currently selected faces.
- Tab back to Edit mode and invert your face selection (Ctrl+I).
You should have everything other than the iris selected. You may also want to deselect the faces of the pupil, but because they're assigned to another material, that's really not necessary.
- Tab back into Vertex Paint mode to paint red and pink tones around the back of the eye.
When you finish, the result should look something like Figure 7-20.
Figure 7-20: Using Vertex Paint mode to paint details for the eye.

Seeing your vertex colors in the 3D View
If you pop back into Object mode, your freshly painted vertex colors may not appear on your model. Don't worry, though, they're definitely there. To see your colors in the 3D View, you need to adjust your display settings. The first thing you need to do is switch your 3D View to the Textured Viewport Shading mode (Alt+Z). By default, the results aren't particularly pleasant. The transparency of your cornea is no longer apparent, and the front of the eye is probably completely darkened.
This ugliness is actually caused by two things: your display settings for the 3D View and your light placement in your scene. To deal with the former, bring up the Properties region of the 3D View (N) and go down to the Display panel. This panel contains a drop-down menu labeled Shading. By default, this menu is set to Multitexture. Left-click the menu and choose GLSL. Assuming that you have a suitably modern video card, the results in your 3D View should already be improved. Of course, the front of the eye is still dark.
To deal with the darkness at the front of the eye, simply select the lamp in your scene, grab it (G), and move it so that it's in front of the eye. Moving the lamp should illuminate the iris and pupil of the eye model. If the eye is still too dark for you, you can duplicate the lamp (Shift+D) a couple times and move those duplicated lamps around your scene to more clearly light the scene. Chapter 9 has more detailed information about lighting in Blender. When you're satisfied, you can hit F12 and kick out a quick render to see what it looks like. Figure 7-21 shows an example of what the eye might look like in the 3D View.
Figure 7-21: The eye, colored with material slots and vertex colors.
