
Sculpting Multiresolution Meshes
Over the years, as computers have gotten more powerful and more capable of handling dense high-poly models with millions of vertices, computer graphics artists have wanted more and more control over the vertices in their meshes. Using a Subdivison Surface modifier is great for adding geometry to make models look more organic, but what if you're modeling a monster and you want to model a scar in his face? You have to apply the modifier to have access and control over those additional vertices. And even though the computer may be able to handle having them there, a million vertices is a lot for you to try to control and keep track of, even with all the various selection methods and the Proportional Edit Tool. Fortunately, Blender supports multiresolution meshes and Sculpt mode.
Multiresolution (or multires) meshes address the problem of having to apply the Subdivision Surface modifier before you can directly control the vertices that it creates. With a multires mesh, you can freely move between a level 1 subdivision and a level 6 subdivision, just like with the Subdivision Surface modifier. However, the difference is that you can directly control the vertices of the level 6 subdivision just as easily as the level 1 subdivision by using Blender's Sculpt mode. And you can see changes made in either level — to varying levels of detail, depending on the level you're looking at. (If you make a very fine detail change in level 6, it may not be readily apparent at level 1.)
Something new: The Multiresolution modifier
![]() Adding multires capabilities to a mesh used to be a process handled outside of the modifier stack. While this method worked fine, mixing the benefits of multires meshes with changes made by modifiers was difficult. You couldn't easily animate multires meshes with an armature or give them particle hair. As of Blender 2.5, those limitations no longer exist. Creating a multires mesh now is just like adding any other modifier to a mesh object. Figure 5-16 shows what the Multiresolution modifier block looks like.
Adding multires capabilities to a mesh used to be a process handled outside of the modifier stack. While this method worked fine, mixing the benefits of multires meshes with changes made by modifiers was difficult. You couldn't easily animate multires meshes with an armature or give them particle hair. As of Blender 2.5, those limitations no longer exist. Creating a multires mesh now is just like adding any other modifier to a mesh object. Figure 5-16 shows what the Multiresolution modifier block looks like.
Figure 5-16: The Multi-resolution modifier block with a couple levels of subdivision added.
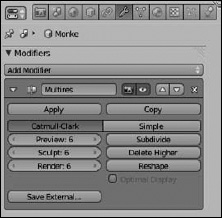
The Multiresolution modifier is similar in appearance to the Subdivision Surface modifier. By default, the Multiresolution modifier starts with zero subdivisions on your mesh. Use the Subdivide button to increase the level of subdivision that you want to add to your mesh. Subdividing increments the values for Preview, Sculpt, and Render. Like the View and Render values in the Subdivision Surface modifier, these values control how many levels of subdivision you see in the 3D View, both while sculpting and when your model is rendered, respectively.
However, unlike with the Subdivision Surface modifier, you don't have exactly six levels of subdivision to switch between. In the Multiresolution modifier, the number can be as low as zero and as high as your computer's processor and memory can handle. And before adding a level, you have the option of choosing Catmull-Clark Subdivision or Simple Subdivision, like you can with the Subdivision Surface modifier.
 The only caveat is that you can't freely change between subdivision types on a given level with the Multiresolution modifier. Changing from Catmull-Clark to Simple (or vice versa) has an effect on all multires levels.
![]() If you have a Subdivision Surface modifier on your mesh, I recommend applying it to your mesh or removing it from the modifier stack before adding the Multiresolution modifier. Because the Multiresolution modifier uses the same process to create subdivision levels, you really don't need to have both active at the same time.
If you have a Subdivision Surface modifier on your mesh, I recommend applying it to your mesh or removing it from the modifier stack before adding the Multiresolution modifier. Because the Multiresolution modifier uses the same process to create subdivision levels, you really don't need to have both active at the same time.
After you have a level added, you have some additional options available. Clicking Delete Higher removes all subdivision levels greater than the level you're currently in. So if you have five levels of subdivision and you're at level 3, clicking Delete Higher effectively kills levels 4 and 5.
Enabling the Optimal Draw check box does the same thing that the corresponding check box does in the Subdivision Surface modifier: It prevents Blender from showing subdivided edges in the 3D View. Some 3D modelers who use sculpting tools like to overlay the model's wireframe on the mesh (Object Properties![]() Display
Display![]() Wire check box) as they work so that they can have an idea of how their topology looks. (See the sidebar “The importance of good topology” in this chapter for more information.) Without Optimal Draw enabled, the 3D View of your model can quickly get cluttered, so enabling this check box simplifies the display for you.
Wire check box) as they work so that they can have an idea of how their topology looks. (See the sidebar “The importance of good topology” in this chapter for more information.) Without Optimal Draw enabled, the 3D View of your model can quickly get cluttered, so enabling this check box simplifies the display for you.
Now, if you try to tab into Edit mode on a multires mesh, you still see only the vertices available to you in the cage provided by the base mesh. So how do you actually edit all those additional vertices created by the Multiresolution modifier? The answer: Sculpt mode. Sculpt mode treats your mesh very much like a solid piece of clay. You have a variety of sculpt brushes that help you shape and form your mesh to look exactly how you want. You can activate Sculpt mode from the Mode menu in the 3D View's header. When you're in Sculpt mode, the Tool Shelf (T) updates to show a whole set of options available to you for editing your mesh.
![]() If you have a drawing tablet like the ones manufactured by Wacom, Sculpt mode takes advantage of the pressure sensitivity that a tablet offers.
If you have a drawing tablet like the ones manufactured by Wacom, Sculpt mode takes advantage of the pressure sensitivity that a tablet offers.
When working in Sculpt mode and using the Multiresolution modifier, the general workflow is to start at low levels of subdivision to block out the rough shape of your model and then proceed to higher levels of subdivision for more detailed elements of your model. The process is very much like traditional sculpting in meatspace, as well as box modeling in the CG world. The only difference in this case is that the Multiresolution modifier allows you to freely move between high and low levels of subdivision, so you don't have to block out your whole model in a single go.
Nothing says that you're required to use the Multiresolution modifier when sculpting in Blender. In fact, Sculpt mode works just fine without any Multiresolution modifier at all. That said, you have far more flexibility and artistic control over your model if you do take advantage of the multiple levels of detail that the Multiresolution modifier provides.
Sculpting options
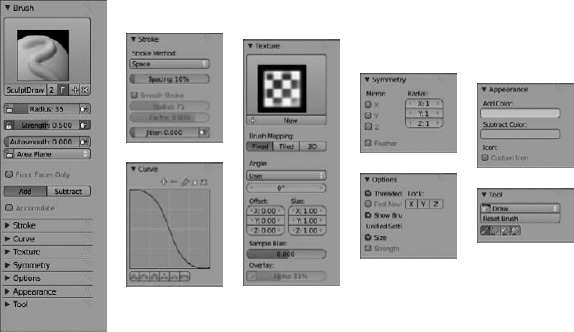
Figure 5-17 shows the contents of the Tool Shelf when you're in Sculpt mode. The buttons in these panels — Brush, Stroke, Curve, Texture, Symmetry, Options, Appearance, and Tool — are for customizing your sculpt brushes as you work.
Figure 5-17: The Sculpt panel.
Brush types
As you work your way down the Tool Shelf, you get finer and finer control of your brush. In fact, the first panel, Brush, just contains a list of brush datablocks, which serve as presets for all the subsequent settings in the Tool Shelf. Switch your brushes by clicking on the brush icon above the datablock and choose the preset brush you're interested in. By default, 19 presets appear in this list, each one modifying your mesh in a very specific way. All brushes work by left-clicking with the brush cursor over the mesh and dragging your mouse cursor around the 3D View. Due to this brush-style of editing, using a drawing tablet can be very beneficial.
Due to space constraints in this book, I can't cover each of the available sculpt brush presets. Here are brief descriptions of some of the most used sculpt brushes in the list:
- Clay: The Clay brush is pretty unique among Blender's sculpt brushes. Its primary purpose is to make large changes, adding or subtracting volume from your base mesh and dealing with details later. The Clay brush is also useful for merging unlinked meshes within the same object.
- Flatten: The Flatten brush lowers vertices to try and get them to be as flat, or planar, as possible. If you're sculpting a landscape and you decide to remove a hill, this brush is the one to use.
- Grab: When you left-click and drag your mouse cursor on a mesh with the Grab brush activated, the vertices that are within the brush cursor's circle are moved to wherever you drag your mouse to. Grab is like selecting a bunch of vertices in Edit mode and pressing G.
- Inflate/Deflate: When you run the Inflate brush over your mesh, vertices move outward along their own local normals. If the Subtract button in the Brush panel is enabled, the vertices move inward. This brush is good for fattening or shrinking parts of a model.
- Layer: The Layer brush is like the SculptDraw brush with a maximum height that it pulls the vertices, basically creating a raised mesa on the surface of your mesh.
- Pinch/Magnify: If you enable the Pinch brush, vertices are pulled toward the center of your brush cursor as you move it over the mesh. Pinch is a great way to add ridges and creases to a model.
- SculptDraw: The SculptDraw brush is the default brush and it basically pulls the surface of your mesh outward (or inward, if you enable the Subtract button in the Brush panel). By default, the brush works with an even falloff, so the raised areas you draw tend to flow smoothly back into the rest of the mesh.
- Smooth: If you have jagged parts of your mesh or undesirable surface irregularities created while sculpting, using the Smooth brush cleans up those bumpy parts and makes the surface of your mesh, well, smoother.
- Snake Hook: The Snake Hook brush is very similar to the Grab brush except it gives you more control over what you can do when you pull the vertices away from the main portion of your mesh. With enough geometry, you can actually sketch in 3D with the Snake Hook brush. It's useful for making things like spines, tentacles, and dreadlocks.
- Twist: Most of the other Sculpt mode brushes are primarily means of translating or scaling vertices. The Twist brush, in contrast, is a brush for rotating vertices in your mesh. When you left-click and drag your mouse on your mesh, the brush remains stationary and the position of your mouse cursor determines how much the vertices within the area of your brush rotate.
Brush controls
The Radius and Strength sliders below the list of brush datablocks control the size and strength of the brush you're currently using. You can use hotkeys for changing these values while in the 3D View so that you don't have to constantly return to the Tool Shelf:
- To change brush radius, press F, move your mouse until the brush cursor is the desired size, and left-click to confirm.
- To adjust the brush strength, press Shift+F and move your mouse cursor toward the center of the circle that appears to increase the strength or away from the center to decrease the strength. When you're at the strength you want, left-click to confirm.
The importance of good topology
If you listen to modelers talk or if you visit some of the Web forums where 3D modelers hang out, you'll hear the words topology and edge flow pretty often. These concepts are very important for a modeler, particularly if your model is destined to be animated. These terms refer to how the vertices and edges of your mesh lay out across its surface. Even when sculpting, 3D modelers will often use a base mesh that has good topology as their starting point. Or, when they're done sculpting, they'll take the model through a process known as retopology to give it a clean edge flow that's usable in animation. To that end, whether you're sculpting or just straight modeling, keep a few key guidelines in mind:
- Use quads. Try to avoid triangles whenever possible. Four-sided polygons look better when subdivided, and they also tend to deform more cleanly when an armature is used to animate them.
- Minimize the use of poles that don't have four edges. Remember that a pole is where multiple edges join at a single vertex. The UV Sphere mesh has two large poles at its top and bottom. Poles are harder to avoid than triangles, but you should do what you can to minimize their use because they can terminate edge loops, and they don't deform as nicely as four-edged poles. If you're forced to use a pole, try to put it in a place on the mesh that won't deform a lot when it's animated.
- Holes such as mouths and eye sockets should be encircled by concentric edge loops. This guideline is particularly important for character models that may be animated. Having concentric edge loops makes it easier to deform and animate these highly expressive parts of the face.
- Edges should follow anatomy. Following the flow of anatomy — particularly musculature — is important because doing so yields cleaner, more natural deformations. Arms don't pinch when you bend them; the crease from the side of the nose flows around the mouth. Following these little rules really makes the lives of riggers and animators much easier (and it helps make the final animation look better).
Additionally, if you happen to have a drawing tablet, you can bind the Radius and Strength values to the pressure sensitivity of your tablet. Each value slider has a button to its right with an icon of a hand pushing against a blue line with its index finger. Left-click this button on either slider, and Blender recognizes the pressure information from your tablet.
The next set of important controls available while in Sculpt mode are a pair of buttons in the Brush panel. Depending on which brush preset you're using, these labels may be named Add and Subtract, Flatten and Contrast, Inflate and Deflate, or they may not be there (for grabbing brushes like Grab, Snake Hook, and Twist). Regardless of what they're named, if they appear, the first button (Add, Flatten, Inflate) is the default behavior for sculpting brushes. If you enable the second button (Subtract, Contrast, Deflate), it does the inverse of the default behavior. For example, with Subtract enabled, the Clay brush pushes vertices into the volume of your mesh instead of pulling them out.
Also, note that regardless of whether you enabled the first or second button in this block, pressing Ctrl while using the brush does the opposite behavior. For example, if you're using the SculptDraw brush with Add enabled, the normal behavior creates a small hill wherever you move your mouse cursor. If you Ctrl+left-click and drag, you sculpt a small valley instead.
![]() If you hold Shift while in Sculpt mode, Blender temporarily activates the Smooth brush, regardless of what the active brush is. The Smooth brush is handy if you find yourself bouncing between adding details and smoothing them out.
If you hold Shift while in Sculpt mode, Blender temporarily activates the Smooth brush, regardless of what the active brush is. The Smooth brush is handy if you find yourself bouncing between adding details and smoothing them out.
When working with brushes like SculptDraw, Inflate, or Layer, an additional check box, labeled Accumulate, appears under the Add/Subtract buttons. By default, when you use these brushes, they move the faces on your mesh relative to the normals that they have when you start making your stroke, regardless of how many times you paint over them in a single stroke. This default behavior is helpful because it prevents your mesh from quickly expanding uncontrollably. However, if you want to use a face's immediate normal when you run your brush over it, then you should enable this check box.
Other settings in the Sculpt mode Tool Shelf
The next few panels in the Tool Shelf while in Sculpt mode — Stroke, Curve, Texture, Symmetry, Options, Appearance, and Tool — are devoted to creating custom brushes. The next section gets into custom brushes in more detail. The following describes each panel in a little more detail:
- Stroke: The Stroke panel holds settings that dictate what happens when you're dragging the brush over your mesh. The most valuable setting in this panel is Stroke Method. The options in this menu dictate how your brush movement influences your mesh. For fun, choose the Layer brush and set the Stroke Method to Anchor. When you left-click and drag your brush over your model, you get a neat mesh tsunami that originates from the location you clicked.
- Curve: Within this panel are settings for adjusting how the influence of your brush changes from its center to its extremities.
- Texture: Any texture you can create in Blender can be used in a brush. The Texture panel is where you assign a texture to your current brush. See Chapter 8 for more information on creating textures.
- Symmetry: This panel controls how the sculpt brushes modify your mesh relative to the object's local axes. For example, if you left-click the X check box, anything you do on the left side of the mesh automatically also happens on the right side of the mesh. Symmetry is an excellent timesaver for doing involved tasks like sculpting faces.
- Options: The settings in this panel are commonly used to speed up your performance while sculpting. In particular, the Show Brush and Fast Navigate check boxes are very helpful. Show Brush (enabled by default) toggles the visibility of the brush's circle of influence around the mouse cursor and Fast Navigate (disabled by default) drops the subdivision level of your mesh while orbiting in the 3D View.
- Appearance: From the Appearance panel, you can stipulate what color to use for your brush's outline. Also, if you have an image that you'd like to use as a custom icon for your custom brush, you can enable the Custom Icon check box and point Blender to the location of that image on your hard drive. Then that image will appear as the representation of your custom brush in the brushes menu at the top of the Tool Shelf.
- Tool: You can base any brush in Blender on 16 different base tools. The Tool panel is where you define which tool your custom brush uses. You can also indicate whether the brush is used only for sculpting or if it can be used in Blender's other paint modes.
Creating custom brushes
Using the controls in the Tool Shelf while in Sculpt Mode, you can customize existing brush datablocks or create your own. Assuming that you want to do the latter, you need to first create a new brush datablock by clicking the Plus (+) button in the datablock beneath the list of brushes in the Brush panel at the top of the Tool Shelf. For efficiency, use an existing brush as a starting point by selecting that brush before adding your custom one. After clicking the Plus (+) icon, name your new brush by typing in the datablock field. Now you can go about customizing your brush.
Using Blender's texture system to tweak brushes
In the Texture panel, you can pick a texture to influence the behavior of your brush. You can use any texture you made in Texture Properties as a brush when you sculpt. Textured brushes are an excellent way to get more details added to your mesh while sculpting. Choose an existing texture by left-clicking the texture square in this panel and picking from the thumbnail images that appear. (See Chapter 8 for more information on creating and loading textures in Blender.) Refer to Figure 5-17 to see the Texture panel in Sculpt mode's Tool Shelf.
 You may want to choose the Rake option from the Angle drop-down menu when you've loaded a texture. With this option chosen, the texture is rotated as you sculpt to match the motion of the brush. Using Rake helps you avoid creating unnatural patterns from your textures when you sculpt.
![]() Sculpting with a high level of subdivisions can be taxing on your computer, using a lot of memory to store all those additional vertices. If you use too many levels of subdivision, your computer may run out of memory, and Blender may lock up or crash. In an effort to prevent a crash and give themselves more vertices to play with, many 3D modelers who use Blender's Multiresolution modifier often go to the User Preferences under Editing to disable Global Undo and change the number of undo steps from the default value of 32 down to 0. This modification removes the safety net of undo, but it can often improve Blender's performance while sculpting.
Sculpting with a high level of subdivisions can be taxing on your computer, using a lot of memory to store all those additional vertices. If you use too many levels of subdivision, your computer may run out of memory, and Blender may lock up or crash. In an effort to prevent a crash and give themselves more vertices to play with, many 3D modelers who use Blender's Multiresolution modifier often go to the User Preferences under Editing to disable Global Undo and change the number of undo steps from the default value of 32 down to 0. This modification removes the safety net of undo, but it can often improve Blender's performance while sculpting.