
Customizing Blender to Fit You
You can really tweak Blender's screen layout to virtually any configuration you can imagine. However, Blender's customization features go much deeper than just readjusting the areas in a Blender window. At this point in time, there are very few parts of Blender that, with a little time and effort, you can't completely overhaul to be as comfortable of a work environment as possible. This ability to customize is especially useful for people who are migrating to Blender from other 3D graphics programs. I won't say that you can make Blender behave exactly like any of these other programs, but sometimes little things like using the same keyboard shortcuts help make the transition smoother.
 Although this section gives you the means to completely bend Blender's interface to your will, bear in mind that unless otherwise specified, this book relies on the default settings that ship with Blender. Unless you can remember your customized behaviors, it may be more helpful to use Blender's default settings (File
![]() Load Factory Settings).
Load Factory Settings).
Using screen layout presets
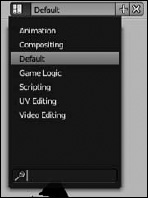
You can make a variety of layouts depending on the sort of work you're doing. In Blender, these workspace layouts are called screens, and, by default, Blender comes with seven presets: Animation, Compositing, Default, Game Logic, Scripting, UV Editing, and Video Editing. When you first load Blender, you're in the Default screen layout. You can cycle through these screens by pressing Ctrl+← and Ctrl+→. If you prefer to use a menu, you can use the datablock (for more on datablocks, see the sidebar in this chapter) at the top of the window in the Info editor, shown in Figure 2-2, and left-click the screen icon next to the name of the current screen layout.
![]() You can rename any screen to any name by switching to that screen and left-clicking its name in the screens datablock. Get used to the idea of naming everything in your projects. Trust me, being in the habit of using a reasonable name makes life infinitely easier when you come back to an old project, and you need to figure out what everything is.
You can rename any screen to any name by switching to that screen and left-clicking its name in the screens datablock. Get used to the idea of naming everything in your projects. Trust me, being in the habit of using a reasonable name makes life infinitely easier when you come back to an old project, and you need to figure out what everything is.
The screens, and therefore the order that they're cycled through when you press Ctrl+← or →, are arranged in alphabetical and numerical order, for fast and logical organization. If you want to cheat a bit, you can give a specific order to the list by putting a number in front of each screen's name (such as 1-Default, 2-Animation, and so on).
To create a new screen, left-click the plus (+) icon next to the current screen name in the Info editor's header. Upon clicking this icon, Blender produces a duplicate of your existing screen layout. From here, you can make the changes create to your own custom layout, creating a horizontal Properties editor layout or a multimonitor layout with a separate window for each of your monitors. You can also delete screens (including the default ones that ship with Blender, so be careful) by clicking the button with the X icon to the right of the Scene datablock. When you're happy with changes you've made and you want to have these screens available each time you start Blender, save your settings by going to the User Preferences editor (Ctrl+Alt+U) and clicking the Save As Default button at the bottom of the editor or using the Ctrl+U hotkey.
Understanding datablocks: Fundamental elements in a Blender scene
In Figure 2-2, look at the widget that's used to manage screens. The interface gives you access to something called a datablock. A simple and obvious definition of a datablock is that it's literally a block of data. However, a datablock has more to it. Datablocks are used throughout both Blender's interface and its internal structure, so understanding how they work and how you can take advantage of them goes a long way to understanding Blender itself. Nearly every critical element in Blender is stored in a type of datablock, from screens and scenes to objects and textures.
Not only is a datablock a handy way to store information, but it also allows Blender to treat this information like a database. In particular, you can link datablocks and let them share information. As an example, say that you create an excellent wood material, and you want to have two objects — a table and a chair — look like they're both made of the same wood. Well, rather than re-create that exact same material for each object, you can simply link both object datablocks to the same material datablock. Your computer uses less memory, and, more important, you have less work to do. And because datablocks are used throughout Blender, this same concept works in all kinds of situations: sharing textures between materials, sharing particle systems between objects, and even sharing worlds between scenes. It's an incredibly powerful feature of Blender and I refer back to datablocks a lot throughout this book.
![]() Before creating a new screen that you want to keep around for future use, first return to your default setup by selecting File
Before creating a new screen that you want to keep around for future use, first return to your default setup by selecting File![]() New or pressing Ctrl+N. When Blender saves your user settings, it saves them to a special .blend file called startup.blend that gets loaded each time it starts. So any models you have in the 3D View and any changes you make to other layouts are saved, too. Fortunately, if you made a mistake, you can always return to the default setup by choosing File
New or pressing Ctrl+N. When Blender saves your user settings, it saves them to a special .blend file called startup.blend that gets loaded each time it starts. So any models you have in the 3D View and any changes you make to other layouts are saved, too. Fortunately, if you made a mistake, you can always return to the default setup by choosing File![]() Load Factory Settings and re-create your custom layouts from there.
Load Factory Settings and re-create your custom layouts from there.
![]() When adjusting screen layouts, the menus and buttons in the header can be obscured or hidden if the area is too narrow. In this case, you can do two things:
When adjusting screen layouts, the menus and buttons in the header can be obscured or hidden if the area is too narrow. In this case, you can do two things:
- If the editor's header has menus, you can left-click the minus icon at the left of the header. The text menus collapse from view so that they're out of the way when you don't need them.
- If you still don't have enough space after collapsing the menus, Blender has another trick up its sleeve: Middle-click the header and drag your mouse left and right. The contents of the header move left and right so that you can bring those obscured buttons into view. You can also hover your mouse cursor over the header and user your scroll wheel. This feature is particularly handy for people who work on computers with small monitors.
Setting user preferences
This section on user preferences is by no means comprehensive. The number of options available in Blender's User Preferences editor is mind-bogglingly large. My intent here is to introduce you to the most helpful and relevant options to get you working effectively. For specific details on every single button, see the online documentation available at www.blender.org.
To change your user preferences, go to File![]() User Preferences (Ctrl+Alt+U), and Blender creates a new window just for the User Preferences editor. Although you can change any area to a User Preferences editor, it is sometimes nicer to use the File menu method because you don't have to replace or split any of your existing areas to get a User Preferences editor.
User Preferences (Ctrl+Alt+U), and Blender creates a new window just for the User Preferences editor. Although you can change any area to a User Preferences editor, it is sometimes nicer to use the File menu method because you don't have to replace or split any of your existing areas to get a User Preferences editor.
![]() If you choose File
If you choose File![]() User Preferences, and you don't see a new window with the User Preferences editor, your window may be in a full-screen state and your operating system's window manager may not be allowing the window with User Preferences to sit atop that full-screen window. To get around this issue, toggle off the full-screen view by clicking the icon on the far right of the Info editor's header region or by pressing Alt+F11.
User Preferences, and you don't see a new window with the User Preferences editor, your window may be in a full-screen state and your operating system's window manager may not be allowing the window with User Preferences to sit atop that full-screen window. To get around this issue, toggle off the full-screen view by clicking the icon on the far right of the Info editor's header region or by pressing Alt+F11.
When you get the User Preferences to be the way you like, you can save them as your personal defaults by clicking the Save As Default button at the bottom of the User Preferences editor or by pressing Ctrl+U.
Interface
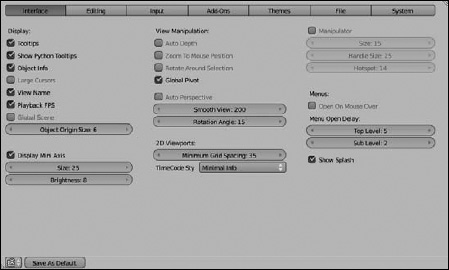
The first set of available options in Blender's User Preferences (shown in Figure 2-3) relate to how you interact with your scene within the 3D View. Moving from left to right, here are some of the more useful options:
- Display: The options in this column toggle the display of various informational elements in the 3D View, such as tooltips, object information, and the small mini axis in the bottom left corner.
- View Manipulation: The options in this column give you control over how you interact with the environment in the 3D View. For example, enabling Auto Depth and Zoom to Mouse Position in large scenes is often useful so that you can quickly navigate your way through your scene without becoming stuck.
- Smooth View: Smooth View is probably one of the coolest convenience options added to Blender in recent history and as such, it deserves explicit mention here. If you go to your 3D View and choose View
 Camera (Numpad 0), the 3D View smoothly animates the change from the default perspective view to the Camera's perspective. Pretty slick, huh? The values in Smooth View are in milliseconds, with a maximum value of 1,000, or 1 second (although that's a bit slow for most tastes). The default value of 200 works nicely, but play with it on your own and see what works best for you.
 - Menus: Some users prefer to have menus immediately pop open when they run their mouse cursor over them. The options under this heading facilitate that preference. It's disabled by default, but you can enable the Open on Mouse Over check box and then use the values below that to adjust the delay, or how long your mouse has to be over a menu's name before it pops up.
Figure 2-3: The Interface options in User Preferences.
Editing
The next set of options is related to the act of editing objects. The most relevant options in this section relate to Blender's Undo feature. The options related to Undo are pretty important. From the Editing section, you can adjust how many steps of undo you have when working in Blender (default is 32), as well as toggle Global Undo on and off. Now, you may be wondering why in the world anyone would ever want to disable the ability to undo a mistake. The most common answer to this question is performance. Having undo enabled requires more memory from your computer, and each level of undo requires a little bit more. Sometimes, when working with very complex scenes or models, an artist might disable undo to dedicate all the computer's memory to the current scene rather than the steps used to create it. This decision occurs most when artists work with Blender's multiresolution sculpting tools (see Chapter 5).
Input
The settings and controls in the Input options of the User Preferences editor have the greatest influence over how you interact with Blender. As Figure 2-4 shows, this section is extensive.
Figure 2-4: The Input options in User Preferences.
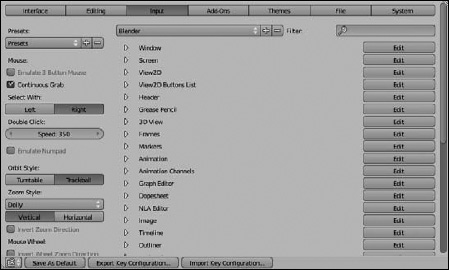
The largest part of this section — the event editor on the right side — is actually covered later in this chapter in the section “Using custom event maps.” However, the left-side column has quite a few useful settings as well:
- Presets: Blender ships with a small assortment of application interaction presets — a fancy way of saying hotkey and mouse configurations that match other 3D programs. You can use this datablocklike menu to choose an existing preset, create a new one, or delete a preset you never want to use.
- Emulate 3 Button Mouse: Blender was designed to be used with a three-button mouse. However, not all computers have three-button mice, particularly Macintosh machines and some tablet PCs. Enabling this option helps these users compensate by using Alt+left-click to do what is normally done with the middle-click.
- Continuous Grab: Continuous Grab is a cool feature added in Blender 2.5 that allows you to continue moving an object even after your mouse cursor has reached the edge of the editor. Continuous Grab is very useful and enabled by default, but it doesn't work as nicely for users working with a tablet interface, so you can disable it here if you need to.
- Select With: Blender's default behavior is to select objects with the right mouse button. However people migrating to Blender from other programs may be more comfortable selecting with the left mouse button. This control lets you switch between the two. A word of warning: Setting this value to Left disables the Emulate 3 Button Mouse feature.
- Emulate Numpad: This setting is a very handy option for laptop users. As you see in the next section, Blender makes use of the numeric keypad for quick access to top, front, side, and camera views in the 3D View. Unfortunately, most laptop users don't have an easily accessible numeric keypad on their keyboards. As a workaround, the Emulate Numpad option uses the number keys at the top of the keyboard to have the functionality that the corresponding Numpad numbers have. This control in User Preferences disables the normal layer-switching functionality that the number keys at the top of the keyboard normally perform, but the ability to quickly change views tends to be more valuable to users than the ability to quickly change layers.
- Orbit Style: By default, Blender uses the Trackball setting. However, users who are familiar with other 3D programs might prefer the Turntable setting. The difference may seem subtle to a new user, but it can be very disorienting for users of other software packages who may be used to turntable orbit style.
- Invert Zoom Direction: Similar to the Orbit Style option, some people are more comfortable scrolling forward to zoom out and back to zoom in. This setting gives users that option.
Add-Ons
Blender ships with an assortment of extensions, called add-ons, which provide users with additional capabilities within Blender. For example, if you're a veteran Blenderhead and you're used to the old Spacebar menu from earlier versions of Blender, there's an add-on that puts that feature back. Other add-ons modify Blender's interface, add new primitive objects, or provide additional tools that can help speed up your work. You can manage all add-ons from the Add-Ons section of User Preferences.
Add-ons come in primarily two types: Officially Supported and Community Supported. You can use the buttons on the left side of the Add-Ons section in User Preferences to filter which types you see. By default, all community supported add-ons that ship with Blender are disabled. Most officially supported add-ons are for importing and exporting file types to and from other programs. The bulk of these add-ons are enabled by default. To enable or disable a specific add-on, just left-click the check box on the right side of the add-on's box. Left-clicking the triangle on the left of the box expands it so that you can get more details about a specific add-on. All of Blender's add-ons are broken down into specific categories, and you can use the buttons on the left to see just the add-ons that are specific to a single category. Alternatively, you can use the search field above the category buttons.
Themes
Blender has quite a bit of flexibility in adjusting how it looks, thanks to the Themes options, as shown in Figure 2-5. I took almost all the screenshots for this book by using a variation of the Default theme, lightened for readability. However, when I work in Blender, I use my own theme that's a bit darker and easier on the eyes. Darker themes are particularly helpful if, like me, you're known for sitting behind the computer and working in Blender for 10- to 15-hour stretches (or more). In those situations, the less stress you can put on your eyes, the better.
Figure 2-5: The Themes options in User Preferences.

![]() I include a copy of the theme I use as a Python script on the DVD that comes with this book. It's also available for download from this book's Web site, www.dummies.com/go/blenderfd2e. Feel free to use this theme for your Blender sessions or make your own! Everyone has their own tastes. In fact, one of the more popular Blender users, Pablo Vazquez (known as VenomGFX), has been known to use a theme that's completely purple and pink!
I include a copy of the theme I use as a Python script on the DVD that comes with this book. It's also available for download from this book's Web site, www.dummies.com/go/blenderfd2e. Feel free to use this theme for your Blender sessions or make your own! Everyone has their own tastes. In fact, one of the more popular Blender users, Pablo Vazquez (known as VenomGFX), has been known to use a theme that's completely purple and pink!
File
The File options relate to how Blender works with files. Figure 2-6 shows the settings in this section of the User Preferences editor.
The following list describes the important parts of this section:
- File Paths: Like most programs, Blender works with files. The values in this column show the default locations where Blender either places files or looks for them. Here you can indicate where your fonts are located, where you want to save your renders by default, and where to look for textures and sounds.
Probably the most important path in this section is the one for Temp. This location is where Blender stores Auto Save files, and it's also where it stores the notorious quit.blend file, which is great for recovering your last blender session. The default location for temporary files is /tmp/.
 Unfortunately for users of Microsoft's Windows operating system, this location doesn't make any sense and actually doesn't even exist. If you're using Windows, I strongly advise that you change this location to C:WindowsTemp or create a folder called tmp on your C: drive. Linux users may also want to change this location because some Linux distributions like Ubuntu automatically clear the /tmp directory on each boot. I can't tell you the number of people who have closed Blender without saving their work and later realized that they couldn't recover any of their work because this path wasn't properly set.
Figure 2-6: The File options in User Preferences.
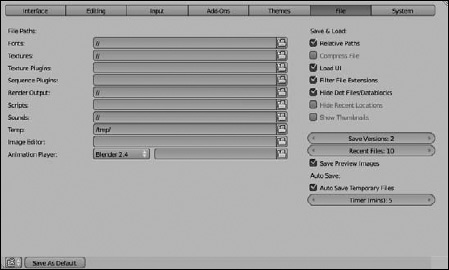
- Save and Load: These options relate to how Blender opens and saves project files. Of these options, the two most worth knowing about are Compress File and Load UI, both of which you can modify from the File Browser, but these check boxes define the default behavior.
The Compress File option is handy because it makes your .blend project files smaller when you save. The Load UI option is short for Load User Interface, meaning that when you open a .blend file, Blender will adjust your screen layout to match the one that was used to create that file.
 If you're opening a file that was created in earlier versions of Blender that relied on the horizontal layout, you may want to disable the Load UI option so that your file opens in the new Blender layout.
 - Auto Save: Before Blender had undo functionality, users relied heavily on its Auto Save features. Even in the age of undo, these options are a lifesaver. For that reason, the following list goes into these settings in more detail:
- Save Versions: Each time you manually save a file in Blender, it takes your last save and stores it as an earlier version. You may have already created work in Blender and noticed some .blend1 files in the same place you saved your .blend files. Those .blend1 files are the earlier version. This option allows you to determine how many of these earlier versions you'd like Blender to retain for you. Each version has a number appended to the end of it, so if you have MyFile.blend and you have Save Versions set at 2, then after a few saves, you should see MyFile.blend, MyFile.blend1, and MyFile.blend2 all in the same folder.
- Recent Files: The number in this field tells Blender how many of your past files to remember when you go to FileOpen Recent or press Shift+Ctrl+O. You can also use the File Browser (F1 or Ctrl+O) and look on the side region under the Recent heading.
- Auto Save Temporary Files: Enabled by default, this option is Blender's auto save functionality. It saves a copy of the current state of your file, or what I call a hot backup, in your Temp directory (adjustable in the File Paths options) every few minutes, as dictated by the Timer field below this button.
 Some file paths begin with two forward slashes (//). These slashes are Blender's notation for a relative path, or file path as it relates to the location on your hard drive of your current file. In contrast is an absolute path, which is the full path to your file from the root of your file system. For example, if you have a file saved as /home/user/Documents/project.blend, then the absolute path to project.blend is /home/user/Documents/. Now say that you have a folder named textures in the same folder as your project.blend file, and in that folder is an image named sandpaper.png. The absolute path to that image is /home/user/Documents/textures/, while its relative path (relative to project.blend) is //textures.
System
Whereas the Interface options dictate how you interact with Blender, the options in the System section, shown in Figure 2-7, tend to dictate more how Blender interacts with you. Many options here are geared toward optimizing for performance, and generally the defaults work well.
Some of the more interesting options follow:
- OpenGL: If Blender is working sluggishly or if the interface looks really odd (noise, strange tears, repeating patterns), these settings are the first place to look to see whether you can get Blender working nicely. In particular, you may want to try enabling VBOs (Vertex Buffer Objects). With VBOs enabled, Blender's interface should be snappier on more modern video cards. However, on older hardware, VBOs may cause Blender's screen to behave strangely.
Figure 2-7: The System options in User Preferences.

- Window Draw Method: This drop-down menu is another fine place to look if Blender is displaying bizarrely on you. The default setting of Automatic should give you the best performance on your computer. However, if you're on an older machine, try seeing whether the Overlap or Full methods work better.
-
 Color Picker Type: Speaking of color pickers, the latest version of Blender added a new circular color picker widget, which is generally much faster to use for choosing colors when painting. However, everyone has different tastes in what color pickers they prefer to use, and some color pickers are better than others for specific purposes. For that reason, a drop-down menu contains a selection of different color pickers that you can use in Blender. Left-click the color swatches on the Solid OpenGL Lights and see which color picker suits you the best.
Using custom event maps
![]() A primary inspiration for the deep structural changes introduced in Blender's code for the 2.5 series was to refactor Blender's event system. An event system is required for a complex program to interact with you and me, the users. Each time you press a button or move your mouse, it registers with the program as an event. The program then handles the event by performing an action of some sort. As an example, moving your mouse registers as an event, which then triggers your computer to perform the action of updating the location of the mouse cursor on your monitor. In earlier versions of Blender, the editors don't update until you release your mouse button.
A primary inspiration for the deep structural changes introduced in Blender's code for the 2.5 series was to refactor Blender's event system. An event system is required for a complex program to interact with you and me, the users. Each time you press a button or move your mouse, it registers with the program as an event. The program then handles the event by performing an action of some sort. As an example, moving your mouse registers as an event, which then triggers your computer to perform the action of updating the location of the mouse cursor on your monitor. In earlier versions of Blender, the editors don't update until you release your mouse button.
With earlier versions of Blender, the event system was hard-coded and based on a design from the early 1990s. This setup not only made extending Blender difficult, but it also prevented Blender's interface from giving more instantaneous feedback. As an example, when you resize an area in Blender now, the editors in each area update while you're moving.
As an even more apparent benefit of the event system refactor, you've gained the ability to customize the event system to suit your needs, mapping events to a wide variety of possible Blender operations. Don't like using a particular hotkey in Blender's default configuration? You're free to change it!
If you refer to Figure 2-4, you should notice that the entire right side of the editor is devoted to modifying how events are handled within Blender. This list of events is particularly daunting to look at, and you can easily get lost among all those expanding and collapsing categories of events. Fortunately, you can modify how events are handled in a much easier way, and you don't even have to use the User Preferences editor if you don't want to. Instead, you can use the following steps:
- Find the operation you want to bind in Blender's menu system.
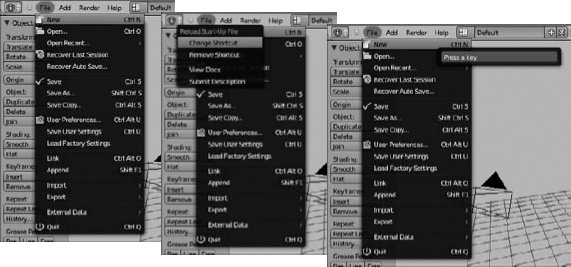
Say that you want to change the hotkey for opening a new project from Ctrl+N (the current hotkey) to Ctrl+X, the hotkey used in previous versions of Blender. You can find this operation by going to the Info editor's header and choosing File
New. Go to that menu item, but don't click it yet. Instead, proceed to the next step. - Right-click the menu item for the operation and choose Change Shortcut from the menu that appears.
In this example, go to File
New, right-click it, and choose Change Shortcut. Blender prompts you for a new hotkey. - When prompted, use the new hotkey that you want to assign.
In this case, you press Ctrl+X. Your new hotkey is assigned!
Figure 2-8 shows this process in action.
As of this writing, Blender doesn't currently warn you if you attempt to assign a hotkey that has already been bound to another operation. Blender simply double-binds the hotkey, favoring default behaviors over custom ones. Blender's interface will still say that your custom hotkey is assigned to the desired action, but it just won't work as expected. Currently, the only way to get around this problem is to make sure that your desired hotkey isn't already assigned.
Figure 2-8: Customizing a hotkey sequence directly from Blender's menus.
Of course, for ultimate control, the Input section of User Preferences is really the way to go. As daunting as this section may appear, it's actually pretty easy to use. The most effective way to make use of the event editor is to use the search feature, labeled Filter, in the upper right corner of the Input section:
- In the Filter field, type all or part of the operation you want to customize and press Enter.
The listing below updates with Blender's best guesses for the operation you're looking for. Alternatively, you can just drill down through the categories until you find the event you want.
- After you find the event you want, left-click the Edit button to the right of that event's category.
All available events for the category are now editable, and the Edit button changes to a Restore button. If at any time you decide that you want to revert to the system defaults, click the Restore button. Everything goes back to the way it initially was.
- Modify the event you want to change.
Changing an actual event is much like the process used to add hotkeys to menu items. It works like so:
- Use the Type of Event Mapping drop-down menu displayed to the right or the operation name to stipulate whether the event is coming from a keyboard, mouse, text input, or some other source. For example, if you're adjusting a hotkey, make sure that you've set it to Keyboard.
- Left-click the Type of Event field that comes after the Type of Event Mapping menu. It will either be blank or already have an event in it. Upon doing so, Blender prompts you for your new custom event (hotkey, mouse click, and so on.).
- Set the event with the action you want assigned to it. For example, if you're changing a hotkey, simply enter the key combination you want to use. If you decide that you don't want to change the event, just click anywhere outside of the Event Type field.
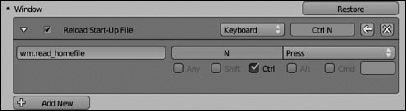
You can also use this interface to activate and deactivate events, delete events, and restore them to their initial values. Furthermore, if you expand the event's details by left-clicking the triangle to the left of the operation name, you have even more advanced controls. Figure 2-9 shows an expanded event.
Figure 2-9: Blender gives you a lot of custom control over its event system.
![]() Customizing the event system can be a pretty involved topic, so if you're really interested in making extensive changes, it's to your benefit to play with the event system editor in the Input section of User Preferences a lot and make heavy use of the Restore buttons so that you can get Blender back to its defaults if something messes up.
Customizing the event system can be a pretty involved topic, so if you're really interested in making extensive changes, it's to your benefit to play with the event system editor in the Input section of User Preferences a lot and make heavy use of the Restore buttons so that you can get Blender back to its defaults if something messes up.
After you have your events customized, you can save them to an external file that you can share with other users or simply carry with you on a USB drive so that your customized version of Blender is available wherever you go. To do so, click the Export Key Configuration button at the bottom of the User Preferences editor. A File Browser opens, and you can pick where you want to save your configuration file. The configuration is saved as a Python script. To load your custom configuration, it's possible to load your script in Blender and just run it. However, simply using the Import Key Configuration button at the bottom of the User Preferences editor is much easier.