
Navigating in Three Dimensions
The 3D View is probably the most used window type in all of Blender. It also has some of the most unique interface decisions of any 3D software program. The purpose of this section is to guide you to understanding how to wield this part of Blender like a virtual 3D ninja!
All right, so perhaps I am a little over the top with the whole ninja thing, but hopefully this section takes you at least one or two steps closer to that goal.
Orbiting, panning, and zooming the 3D View
When trying to navigate a three-dimensional space through a two-dimensional screen like a computer monitor, you can't interact with that virtual 3D space exactly like you would in the real world, or as I like to call it, meatspace. The best way to visualize working in 3D through a program like Blender is to imagine the 3D View as your eyes to this 3D world. But rather than think of yourself as moving through this environment, imagine that you have the ability to move this entire world around in front of you.
The most basic way of navigating this space is called orbiting. Orbiting is the rough equivalent of rotating the 3D world around a fixed point in space. In order to orbit in Blender, middle-click anywhere in the 3D View and drag your mouse cursor around.
Occasionally, you have the need to keep your orientation to the world, but you'll want to move it around so that you can see a different part of the scene from the same angle. In Blender, this movement is called panning, and you do it by holding Shift while middle-clicking and dragging your mouse cursor in the 3D View. Now when you drag your mouse cursor around, the world shifts around without changing the angle that you're viewing from.
The third way of navigating 3D space is when you want to get closer to an object in your scene. Similar to working with a camera, this movement is called zooming the view. In Blender, you can zoom in two ways. The easiest method is by using your mouse's scroll wheel. By default, scrolling forward zooms in and scrolling back zooms out. However, this method doesn't always give you fine-grained control, and, even worse, some people don't have a mouse with a scroll wheel. In these cases, you can zoom by holding Ctrl while middle-clicking in the 3D View. Now, when you drag your mouse cursor up, you zoom in, and when you drag your mouse cursor down, you zoom out. If you prefer to move your mouse horizontally rather than vertically for zooming, you can adjust this behavior in the Input section of User Preferences.
Of course, if you happen to be working with a mouse that doesn't have a middle mouse button, you should go to User Preferences under Input and enable the Emulate 3 Button Mouse check box. With this check box enabled, you can emulate the middle mouse button by pressing Alt+left-click. So orbiting is Alt+left-click, panning is Shift+Alt+left-click, and zooming is done with Ctrl+Alt+left-click. Table 2-1 has a more organized way of showing these hotkeys.
Table 2-1 Keyboard/Mouse Keys for Navigating 3D Space

Changing views
Although using the mouse to work your way around the 3D space is the most common way to adjust how you view things, Blender has some menu items and hotkey sequences that help give you specific views much faster and more accurately than you can do alone with your mouse.
The View menu
On occasion, you want to know what a model looks like when it's viewed directly from the front, side, or top. Blender has some convenient shortcuts for quickly switching to these views. The most obvious way is to use the View menu in the 3D View's header, as shown in Figure 2-10. This menu lets you choose a variety of angles, including the top, front, right, and the view from any of the cameras you may have in your scene.
Figure 2-10: The View menu in the 3D View.
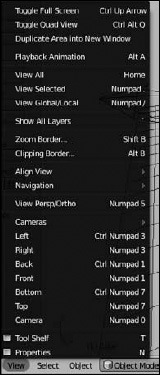
You can also use this menu to switch between orthographic and perspective views. The orthographic view of a 3D scene is similar to how technical drawings and blueprints are done. If two objects are the same size, they always appear to be the same size, regardless of how far away from you they are. This view is ideal for getting sizes and proportions correct in your models, especially if they're based on blueprints or technical drawings. The perspective view is more akin to how you actually see things. That is, objects in the distance look smaller than objects that are near you.
Behold the power of the numeric keypad!
The View menu is certainly helpful, but you can change your view in an even faster way: the numeric keypad. Each button on your keyboard's numeric keypad has an extremely fast way of changing your viewing angle in the 3D View. Figure 2-11 is an image of the numeric keypad with an indication of what each key does.
If the image in Figure 2-11 doesn't quite work for you as a reference, Table 2-2 shows what each key does in a table-based format.
In Figure 2-11, notice that the hotkeys are arranged in a way that corresponds with how you would expect them to be. Top view is at the top of the keypad at Numpad 7. The front view is accessed at Numpad 1, and if you move to the right on the keypad, you can see the right side view by pressing Numpad 3. Because it's the view you render from, the active camera is the most important and therefore gets the largest key at Numpad 0. Pressing Numpad 5 is a quick way to toggle between orthographic and perspective views. If you have View Name turned on in the Interface section of User Preferences, it actively informs you about which view you're using. And having the very cool Smooth View option enabled definitely helps you keep from getting disoriented while working.
Figure 2-11: The numeric keypad is your ultimate tool for navigating 3D space.

 The notions of what is left and right in the 3D View are relative to you, not the object or scene you're working in. That is, if you model a character who's facing you from the front view, pressing Numpad 3 (right side view) shows your character's left side. This setup can be a bit confusing in writing or conversation, but while you're working, it's really not much of an issue. I actually tend to think of the right and left side views as side view and other side view to avoid confusing myself.
Table 2-2 Hotkeys on the Numeric Keypad
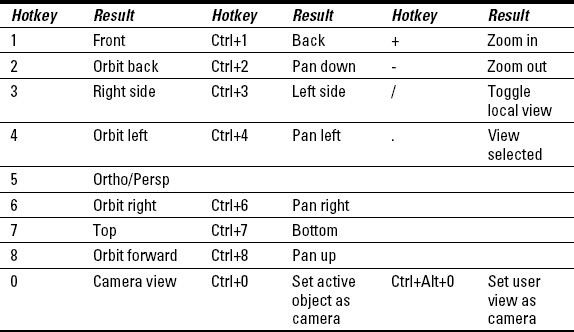
Here is where the numeric keypad shows its real power. With the numeric keypad, you can just as easily view the opposite angle (bottom, back, or left side views) as you can the standard views. To see the opposite side of the standard views, press Ctrl while hitting the corresponding Numpad key. For example, if you want to see the bottom view, press Ctrl+Numpad 7.
Now, maybe you got a little bit excited and hit Ctrl+Numpad 0 to see what the opposite of the camera view is and had some unexpected results. Ctrl+Numpad 0 does something entirely different than pressing Ctrl in combination with the other Numpad numbers. The Ctrl+Numpad 0 hotkey actually allows you to treat any selectable object in Blender as a camera, with the view looking down the object's local Z-axis. You can also access this functionality from the View menu at View![]() Cameras
Cameras![]() Set Active Object as Camera. If you're confused, take a quick look at the beginning of Chapter 3 for more explanation on local and global coordinate systems. The ability to treat any object as a camera may seem like a strange feature to have, but it can be really helpful for doing things like aiming lights and checking the line of sight of an object or a character.
Set Active Object as Camera. If you're confused, take a quick look at the beginning of Chapter 3 for more explanation on local and global coordinate systems. The ability to treat any object as a camera may seem like a strange feature to have, but it can be really helpful for doing things like aiming lights and checking the line of sight of an object or a character.
![]() Another cool thing you can do with Numpad 0 is to quickly snap the camera to your user view. For example, say that you've been working on a 3D model for a while from a certain angle, and you want to see what the model looks like in a render from that specific angle. Rather than try to grab and rotate your camera to get close to this same angle, you can simply press Ctrl+Alt+Numpad 0 or choose View
Another cool thing you can do with Numpad 0 is to quickly snap the camera to your user view. For example, say that you've been working on a 3D model for a while from a certain angle, and you want to see what the model looks like in a render from that specific angle. Rather than try to grab and rotate your camera to get close to this same angle, you can simply press Ctrl+Alt+Numpad 0 or choose View![]() Align View
Align View![]() Align Active Camera to View, and the camera jumps directly to where you're viewing your model from. I find myself using this hotkey sequence quite a bit when I'm creating my models. Sometimes it's just easier to change your user view and snap your camera to it than it is to aim the camera how you want it.
Align Active Camera to View, and the camera jumps directly to where you're viewing your model from. I find myself using this hotkey sequence quite a bit when I'm creating my models. Sometimes it's just easier to change your user view and snap your camera to it than it is to aim the camera how you want it.
The numeric keypad also gives you the ability to navigate your scene like you might normally do with your mouse. You use the 8, 4, 6, and 2 keys on the numeric keypad. Numpad 8 and Numpad 2 orbit the view forward and back, respectively, whereas Numpad 4 and Numpad 6 orbit it left and right. By default, Blender does these rotations in 15-degree increments, but you adjust this amount to be more fine or coarse in User Preferences under Interface with the value labeled Rotation Angle. Orbiting with the Numpad is a nice way to get a quick turntable view of a scene, particularly if you have your View rotation set to Trackball in User Preferences. You can also pan the view by pressing Ctrl in combination with any of these buttons. For example, Ctrl+Numpad 4 and Ctrl+Numpad 6 pan the view left and right. You can even zoom the view by using the Numpad Plus (+) and Numpad Minus (-) keys.
Two more useful hotkeys are on the numeric keypad: Numpad Slash (/) and Numpad Dot (.). These keys are somewhat more esoteric than the other keys, but they definitely come in handy.
Of the two, I tend to use Numpad Slash the most. Pressing Numpad Slash (/) toggles what Blender calls Local View. Basically, Local View hides everything in your scene except for the object or objects you've selected. Local View is really helpful for temporarily isolating a single object or set of objects in a complex scene so that you can work on it without anything else getting in your way.
Another key worth mentioning, although it's not exactly on the numeric keypad, is the Home key. Whereas using Numpad Dot (.) brings your selected objects into view, pressing Home zooms your view back until all objects in your scene are visible in the 3D View. Home is a very convenient key for getting an overall idea of what's going on in your scene.
Viewport shading types
Aside from changing the angle from which you view your 3D world, you may also want to change how the world is shown in the 3D View. In particular, I'm referring to what is called the viewport shading. By default, Blender starts in the Solid shading type, which shows your models as solid 3D objects, lit by the OpenGL lights you can set in Blender's User Preferences under System. You can change the viewport shading by going to the 3D View's header and left-clicking the button with a white circular icon, as shown in Figure 2-12.
Figure 2-12: Viewport shading types.

Clicking this button reveals the following possible viewport shading types:
- Textured: The textured viewport shading type attempts to faithfully show you what your object will look like when textured and lit for the final render. The preview may differ a bit from what the final looks like, but short of rendering, it should give you the best idea to work from. Pressing Alt+Z quickly toggles between this viewport shading type and the solid one.
 If you have the a modern accelerated video card, you can enable GLSL (OpenGL Shading Language) shaders from the Properties region of the 3D View (View
 Properties or the N hotkey) under DisplayShading. Change this drop-down menu from Multitexture to GLSL; when you use image-based textures, the textured viewport shading type will be more accurate. More on this topic is in Chapter 8.
 - Solid: Solid is the default viewport shading type that Blender starts with. Press Z to toggle between solid and wireframe. Using solid is usually the standard work mode for working in Blender. If you have an older video card, the textured viewport shading types will perform much slower than this one.
- Wireframe: This viewport shading type shows the objects in your scene as transparent line drawings. The wireframe viewport shading type is a good quick way to get an idea of the structure of your models. And because wireframe is a bunch of lines, Blender doesn't have to worry about shading and therefore doesn't tax your computer's processor as much. On older computers, Blender is a lot more responsive using wireframe than it is when using solid or textured.
- Bounding Box: The bounding box viewport shading type replaces your 3D object with a wireframe cube that shows how much space your object takes up in the 3D world. This type isn't as commonly used as the others, but it does come in handy for quickly placing objects in a scene or detecting when two objects might collide. It can also be handy for scenes that feature a lot of complex geometry.
If you have more than one 3D View editor, they don't all have to have the same viewport shading. You can see the wireframe of your model in one editor while adjusting the lighting by using the textured viewport shading in another.
Selecting objects
How you select objects is one of the most controversial design decisions in Blender's interface: In nearly every other program, you select things — be they text, 3D objects, files, or whatever — by left-clicking them. This is not the case in Blender. When you left-click in the 3D View, all it seems to do is move around some strange crosshair thing. That thing is Blender's 3D cursor. I talk more about the 3D cursor later, but in the meantime, you're probably thinking, “How in the world do I select anything?”
The answer is simple: You select objects in Blender by right-clicking them. Multiple objects are selected and deselected by Shift+right-clicking them.
Although right-clicking to select certainly seems strange, there is actually a reason for doing it this way. This design decision wasn't made at random or just to be different for the sake of being different. There are actually two reasons for doing it this way. One is philosophical, and the other is practical.
- Blender's approach to using the mouse: In Blender, the left mouse button is intended to be used to perform or confirm an action. You left-click buttons or menus and left-click to confirm the completion of an operation like moving, rotating, or scaling an object, and you use it to place the 3D cursor. Selecting an object doesn't really act upon it or change it. So right-click is used to select objects as well as cancel an operation before it's completed. This setup is a bit abstract, but as you work this way, it does actually begin to make sense.
- Prevention of Repetitive Stress Injury (RSI): Computer graphics artists like 3D modelers and animators are known for working at a computer for insanely long stretches of time. Repetitive stress injury, or RSI, is a real concern. The more you can spread the work across the hand, the lower the chance of RSI. By making it so that you're not doing every single operation with the left mouse button, Blender helps in this regard.
Bottom line, the right-click-to-select paradigm really is a nice, efficient way of working in 3D space after you get used to it. However, if you try it and still don't like it, Blender offers you the ability to swap left and right mouse button usage in the Input section of User Preferences. Do note, however, that this book is written with the default right-click behavior in mind, so remember that as you read other chapters.
Taking advantage of the 3D cursor
“Okay,” you say, “I can handle the right-click-to-select thing. But what's with these crosshairs that move to where ever I left-click? It seems pretty useless.”
Those crosshairs are the 3D cursor. It's a unique concept that I've only seen in Blender, and this design is anything but useless. The best way to understand the 3D cursor is to think about a word processor or text editor. When you add text or want to change something, it's usually done with or relative to the blinking cursor on the screen. Blender's 3D cursor serves pretty much the same purpose, but in three dimensions. When you add a new object, it's placed wherever the 3D cursor is located. When you rotate or scale an object, you can do it relative to the 3D cursor's location. And when you want to snap an object to a specific location, you do it with the 3D cursor.
In terms of adjusting your 3D View, you can use the 3D cursor as a quick way to recenter your view. Simply place the 3D cursor anywhere in the 3D View by left-clicking. Now press Ctrl+Numpad Dot (.) and watch as the 3D View adjusts to put the cursor at the center of the window. This is similar to pressing Numpad Dot (.), except that you don't have to select any objects. Another convenient hotkey sequence is Shift+C. This combination relocates the 3D cursor to the origin coordinates of the 3D environment and then brings all objects into view. The Shift+C hotkey combination is like pressing Home with the added benefit of moving the cursor to the origin.
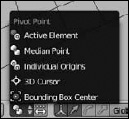
In Chapter 3, I cover the topic of grabbing, scaling, and rotating objects. Usually, you want to use Blender's default behavior of doing these operations relative to the median point of the selected objects. However, you can also perform any of these operations relative to the 3D cursor by pressing the Period (.) key on your keyboard or selecting 3D Cursor from the Pivot menu in the 3D View's header, as shown in Figure 2-13. You can use this menu to switch back to the default behavior or press Comma (,).
Figure 2-13: The Pivot menu in the 3D View.
The 3D cursor is also very useful for snapping, or moving a selection to a specific point in space. For a better idea of what snapping means, hover your mouse over the 3D View and press Shift+S. A menu like the one in Figure 2-14 appears.
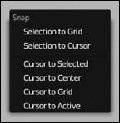
Through this menu, you can snap your selected object to a fixed coordinate on the grid in the 3D View, the location of the cursor, or to the center of the grid, also known as the origin of the scene. You also have the ability to snap the 3D cursor to the middle of multiple selected objects, a fixed location on the grid, or to the active object in the scene. This method is a very effective way to move an object to a specific point in 3D space, and it's all thanks to the little 3D cursor.