
Coloring Vertices with Vertex Paint
One downside to material slots is the fact that although they make defining multiple colors and materials on a single mesh easy, there's a very distinct line between materials. The color of one material doesn't smoothly transition into the next. For example, if you want to create a car with a paint job that's light blue near the ground that smoothly transitions to a bright yellow on its roof and hood, you can't effectively do this color graduation with material slots. However, with vertex colors, it's completely doable. This technique works only on mesh objects, but it's also a very effective way of quickly coloring a mesh without the hard-edged lines that material slots give you.
The way vertex colors works is pretty simple. You assign each vertex in your mesh a specific color. If the vertices that form a face have different colors, a gradient goes from each vertex to the others, where the color is most intense at the vertex and more blended with other colors the farther away it gets.
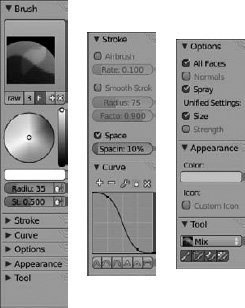
Of course, trying to go in and explicitly set the color for each and every vertex in a mesh can get really tedious on complex meshes. To alleviate this problem, Blender has a Vertex Paint mode. You activate Vertex Paint mode by selecting (right-clicking) the mesh object that you would like to paint in the 3D View and then pressing V. You can also use the mode drop-down menu in the 3D View's header. When you enter Vertex Paint mode, your mouse cursor changes to include a paint brush circle similar to the one you see when in Sculpt mode and the Tool Shelf updates with paint options. The Tool Shelf for painting is shown in Figure 7-12.
The largest function of the paint options in the Tool Shelf is in the Brush panel. Here you set the color you want to use and control how that color is applied to the selected object. You can choose the color you want by adjusting the embedded color picker.
Figure 7-12: The paint options in the Tool Shelf while in Vertex Paint mode.
After you pick the color you want to use, left-click and drag your mouse over vertices in the 3D View. Those vertices take on the color you defined. To get an idea of where the vertices that you're painting actually exist on your mesh, you may want to have Blender overlay the object's wireframe in the 3D View. To do so, navigate to Object Properties and left-click the Wire check box in the Display panel. Blender adds the wireframe over the surface of the object, making it much clearer where each of the vertices of the mesh lie.
By default, the base vertex color for an object is a flat white. If you would rather start with a different base color, choose Paint![]() Set Vertex Colors (Shift+K) from the 3D View's header. Doing that sets all the vertices in your mesh to have the color you defined in the Vertex Paint color swatch.
Set Vertex Colors (Shift+K) from the 3D View's header. Doing that sets all the vertices in your mesh to have the color you defined in the Vertex Paint color swatch.
In Vertex Paint mode, the buttons in the Tool panel of the Tool Shelf control how the paint color is applied to the vertices. The default setting of Mix simply blends the defined color with the color that the vertex already has assigned, according to whatever value is set by the Strength slider. Choosing the Add, Subtract, or Multiply options from the drop-down menu in the Tool panel takes the current color and respectively adds, subtracts, or multiplies that with the current vertex color under the brush in the 3D View. The Blur option is the only paint setting that doesn't use the selected color. It uses the vertices that are within the radius defined by the Radius slider and attempts to mix their colors, effectively blurring them. The Lighten and Darken options take the value of the color you chose and use that to control how much influence it has on the already existing colors. So if you have your color set to full white, painting with Darken enabled won't change the vertex colors at all. But using that color to paint with Lighten enabled makes it appear everywhere you work.
If you're familiar with Sculpt mode (see Chapter 5), you may be tempted to try to adjust the radius of your brush by using the F hotkey. Go ahead, try it; it works! The same goes for using Shift+F to adjust the strength of your brush. You can also use the brush datablocks like you can with Sculpt mode to create your own savable custom brushes.
Occasionally when vertex painting, your mesh may have some faces on it that you don't want to receive any of the color you're currently painting. In this case, you want to define face selection masking by left-clicking the Painting Mask button in the 3D View's header. It has an icon of a cube with one face showing a checkerboard pattern, as shown in Figure 7-13.
Figure 7-13: Enabling the Painting Mask button.
![]()
When you enable the painting mask, you can select faces of your mesh by right-clicking. After you do, these faces are the only ones that are affected by your painting. This method is an excellent way of isolating a portion of your mesh for custom painting without changing the color of the faces around that area. By using a painting mask, you can actually get the hard-edged color changes that you get with material slots, should you want such a thing.
 In order to have your vertex colors appear in your render, you need to enable the Vertex Color Paint check box in the Options panel of Material Properties.