Unwrapping a Mesh
The most precise type of mapping you can use is UV mapping. UV mapping also allows you to take advantage of other Blender features, such as Texture Paint mode and texture baking. With NURBS surfaces, you get UV coordinates for free as part of their structure. However, Blender is predominantly a mesh editor, and in order to get proper UV coordinates on your mesh objects, you must put those meshes through a process known as unwrapping.
To understand this process, think about a globe and a map of the world. The map of the world uses the latitude and longitude lines to relate a point on the three-dimensional surface of the globe to the two-dimensional surface of the map. In essence, the world map is an unwrapped texture on the globe, whereas the latitude and longitude lines are the UVs.
Marking seams on a mesh
You unwrap a mesh in Blender by selecting all vertices (A) and, while in Edit mode (Tab), either pressing U or choosing UV Mapping![]() Unwrap in the Tool Shelf. You then see a menu with a handful of options.
Unwrap in the Tool Shelf. You then see a menu with a handful of options.
However, despite the menu's variety of options, unless your mesh is simple or a special case, you should use the first menu item, Unwrap. Blender has very powerful unwrapping tools, but to take full advantage of them, you need to first define some seams. Remember that you're basically trying to flatten a 3D surface to a 2D plane. In order to do so, you need to tell Blender where it can start pulling the mesh apart. This location on your mesh is a seam. If you were unwrapping a globe, you might choose the prime meridian as your seam. I like to think about seams for unwrapping in terms of stuffed animals, such as a teddy bear. The seam is where the bear is stitched together from flat pieces of cloth.
To add a seam to your mesh, use the following steps:
- Tab into Edit mode and switch to Edge Select mode (Tab
 Ctrl+TabEdges).
You can also add seams from Vertex Select mode, but I find that it's easier in Edge Select.
- Select the series of edges you want to make into a seam (right-clickShift+right-click).
Using edge loop selection (Alt+right-click) can really be helpful here. Everyone has their own tastes when it comes to defining seams, but a good general rule is to put the seams on parts of the mesh that are easier to hide (for example, behind the hairline on a character, the undercarriage of a car, and so on).
- Use the Edge Specials menu to make the seam (Ctrl+EMark Seam or, in the Tool Shelf, UV MappingMark Seam).
Seams on your mesh are highlighted in orange. If you mistakenly make a seam with the wrong edges, you can remove the seam by selecting those edges (right-click) and pressing Ctrl+E
Clear Seam or choosing UV MappingClear Seam in the Tool Shelf.
With your seams defined, you're ready to unwrap your mesh. In order to see what you're doing, though, you should make a couple changes to your screen layout. First, change the viewport shading of your 3D View to textured (Alt+Z). Then split off a new area and change it to be a UV/Image Editor (Shift+F10). Alternatively, you can switch to the default UV Editing screen that ships with Blender by clicking the screen datablock at the top of your Blender window. Your layout should look something like what is shown in Figure 8-6.
Adding a test grid
The next thing you need is an image for mapping to your mesh. Using a test grid — basically an image with a colored checkerboard pattern — is common practice when unwrapping. A test grid is helpful for trying to figure out where the texture is stretched on your mesh. To add a test grid, go to the UV/Image Editor and choose Image![]() New or press Alt+N. A set of buttons like the ones in Figure 8-7 appear. Name the image something sensible, such as Test Grid, and left-click the UV Test Grid check box. Leave the other settings at their defaults for now. The UV/Image Editor updates interactively.
New or press Alt+N. A set of buttons like the ones in Figure 8-7 appear. Name the image something sensible, such as Test Grid, and left-click the UV Test Grid check box. Leave the other settings at their defaults for now. The UV/Image Editor updates interactively.
Figure 8-6: A typical screen layout for UV unwrapping and editing.

Figure 8-7: The New Image buttons for adding a test grid image.

![]() You can unwrap your mesh without adding a test grid, but a test grid gives you a frame of reference to work from when unwrapping.
You can unwrap your mesh without adding a test grid, but a test grid gives you a frame of reference to work from when unwrapping.
Also, note the height and width of the test grid image. The most obvious thing is that it's square; the height and width are equal. When you create the image, you can make it nonsquare, but UV texturing is optimized for square images, so it's in your best interest to keep it square.
Another tip that helps performance when working with UV textures is to make your texture size a power of two — a number that you get by continually multiplying 2 by itself. The default size is 1,024 pixels square, or 210. The next larger size is 2,048 (211) pixels, and the next size down would be 512 (29) pixels.
Generating and editing UV coordinates
All righty, after marking seams on your mesh and adding a test grid for reference, now you're ready to unwrap your mesh. From Edit mode, unwrapping is pretty simple:
- Select all vertices (A).
Remember that the A key is a toggle, so you may have to hit it twice to get everything selected.
- Unwrap the mesh (UUnwrap).
Poof! Your mesh is now unwrapped! If you used a Suzanne to practice unwrapping, you may have something that looks like Figure 8-8.
Figure 8-8: An unwrapped Suzanne head.

From this point, you can edit your UV layout to arrange the pieces in a logical fashion and minimize stretching. You can tell a texture is stretched with your test grid. If any of the squares on the checkerboard look distorted or grotesquely nonsquare-shaped, stretching has taken place. If you don't see the test grid texture on your monkey, make sure that you're using Textured Viewport Shading (Alt+Z). The controls in the UV/Image Editor are very similar to working in the 3D View. The Grab (G), Rotate (R), and Scale (S) hotkeys all work as expected, as well as the various selection tools like Border select (B), Circle select (C), and Edge Loop Selection (Alt+right-click). There's even a 2D cursor like the 3D cursor in the 3D View to help with snapping and providing a frame of reference for rotation and scaling.
If you're trying to fix stretching, you may notice that moving some vertices in your UV layout to fix stretching in one place distorts and causes stretching in another part. To help with this problem, Blender offers you two features: vertex pinning (P) and Live Unwrap (UVs![]() Live Unwrap). They actually work together. The workflow goes something like these steps:
Live Unwrap). They actually work together. The workflow goes something like these steps:
- In the UV/Image Editor, select the vertices that you want to define as control vertices (right-clickShift+right-click).
The control vertices are usually the vertices at the top and bottom of the center line and some corner vertices. I tend to prefer using vertices that are on the seam, but sometimes using internal vertices is also helpful.
- Pin these selected vertices (P).
The vertices now appear larger and are a bright red color. If you want to unpin a vertex, select it (right-click) and press Alt+P.
- Turn on Live Unwrap (UVsLive Unwrap).
If a check mark appears to the left of this menu item, you know it's currently enabled.
- Select one or more pinned vertices and move them around (right-clickG).
As you edit these pinned vertices, all the other vertices in the UV layout automatically shift and adjust to compensate for this movement and help reduce stretching.
 When using pinned vertices and Live Unwrap, selecting and moving unpinned vertices isn't normally going to be very helpful. The moment you select and move a pinned vertex, any manual changes you made to unpinned vertices are obliterated.
![]() You can actually see the changes you make in the UV/Image Editor in real time if you left-click the Lock button (the last button with an icon of a lock) in the header of the UV/Image Editor. The Lock button is enabled by default. Of course, if your computer seems to be performing slowly with this option on, you can always disable it by left-clicking it.
You can actually see the changes you make in the UV/Image Editor in real time if you left-click the Lock button (the last button with an icon of a lock) in the header of the UV/Image Editor. The Lock button is enabled by default. Of course, if your computer seems to be performing slowly with this option on, you can always disable it by left-clicking it.
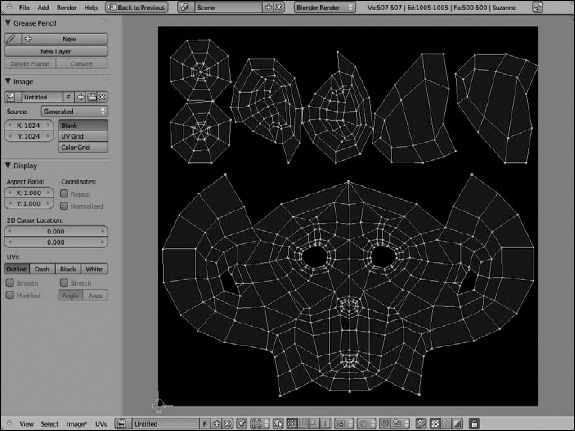
Figure 8-9 shows the unwrapped Suzanne head from before, after a bit of editing and adjustment.
Figure 8-9: An unwrapped and (mostly) stretchless Suzanne head.