3.2 Simple App: Displaying a Line of Text
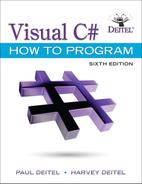
Let’s consider a simple app that displays a line of text. Figure 3.1 shows the app’s source code and its output. The app illustrates several important C# features. Each app we present in this book includes line numbers, which are not part of actual C# code. In the Before You Begin section following the Preface, we show how to display line numbers for your C# code in Visual Studio. We’ll soon see that line 10 does the real work of the app—namely, displaying the phrase Welcome to C# Programming! on the screen. We now discuss each line of the app.

Fig. 3.1 Text-displaying app.
Alternate View
  1   // Fig. 3.1: Welcome1.cs
  2   // Text-displaying app.
  3   using System;
  4
  5   class Welcome1
  6   {
  7      // Main method begins execution of C# app
  8      static void Main()
  9      {
 10         Console.WriteLine("Welcome to C# Programming!");
 11      } // end Main
 12   } // end class Welcome1
Welcome to C# Programming!
3.2.1 Comments
Line 1
// Fig. 3.1: Welcome1.cs
begins with //, indicating that the remainder of the line is a comment. You’ll insert comments to document your apps and improve their readability. The C# compiler ignores comments, so they do not cause the computer to perform any action when the app executes. We begin every source-code file with a comment indicating the figure number and the name of the file in which the code is stored.
A comment that begins with // is called a single-line comment, because it terminates at the end of the line on which it appears. A // comment also can begin in the middle of a line and continue until the end of that line (as in lines 7, 11 and 12).
Delimited comments such as
/* This is a delimited comment.
   It can be split over many lines */
can be split over several lines. This type of comment begins with the delimiter /* and ends with the delimiter */. All text between the delimiters is ignored by the compiler.
 Common Programming Error 3.1
Forgetting one of the delimiters of a delimited comment is a syntax error. A programming language’s syntax specifies the grammatical rules for writing code in that language. A syntax error occurs when the compiler encounters code that violates C#’s language rules. In this case, the compiler does not produce an executable file. Instead, it issues one or more error messages to help you identify and fix the incorrect code. Syntax errors are also called compiler errors, compile-time errors or compilation errors, because the compiler detects them during the compilation phase. You cannot execute your app until you correct all the compilation errors in it. We’ll see that some compile-time errors are not syntax errors.
When the compiler reports an error, the error may not be in the line indicated by the error message. First, check the line for which the error was reported. If that line does not contain syntax errors, check several preceding lines. Error-Prevention Tip 3.1
Line 2
// Text-displaying app.
is a single-line comment that describes the purpose of the app.
3.2.2 using Directive
Line 3
using System;
is a using directive that tells the compiler where to look for a class that’s used in this app. A great strength of Visual C# is its rich set of predefined classes that you can reuse rather than “reinventing the wheel.” These classes are organized under namespaces—named collections of related classes. Collectively, .NET’s predefined namespaces are known as .NET Framework Class Library. Each using directive identifies a namespace containing classes that a C# app should be able to use. The using directive in line 3 indicates that this example intends to use classes from the System namespace, which contains the predefined Console class (discussed shortly) used in line 10, and many other useful classes.
Error-Prevention Tip 3.2
Forgetting to include a using directive for a namespace that contains a class used in your app typically results in a compilation error, containing a message such as “The name 'Con-sole' does not exist in the current context.” When this occurs, check that you provided the proper using directives and that the names in them are spelled correctly, including proper use of uppercase and lowercase letters. In the editor, when you hover over an error’s red squiggly line, Visual Studio displays a box containing the link "Show potential fixes." If a using directive is missing, one potential fix shown is to add the using directive to your code—simply click that fix to have Visual Studio edit your code.
For each new .NET class we use, we indicate the namespace in which it’s located. This information is important, because it helps you locate descriptions of each class in the .NET documentation. A web-based version of this documentation can be found at
https://msdn.microsoft.com/library/w0x726c2
This also can be accessed via the Help menu. You can click the name of any .NET class or method, then press the F1 key to get more information. Finally, you can learn about the contents of a given namespace by going to
https://msdn.microsoft.com/ namespace
So
https://msdn.microsoft.com/System
takes you to namespace System’s documentation.
3.2.3 Blank Lines and Whitespace
Line 4 is simply a blank line. Blank lines and space characters make code easier to read, and together with tab characters are known as whitespace. Space characters and tabs are known specifically as whitespace characters. Whitespace is ignored by the compiler.
3.2.4 Class Declaration
Line 5
class Welcome1
begins a class declaration for the class named Welcome1. Every app consists of at least one class declaration that’s defined by you—the programmer. These are known as user-defined classes. The class keyword introduces a class declaration and is immediately followed by the class name (Welcome1). Keywords (also called reserved words) are reserved for use by C#.
Class Name Convention
By convention, all class names begin with a capital letter and capitalize the first letter of each word they include (e.g., SampleClassName). This naming convention is known as camel case, because the uppercase letters stand out like a camel’s humps. When the first letter is capitalized, it’s known as Pascal Case. A class name is an identifier—a series of characters consisting of letters, digits and underscores (_) that does not begin with a digit and does not contain spaces. Some valid identifiers are Welcome1, identifier, _value and m_inputField1. The name 7button is not a valid identifier because it begins with a digit, and the name input field is not a valid identifier because it contains a space. Normally, an identifier that does not begin with a capital letter is not the name of a class. C# is case sensitive—that is, uppercase and lowercase letters are distinct, so a1 and A1 are different (but both valid) identifiers. Keywords are always spelled with all lowercase letters. The complete list of C# keywords is shown in Fig. 3.2.1
 Good Programming Practice 3.1
By convention, always begin a class name’s identifier with a capital letter and start each subsequent word in the identifier with a capital letter.
C# is case sensitive. Not using the proper uppercase and lowercase letters for an identifier normally causes a compilation error. Common Programming Error 3.2
Using a keyword as an identifier is a compilation error. Common Programming Error 3.3Fig. 3.2 Keywords and contextual keywords.
Keywords and contextual keywords
abstractasbaseboolbreakbyte
casecatchcharcheckedclassconst
continuedecimaldefaultdelegatedodouble
elseenumeventexplicitexternfalse
finallyfixedfloatforforeachgoto
ifimplicitinintinterfaceinternal
islocklongnamespacenewnull
objectoperatoroutoverrideparamsprivate
protectedpublicreadonlyrefreturnsbyte
sealedshortsizeofstackallocstaticstring
structswitchthisthrowtruetry
typeofuintulonguncheckedunsafeushort
usingvirtualvoidvolatilewhile
Contextual Keywords
addaliasascendingasyncawaitby
descendingdynamicequalsfromgetglobal
groupintojoinletnameofon
orderbypartialremoveselectsetvalue
varwhereyield
Class Declaration’s File Name
A class declaration’s file name is usually the class name followed by the .cs file-name extension, though this is not required. For our app, the file name is Welcome1.cs.
Good Programming Practice 3.2
By convention, a file that contains a single class should have a name that’s identical to the class name (plus the .cs extension) in both spelling and capitalization. This makes it easy to identify which file contains the class’s declaration.
Body of a Class Declaration
A left brace, { (in line 6 in Fig. 3.1), begins each class declaration’s body. A corresponding right brace, } (in line 12), must end each class declaration. Lines 7–11 are indented. This indentation is a spacing convention. We define each spacing convention and other conventions that improve program clarity as Good Programming Practices.
Good Programming Practice 3.3
Indent the entire body of each class declaration one “level” of indentation between the left and right braces that delimit the body of the class. This format emphasizes the class declaration’s structure and makes it easier to read. You can let the IDE format your code by selecting Edit > Advanced > Format Document.
Set a convention for the indent size you prefer, then uniformly apply that convention. The Tab key may be used to create indents, but tab stops vary among text editors. Microsoft recommends four-space indents, which is the default in Visual Studio. Due to the limited width of code lines in print books, we use three-space indents—this reduces the number of code lines that wrap to a new line, making the code a bit easier to read. We show how to set the tab size in the Before You Begin section that follows the Preface. Good Programming Practice 3.4
Whenever you type an opening left brace, Error-Prevention Tip 3.3{, in your app, the IDE immediately inserts the closing right brace, }, then repositions the cursor between the braces so you can begin typing the body. This practice helps prevent errors due to missing braces.
It’s a syntax error if braces do not occur in matching pairs. Common Programming Error 3.4
3.2.5 Main Method
Line 7
// Main method begins execution of C# app
is a comment indicating the purpose of lines 8–11 (Fig. 3.1). Line 8
static void Main()
is where the app begins execution—this is known as the entry point. The parentheses after the identifier Main indicate that it’s a building block called a method. Class declarations normally contain one or more methods. Method names usually follow the same capitalization conventions used for class names. For each app, one of the methods in a class must be called Main (which is typically defined as shown in line 8); otherwise, the app will not execute. A method is able to perform a task and return a value when it completes its task. Keyword void (line 8) indicates that Main will not return a value after it completes its task. Later, we’ll see that most methods do return values. You’ll learn more about methods in Chapters 4 and 7. We discuss the contents of Main’s parentheses in Chapter 8. For now, simply mimic Main’s first line in your apps.
Body of a Method Declaration
The left brace in line 9 begins the body of the method declaration. A corresponding right brace ends the body (line 11). Line 10 in the method body is indented between the braces.
Good Programming Practice 3.5
Indent each method declaration’s body statements one level of indentation between the left and right braces that define the body.
3.2.6 Displaying a Line of Text
Line 10
Console.WriteLine("Welcome to C# Programming!");
instructs the computer to perform an action—namely, to display the string of characters between the double quotation marks, which delimit the string. A string is sometimes called a character string, a message or a string literal. We refer to them simply as strings. Whitespace characters in strings are not ignored by the compiler.
Class Console provides standard input/output capabilities that enable apps to read and display text in the console window from which the app executes. The Console.Write-Line method displays a line of text in the console window. The string in the parentheses in line 10 is the argument to the method. Method Console.WriteLine performs its task by displaying its argument in the console window. When Console.WriteLine completes its task, it positions the screen cursor (the blinking symbol indicating where the next character will be displayed) at the beginning of the next line in the console window. This movement of the cursor is similar to what happens when a user presses the Enter key while typing in a text editor—the cursor moves to the beginning of the next line in the file.
Statements
The entire line 10, including Console.WriteLine, the parentheses, the argument "Welcome to C# Programming!" in the parentheses and the semicolon (;), is called a statement. Most statements end with a semicolon. When the statement in line 10 executes, it displays the message Welcome to C# Programming! in the console window. A method is typically composed of one or more statements that perform the method’s task.
3.2.7 Matching Left ({) and Right (}) Braces
You may find it difficult when reading or writing an app to match the left and right braces ({ and }) that delimit a class’s or method’s body. Visual Studio can help you locate matching braces in your code. Simply place the cursor immediately in front of the left brace or immediately after the right brace, and Visual Studio will highlight both.