
5. Text Flow
Adding pages
In the previous chapter, you learned how to get text into a box. The next step is to learn how to route overflow text from box to box and from page to page.
Auto page insertion is used for layouts in which a story flows consecutively from one page to the next, as in a book or booklet. You’ll start by enabling the Automatic Text Box and Auto Page Insertion options. Then when you import or input text into an automatic text box, new pages will be added, if necessary, to contain any overflow text, and text boxes will be linked from page to page. Each layout can have up to 2,000 pages.
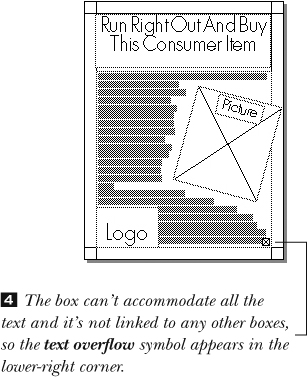
For layouts that contain multiple stories that may flow onto nonconsecutive pages, as in a newsletter, manual linking is a better choice (see page 89).
To turn on Auto Page Insertion for a new project
- Choose File > New > Project (Cmd-N/Ctrl-N) to create a new print project.
- Check Automatic Text Box to have an automatic text box appear on every layout page based on the default master page.
- Choose or enter Page Size, Orientation, Margin Guides, and Column Guides options, then click OK.
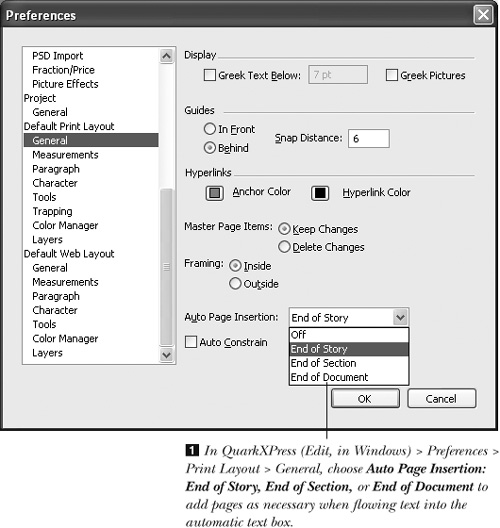
- Choose QuarkXPress (Edit, in Windows) > Preferences > Print Layout > General.
- Choose from the Auto Page Insertion menu the location where you want new pages to be added
 .
.
- Click OK.
A text file created in a word processing program can be imported into a text box or boxes in QuarkXPress, provided its import/export filter is installed and enabled (see page 377). Formats that can be imported include word processing files (such as WordPerfect and Microsoft Word), HTML files, XPress Tags, and plain text with or without XPress Tags.
To import text
- Optional: Turn on Auto Page Insertion (see steps 4–6 on the previous page).
- Choose the Content tool.
- Click in a text box. Click in an automatic text box for automatic page insertion. (If Auto Page Insertion is off, the imported text will flow into a box or a series of linked boxes, but new pages won’t be added.)
- Choose File > Import Text (Cmd-E/Ctrl-E).
or
Control-click/Right-click the text box and choose Import Text.
- Locate and click a text file , then click Open, or double-click the file. In Windows, you can use the “Files of type” menu to narrow or widen the list.
- Check Convert Quotes to convert foot and inch marks into quotation marks (see page 130) and double hyphens into em dashes.
- Optional: Check Include Style Sheets to append style sheets from a Microsoft Word or WordPerfect file or when importing a plain text file with XPress Tags codes.
- Click Open (–
 , next page).

Tip
You can import Excel spreadsheets, also, but only into a table and not into the automatic text box.
Auto Page Insertion on
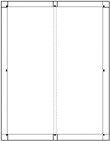
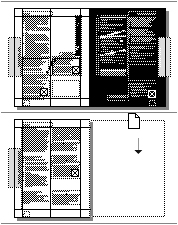
![]() Auto Page Insertion is on, an automatic text box is selected, and then a text file is imported.
Auto Page Insertion is on, an automatic text box is selected, and then a text file is imported.
![]() New pages are created automatically to accommodate the imported text, and the text is linked in a continuous flow.
New pages are created automatically to accommodate the imported text, and the text is linked in a continuous flow.
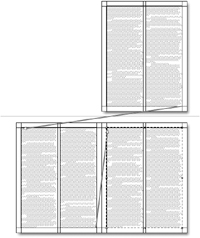
Auto Page Insertion off
![]() Auto Page Insertion is off, a non-automatic text box is selected, and then a text file is imported.
Auto Page Insertion is off, a non-automatic text box is selected, and then a text file is imported.
New pages can be added to a layout using either the Insert Pages dialog box or the Page Layout palette. We tend to use the Page Layout palette to add single pages and the dialog box to add multiple pages.
To insert pages using a dialog box
- Optional: We take a methodical approach to adding pages, since it can have a domino effect on the existing pages in a layout. Our first step is to save our file, so we can use Revert to Saved if we need to. Our second step is to choose Page > Go to (Cmd-J/Ctrl-J), enter the number of the page we want pages inserted before or after, and then click OK.
- If you want to link the new pages to an existing text chain, choose the Item or Content tool, then click a box in the chain.
- Choose Page > Insert.
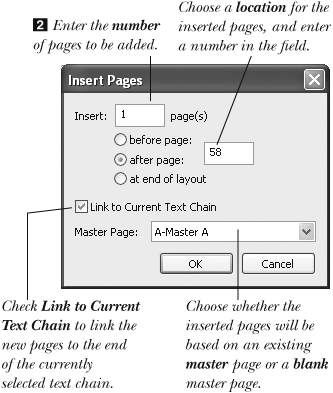
- In the Insert field, enter the number of pages to be inserted (1–1999)
 .
.
- Click “before page,” “after page,” or “at end of layout,” and make sure the correct page number appears in the field. The number of the currently displayed page will appear there, but you can enter a different number. If the page has a prefix or Roman style that was assigned via the Section command, type it that way.
- Choose Master Page: Blank Single, Blank Facing Page, or a master page.
If you want to link the new pages using an automatic text box, choose a Master Page that contains an automatic text box, and check Link to Current Text Chain. (Linking is covered on pages 89–91 in this chapter; Chapter 14 is devoted entirely to master pages.)
- Click OK. The Insert Pages command can’t be undone but the inserted pages can be deleted or you can choose Revert to Saved.
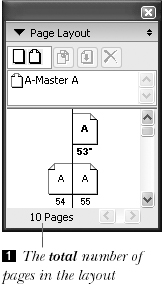
Need to know the total number of pages in a layout? Make sure no page icons are selected on the Page Layout palette, then look at the total page count readout in the lower-left corner of the palette ![]() .
.
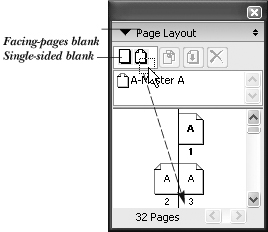
If you check Facing Pages in the New Project or New Layout dialog box for a print layout, all pages after the first page will be stacked in pairs along a central spine. This format is used for books and magazines. On the Page Layout palette, facing-page icons have a turned-down (dog-eared) corner.
If you uncheck Facing Pages in the New Project or New Layout dialog box, pages will be stacked singly. Single-sided page icons have square (not dog-eared) corners. To create a spread in a single-sided layout, you can arrange your layout page icons side by side (see the following page). To convert a layout from single-sided to facing-pages, or vice versa, see page 247.
Beware! Few Page Layout palette operations can be undone. So do yourself a favor and save your file before performing any of those operations. Then, if something goes awry, you can resort to File > Revert to Saved to rescue your file.
To insert pages using the Page Layout palette
- Choose Window > Page Layout (F10/F4).
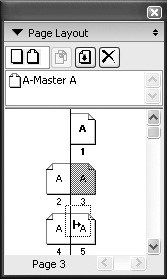
- Drag a blank or master page icon into the layout page area (–, this page and –, next page). A blank page won’t be associated with a master page and won’t have an automatic text box, but a master page can be applied to it at any time (see page 251).
 Drag a blank page icon to insert a new page......or drag a master page icon.
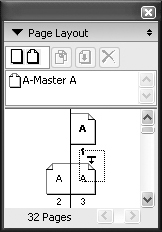 To insert a page between spreads in a facing-pages layout, release the mouse when the Force Down pointer is displayed.
 In a facing-pages layout, if you release the mouse when the Force Right pointer is displayed, subsequent pages may reshuffle leading to duplicate master page items on layout pages. Pages won’t reshuffle in a single-sided layout.
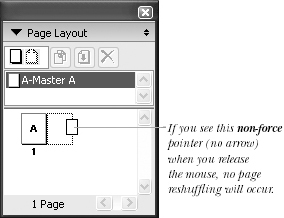
 To create a spread in a single-sided layout drag a new page next to an existing page. Choose a very small view size for your layout so you can see how the new arrangement looks.
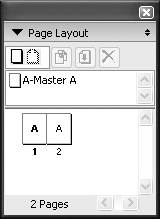 With the page icons in this arrangement, pages 1 and 2 display side by side in the project window. The maximum overall width is 48". Pages will print singly unless Spreads is checked in File > Print.

Tip
You can’t insert a page to the left of the first page in a facing-pages layout, unless the layout begins with an even section number (see page 96).
Tip
If you Option-drag/Alt-drag a blank or master page into the layout page area, the Insert Pages dialog box will open.
Deleting pages
Both methods on this page work equally well for deleting pages. It all comes down to personal preference—whether you’re a dialog box kind of person or a palette kind of person.
To delete pages using a dialog box
- Choose Page > Delete.
- Enter a number in the first field to delete one page.
or
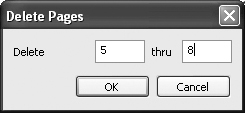
Enter numbers in both fields to delete a range of pages
. If a page has a prefix or Roman style that was assigned via the Section command, type it in exactly that manner. You can enter “end” in the second field to delete pages from the starting number through the end of the layout. Enter starting and ending page numbers if you want to delete a series of pages. - Click OK. You can’t undo this.
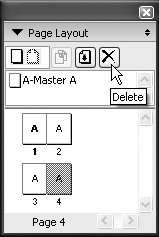
To delete pages using the Page Layout palette
- On the Page Layout palette:
Click a layout page icon
. To delete a page, click its icon, then click the Delete button.or
Click the icon of the first page in a series of pages to be deleted, then Shift-click the icon of the last page in the series.
or
Cmd-click/Ctrl-click nonconsecutive page icons. (Cmd-click/Ctrl-click a selected page icon if you need to deselect it.)
- Click the Delete button on the palette, then click OK when the prompt appears . You can’t undo this, either.
Click OK when this prompt appears.
or
Option-click/Alt-click the Delete button on the palette to bypass the prompt.

Rearranging pages
If you rearrange pages in Thumbnails view, you will be less likely to move the wrong ones, because you’ll be able to see which ones you’re moving.
Note: Before proceeding with the instructions on this page, which can’t be undone, we recommend that you save your file.
To rearrange pages in Thumbnails view
- Choose View > Thumbnails (Shift-F6).
or
Press Control-V/Ctrl-Alt-V, press “t”, then press Return/Enter.
- In the project window, drag a page icon to a new location . If automatic page numbering was applied to the layout, the numbers will update to reflect their new position.
A page being dragged to a new location in thumbnails view
- Choose a different zoom level for the layout.
Tip
To move more than one page at a time in Thumbnails view, click the first page in a series of consecutive pages, Shift-click the last page in the series, then drag. Or Cmd-click/Ctrl-click to select nonconsecutive pages, then drag.
Tip
You can also rearrange layout pages using the Page > Move dialog box.
To rearrange pages using the Page Layout palette
- Choose Window > Page Layout (F10/F4).
- Drag a layout page icon to a new location –.
If you force a page between two pages in a facing-pages layout, the remaining pages may reshuffle. Note the Force Right pointer. If you force a page between two spreads in any kind of layout, the remaining pages won’t reshuffle. Note the Force Down pointer.
or
Click the icon of the first page in a series of pages to be moved, Shift-click the icon of the last page in the series, release Shift, then drag the pages to a new location. Or Cmd-click/Ctrl-click to select nonconsecutive pages, then drag.

Linking/unlinking text items
Text that flows from one box, path, or cell to another, whether linked manually or automatically, is called a story. Manual linking can be used in addition, or as an alternative, to using the automatic text box. In a print layout, you can manually link text boxes or paths on the same page or on different pages within the same layout. You can also link cells within the same table or from table to table. In a Web layout, the only thing you can link are boxes on the same page. (To link all the cells in a table, see pages 139–140.)
To link text items manually
- With no items selected, choose the Linking tool.

- Click a text box, text path, or table cell. It can contain text or it can be empty. A “marching ants” marquee will appear .
- Click an empty text box, path, or table cell. An arrow will appear briefly, showing the new link –. A new item can be added at any juncture in an existing chain.


Tip
If you click the wrong item initially with the Linking tool, choose a different tool or click outside the box to stop the ants from marching.
To unlink text items
- With no items selected, choose the Unlinking tool.

- Click one of the text boxes, paths, or table cells in the chain to be unlinked.
- Click the head or tail of the link arrow . Links preceding the break will remain intact; the link to succeeding boxes, paths, or cells will be broken . (You can undo this.)


Tip
If you’re unable to unlink with the Unlinking tool, make sure there are no other items obstructing the one that you’re trying to click.
Tip
If you click in a linked box with the Content tool, you can press the up or down arrow on the keyboard to jump from the first line in the box to the last line of the previous box in the chain or from the last line in the box to the first line in the next box in the chain.
Tip
If you rearrange pages in a text chain, the links will stay intact.

To delete a text item from a chain and preserve the chain
- Choose the Item or Content tool.
- Select the text item to be deleted.
- Choose Item > Delete (Cmd-K/Ctrl-K). Simple! The text will be rerouted to the next item in the chain. You can undo this.
To unlink a text item from a chain and preserve the item and chain
- Choose the Unlinking tool.
- Shift-click inside the text box, path, or table cell to be unlinked –.
The middle box has been unlinked from the chain.


Tip
Using Linkster from GLUON, Inc. (at press time, the QuarkXPress 7 version is Mac-only) you can perform magic tricks, like unlinking a chain and having the text stay right where it is.
Working with blocks of text
If you’re doing a rough layout and you need some mock text to fill in some boxes on your page, you can have Jabberwocky do the work for you. You have a choice of four default “languages,” in prose or verse. If you’re ambitious or have a light schedule, you can create and edit your own jabber.
Jabberwocky, if you don’t happen to know, is the name of a wonderful poem in the book Through the Looking Glass by Lewis Carroll (“Twas brillig, and the slithy toves did gyre and gimble in the wabe...”). Love that book.
To fill text boxes with dummy text
- Optional: To specify the kind of text to be inserted, choose QuarkXPress (Edit, in Windows) > Preferences > Application > Jabberwocky, choose English, Esperanto, Klingon, Latin, or a custom language from the Language menu , choose Prose or Verse from the Format menu, then click OK.
Choose a “language” in Preferences > Application > Jabberwocky.
- To fill a text box/path or a series of linked boxes/paths with dummy text based on the parameters chosen in Jabberwocky Preferences, choose the Content tool, click in a text box or path, then choose Utilities > Jabber –.
Klingon verse The point of using dummy text is to create a text “texture.” If you find any of the jabber languages distracting or idiotic, by all means don’t use them. You can customize the language so the word length is more typical of an individual project. This is QuarkXPress’s English prose jabber.
Note: The Jabberwocky.xnt XTension, which ships with QuarkXPress 7, must be enabled in order to access this feature (see page 377).
Note: If Jabber is used to fill a chain of boxes or paths, the text will stop at the end of the last box or path in the chain; there will be no hidden, overflow text.


You can invent your own Jabberwocky language or edit an existing language.
To create or edit a Jabberwocky set
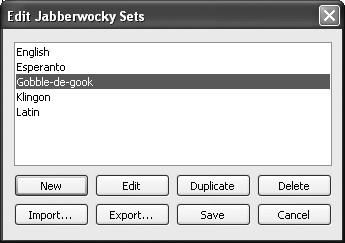
- Choose Edit > Jabberwocky Sets.
- Click an existing set, then click Edit .
You can create, edit, duplicate, or delete a Jabberwocky set using the Edit Jabberwocky Sets dialog box.
or
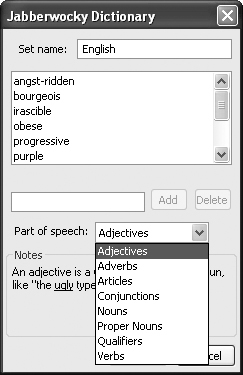
- Here’s where the fun starts. Choose a Part of Speech from the menu, type a real or made-up word in the field, then click Add . (To delete a word, click it, then click Delete.)
Use the Jabberwocky Dictionary dialog box to add or delete words from a Jabberwocky set.
- Click Save . The new set will appear on the first menu in the Jabberwocky Preferences dialog box.
Custom jabber

The Line Check command can be used to find out how many overflow text boxes are present in a layout, along with other typesetting data, and if you want, it can get your cursor to each occurrence.
To use the Line Check command
- Choose Utilities > Line Check > Search Criteria.
- Check or uncheck any boxes to include/exclude those criteria from the search .
In the Search Criteria dialog box, choose what you want QuarkXPress to search for.
- Optional: Click Count, note the quantities listed, then click OK.
- To start the search, click in a text box, then choose Utilities > Line Check > First Line. The first instance found of any of the items you checked in step 2 will be selected in the layout.
- To jump from one instance to the next, press Cmd-;/Ctrl-;.

When text is linked between nonconsecutive pages, as in a newsletter or magazine, there is usually an indicator to guide the reader to the continuation of the story or article. These “Continued on” and “Continued from” indicators are called “jump lines.” When the Next Box Page Number character is inserted, like magic, it instantly converts into the page number of the next linked box in the chain. If that text is relinked or moved to a different page, the page number will update automatically.
To insert a “Continued on” character
- Choose the Rectangle Text Box tool. Or if you want to get fancy, choose a Bézier Text Box or Text-Path tool.
- Create a separate, small box or path that overlaps the text box that contains the story, and keep it selected.
- Choose the Content tool.
- Type any desired text into the small box, such as “Continued on page,” or use a graphic symbol, such as an arrow. The keystrokes for entering Zapf Dingbat characters are in Appendix A.
- Choose Utilities > Insert Character > Special > Next Box Page # (Cmd-4/Ctrl-4) to insert the Next Box Page Number character –. Don’t enter the actual page number—it will appear automatically.
If the characters <None> appear instead of a page number, either the text box or path that contains the Previous or Next Box Page Number character isn’t overlapping a linked text box or the text box it overlaps isn’t linked to a box on another page. You can create a jump line on a text path.
Tip
Press the down arrow on the keyboard to move the text insertion point from the last line of text in a box to the first line of text in the next box in the chain (or press the up arrow to do the reverse).


To insert a “Continued from” character
Follow the instructions above, but for step 5, Choose Utilities > Insert Character > Special > Previous Box Page # (Cmd-2/Ctrl-2) to insert the Previous Box Page Number character ![]() .
.

To drag-copy pages from one layout or project to another
- Open the project containing the source layout and display it. Open the project containing the target layout and display it.
- If the layouts are in the same project, choose Window > Split Window > Horizontal (or Vertical). If the layouts are in different projects, in Mac OS X, choose Window > Tile. In Windows, choose Window > Tile Vertically.
- Then for each window, choose View > Thumbnails.
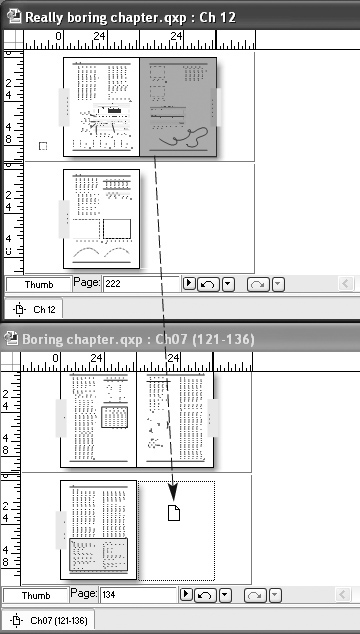
- Drag a page icon from one project window into the other . A copy of the page will appear in the target project window. Pages will reshuffle depending on where you release the mouse (watch for the Force Right, Force Left, Force Down, or non-force pointer).
Drag-copying pages in Thumbnails view from one project window to another
or
To drag multiple pages, click the first page in a series of consecutive pages, Shift-click the last page in the series, then drag. If the pages to be drag-copied contain linked text, copy all the linked pages at once instead of one by one. Otherwise, the text from the linked boxes will copy, but the links will be broken.
Notes: You can’t copy a page to a layout whose page size is smaller than the one you’re copying. A page to which a facing-pages master has been applied can be copied to a single-sided layout, but items on the page may be repositioned as a result. Any style sheets, colors, dashes & stripes, lists, H&Js, or master pages on the appending pages will be added to the target layout. And finally, all the layers from the destination layout are copied to the target layout.
The Section command renumbers all or some of the pages in a layout with a user-specified starting number. This is useful for publications such as books that are composed of multiple files. You can choose a different page numbering format for each section. For example, in this book, the lowercase Roman format is used for the table of contents and the numeric format is used for the main body of the book.
Note: To make the page numbers actually appear on your layout pages, follow the instructions on page 248.
To number a multifile layout automatically, you can use the Book feature (see Chapter 21).
To number a section of a file
- Display the layout page where the new section is to begin by double-clicking its icon on the Page Layout palette.
or
Choose Page > Go to (Cmd-J/Ctrl-J), enter the number of the page that is to begin the new section, then click OK.
- Click the Section button
 at the top of the Page Layout palette.
or
Choose Page > Section.
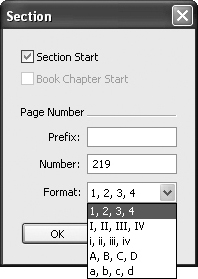
- Check Section Start . (Book Chapter Start is available only when a chapter is opened independently of its book.)
Check Section Start, enter a Prefix (if desired), enter the starting Number, and choose a numbering Format.
- Enter the desired starting Number for the section.
- Optional: Enter a maximum of four characters in the Prefix field (e.g., “Page”).
- Optional: Choose a different numbering Format.
- Click OK.
Tip
If you choose an even-numbered page to start a section in a facing-pages layout, the first page will become a lefthand page.

Using the Next Box and Next Column characters
The Next Box character pushes text to the next box in a linked chain. The Next Column character pushes text to the next column within the same box (or in some cases, the next text box in the chain).

The original text boxes
Instead of shortening the text box to push the text to the next box, a Next Box character (Shift-Enter)* is inserted. Remove a Next Box character as you would any text character: Click to the right of it with the Content tool, then press Delete/Backspace.
QuarkXPress 7 makes it easier to enter special characters, especially for the numerickeypad-challenged. See the next page to learn how.
*Use the numeric keypad.

The contents of the Utilities > Insert Character > Special menu in Mac OS X

The contents of the Utilities > Insert Character > Special (Nonbreaking) menu