
21. Books
Books, lists, and indexes
In this chapter we cover three features: books, lists, and indexing.

Like libraries, book palettes have their own unique file icons and can be opened using File > Open.
In QuarkXPress, a book is an umbrella file that’s used for organizing and synchronizing multiple chapter files. A book can be any kind of publication that comprises more than one QuarkXPress file (e.g., magazine, newsletter, manual). Once individual book chapter files are united into a book, all of its style sheets, colors, H&Js, lists, and dashes & stripes are then derived from the file that you designate as the master, and page numbering flows continuously from one file to the next. In a workgroup situation, individual chapters of a book can be open and edited simultaneously on a network. If a book is edited at one station, any open copies of the same book on other stations will update automatically. Each book has its own book palette ![]() and can contain up to 1,000 chapters.
and can contain up to 1,000 chapters.
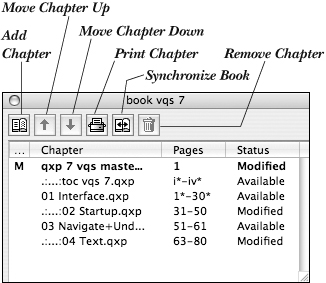
![]() A master file and several chapter files are displayed on this Book palette.
A master file and several chapter files are displayed on this Book palette.
A list is a compilation, from one or more projects, of text passages that have the same paragraph or character style sheet applied to them. A common use for this feature would be to construct a table of contents. Via the Lists palette, you can choose options, such as whether the list will be alphabetized and whether it will include page numbers.
And lastly, you can create an index by manually tagging individual entries in a layout and then assigning an indent level and other formats to each entry via the Index palette (yup, it’s as time-consuming as it sounds!). You can generate a different index for each layout in a project or an index for an entire book.
Creating books
Before creating a book, you need a master file. Specifications from this master will be applied to all the book chapters.
To create a master file
Create a new file that contains only the master page(s), style sheets, colors, H&Js, lists, and dashes & stripes that you want all the chapter files to share. Insert the Current Page Number character (Cmd-3/Ctrl-3) into a text box on the master page. Save the file (you can include the word “master” in the title to help prevent confusion later).
or
Open an existing file, and use File > Save As to save a copy of it (use the word “master” in the name). Delete all the text and all the pages except the first page, then resave the file. As with a new file, make sure it contains only the master pages, style sheets, colors, H&Js, lists, and dashes & stripes that you want all the chapter files to share, and make sure it contains the Current Page Number command in a text box on the master page.
You can use File > Append to append style sheets, colors, lists, etc. from any other file to the master.
To create a book
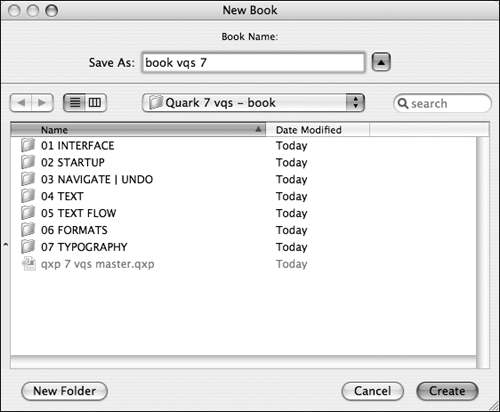
- Choose File > New > Book.
- Enter a name for the book, and choose a location in which to save it
 .
Type a name for the book, then click Create.
.
Type a name for the book, then click Create. - Click Create (Return/Enter).
- In the top-left corner of the Book palette that opens, click the Add Chapter button.

- Locate and click the name of the file that you want to serve as the master
 , then click Add (Return/Enter)
  . Now you can start adding chapters to the book (follow the instructions on the next page).


To add chapters to a book
- Prepare the chapter files. You can use File > Export > Layout as Project to generate copies of the master file, or you can use existing files. Chapters in an individual book don’t have to have the same page size.
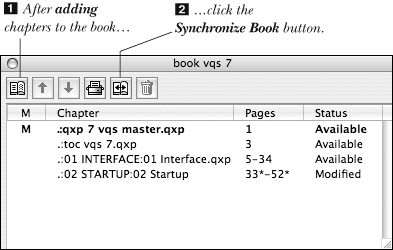
- Click the Add Chapter (leftmost) button on the Book palette, locate and click the name of a file that you want to add as a chapter in the book, then click Add (Return/Enter) . Repeat this step for any other files that you want to add as chapters. The actual files don’t have to be open.
Note: If no chapter name is selected when you click the Add Chapter button, the new chapter will be added at the end of the list. If a chapter name is selected when you click the Add Chapter button, the new chapter will be added directly after the selected one.
Note: A project can be added to a book only if it contains one, and only one, print layout. If it contains more than one layout, make copies of the project using Save As, delete all the layouts but one in each copy, then add any of those separate files to the book.
- Click the Synchronize Book button .

- In the Synchronize list in the Synchronize Selected Chapters dialog box, click the items from the master chapter that you want to add to all the chapter files (click, then Shift-click to select consecutive items; or Cmd-click/Ctrl-click to select nonconsecutive items), then click the right arrow in the middle of the dialog box to add the selected items . (Click the left arrow at any time to remove the currently selected items.)
Use the Synchronize Selected Chapters dialog box to specify which Style Sheets, Colors, H&Js, Lists, and Dashes & Stripes are to be added to all the chapter files.
or
Click Include All to include all the items in the currently displayed category.
Tip
Remove All removes all the items in the current category from the Including window; Reset All eliminates your selections from all categories.
or
Click Synch All to synchronize everything from the master file to the chapter files.
- Click OK, and answer any warning prompts. Page numbering will advance incrementally through the chapter files (unless any files contain section numbering; see page 344).
- Close the Book palette by clicking the close button. All open book chapters will also close; you’ll be prompted to save changes, if any were made.
Tip
Once chapters have been added to a book, all you have to do is double-click a chapter name on the palette to open that chapter.
Tip
A chapter file can be part of only one book at a time. To get around this, you can open the file and make a copy of it (being sure to change its name) using File > Save As. Then you can use the copy in a different book.

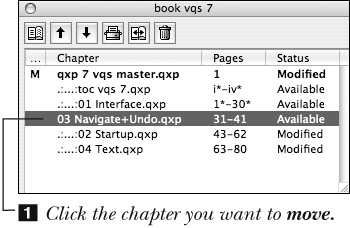
To change the chapter order
On the Book palette, click a chapter name, then click the Move Chapter Up button ![]() or Move Chapter Down button
or Move Chapter Down button ![]()
![]() –
–![]() .
.

or
Drag a chapter name upward or downward to a new spot on the chapter list ![]() .
.

![]() You can also restack a chapter by dragging it upward or downward.
You can also restack a chapter by dragging it upward or downward.
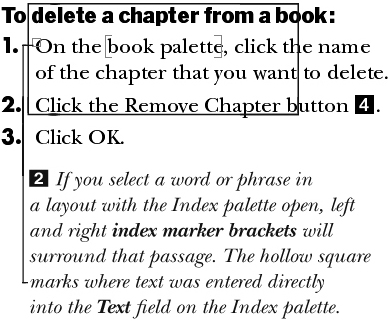
To delete a chapter from a book
- On the Book palette, click the name of the chapter that you want to delete.
- Click the Remove Chapter button.
- Click OK.
If you work with a book on a network, you’ll need to look in the Status column on the Book palette to find out if someone else on the network has a chapter of that book open. On a network, chapters should always be opened and closed from the server.
Deciphering the Status column
Available ![]() means that the chapter can be opened.
means that the chapter can be opened.

Open means that the chapter is open at your station.
[Other station name] means that the chapter is open at another station on the network.
Modified means that the chapter was opened and edited outside the book when the Book palette was closed. To update it, double-click the chapter name on the Book palette, then close the newly opened project window.
Missing means that the chapter was moved. To relink the chapter to the book, double-click its name on the palette, then locate and open the file.
To edit the master file
- Double-click the master file on the Book palette.
- Create new style sheets, colors, H&Js, lists, and dashes & stripes in the master file, or use the File > Append command to add any of those elements from another file to the master file.
- Make sure all the chapters in the book have a status of Available. If a chapter has a Modified status, double-click it, then close it.
- Click the Synchronize Book button to add the new elements from the master file to all the book chapters.
- Click OK.
Numbering pages in a book
There are two ways to number pages in a book, both of which we discuss below. With either method, for any numbering to show up on any layout pages, the Current Page Number character (Cmd-3/Ctrl-3) must be inserted into a text box on the master page of the master file.
One option is to let the page numbering occur automatically without doing anything. Chapters will have their pages numbered sequentially, and Book Chapter Start will be checked in the Page > Section dialog box for each one ![]() .
.

![]() This is the default setting in the Section dialog box for a book.
This is the default setting in the Section dialog box for a book.
A second option is to control the numbering yourself. On the Book palette, double-click the name of the chapter that is to begin a section, choose Page > Section, check Section Start ![]() , then enter a Number. Choose other options just as you would for a normal file. Section numbering will proceed through subsequent chapters up to the next section start, if there is one. You can make the first chapter (not the master) the beginning of the section, thus keeping the master outside the main flow of pages.
, then enter a Number. Choose other options just as you would for a normal file. Section numbering will proceed through subsequent chapters up to the next section start, if there is one. You can make the first chapter (not the master) the beginning of the section, thus keeping the master outside the main flow of pages.

![]() To apply custom page numbering, click Section Start, then enter a starting page Number. If you want, you can also enter a Prefix and/or choose an alternative numbering Format.
To apply custom page numbering, click Section Start, then enter a starting page Number. If you want, you can also enter a Prefix and/or choose an alternative numbering Format.
All book chapters adopt either the number format used in the first chapter file that’s listed on the Book palette or any manual Section Start that occurs in any chapter that’s listed above other chapters. Also, any master file counts as a page. To have chapter 1 start as page 1, set up a custom page number of 1 in the Section dialog box for that chapter.
To print book chapters
- To print an individual chapter in a book, click its name on the Book palette. Only a chapter file with a status of Available or Open will print. The chapter doesn’t have to be open.
or
To selectively print more than one chapter, Cmd-click/Ctrl-click individual chapter names, or click and then Shift-click to select consecutively listed chapters.
or
To print a whole book, make sure no chapter names are selected (click in the blank area below the chapter names), and make sure no chapters have a Missing or Modified status or are open at another station on the network.
- Click the Print Chapters button.

- Choose the desired Print settings (including a Print Style, if desired), then click Print.
To designate a different chapter as the master
- On the Book palette, click the name of the chapter that you want to become the new master .
- Click in the blank area to the left of the chapter name .
Chapter 4 is now the master file.


Creating lists
The purpose of the Lists feature is to generate a table of contents or other list for a layout (or a book), with or without page reference numbers, and with or without alphabetization ![]() . It works by grabbing chapters names and numbers, section subheads, captions, sidebars, reference tables, etc. from a layout by searching for the style sheets that are assigned to paragraphs and characters.
. It works by grabbing chapters names and numbers, section subheads, captions, sidebars, reference tables, etc. from a layout by searching for the style sheets that are assigned to paragraphs and characters.
![]() A list can consist of anything from a simple alphabetized shopping list to a whole table of contents for a book.
A list can consist of anything from a simple alphabetized shopping list to a whole table of contents for a book.
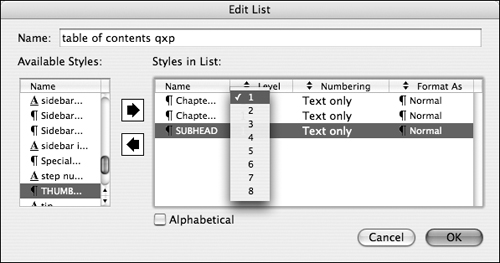
For example, let’s say you want all your text that has been assigned a subhead style to be gathered into a table of contents. First you use the Edit List dialog box to specify which style sheets are to be searched for. Then you decide how the list will be formatted. And finally, you use the Lists palette to preview and build the actual list.
To summarize, these are the basic steps you’ll follow to create a list:
• Create a list definition by choosing which style sheets you want the program to search for throughout the layout or book, and by choosing format options.
• Preview the list in the scroll window on the Lists palette.
• Build the actual list in a text box in a layout.
To create and build a list definition for a project, follow the instructions starting on this page. To create and build a list for a book, follow the instructions on pages 350–351. The list definition you create draws only from the currently active layout when you preview and build it, but it can be reused for any other layouts in the same project or appended to other projects.
To create a list definition for a project
- Create separate style sheets for styling the list. And make sure your project’s style sheets are consistent and are applied correctly to the categories of text that you want to appear in the table of contents.
- If you’re generating a table of contents from one project, open that project now.
- Choose Edit > Lists, click New (, previous page) then enter a Name for the list definition .

- On the Available Styles scroll list, click the style sheet name (text category) to be searched for in the project , then click the right-pointing arrow to add that style sheet to the Styles in List window . Or just double-click the style sheet name.
To add multiple style sheets at a time, click and then Shift-click to select a consecutive series, or Cmd-click/Ctrl-click to select multiple style sheet names individually, then click the right-pointing arrow. (Click the left-pointing arrow if you need to remove a style sheet from the Styles in List area.) You can select both paragraph and character style sheets for a list.
- Click a style sheet in the Styles in List area and then, from the drop-down menus, choose the following:
The Level of indent text you want that style sheet content to have in the list (1, 2, 3, and so on)
 . For example, you might assign level 1 to chapter names, the level 2 to headers, the level 3 to subheads, and so on. For each style sheet category, choose an indent Level,...
A page Numbering style
 . Choose Text...Page # if you want the page number to follow the text; choose Page #...Text if you want the page number to precede the text. Choose “Text only” if you don’t want page numbers to appear at all. ...choose a Numbering option,...
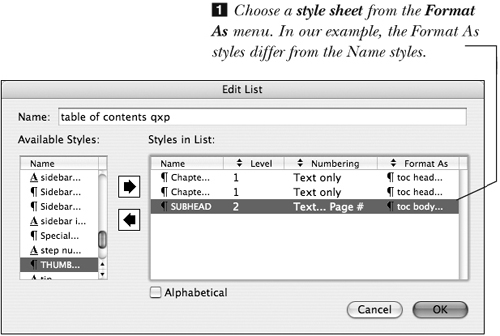
Which style sheet (from the Format As menu) will be applied to that text category
. If you created a style sheet(s) specifically for the list, this is the time to choose it.Do the same for the other style sheets.
- Optional: Check Alphabetical to have items on the list appear in alphabetical order rather than the order in which they appear in the layout.
- Click OK.
- Click Save. Follow the instructions on the next page to build (generate) the list.
Tip
In the Lists dialog box, click Duplicate to duplicate the currently selected list if you want to create a variation of it; click Delete to remove the currently selected list. To append a list from another project, follow the intructions for appending specifications on pages 49–50.
Tip
The maximum number of style sheets that can be chosen for a list definition is 32. The maximum number of characters per paragraph that a list can contain is 256.
Tip
For a list level that contains page number references, choose a style sheet with a right tab and a dot leader. The tab character will be inserted automatically.


Once a list definition has been created and saved with your Levels, Numbering, and Format As (style sheet) choices, it’s time to use the Lists palette to preview and build the actual list.
To preview and build a list for a layout
- Display the layout for which you want to build a list.
- Make sure that Window > Lists is checked (Option-F11/Ctrl-F11).
- Choose Show List For: Current Layout .
From the Show List For menu in the Lists dialog box, choose Current Layout.
- From the List Name menu, choose the list that you want to build . The list will preview in the scroll window on the palette . If necessary, click Update.
Choose an existing list from the List Name menu. This Lists palette is displaying a layout’s table of contents.
- Choose the Content tool, and in the same layout, click in an empty text box to create an insertion point. It can be either a new box or the first in a chain of linked text boxes.
A list also can be appended to the end of a block of text. For example, you can write an introductory paragraph, and then have the list start after that paragraph.
- Click Build on the Lists palette. The list will be built in the selected text box (or series of linked boxes), using your list definition, that is, the formatting options that were chosen in Edit > Lists.
Tip
Beware! Don’t delete any style sheets from a project that were used in a list. If you do, text that those style sheets were assigned to won’t appear on the list when you build it.
Tip
The stacking order of text boxes determines how entries will be listed, with the frontmost box on a page appearing first. If your chapter title box is stacked in front of the chapter number box, the chapter title will be listed first.


Note: Before executing these instructions, make sure the book’s master file contains all the style sheets that are used in the book and a list definition has been created for that master. Also make sure that all the book chapters have a status of Available.
To create a list definition for a book
- Close all open files, open the book file (its Book palette will also open), and open the master file.
- Choose Edit > Lists.
- Create a new list definition (see pages 346–347).
or
Click Append, locate and open the file that contains the list definition you want to use, click the name, click the right-pointing arrow, click OK
, and finally, respond to any name conflicts. - Click Save, then save and close the master file.
- On the Lists palette (Window > Lists or Option-F11/Ctrl-F11), make sure the book file is chosen in the Show List For menu.
- Deselect all chapter names, then click the Synchronize Book button on the Book palette.
- In the Synchronize Selected Chapters dialog box, click Lists, select the desired list definition name, click the right-pointing arrow to include that list definition, then click OK. (Click OK in any alert dialog boxes.)
- Make sure the list definition chosen in the previous step appears on the List Name menu on the Lists palette, then click Update. The list that’s generated from all the chapters will display on the palette –. Note: If the list doesn’t preview correctly, try opening the master file first, then click Update.
The list previews on the Lists palette.
Tip
If you renumber or rearrange pages in a book, you’ll have to update and rebuild the list to make it current.


This is part of a list (table of contents) that was built from a book. This list is styled using style sheets that were created specifically for the list and assigned via the Format As menu in the Edit List dialog box.
Perform the following steps after creating and updating a list definition for your book file (instructions on the previous page).
To build a list for a book file
- Create a new chapter for the book. One way to do this is by opening the master file, generating a copy of it using File > Save As, and stripping out the text from the new chapter. If it’s going to be a table of contents and you want it to have its own numbering format, choose Page > Section, check Section Start, enter a Number, and choose a Format. And finally, make sure the file contains only one layout!
- Add the new chapter to the book: Click the Add Chapter button on the Book palette, then locate and open the new chapter.
- Click the Synchronize Book button on the Book palette to copy the style sheets, colors, etc. from the master file to the new file, then click OK.
- Click in a blank text box in the newly created chapter file.
- On the Lists palette, choose Show List For [book name].
- Optional: Turn on Auto Page Insertion in QuarkXPress (Edit, in Windows) > Preferences > Print Layout or Web Layout > General for the new chapter if you want overflow text from the list, if any, to flow into linked boxes on additional pages.
- If the Build button is dimmed, click Update.
- Click Build. The list will appear in the text box (or boxes).
To revise a list
- Open the project and open the Lists palette (Option-F11/Ctrl-F11).
- Choose a List Name.
- For a nonbook file, double-click an entry; that text will become selected in the project window . With any book chapter file open, if you double-click an entry from any chapter file, the chapter file will open and the text will become selected.
- Make any modifications to the text in the layout. For example, to prevent a text passage from appearing on the list, apply any style sheet to it that isn’t being searched for in the list.
- Click Update on the Lists palette to update the list preview.
- If you’re going to rebuild the list in the same project, click in the text box that contains the list. Or if you’re going to insert the rebuilt list and leave the old list unchanged, click exactly where you want the new one to appear. If the list is in a separate chapter of a book, open that chapter now.
- Click Build.
- Click Insert to build a new list and leave the old list unchanged .
or
Click Replace to replace the current list with the new list
.You can’t undo either operation.
Tip
You can reformat a built list manually or apply different style sheets to it, but such changes will be lost if you rebuild the list using the Replace option.
Tip
If the list on the palette is long and you want to quickly find a particular line, type the first word of the line in the Find field; a line will become selected after you start typing
. You have to type enough of the entry to differentiate it from similar entries. An entry that was typed into the Find field on the Lists palette is found in the list.


Indexing
Indexes are layout-specific, so you’ll need to build a different index for each layout in a project. You can also build an index that covers all the chapters in a book. Building an index requires four main steps, in roughly this order:
• Create the style sheets for the index itself, for letter headings, for the entries themselves, etc.
• Mark all the text that is to be referenced in the index.
• Build the index ![]() –
–![]() .
.

![]() Portions of a built index in the Run-in format
Portions of a built index in the Run-in format

![]() Part of a built index in the Nested format: A comma with a space “,” was specified for Separation Characters: Following Entry in Index Preferences.
Part of a built index in the Nested format: A comma with a space “,” was specified for Separation Characters: Following Entry in Index Preferences.
• Look over the index, and edit it where necessary.
Use the Index palette to mark and format index references for individual text strings in a layout. This is a time-consuming process. After that you’ll build the index itself in the same file or in a separate file.
To mark a layout for indexing
- Enable Quark’s Index.xnt XTension, if it’s not already enabled.
- Display a layout to mark for indexing or create a new layout to be marked as you enter text.
- If you’re going to do any “see also” cross-referencing or if you want page number references to appear in a different style from the index entries, create the character style sheet(s) that you want to apply to those references.
This is also a good time to create all the other style sheets that you want to use in the built index. An index can have either a nested or run-in format (see the illustrations on the previous page). You can edit the style sheets later.
For a nested index, you’ll need a style sheet for the First Level text passages as well as a style sheet for each subsequent indent level. In the Edit Style Sheet dialog box, you can use the Based On option for this, and apply progressively larger Left Indent values for the Second, Third, and Fourth Level styles.
Also create a style sheet for letter headings if you’re going to use them (A, B, C, and so on). Apply a Space Before value via Style > Formats, and choose a bolder font than the body text for that style sheet so it stands out.
- Choose Window > Index.
- In the layout, select a word or phrase that you want to include in the index . You’ll be choosing settings for each individual entry separately.
Start by selecting a word or a phrase in a layout that you want included in the index.
or
Select any text in the layout that you want to create an entry for; it will display in the Text field on the Index palette (
, previous page). Change the text in this field if you want to create a broad category for the entry as opposed to having the item be indexed as written.
- On the Index palette, review the text in the Text field, and change any capitalization or word endings, if desired.
- Optional: In the Sort As field, enter a different method for alphabetizing . For example, if you spell out a number in this field (e.g., “Seven-Up” instead of “7-Up”), that number will be sorted alphabetically in the index rather than be placed at the top of the index. The Sort As spelling won’t affect the spelling of the entry in the layout.
- Choose indent Level: First Level .
- Optional: From the Style menu , choose a custom style to be assigned to any cross-reference words (see step 10) and page number(s) for this entry.
- From the Scope menu, specify the range of pages to be referenced in the index for the current entry :
Selection Start to specify the page on which the entry is located. If the entry spans more than one page, the page where the selection starts will be used.
Selection Text to specify the page(s) of a block of text.
To Style to specify the range from the selection start (or cursor position) to a style sheet you choose from the adjoining menu.
Specified # ¶’s to specify a range spanning the exact number of paragraphs that you enter in the adjoining field.
To End Of to specify either the end of the story or the end of the layout, whichever you choose from the menu. Choose this option for the title of any section that you want listed as a range of pages (e.g., “42–58”).
Suppress Page # to suppress the page number. This is a good idea when you want to include a broad category, say “Preferences,” that will have second-level items, such as “Application preferences” and “Layout preferences.”
Cross-Reference to create a cross-reference for the current text. Choose “See,” “See also,” or “See herein” and enter the reference in the text field on the right.
- Click the Add button . The newly added entry will preview at the bottom of the palette and will be listed alphabetically in its chosen indent level. While the Index palette is open, an index marker (red brackets) will surround that passage in the layout . When text is typed directly into the Text field on the palette, a square box appears in the layout at the location of the cursor.
- Repeat steps 5–11 for all the remaining text in the layout that you want the index to include.
Tip
If you double-click an index entry’s page number on the palette, the text will become selected in the layout.
Tip
To delete an entry, click it in the scroll window on the Index palette, click the Delete button on the palette, then click OK (you can’t undo this!). No need to select the text in the layout; the brackets will be removed automatically.


• To find, mark, and add all instances of the current text as an entry, using the current settings, click the Add All button. ![]()
• To zip through a story to review the entries you’ve marked, keep clicking the Find Next Entry button. ![]()
• Hold down Option/Alt to turn the Add button into Add Reversed, which creates an entry based on the last word in the currently selected text; do the same to turn Add All into Add All Reversed, which does what Add Reversed does for all occurrences of that phrase. Option/Alt also turns Find Next Entry into Find First Entry.
To edit an index entry
- Click an index entry in the scroll window on the Index palette .
- Click the Edit button .
 The button will change shade .
- Edit the text in the Text field and/or the Sort As field , change the Level value, then press Tab. The entry will update immediately.
and/or
Click the entry’s reference (page number or cross-reference) in the scroll window (click the arrowhead/+ to reveal it, if necessary), then change the Reference: Style or Scope. The reference will update immediately.
- Click any other entries, and edit them as needed.
- Click the Edit button again when you’re finished editing.


If you want to add an entry a second time, as a Second Level entry under a different First Level entry, you can’t add it the same way. You’ll need to follow these instructions instead.
To add an already marked word again to an index
- Click in the original marked word in the layout (don’t select it).
- Click in the Text field on the Index palette, then retype the entry.
- Choose other Entry and Reference options.
- To create a nested entry, click in the indent arrow (leftmost) column next to the entry below which you want the new entry to nest.
- Click Add. A small hollow square will display inside the index marker brackets in the layout .
The second index entry marker box appears when a word is indexed more than once.

To cross-reference an index entry
- Click in the text box in the layout that contains the indexed word.
- Click the entry in the scroll window on the Index palette.
- Choose Scope: Cross-Reference, choose menu, then type the cross-referenced word.
- Click Add . Click the arrowhead/+ next to the entry to preview. Click the arrowhead again to hide the entry.

Before building or rebuilding an index, you can use the Index pane of the Preferences dialog box to specify which punctuation marks will be used in the index.
To choose Index preferences
- Choose QuarkXPress (Edit, in Windows) > Preferences > Index.
- Optional: To change the Index Marker Color (the brackets in marked text), click the color square, choose a new color, then click OK.
- Change any or all of the settings in the Separation Characters fields :
Choose Index Preferences before building or rebuilding an index.
Following Entry is the punctuation to follow each index entry (e.g., the comma in “Biscuit,”).
Between Page Numbers is the punctuation between nonconsecutive page numbers (as in “34, 77”).
Between Page Range is the punctuation used to define a range of pages (as in “24–102”). Use an en dash (Option-hyphen/Ctrl-Alt-Shift-hyphen).
Before Cross-Reference is the punctuation that’s used before a “See” cross-reference (as in “Biscuit, 20. See also Rolls”). (This character will replace the chosen “Following Entry” character, when necessary.)
The Cross-Reference Style pop-up menu lists all the character style sheets in your project. Choose a style for the cross-referenced words, such as “See” or “See also.”
Between Entries is the punctuation between entries in a run-in style index (as in “frog, 17; toad, 18”) and the ending punctuation in paragraphs in a nested style index.
- Click OK.

Follow these instructions to build the actual index after the layout or book project has been marked for indexing and the pagination is finalized.
Note: Before building an index, you can choose Index Preferences (previous page).
To build an index
- For a book, create a new chapter file to hold the index, and make it the last chapter. Or open a nonbook project to create an index for just that marked project.
- Turn Auto Page Insertion on in Preferences > Print Layout > General.
- Optional: If you haven’t already done so, create style sheets for each level of indentation and for alphabet letter headings. For a book, do this in the master file and then Synchronize.
- Choose Utilities > Build Index.
- Choose Format: Nested to indent each progressive level in the index .
or
Choose Format: Run-in to string the index entry levels together in paragraph form following the First Level entry. They will be separated by the Between Entries punctuation mark that you chose in Index Preferences.
- Do any of these optional steps:
Check Entire Book to index an entire set of book files
.Check Replace Existing Index to replace an existing, previously built index with the newly built index.
Check Add Letter Headings to separate each alphabetical group of index entries by the appropriate letter of the alphabet (
, previous page). Choose a Style sheet for the headings from the menu. - Choose a Master Page for the index (, previous page). The master page you choose must contain an automatic text box for the index to flow into.
- In the Level Styles area of the dialog box:
For the Nested format, choose a paragraph style sheet for each level of indent (First Level, Second Level, Third Level, and Fourth Level).
or
For the Run-in format, choose a First Level style sheet.
- Click OK (see the illustrations on page 353). The index will be built and a new page will be added to the end of your layout. (You don’t have to select a text box first.)
Tip
After building an index, if you want to edit any of the style sheets that were assigned via the Level Styles area of the Build Index dialog box, use Edit > Style Sheets. This index, and any other index that uses those style sheets, will update to reflect your changes. These changes will also be applied if you rebuild the index.
