14. Master Pages
Using master pages
You can use the master pages in each layout as a blueprint for building your layout pages. For starters, they automatically contain a layout’s margin and column guides. Then there are the items that you add to a master page yourself, such as headers, footers, picture boxes, logos, lines, and the all-important automatic page numbering command. Any item that you don’t want to bother having to reconstruct over and over again on your layout pages can originate from a master page; it will appear automatically on every layout page that master page is applied to.
An item that’s modified on a master page will also update on any layout pages that the master is currently applied to. Items that originate from a master page can be edited on any layout page, though, without affecting the master. Each new layout automatically contains its own Master A page, and you can add as many more as you need.

This is a screenshot of the left and right facing master pages that were used to produce this book (we do the layout work ourselves!).
Before you can learn how to use master pages, you need to learn how to navigate back and forth between master pages and layout pages. Master pages are created, modified, and applied using the Page Layout palette. Choose Window > Page Layout (F10/F4) to open it.
To switch between master page and layout page display
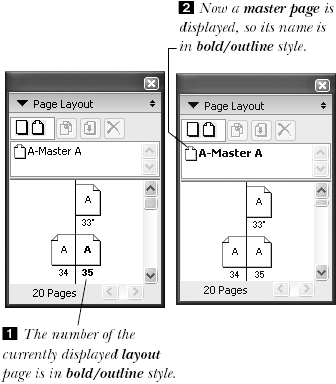
On the Page Layout palette, double-click a master page icon or layout page icon, or click once on the page number below a layout page icon. The number of the currently displayed page will switch to outline/bold style ![]() –
–![]() .
.
or
From the Go-to-page pop-up menu at the lower-left corner of the project window, choose a layout or master page icon ![]() .
.

or
From the Page > Display submenu, choose Layout or a master page name. If you choose Layout when a master page is displayed, the last displayed layout page will redisplay.
or
To view the master page that’s applied to the currently displayed layout page, press Shift-F10/Shift-F4. To go back to the layout page, use the same shortcut.
Single-sided vs. facing pages
If you check Facing Pages in the New Project or New Layout dialog box, you can specify Inside and Outside margins instead of Left and Right margins. In this type of layout, the first page is positioned by itself (because page 1 is always a right-facing page), and any subsequent pages are arranged in pairs along a central spine ![]() (unless you’ve applied an even starting page number via the Section command; see page 84). Facing master page and layout page icons on the Page Layout palette have a turned-down (dog-eared) corner. Books and magazines use this format.
(unless you’ve applied an even starting page number via the Section command; see page 84). Facing master page and layout page icons on the Page Layout palette have a turned-down (dog-eared) corner. Books and magazines use this format.
![]() The Page Layout palette for a facing-pages layout
The Page Layout palette for a facing-pages layout
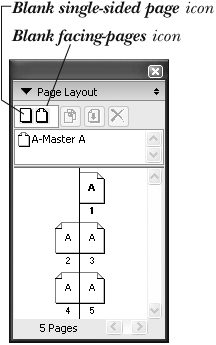
If Facing Pages is unchecked in the New Project or New Layout dialog box, pages will be stacked vertically (not in pairs) ![]() . Single-sided master and layout page icons have square (not dog-eared) corners. You can create a spread in a single-sided layout by moving layout page icons so they’re side by side (see page 85). To convert a layout from single-sided to facing pages, or vice versa, see the sidebar on page 254.
. Single-sided master and layout page icons have square (not dog-eared) corners. You can create a spread in a single-sided layout by moving layout page icons so they’re side by side (see page 85). To convert a layout from single-sided to facing pages, or vice versa, see the sidebar on page 254.

![]() The Page Layout palette for a single-sided layout
The Page Layout palette for a single-sided layout
If you modify the margin or column guides on a master page, all the layout pages with which that master is associated will display the updated guides. Any automatic text boxes that fit exactly within the margin guides before the guides were changed will exhibit the new column and gutter width values and will resize automatically to fit the new margins.
To modify the non-printing margin and column guides
- Double-click a master page icon on the Page Layout palette.
- Control-click/Right-click in the master pages area of the Page Layout palette and choose Page > Master Guides.
- Change the Column Guides and/or Margin Guides values
 .
Change the non-printing margin guides and/or column guides in the Master Guides dialog box.
.
Change the non-printing margin guides and/or column guides in the Master Guides dialog box. - Click OK
 –
– , then redisplay a layout page.
A one-column master... ...is changed to a two-column master.
, then redisplay a layout page.
A one-column master... ...is changed to a two-column master.


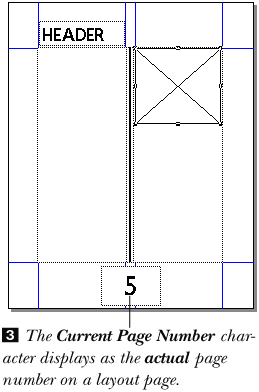
If you enter the Current Page Number placeholder character on a master page, the current page number will appear on any layout pages to which that master is applied. If you then add or delete pages from the layout, the page numbers will update automatically.
Note: Many of the procedures discussed in this chapter can’t be undone, like applying a master page or deleting pages. We suggest that you save your file before working with master pages and the Page Layout palette, so you’ll have the Revert to Saved command to fall back on.
To number pages automatically
- Double-click a master page icon on the Page Layout palette
 . The name of the page will appear in the lower-left corner of the project window.
- Choose the Rectangle Text Box tool.

- Drag to create a small text box where you want the page number to appear (typically, it’s placed at the bottom of the page, but any location is fine).
- With the new box and the Content tool selected, choose Utilities > Insert Character > Special > Current Box Page # (Cmd-3/Ctrl-3) to insert the Current Page Number character
 . It will look like this: <#>.
In a facing-pages layout, you need to enter the character on both the left and right master pages (see
, next page)—it’s easy to forget this! In a facing-pages layout, you must enter the Current Page Number character on both the left and right facing master pages.
 - Select the Current Page Number character, then style it as you would a regular character (choose a font, point size, etc.). (To add other master page items, such as headers, footers, and the like, see page 250.)
- To see how the page numbers look, display any layout page: Click a layout page number on the Page Layout palette or press Shift-F10/Shift-F4 .
To make sure the two boxes that hold the Current Page Number character align vertically on the left and right master pages in a facing-pages layout, use Item > Step and Repeat (e.g., Horizontal Offset 10p, Vertical Offset 0) to duplicate the box, then Shift-drag the duplicate to the right page ![]() . Remember to choose right paragraph alignment (click the Right Alignment icon on the Classic or Paragraph tab of the Measurements palette) for the character on the right facing page.
. Remember to choose right paragraph alignment (click the Right Alignment icon on the Classic or Paragraph tab of the Measurements palette) for the character on the right facing page.
Tip
Unfortunately, automatic page numbers can’t be manually kerned, and they are unaffected by the Kerning Table Editor. You could track the Current Page Number character on the master page, but doing so would cause all the automatic page numbers in the layout to be tracked by the same value.
Tip
You can enter the Current Page Number character on any layout page, but the page number will appear only on that individual page.
Tip
To print a master page (or a set of facing-pages masters), display that page before choosing File > Print.
Tip
If you’re in a position to break with the norm, instead of automatically placing the Current Page Number character at the bottom of the page, try placing it in a new location ![]() . Then embellish it: Apply a color to it, make it very large, add a paragraph rule above and/or below it, etc. For more formal documents, you may type a prefix such as “Page” before the character.
. Then embellish it: Apply a color to it, make it very large, add a paragraph rule above and/or below it, etc. For more formal documents, you may type a prefix such as “Page” before the character.
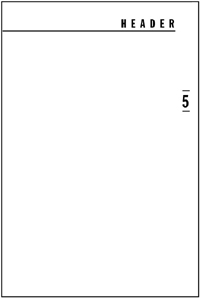
![]() This is how the page number looks on a layout page.
This is how the page number looks on a layout page.
Note: In a facing-pages layout, every master page has two parts: a left page and a right page. Items from the left master page appear only on left (even-numbered) layout pages; items on the right master page appear only on right (odd-numbered) layout pages.
To modify a master page
- Double-click a master page icon on the Page Layout palette or choose a master page icon from the Go-to-page pop-up menu at the bottom of the project window.
- Add or modify any master item—header, footer, line, ruler guide, picture box, or what have you. You can drag any item from a library onto a master page. You can’t enter text into an automatic text box.
Pages to which the master page has already been applied will be modified. See “Keep or delete changes?” starting on page 252.
- To redisplay a layout page, click a layout page number on the Page Layout palette or choose a layout page icon from the Go-to-page pop-up menu.
Tip
If you checked Automatic Text Box in the New Project or New Layout dialog box, an automatic text box will appear on the default A-Master A page and on any layout pages to which A-Master A is applied. Text can’t be entered into the automatic text box on a master page, but text can be entered into any other text box on a master page. You can reshape the automatic text box
. These are the left and right master pages for this book. The automatic text box on each page was resized to fit into one column to make room for illustrations, and the number of columns in the box was reduced to one.
Tip
You can preformat any text box on a master page by applying a style sheet or individual type specifications. Text that you subsequently type into the box will take on those specifications.


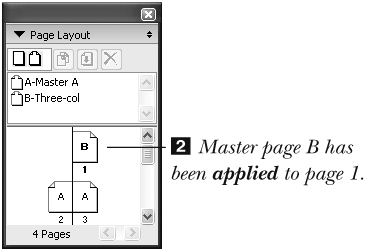
To apply a master page to a layout page
Click a layout page icon on the Page Layout palette (or double-click the icon, if you also want the page to display on screen) ![]() , then Option-click/Alt-click a master page icon
, then Option-click/Alt-click a master page icon ![]() .
.

or
Drag a master page icon (labeled icon) over a layout page icon.
or
To apply a master page to multiple layout pages, click the page icon of the first page in the series, Shift-click the last page icon in the series ![]() (or Cmd-click/Ctrl-click nonconsecutive icons
(or Cmd-click/Ctrl-click nonconsecutive icons ![]() ), then Option-click/Alt-click a master page icon.
), then Option-click/Alt-click a master page icon.

![]() To select a series of consecutive layout page icons, click the first icon, then Shift-click the last icon in the series.
To select a series of consecutive layout page icons, click the first icon, then Shift-click the last icon in the series.
![]() Or Cmd-click/Ctrl-click individual layout page icons to select nonconsecutive icons.
Or Cmd-click/Ctrl-click individual layout page icons to select nonconsecutive icons.
Tip
If you drag-copy a page or pages from one project to another in Thumbnails view, any master pages that were assigned to the source pages that differ from those in the target project will also be added to the target project. If the target project already contains a master page of the same name, the newly appended master page will be assigned the next letter of the alphabet.
Keep or delete changes?
If Master Page Items: Delete Changes is chosen in QuarkXPress (Edit, in Windows) > Preferences > Print Layout or Web Layout > General (Cmd-Option-Shift-Y/Ctrl-Alt-Shift-Y), and a master page is applied or reapplied to a layout page, locally modified and unmodified master items will be deleted from the layout page ![]() –
–![]() . If Keep Changes is chosen as the Master Page Items setting instead, only unmodified master items will be deleted
. If Keep Changes is chosen as the Master Page Items setting instead, only unmodified master items will be deleted ![]() . Confused?
. Confused?

![]() This is an item on a master page.
This is an item on a master page.

![]() The master page item is moved and modified on one of the layout pages.
The master page item is moved and modified on one of the layout pages.

![]() With Delete Changes as the default setting, after the master is reapplied, the modified master item is deleted.
With Delete Changes as the default setting, after the master is reapplied, the modified master item is deleted.

![]() With Keep Changes as the default setting, after the master page is reapplied, the modified item remains.
With Keep Changes as the default setting, after the master page is reapplied, the modified item remains.
To learn the difference between these two settings, start by putting a couple of items on a master page (make them large and/or colorful so they’ll be easy to spot). Next, locally modify one of those master page items on a layout page. Now reapply the master page to the same layout page. If the item you modified disappeared, Delete Changes is the current setting. Then do the same procedure with Keep Changes chosen instead. See the difference?
Tip
Text contained in the automatic text box on any layout page is preserved regardless of the current Master Page Items setting, even if the automatic text box is resized on the master page.
To further confuse matters
If master page items are edited on layout pages and the master page is reapplied, there’s one more thing to keep in mind: Reapplying the master page can affect an item’s attributes (color, size, shape, frame, etc.) and its contents (text or picture) differently.
Scenario 1
On a layout page, you edit the contents of a text box that originated from a master page but you don’t recolor, resize, or move the box itself. The same master page is reapplied with Master Page Items: Delete Changes as the current Preferences setting. The result: The locally modified text in the box on the layout page is replaced with the original item from the master page.

The unmodified master page

The contents are modified on a layout page.

Delete Changes is in effect and the same master page is reapplied. The modified contents are replaced.
Scenario 2
On a layout page, you edit the contents of an item that originated from a master page but not its attributes. The same master page is reapplied, but this time with Keep Changes as the Preferences setting. The result: The reapplied master page item appears behind the modified layout page item, and it’s hidden (perhaps only partially) from view.
The unmodified master page

The contents are modified on a layout page.

Keep Changes is in effect and the same master page is reapplied. The master item appears behind the modified item.
Scenario 3
You edit the contents of a box on a layout page and also edit attributes of the master item on the master page (but not its contents) with Keep Changes selected in Preferences. (In this scenario, the master page is not reapplied) The result: The attributes of the box, but not its contents, update on the layout page.
The unmodified master page

The contents on an associated layout page are modified.
An item attribute (background color, in this case) is modified on the master page.
Keep Changes is in effect. The background is changed; the modified contents remain.
Scenario 4
You edit an item’s attributes and contents on the master page with Delete Changes as the Preferences setting. The result: The item is completely replaced with the updated master page item—even if that item was modified on the layout page.
The unmodified master page

An item’s attributes and contents are modified on the master page.
The contents of the item are modified on the layout page.

Delete Changes is in effect and the same master is reapplied. The item is completely replaced on the layout page.
You can use the Duplicate command on the Page Layout palette to create a variation on an existing master page. The new, duplicate master page will contain all the items from the master page from which it’s copied, including an automatic text box or Current Page Number character, if any. You can make any additions or changes to the duplicate.
To duplicate a master page
- On the Page Layout palette, click the icon of the master page you want to copy .
- Click the Duplicate button .


Tip
If you duplicate a layout, all master pages and master page items from the original layout will be duplicated, too.

To create a new, blank master page
Drag a blank master page icon into the blank part of the master page icon area on the Page Layout palette ![]() . Move the palette divider downward to enlarge the top portion of the palette, if necessary
. Move the palette divider downward to enlarge the top portion of the palette, if necessary ![]() –
–![]() . The next available letter of the alphabet will be assigned to the new master page.
. The next available letter of the alphabet will be assigned to the new master page.

![]() To create a new, blank master, drag a blank page icon into the master page area.
To create a new, blank master, drag a blank page icon into the master page area.

Note: If you drag a new master page icon over an existing one (whether intentionally or not), an alert dialog box will open. Click OK to replace the existing master page with the new blank one, or click Cancel. You can’t undo this, so be careful.
Tip
To change the order of master page icons on the Page Layout palette, drag an icon upward or downward. The master page names won’t change. Make sure you see the Force Down pointer as you do this; otherwise you’ll end up replacing one master page with another (luckily for you, you’ll get a prompt).
Another way of accessing the commands described on these pages, as well as the Master Guides dialog box, is by means of a context menu ![]() . Control-click/Right-click anywhere in the master page area of the Page Layout palette to create a new master page. Select an existing master page first to access the Duplicate or Delete commands. Open a master page and the Master Guides command becomes available.
. Control-click/Right-click anywhere in the master page area of the Page Layout palette to create a new master page. Select an existing master page first to access the Duplicate or Delete commands. Open a master page and the Master Guides command becomes available.

![]() The Page Layout palette context menu
The Page Layout palette context menu
The name of each master page must include a prefix or no more than three letters followed by a hyphen. The layout page icons in the Page Layout palette are labeled with this prefix to show which master page they are associated with.
To rename a master page
- In Mac OS X, click a master page name (not the icon) on the Page Layout palette. In Windows, double-click a master page name.
- Type a new name, which must include a prefix followed by a hyphen . The part of the name to the right of the prefix can be anything you want, as long as the total length of the name does not exceed 64 characters.
- Press Return/Enter. If you forgot to include a hyphen, QuarkXPress will insert its own prefix.
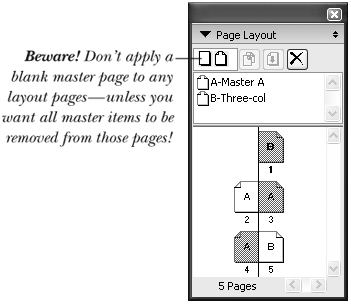
Beware! If you delete a master page, any unmodified master items on any associated layout pages will also be deleted. If a layout page associated with the deleted master page contains an automatic text box from the deleted master and that text box isn’t resized, it too will be deleted—even if it contains text! If, on the other hand, the automatic text box is resized on a layout page and the current Master Page Items setting in QuarkXPress (Edit, in Windows) > Preferences > Print Layout > General is Keep Changes, the box will be preserved.

To delete a master page
- Click a master page icon on the Page Layout palette.
- Click the Delete button on the palette –.
To delete a master page, click its icon, then click the Delete button (this is the palette in Windows). This is the Delete button in Mac OS.
- If the master page is in use, an alert prompt will appear. You can’t undo this, so click OK if you’re confident (choose File > Revert to Saved if you make a boo-boo).


To create your own automatic text box
- Display the master page that you want to add an automatic text box to.
- Choose Fit in Window view (Cmd-0/Ctrl-0) so you can see the whole page, and make sure the guides are showing (View > Guides should be checked).
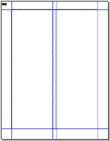
- Choose the Rectangle Text Box tool or any other Text Box tool, then draw a text box .
To create an automatic text box, first draw a text box of any size on the master page with the Rectangle Text Box tool.
- Choose the Linking tool.

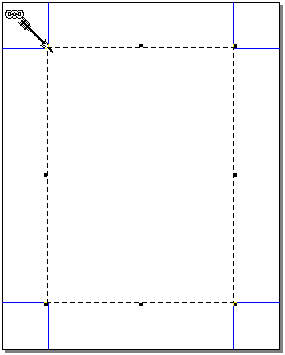
- Click the link (broken chain) icon in the upper-left corner of the page .
Choose the Linking tool, then click the broken chain icon in the upper-left corner of the master page.
- Click the text box , then click the Item or Content tool to deselect the Linking tool.
Finally, click the text box.
- For a facing-pages layout, repeat all of the above steps on the opposing facing page for that master.
Note: If your automatic text box fits perfectly within the current margin guides and you later change the margin guides, the automatic text box will resize automatically to fit within the new guides.