
11. Pictures and Text
Pictures and text
There are many ways to combine text and pictures in QuarkXPress. For example, you can place a picture behind a text box that has a transparent or semitransparent background. Or you can have text wrap around the perimeter of a picture box, or wrap partially or completely around the irregular contours of the picture itself ![]() .
.

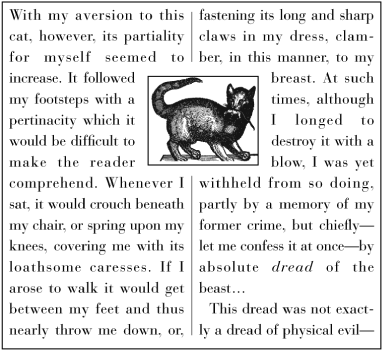
![]() We placed this cat-eating-mouse image, which has a Background of None, on top of a text box containing some text. We had Quark give the image a clipping path determined by its non-white areas; the white areas are now transparent and the text behind the image shows through. We also told Quark to use non-white areas to determine the runaround, causing the text to follow the contours of the image. Finally, we added another text box on top of the image and assigned it a drop shadow.
We placed this cat-eating-mouse image, which has a Background of None, on top of a text box containing some text. We had Quark give the image a clipping path determined by its non-white areas; the white areas are now transparent and the text behind the image shows through. We also told Quark to use non-white areas to determine the runaround, causing the text to follow the contours of the image. Finally, we added another text box on top of the image and assigned it a drop shadow.
QuarkXPress not only gives you control over how text wraps around a picture, it also lets you create editable clipping paths that control how much of a picture prints. If you have a picture with a white background, for example, you can tell the program not to print the background. A clipping path can even be created from an embedded path or alpha channel that was saved with a picture in another application.
In QuarkXPress 7, you can also add depth to your pages by applying drop shadows to text as well as to text and picture boxes. Shadows can be cast by the outlines of the boxes themselves, or by the clipping paths that surround their contents.
Using Runaround
You can use either the Item > Modify dialog box or the Measurements palette to wrap text around an item.
To wrap text around an item
- The item the text is to wrap around must be on top of the text. It can be any kind of item (picture box, text box, contentless box, text path, Bézier shape, or table). To bring it forward, select it, then press Option-F5/Ctrl-F5 (or move it to a higher layer).
- Choose the Item or Content tool.
- Select the picture box.
- Click the Runaround tab on the Measurements palette.
or
Choose Item > Runaround (Cmd-T/Ctrl-T).
- Choose Item from the Type menu
 .
.
- To adjust the space between each side of a rectangular picture box and the text that’s wrapping around it, enter Top, Left, Bottom, and Right Outset values. For other shapes, enter a single Outset value.
- If you have used the Measurements palette to set Outset values, press Return/Enter
 .
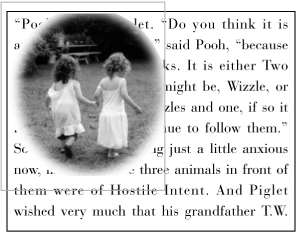
The picture box straddles two columns, so the text wraps completely around it.
.
The picture box straddles two columns, so the text wraps completely around it.or
In the Modify dialog box, click Apply to preview the text wrap, then click OK.
Note: If the item straddles two columns, text will wrap around all its sides; if it’s within a column, text will wrap around just three of its sides. (For a complete wrap in the latter case, see page 218.)

Tip
To choose default Runaround settings for any item creation tool, double-click the tool, click Modify, click Runaround, then choose settings.
Tip
The Runaround value around a text path is calculated based on the path itself, not the text.
Using clipping paths
A clipping path is a mechanism that controls which parts of a picture display and print ![]() –
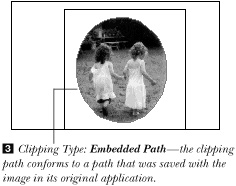
–![]() . Areas of the picture within the clipping path are visible and will print; areas outside the clipping path are transparent and won’t print. You may already know how to create a clipping path in another application, such as Adobe Photoshop. In that type of clipping path, the clipping information is saved in the picture itself. In QuarkXPress, when you use a clipping path that was saved with the original picture in another application, it’s called an “embedded path.”
. Areas of the picture within the clipping path are visible and will print; areas outside the clipping path are transparent and won’t print. You may already know how to create a clipping path in another application, such as Adobe Photoshop. In that type of clipping path, the clipping information is saved in the picture itself. In QuarkXPress, when you use a clipping path that was saved with the original picture in another application, it’s called an “embedded path.”

![]() Before a clipping path is created, the white area around the photo prints.
Before a clipping path is created, the white area around the photo prints.
![]() A QuarkXPress clipping path is used to prevent the white area from printing. The text is still running behind the photo, though—it’s not wrapping around it.
A QuarkXPress clipping path is used to prevent the white area from printing. The text is still running behind the photo, though—it’s not wrapping around it.

![]() Finally, Runaround is turned on with Type: Same As Clipping selected to force the text to wrap around the image.
Finally, Runaround is turned on with Type: Same As Clipping selected to force the text to wrap around the image.
Clipping paths in QuarkXPress work a little bit differently. They are also used to control which parts of an image will print, but they don’t permanently clip areas of the image that extend outside it. Clipping path information in QuarkXPress is saved with the project, not in the image itself. This means that you can create a different clipping path for each instance in which you use an image. If you want to reuse a picture and its clipping path, on the other hand, you can simply drag and drop the picture box from one project to another; a copy will appear in the target project.
Another compelling reason to have QuarkXPress generate a clipping path is that as you reshape it or choose different settings for it, you’ll be able to see immediately how it looks in your layout. What’s more, you can adjust the shape of a clipping path to your heart’s delight using any technique that you’d use to adjust a Bézier path.
You can have QuarkXPress create a clipping path based on the shape or silhouette of a picture, or you can create a custom path. QuarkXPress can also generate a new, editable clipping path based on any alpha channel (saved selection) or embedded path, provided the channel or path is saved with the picture file in its original application (e.g., Adobe Photoshop).
Runaround vs. clipping, in a nutshell
A clipping path controls which parts of a picture display and print. The Runaround feature controls how text wraps around a picture. The runaround text wrap or clipping path can be controlled by any of the following parameters ![]() –
–![]() :
:
Item: The edge of the picture box.
Embedded Path or Alpha Channel: An embedded alpha channel or path that was created and saved with the picture in another application. You can use an path embedded in an imported picture if it was saved in any of these formats: PSD, TIFF, EPS, BMP, JPEG, PCX, or PICT. You can also use an alpha channel in a PSD or TIFF.
Non-White Areas: The non-white edge of a picture (the silhouette of an image, if it has a white background).
Picture Bounds: The picture’s rectangular bounding box (not the QuarkXPress picture box).

![]() The Type options in the Clipping tab of the Measurements palette
The Type options in the Clipping tab of the Measurements palette

![]() The Type options in the Runaround tab of the Measurements palette
The Type options in the Runaround tab of the Measurements palette
To make matters even more confusing, for each Type there are additional options for controlling the placement of the clipping path or the runaround text wrap.
And for Runaround, there’s an additional option: Auto Image. With Auto Image chosen, text will wrap around the edge of the image itself, not its bounding box. The runaround is created from the original, high-resolution image (not the preview), using Bézier curves, and works effectively on an image that has a clearly defined border and a flat, light background. It creates a combined, uneditable clipping and runaround path in one step (the edit clipping and runaround functions aren’t available).
Choosing Type: None in the Runaround pane turns off Runaround altogether.
Though they may at first seem confusing, the Runaround and Clipping options offer a lot of control and flexibility, so they’re worth spending some time to learn.
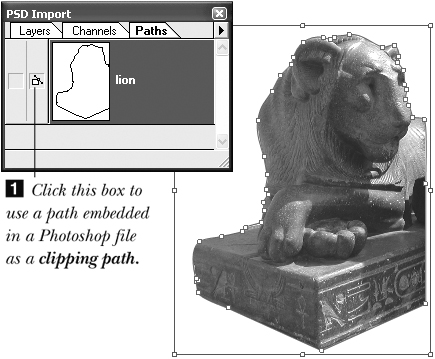
QuarkXPress 7 can use any path embedded in an Adobe Photoshop file as a clipping path. In the PSD Import palette, display the Paths pane and click in the second column next to the path you want to use ![]() .
.
To create a clipping path
- Import an EPS, TIFF, BMP, PCX, or PICT file into a rectangular picture box. For this first attempt, try using an image that has a white background.
- To layer a picture, make sure its box has a background of None. (Select the box, click the Background Color button
 on the Colors palette, then click None.)
 - Choose Item > Clipping (Cmd-Option-T/Ctrl-Alt-T).
- As you choose from the Type menu the green line in the preview window represents the chosen clipping path, :
(Choose Item to turn off the clipping path function
. The picture will be cropped only by the picture box.)Choose Embedded Path to create a clipping path based on a clipping path that was saved with the picture in another application
 . Choose Alpha Channel to create a clipping path based on the nonblack parts of an alpha channel that was saved with the picture in an image-editing program. Note: If the picture was saved with more than one alpha channel or path, choose the desired channel or path name from the Alpha or Path menu.
Choose Non-White Areas to create a clipping path that follows the contours of the actual image and ignores non-white areas of the picture. The white areas have to be either close to white (e.g., very light gray) or absolute white for this to work.
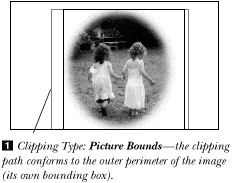
Choose Picture Bounds to have the path conform to the rectangular outer boundary of the picture (its bounding box)(
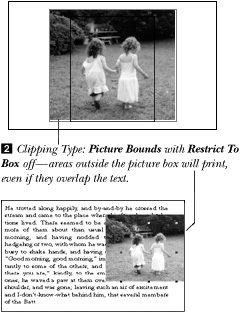
, next page). If Restrict To Box is unchecked, any areas of the picture that the picture box is cropping will become visible and may obscure items behind them. - As you choose any of these optional settings, click Apply at any time to preview the current settings in the layout:
Click Crop To Box, if available, to have the clipping path stop at the edge of the box.
Click Rescan to restore the original path.
Check Invert to switch the cropped and visible areas
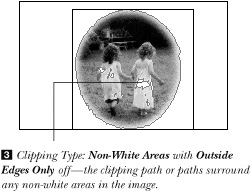
. This option isn’t available when the Item or Picture Bounds Type is chosen. Clipping Type: Non-White Areas with the Invert option on—only pixels in the outer fringe will print.Check Outside Edges Only for an Alpha Channel, Embedded Path, or Non-White Areas (not Item or Picture Bounds) clipping path if the picture contains a blank hole or holes where the background white shows through, and you don’t want the clipping path to include them. With Outside Edges Only unchecked, an additional clipping path will be created for each hole
.Check Restrict To Box to have only areas of the picture inside the picture box display and print (
–, next page). Uncheck to let the entire picture display and print.
With any Type option except Item chosen, you can further expand or contract the clipping path to print more or less of the picture by entering a positive or negative value, respectively, in the Outset field. For Type: Picture Bounds, enter Top, Left, Bottom, and Right values. For Type: Embedded Path or Alpha Channel, the Outset value will expand or contract the entire clipping path relative to the original path or alpha channel. For the Non-White Areas type of clipping path, the Outset value will expand or contract the entire clipping path relative to the original non-white areas (
–, page 216).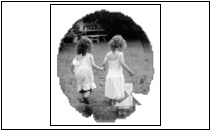 Clipping Type: Non-White Areas, Outset -15—the clipping path shrinks slightly inward.
 Clipping Type: Non-White Areas, Outset 15—the clipping path expands slightly outward.
 - Choose Tolerance settings for an Alpha Channel or Non-White Areas type of clipping path:
For an Alpha Channel clipping path, the Noise value (0–288 pt.) is the minimum size an area near the border of an alpha channel must be to be included in the clipping path (
– , next page). Adjust the Noise value to exclude tiny, extraneous blobs in the background from the clipping path.
 Clipping Type: Non-White Areas at the default Noise setting of 2 pt.—the clipping path includes extraneous pixels outside the oval.
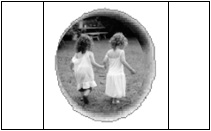 Clipping Type: Non-White Areas, Noise 30 pt.—the extraneous blobs aren’t included in the clipping path.
For an Alpha Channel or Non-White Areas clipping path, Smoothness (0–100) makes the path more or less smooth by adding or decreasing points (
 –
– , next page). The lower the Smoothness value, the more points the clipping path will contain; the higher the value, the fewer points the path will contain and the less precisely its shape will match that of the image. A low Smoothness could cause output problems, but the program can adjust this setting automatically during printing, if need be. You may need to play with this to achieve the optimal setting.
 Clipping Type: Non-White Areas at the default Smoothness setting of 2 pt.—the clipping path has many points, and hugs the image precisely. (To display the points on the path, choose Item > Edit > Clipping Path.)
 Clipping Type: Non-White Areas, Smoothness 75 pt.—here the clipping path is smoother, but it’s less accurate.
Threshold works with an Alpha Channel or Non-White Areas clipping path (
–, page 217). It controls what percentages of gray on the alpha channel will be treated as white (and not mask the picture) and what percentages will be treated as black (and mask parts of the picture). At a Threshold setting of 10%, for example, gray values between 0% and 10% will be treated as white; gray values between 11% and 100% will be treated as black and will act as a mask. At a Threshold setting of 40%, more gray values will be treated as white, and less of the picture will be masked. For the Non-White Areas type of clipping path, the opposite is true: The Threshold is the percentage a color can be darker than white before it will be left outside the clipping path and thus won’t print.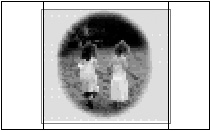 Clipping Type: Non-White Areas, Threshold 2—the clipping path includes the gray background.
 Clipping Type: Non-White Areas, Threshold 10—the clipping path ignores the gray background.
 - Click Apply, then click OK. If you’d like to reshape the clipping path, follow the instructions on page 219.


Runaround and clipping: How they work together
If different Runaround and Clipping Types are chosen for the same picture, the text won’t wrap at the edge of the picture. For example, if Picture Bounds is chosen as the Runaround Type, and Alpha Channel or Embedded Path is chosen as the Clipping Type (and assuming the picture’s channel or path is smaller than the picture bounds), there will be a buffer area between the clipped picture and the text wrap.
If the Non-White Areas option is chosen for a picture as both the Runaround and the Clipping Type, text will wrap to the edge of a silhouetted image, plus or minus the current Outset width.
Tip
To force text to flow into any holes in a picture where the white background shows through, uncheck the Outside Edges Only option in both the Clipping and Runaround panes.
Tip
Don’t wrap text inside a clipping path unless the text or picture’s contrast has been carefully adjusted to ensure that the type is readable.
Here you’ll be making text wrap around an image—not around an item’s outer edge.
To wrap text around a picture
- Choose the Item or Content tool.
- Select a picture box, and make sure it’s in front of the text box. If it’s not, Control-click/Right-click and choose Send & Bring > Bring Forward (or move it to a higher layer).
- Display the Runaround tab of the Measurements palette.
or
Choose Item > Runaround (Cmd-T/Ctrl-T).
- Choose Type: Non-White Areas .
You can make text run completely around a picture within the same column, but the text will be tiring to read, so don’t use this option if you need to convey important information.
or
Choose Type: Same As Clipping to have the text runaround conform to a QuarkXPress clipping path and utilize all the options that were chosen for that clipping path. To edit this type of wrap, edit the clipping path (see the next page).
- Enter an Outset value in points to adjust the space between the picture and the surrounding text. Try between 5 and 10 pt. If you’re using the dialog box, click Apply to preview.
- Press Return/Enter (palette) or click OK (dialog box).
- Press Cmd-Option-. (period)/Shift-Esc, if necessary, to force a screen redraw.

Tip
To run text inside the holes of a picture, choose Non-White Areas for the runaround Type and uncheck Outside Edges Only ![]() .
.

![]() It’s possible to flow text into the white spaces within a picture.
It’s possible to flow text into the white spaces within a picture.
Tip
Beware! If Picture Bounds is chosen as the Clipping Type and Non-White Areas is chosen as the Runaround Type, text will wrap to the edge of the image, but it may be obscured by the opaque background of the picture. That’s because the edge of a picture box usually doesn’t match up with the picture’s bounding box.
Note: QuarkXPress generates a clipping path based on the original, high-resolution picture file. When you manually edit a clipping path, however, if you work off a low-resolution screen preview, your edits won’t be precise. To work off the high-resolution screen preview, choose Item > Preview Resolution > Full Resolution, and choose View > Show Full Res Previews (if this option is already chosen, the menu option will be Hide Full Res Previews).
To reshape a runaround or clipping path
- Choose the Item or Content tool.
- Click a picture that has a clipping path or one of these Runaround types: Embedded Path, Alpha Channel, Non-White Areas, or Picture Bounds.
- Choose Item > Edit > Runaround (Option-F4/Ctrl-F10).
or
Choose Item > Edit > Clipping Path (Option-Shift-F4/Ctrl-Shift-F10).
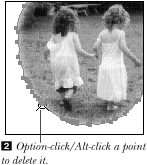
- Use any of the techniques that you’d normally use to reshape a Bézier path (see pages 312–324) –. You can add or delete an anchor point; drag a point, segment, or control handle; or convert an anchor point from corner to curved (or vice versa).
Reshape a clipping path to change which parts of a picture will print.
Hold down Spacebar to suspend redraw and rewrap as you reshape a runaround or clipping path.
Reshape a runaround path to change how text wraps around a picture.
Dragging a segment The text rewraps.Beware! If you edit a clipping path and then reopen the Clipping pane, the clipping Type will be listed as User-Edited Path. If you choose a different Type at this point and click OK, you’ll lose your custom path edits!
- When you’re done editing a runaround path, choose Item > Edit > Runaround again (Option-F4/Ctrl-F10). When you’re done editing a clipping path, choose Item > Edit > Clipping Path again (Option-Shift-F4/Ctrl-Shift-F10).


Tip
To force the screen to redraw, press Cmd-Option-.(period)/Shift-Esc.
Wrapping text inside a hidden picture isn’t something that you’re going to do day in and day out, but it’s a fun technique for special occasions.
To wrap text inside a hidden picture
- Choose the Item or Content tool, then click a silhouetted image on a solid white or off-white background .
Click a picture that has a white background.
- Make sure the picture box is in front of the text box. If necessary, Control-click/Right-click and choose Send & Bring > Bring To Front or move the picture box to a higher layer.
Also make sure the picture box completely covers the text box; otherwise the text will be visible within the picture’s clipping path and around the edge of the picture box.
- Display the Clipping tab of the Measurements palette and choose Non-White Areas from the Type menu and check Invert.
- Click the Runaround tab and choose Same As Clipping from the Type menu.
If necessary, press Cmd-Option-. (period)/Shift-Esc to force the screen to redraw
. The text is wrapping inside the clipping path instead of outside it.Note: If the edge of the picture is showing (as in
), but you don’t want it to print, click the picture, choose Item > Modify > Box, then check Suppress Output. It will still display onscreen, but it won’t print.

Tip
Choose a small point size and justified horizontal alignment for the type.
Tip
You can also use the Clipping and Runaround panes of the Item > Modify dialog box for this task.
Applying drop shadows
In QuarkXPress 7, you can add a feathered drop shadow to any text, box, line, table, group, or Composition Zone. Drop shadows are live, and adapt to any changes you make in the parent object.
Drop shadows behave differently depending on the type of object they’re applied to:
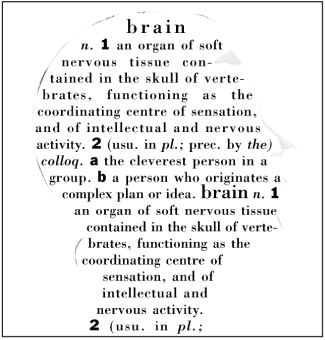
Items: If the item has a background color, the shadow is applied to the overall shape of the item. If the item’s background color is None, the drop shadow is applied to the item’s contents (picture or text). Does the item have a frame? If so, the frame gets a shadow, too.
Pictures: If a picture has a clipping path or an alpha mask and the background color of its box is set to None, the drop shadow will follow the shape of the clipping path or mask.
Text: The drop shadow is applied to text if the opacity of the text box background is less than 100%. The shadow applies to all of the text in the box or on the text path.
Groups and Composition Zones: A drop shadow applied to a group follows the outline of the entire group (but individual members of the group can also have their own shadows).
To add a drop shadow to an item
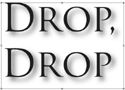
- Select an item .
The original text
- Click the Drop Shadow tab on the Measurements palette.
or
Choose Item > Modify (Cmd-M/Ctrl-M) and click the Drop Shadow tab.
- Check Apply Drop Shadow and choose from the options provided (see next page).
- If you’re using the dialog box, click OK –.
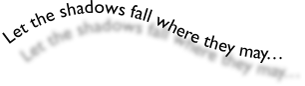
A drop shadow is applied (the background of the box is 100% White). The background of the text box is changed to None (and the frame is removed), so now the drop shadow applies to the text. The angle of the drop shadow is changed to 100°, the distance to .5″, and the skew to –25°.


Adjusting drop shadows to taste
You’ll find this generous array of controls ![]() –
–![]() on the Drop Shadow tab of the Measurements palette and pane of the Modify dialog box:
on the Drop Shadow tab of the Measurements palette and pane of the Modify dialog box:
Angle: The apparent direction of the shadow’s light source (−180° to 180°). With Angle checked, you can also check Synchronize Angle to apply the same angle to all the other drop shadows in the same layout.
Distance: The distance the shadow is offset from the object to which it is applied.
Blur: The fuzziness of the edge of the drop shadow (0″–2″). The higher the value, the blurrier the edge of the shadow.
Scale: The size of the shadow relative to the item to which it is applied (0%–1000%).
Skew: The angle at which the shadow is tilted from the vertical (−75° to 75°).
Color, Shade, Opacity: Color characteristics of the drop shadow, using the same controls as are found on the Colors palette.
Inherit Item’s Opacity: If checked, the shadow will echo the opacity characteristics of the item to which it is applied.
Item Knocks Out Drop Shadow: If checked, the drop shadow won’t be visible behind areas of an item that have an opacity of less than 100%.
Multiply Drop Shadow: If checked, the drop shadow’s color will be combined with the background color(s) using multiply blending mode, resulting in a darker shadow. Check for black shadows; leave unchecked for shadows of other colors.
Runaround Drop Shadow: If checked, the drop shadow will be taken into account if text is wrapped around the item.

![]() The Drop Shadow tab of the Measurements palette
The Drop Shadow tab of the Measurements palette

![]() A text box with a background color. The default drop shadow is applied, and it appears at the edge of the box.
A text box with a background color. The default drop shadow is applied, and it appears at the edge of the box.
![]() With the background of the same text box changed to None, now the drop shadow appears behind the text.
With the background of the same text box changed to None, now the drop shadow appears behind the text.