12. Lines
Drawing lines
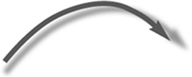
The line creation tools produce horizontal, vertical, and diagonal straight lines and arrows to which a variety of styles, endcaps, colors, and opacities (new in QuarkXPress 7) can be applied. Using the Dashes & Stripes command, which is covered in this chapter, you can create custom line styles for use with the line tools, the Frame command, or the paragraph Rules command. In QuarkXPress 7, you can also apply drop shadows to lines.
Note: To place rules under type, use the paragraph Rules feature (see pages 112–114). To anchor a line, see page 199. The Bézier Line, Freehand Line, Line Text-Path, and other Bézier tools are discussed in Chapter 18.
To draw a straight horizontal or vertical line
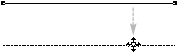
- Choose the Orthogonal Line tool.

- Drag the crosshair icon horizontally, vertically, or at a multiple of 45°
 .
Choose the Orthogonal Line tool, then drag horizontally or vertically.
.
Choose the Orthogonal Line tool, then drag horizontally or vertically.
To draw a straight line at any angle
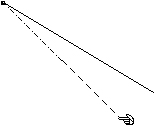
- Choose the Line tool.

- Drag the crosshair icon in any direction
 .
Choose the Line tool, then drag in any direction.
.
Choose the Line tool, then drag in any direction.

Tip
Hold down Shift while drawing a line to constrain it to an increment of 45°.
Tip
To choose preferences for a line tool, such as its default width, style, or color, double-click the tool to open the Tools pane of the Tools Preferences dialog box, click Modify, then change any of the settings.
Modifying lines
To change the width of a line
- Choose the Item or Content tool.
- Click a line (Bézier or other).
- Press Cmd-Option-Shift->/Ctrl-Alt-Shift-> to widen the line, or press the < key (while holding the same modifiers) to reduce the line width in 1-point increments. Omit the Option/Alt key to change the line width to preset increments (Hairline, 1, 2, 4, 6, 8, or 12 pt).
or
Press Cmd-Shift-/Ctrl-Shift-. The Item > Modify dialog box will open with the Line pane active, with the Line Width field selected automatically. Enter the desired width (you don’t have to type the “pt”), then click OK.
or
Choose Style > Width and select an option from the submenu.
To restyle a line using the Measurements palette
- Choose the Item or Content tool.
- Click a line (Bézier or other).
- Click the Classic tab on the Measurements palette and do any of the following –
 :
A line is selected. These are a few sample line widths. A Hairline prints as .125 pt. on a PostScript imagesetter.
:
A line is selected. These are a few sample line widths. A Hairline prints as .125 pt. on a PostScript imagesetter.Its width is increased.
A new style is applied.
An arrowhead is added.
Change the color of the line using the Color and Shade menus.
Change the line’s transparency using the Opacity menu.
Enter a Width value (.001–864 pt.) or choose a preset width from the menu.
Choose from the Style menu. (To create custom line styles, see pages 227–228.)
Choose an arrowhead from the rightmost menu.

Tip
You can Control-click/Right-click a line and choose from the Line Style, Arrowheads, Width, Color, Shade, or Opacity submenu. These submenus are also found on the Style menu. For more on adding color to lines, see page 270.
You can use a non-printing line to force text runaround and create an offbeat text shape ![]() . Click a line, bring it to the front, choose Item > Modify, click the Line tab, check Suppress Output, click the Runaround tab, choose Type: Item, then specify an Outset value.
. Click a line, bring it to the front, choose Item > Modify, click the Line tab, check Suppress Output, click the Runaround tab, choose Type: Item, then specify an Outset value.
To shorten or lengthen a line manually
- Choose the Item or Content tool.
- Click a line.
- Drag an endpoint to lengthen or shorten the line . Option-Shift-drag/Alt-Shift-drag to preserve the line’s angle as you change its length.
Drag an endpoint to resize a line.
To shorten or lengthen a line using the Measurements palette
- Choose the Item or Content tool.
- Click a line.
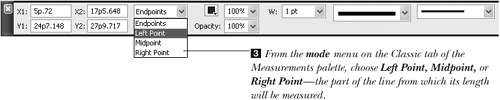
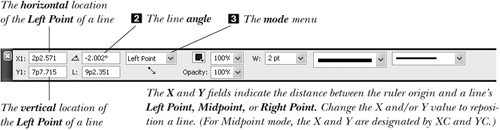
- From the mode menu on the Classic tab of the Measurements palette , choose which point you want the line to be measured from: Left Point (the beginning of the line), Midpoint, or Right Point.
- In the Length (L) field on the Measurements palette, enter the desired length
 .
.

To move a line manually
- Choose the Item or Content tool.
- Drag any part of a line other than an endpoint
 .
A line being moved
.
A line being moved
To change the angle of a line
- Choose the Item or Content tool, then click a line.
- Drag either handle. To snap a non-orthogonal line to an increment of 45° from the original angle, hold down the Shift key .
To snap a line to an increment of 45° from its existing angle, drag a handle with Shift held down.
or
On the Classic tab of the Measurements palette, choose Left Point, Midpoint, or Right Point, then change the angle value
.or
Choose the Rotate tool,
 press to establish an axis point, drag away from the line to create a lever, then drag clockwise or counterclockwise.
To reposition a line using the Measurements palette
- Choose the Item or Content tool, then click a line.
- On the Classic tab of the Measurements palette, choose from the mode menu the part of the line from which its position will be measured –.
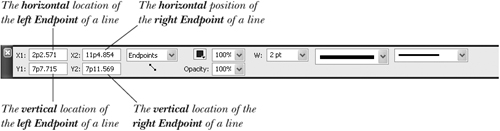
Change the X1, Y1, X2, or Y2 value to reposition a line, as measured from its two Endpoints relative to the ruler origin.
- Change the X and/or Y values. You can use math (add or subtract) in any field.
Dash and stripe styles are available for all layouts in a project. This is how they’re applied:
Creating dashes and stripes
Using the Dashes & Stripes dialog box, you can create custom PostScript line styles for lines, frames, and paragraph rules. An edited dash or stripe style will update on all items to which it’s already applied—in any and all layouts in the current project.
Note: To append a line style from one project to another, click Append in the Dashes & Stripes dialog box (it’s below the New button). Any dash or stripe style that’s created when no projects are open will appear in future projects.
To create or edit dashes or stripes
- Choose Edit > Dashes & Stripes.
- To create a new style, choose New: Dash or Stripe , then type a name.
or
To edit an existing style, double-click it. Or click its name, then click Edit.
or
To create a new style based on an existing one, click the style, click Duplicate, then change the name.
- In the Edit Stripe dialog box, note the Preview as you do any of the following:
To add more dash or stripe segments, drag in the ruler, then drag again in another part of the ruler
. (Five is the maximum total number of dashes.)To move a dash or a stripe, drag inside it with the hand cursor.
To shorten or lengthen a dash or widen or narrow a stripe, drag either of its arrows.
To remove a dash, drag either of its arrows or the dash itself upward or downward off the ruler. To remove a stripe, drag either of its arrows or the stripe itself to the left or the right off the ruler.
If you want to specify the distance between dashes, enter a number in the Repeats [Every] field
. The higher the Repeats Every value, the further apart the dashes will be. If you choose Times Width from the Repeats Every menu, dash segments will spread to fit the dimensions of the line or frame to which that style is applied. If you choose Points from the same menu, segments will maintain the same spacing no matter what.Create a dash or stripe segment by entering the ruler % position where you want it to start in the Segment: Position field, then click Add.
- Choose a Miter style for the corners of a Bézier frame or a multisegment line: Sharp, Rounded, or Beveled.
- For dashes, you can choose a different Endcap style for the shape of the ends of the dash segments –. To enlarge the preview so you can see a closeup of how the endcap style looks, drag the Preview slider upward.
Pointed miter and square endcaps Rounded miter and square endcaps Rounded miter and rounded endcaps
- Optional: Check Stretch to Corners to have the dash or stripe design be stretched to fit symmetrically when chosen as a frame style for a box (–, next page).
 A custom dash style, with Stretch to Corners turned on
 The same dash style with Stretch to Corners turned off
 - Click OK.
- Click Save.


Tip
To remove a dash or stripe style, click it, then click Delete. If the style you’re deleting is currently applied to any items in your project, an alert dialog box will appear. Choose a replacement dash or stripe, then click OK.
To compare two dashes or stripes
- Choose Edit > Dashes & Stripes.
- Cmd-click/Ctrl-click two dashes and/or stripe styles in the scroll window.
- Option-click/Alt-click the Append button (it will turn into a Compare button). Differences between the two styles will be listed in boldface .
Specifications for the Dash Dot style compared with specifications for the Dotted style.

Dashes and stripes are colored or given transparency on an object by object basis—not in the Edit Dash or Edit Stripe dialog box. In addition to recoloring dashes or stripes, if a style is applied as a frame or line, you can also recolor (or change the opacity of) the gaps between them. Rules can also be colored via a style sheet.
Experiment and have fun with this feature! Once you have a dash or stripe you like, you can apply it quickly via a style sheet, as you would apply any other paragraph rule style ![]() .
.
![]() This is a custom stripe style applied as a paragraph Rule Above (Shade: 12% and Offset: -p.5)
This is a custom stripe style applied as a paragraph Rule Above (Shade: 12% and Offset: -p.5)
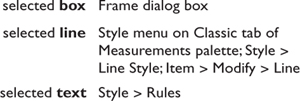
To color a dash or stripe
- Select the item that contains the dash or stripe you want to recolor.
- For a frame, choose Item > Frame (Cmd-B/Ctrl-B); for a line, choose Item > Modify > Line; for a paragraph rule, go to Style > Rules (Cmd-Shift-N/Ctrl-Shift-N).
- In the Frame, Line, or Rules pane:
Choose a Color, Shade, and Opacity.
and/or
Choose a Gap: Color, Shade, and Opacity (this isn’t available for a paragraph rule)
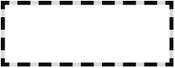
-. This is a dashed frame with a 15% Black Gap color. To polish it off, we added inner and outer frames in separate text boxes, both with a background color of None.Note: You can also use the Classic tab of the Measurements palette to choose colors for a frame and its gap, but when a line is selected, only the line color is available.

Lines, like other items, can be given drop shadows.
To add a drop shadow to a line
- Select a line.
- Click the Drop Shadow tab on the Measurements palette.
or
Choose Item > Modify (Cmd-M/Ctrl-M) and click the Drop Shadow tab.
- Check the Apply Drop Shadow box and choose from the options provided (see pages 221–222).
- Click OK (dialog box) to apply the shadow .
A Drop shadow (with the Inherit Item’s Opacity option checked) applied to a line