
15. Color
Creating colors
Each file can contain up to 1,000 colors, and they appear on the Colors palette ![]() and in any other location where colors are chosen, such as the Measurements palette
and in any other location where colors are chosen, such as the Measurements palette ![]() , Character Attributes dialog box, Box pane of the Modify dialog box, or Style > Color submenu. When you apply a color, you can choose its shade (intensity) and opacity (transparency).
, Character Attributes dialog box, Box pane of the Modify dialog box, or Style > Color submenu. When you apply a color, you can choose its shade (intensity) and opacity (transparency).

![]() The Colors palette
The Colors palette
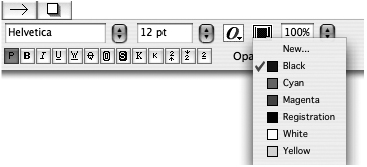
![]() All the formatting tabs of the Measurements palette—including the Classic tab, the Frame tab, and the Character Attributes tab—offer a Color menu, saving you the trouble of reaching for the Colors palette.
All the formatting tabs of the Measurements palette—including the Classic tab, the Frame tab, and the Character Attributes tab—offer a Color menu, saving you the trouble of reaching for the Colors palette.
Where colors are saved
Colors that are created when no projects are open will be present in all subsequently created projects. Colors that are created with a project open will be saved only with that project. Regardless of which layout is displayed when you add a color, that color will be available for all the layouts in the current project.
Colors for print
Two basic methods are used for printing color—spot color and process color—and you can use both in the same file.
Each spot color is printed using a separate plate. Spot color inks are mixed according to specifications defined in a color matching system, such as PANTONE. Various tints (percentages) of the same spot color will appear on the same printing plate.
In process color (CMYK) printing, four plates are used: cyan (C), magenta (M), yellow (Y), and black (K). A layer of tiny colored dots is printed from each plate, and the overlapping dots create an illusion of solid or graduated color. The only way to print the continuous tones in a photograph is by using process colors.
To create colors that output successfully, it’s important to understand the color models:
• RGB: The computer’s native color model. Use for on screen output.
• HSB: The traditional artist’s method for mixing colors based on their individual hue (H), saturation (S), and brightness (B) components.
• LAB: A device-independent color model used for color conversions across multiple devices, such as printers and monitors.
• CMYK: A four-color printing model that simulates a multitude of colors by printing tiny dots of cyan (C), magenta (M), yellow (Y), and black (K) ink. You choose the percentages.
• Multi-ink: A user-defined color comprising multiple spot and/or process colors.
• PANTONE: Widely used spot and process color matching systems. In its Hexachrome matching system, two additional plates—orange and green—are added to the usual cyan, magenta, yellow, and black. Hexachrome (“high fidelity” or “HiFi”) colors are more vibrant—and more expensive; speak with your commercial printer before using them!
• TOYO, DIC: Spot color matching systems that are primarily used in the Far East.
• FOCOLTONE, TRUMATCH: Four-color process matching systems for choosing predefined, prenamed process colors (not spot colors). Focoltone colors were designed to lessen the need for trapping colors.
Note: Trapping, which improves the printing of overlapping colors, is covered in Chapter 24.

When a picture is selected, the Colors palette (Window menu) displays controls for changing the color of the frame, the picture, and the background of the box. Different controls are available depending on the tool (Item or Content) and type of item selected.
To create a spot color for print output
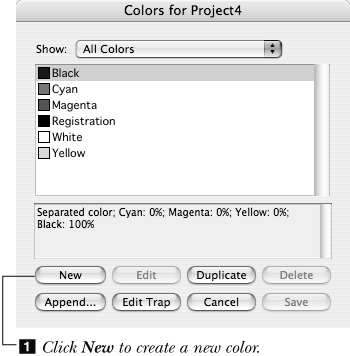
- Choose Edit > Colors (Shift-F12), then click New
 .
.
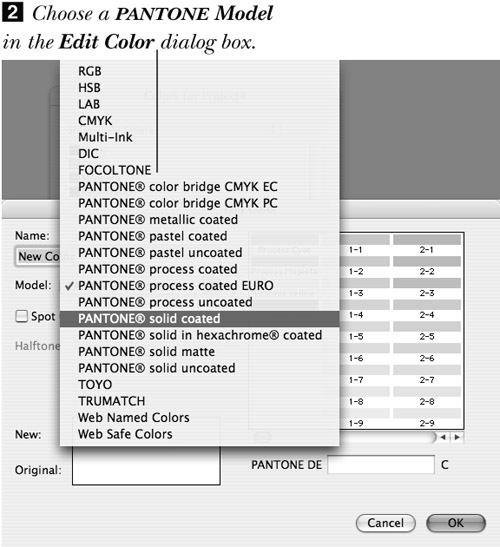
- From the Model menu in the Edit Color dialog box, choose one of the PANTONE options (nothing that says “process,” though)
 .
.
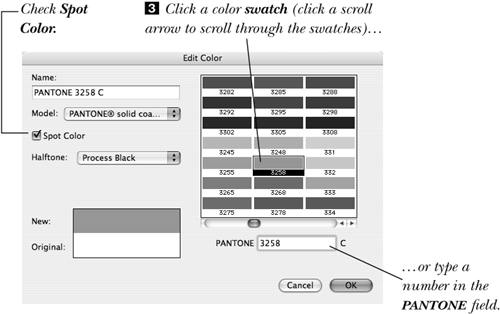
- Click a color swatch (use the scroll arrows to scroll through the choices)
 .
.
or
Click in the PANTONE field, then type a number from a PANTONE color guide.
- Spot Color is checked automatically. (If this option is unchecked, the spot color will be converted into a process color.)
- Click OK, then click Save, if necessary. The new color will appear on the Colors palette and on all the Color menus
 .
.

Tip
If an item is selected in the layout, you can Control-click/Right-click the Colors palette and choose New from the context menu to go directly to the Edit Color dialog box.
To create a process color
- Choose Edit > Colors (Shift-F12), then click New.
or
If an item is selected, Control-click/Right-click in the Colors palette and choose New.
- Choose Model: FOCOLTONE or TRUMATCH or choose one of the PANTONE process or hexachrome options . Then enter the desired color number in the FOCOLTONE, TRUMATCH, or PANTONE field or scroll through the swatches and click a swatch ; a name will appear in the Name field. PANTONE solid colors are four-color process colors that simulate spot colors.
or
Choose Model: CMYK
, enter percentages (or move the sliders to the desired percentages) from a color matching book in the C, M, Y, and K fields , then type a name for the color in the Name field. The vertical bar controls brightness (the amount of black in the color). - Click OK and then, if necessary, click Save. The color will appear on the Colors palette and in dialog boxes that have a color option, in all layouts in the current project.


Tip
The Registration color is used for registration and crop marks, which commercial printers use to align color plates.
You can use a duplicate of an existing color as a starting point for a new color. This is for CMYK or RGB colors only—not for spot colors.
To create a color by duplicating an existing color
- Choose Edit > Colors (Shift-F12), click a color, then click Duplicate.
or
If an item is selected, Control-click/Right-click in the Colors palette and choose Duplicate [color name].
- Edit the color by adjusting any of the C, M, Y, or K (cyan, magenta, yellow, or black) or R, G, or B (red, green, or blue) percentages. You can also change the color Model.
- Once you’ve changed the color itself, change its Name (using the CMYK color values if you’re creating a CMYK color).
- Click OK and then, if necessary, click Save.
Tip
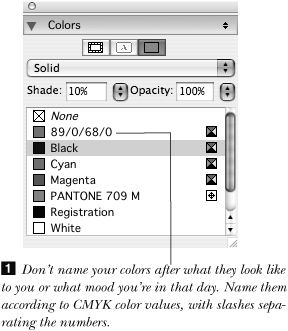
What’s with those color names ![]() —89/0/68/0? How are we supposed to know what that means? The truth is, those CMYK color values mean more to an experienced graphic designer than generic names like “Garden Green” or “Bright Blue.”
—89/0/68/0? How are we supposed to know what that means? The truth is, those CMYK color values mean more to an experienced graphic designer than generic names like “Garden Green” or “Bright Blue.”
Tip
To compare the components of two colors, in the Colors dialog box, Cmd-click/Ctrl-click two color names, then Option-click/Alt-click Append (it will turn into a Compare button). Any differences between the colors will be listed in boldface.
Tip
Another quick way to get to the Edit > Colors dialog box is to Cmd-click/Ctrl-click a color on the Colors palette.
To edit a CMYK or RGB color
- Choose Edit > Colors (Shift-F12), then double-click the CMYK or RGB color that you want to edit (or click a color name, then click Edit) .
or
If an item is selected, Control-click/Right-click a color on the Colors palette, then choose Edit [color name]
. Or choose Edit [color name] from the context menu for the Colors palette. - Change any of the C, M, Y, K or R, G, B percentages by entering new values or moving the sliders . The vertical bar controls brightness (the amount of black in the color). You can also change the color Name or Model.
- Click OK and then, if necessary, click Save. The color will update immediately on all items in the project where it’s currently being used and will update on the Colors palette for all layouts in the project.


Tip
To create a rich black, you can add some magenta (M) or cyan (C) to your black (K). Ask your commercial printer for advice.
Tip
Click the Original color swatch in the Edit Color dialog box to restore the color’s original formula.
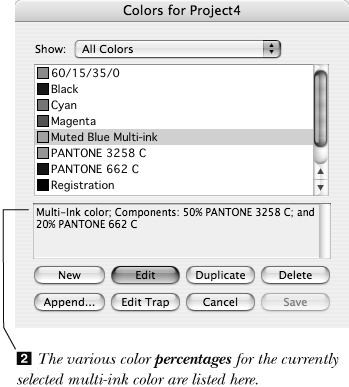
Multi-ink is a color model for print output in which you can create new colors from a combination of process and/or spot colors. For example, you could create a new color by combining 50% of a PANTONE color and 20% of a CMYK color. Multi-ink colors print from more than one plate.
Note: Talk to your commercial printer before using multi-ink colors, as they can cause moiré patterns or other printing problems if the proper screen angles aren’t used.
To create a multi-ink color
- Choose Edit > Colors (Shift-F12), then click New.
or
If an item is selected, Control-click/Right-click in the Colors palette and choose New.
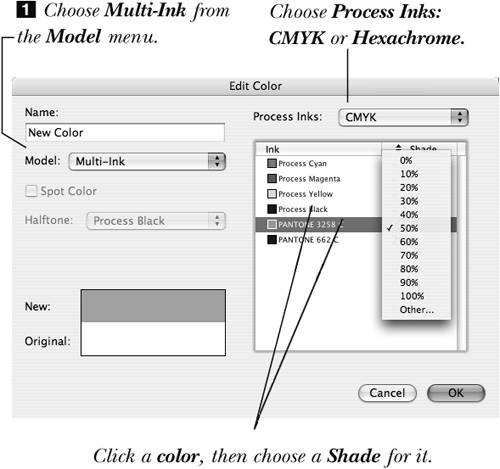
- Choose Model: Multi-Ink .
- On the right side of the dialog box, choose Process Inks: CMYK or Hexachrome.
- Click a color, then choose a Shade percentage for that color.
- Repeat the previous step for the colors you want to combine with the first color.
Tip
To apply the same Shade percentage to more than one color at a time, Shift-click or Cmd-click/Ctrl-click them before choosing a percentage.
- Type a Name for the multi-ink color (tip: include “multi-ink” in the name).
- Click OK. Click Save, if necessary . The color will appear on the Colors palette and in dialog boxes that have a color option.
Tip
To see how color mixes look when printed, refer to the Color+Black (spot colors plus black) or Color+Color (spot color combinations) PANTONE swatch book.
Deleting and replacing colors
It’s as easy to delete colors as it is to create them. It’s never a good idea to leave a project littered with unused colors—especially colors that won’t work for the intended printing process—because you never know if they’ll slip into a layout. If you delete colors that are being used in your layout, QuarkXPress lets you choose replacement colors, providing a quick-and-dirty find/change for colors.
To delete or globally replace a color
- To delete or replace a color in all layouts in a project, leave the project open.
or
To delete or replace default colors for new projects, close any open projects.
- Choose Edit > Colors (Shift-F12).
- If you’re going to replace the deleted color, create the replacement color now, if it doesn’t already exist.
- Click the color you want to delete. Cyan, Magenta, Yellow, Black, White, and Registration cannot be deleted.
or
To delete the colors that aren’t being used (and reduce the file’s storage size), choose Show: Colors Not Used
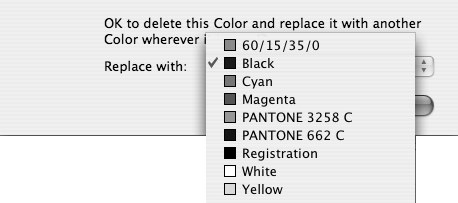
, then select the colors you want to delete. To do this, click the first in a series of consecutive colors, then Shift-click the last color. Or Cmd-click/Ctrl-click to select nonconsecutive colors. In the Colors dialog box, click the color you want to delete, then click Delete. Or to delete all the colors that aren’t currently being used in the project, choose Show: Colors Not Used, select the colors you want to delete, then click Delete. - Click Delete. If the color you deleted was currently applied to any item in the active project, a prompt will appear. Choose a replacement color from the “Replace with” menu , then click OK. You can undo this by clicking Cancel, but not after you’ve clicked Save.
When deleting a color, you can choose a replacement color from the Replace with menu.
- Click Save.

Tip
To quickly delete one color with the option to undo, Control-click/Right-click the color on the Colors palette, and choose Delete [color name].
Applying colors
Any time you’re formatting an item or its contents, QuarkXPress provides convenient methods for choosing a color as well. If you are going through a layout and only applying color, the Colors palette is the most straightforward method. But as you’re performing other tasks, you’ll see color swatches ![]() and Color menus
and Color menus ![]() throughout the interface that you can use to apply colors.
throughout the interface that you can use to apply colors.

![]() The Line Color menu on the Classic tab of the Measurements palette for lines
The Line Color menu on the Classic tab of the Measurements palette for lines
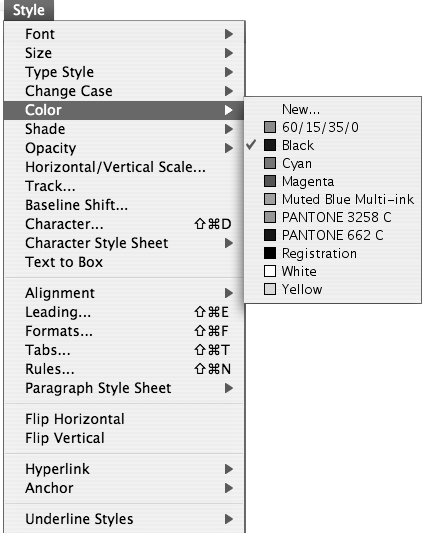
![]() The Color submenu of the Style menu for text
The Color submenu of the Style menu for text
To apply a color
- Select the Item tool (to apply a color to an item such as a box background) or select the Content tool (to apply a color to content, such as text or a picture).
- Select the item or contents you want to apply the color to (details on the following pages in this chapter).
- Apply a color via one of the following:
Colors palette (Window menu); click a button at the top to specify what to color—text, picture, frame, box, etc.
Color menu on the Measurements palette (Classic tab, Frame tab, Character Attributes tab, etc.).
Style > Color submenu.
Modify dialog box (Box pane, Picture pane, Frame pane, etc.)
- When you choose a color, look for nearby controls for Shade and Opacity.
Tip
The shade controls the intensity of the color (the tint) while the opacity controls the transparency (how much you can see through it) ![]() .
.

Use the following method to apply a color to a unique area of text, such as a headline. Since you can apply color to text using the Character Attributes dialog box, the fastest way to color repetitive instances or larger bodies of text is via a style sheet. You can also use Find/Change to apply a color, either directly or via a style sheet.
To color text
- Choose Window > Show Colors to display the Colors palette (F12).
- Choose the Content tool.
- Select the text that you want to apply a color to.
- Click the Text Color button on the Colors palette .
- Click a color.
- Optional: Enter a value in the Shade field or drag the slider (). The default shade (tint) value is 100%.
A different shade percentage is applied to each character.
- Optional: Enter a value in the Opacity field or drag the slider. The default opacity (transparency) value is 100%, which is fully opaque.


Tip
If you’re coloring type white or restoring reversed type to black-on-white, change the type color first and then change the background color. That way, the text will be easier to select ![]() .
.

In the following instructions, you’ll learn how to color the background of any kind of box. Want to have some fun? Create playful or dramatic graphic items using empty or contentless standard or Bézier boxes (or lines). Use your imagination! To create multiples of any item, use Item > Step and Repeat. To apply blends, see pages 275–276.
To color the background of an item
- Choose Window > Show Colors to display the Colors palette (F12).
- Choose the Item or Content tool, then click a text box, picture box, contentless box, or group, or select multiple items. For a table, choose the Content tool, then select one or more table cells.
- Click the Background Color button on the Colors palette .
The Colors palette when a text box, picture box, or contentless box is selected
- Click a color.
- Optional: Enter a value in the Shade field or drag the slider (–). The default shade (tint) value is 100%.
Black type on top of a picture that has a 10% black background The black ampersand has a shade of 50% and opacity of 30% so you can see the text through it (this would have more impact in color—trust us!).
- Optional: Enter a value in the Opacity field or drag the slider. The default opacity (transparency) value is 100%, which is opaque.


To color a picture
- Choose Window > Show Colors to display the Colors palette (F12).
- Choose the Content tool.
- Click a grayscale PICT or TIFF or a grayscale JPEG.
- Click the Picture Color button on the Colors palette .
The Colors palette when a picture is selected
- Click a color.
- Optional: Enter values in the Shade and Opacity fields or drag the sliders ().
TIFF line art with a 50% shade of black on the picture and 20% shade of black on the picture background
- Optional: Click the Picture Background Color button (next to the Picture Color button) and change the color, shade, and opacity.


Tip
You can also apply color to a picture using the Style menu for pictures or Item > Modify > Picture.
To color a line or a text path
- Choose Window > Show Colors to display the Colors palette (F12).
- Choose the Item tool.
- Select a standard line, Bézier line, or text path, or create a multiple-item selection.
- Click the Line Color button on the Colors palette .
The Colors palette when a line is selected
- Click a color.
- Optional: Enter values in the Shade and Opacity fields or drag the sliders.

Tip
You can also apply a color to a line using the Style menu. If you need to color the gaps in a dashed or striped style, use Item > Modify > Line or the Line tab of the Measurements palette.

Showing off opacity at work, in this frame the darker lines are a 50% shade of black whereas the lighter, semitransparent lines are a 100% shade of a light green color set at 50% opacity.
The easiest way to apply color to frames is via the Frame tab of the Measurements palette where you can adjust the width, style, and colors all at once.
To color a frame
- Display the Frame tab of the Measurements palette .
The Frame tab of the Measurements palette provides one-stop shopping for width, style, color, and gap color.
- Choose the Item or Content tool.
- Click a text box, picture box, or group of items, or create a multiple-item selection.
- Enter a value in the Width field if necessary, then choose a color from the Color menu.
- Optional: Enter values in the Shade and Opacity fields or drag the sliders.

Tip
If you do use the Colors palette to apply a color to a frame, click the Frame Color (first) button.
You can color the white areas, called “gaps,” between lines, dots, or dashes in a line or frame.
To color the gaps in a line, frame, or text path
- Choose the Item or Content tool.
- Click the box or line that contains the gaps you want to color.
- For a box, choose Item > Modify, then click the Frame tab (Cmd-B/Ctrl-B gets you directly to the Frame pane).
For a line or text path, choose Item > Modify, then click the Line tab (Cmd-M/Ctrl-M).
- Choose from the Gap: Color menu .
- Optional: Enter values in the Shade and Opacity fields or drag the sliders.
- Click OK.

Tip
You can also apply a color to gaps using the Frame or Line tab of the Measurements palette.
Tip
You cannot apply a gap color to paragraph rules (Style > Formats > Rules).
Applying colors to tables
With tables, you can change the color of a dizzying array of elements. You can apply:
• A color of None, a color, or a blend to the background of one or more cells
• A color or a blend to the background of a table box (the overall box that contains all the table cells)
• A color or a blend to the gridlines between cells
• A color of None or a Width of 0 to a gridline or border segment (to make it disappear)
• A color to a table’s outer frame
Note: By default, table cells are white. To change this default color for future tables, double-click the Tables tool, click Modify, click the Cell tab, then choose a Cell: Color and Shade.
To color the background of table cells
- Choose the Content tool.
- Click in one cell or Shift-click to select multiple cells.
- Click the Background Color button
 on the Colors palette, click a color, and adjust the shade and/or opacity. You can also apply a blend (see pages 275–276) .
We applied a solid tint to the background of some table cells and a subtle blend to the topmost cell.
on the Colors palette, click a color, and adjust the shade and/or opacity. You can also apply a blend (see pages 275–276) .
We applied a solid tint to the background of some table cells and a subtle blend to the topmost cell.or
Choose Item > Modify (Cmd-M/Ctrl-M), then click Cell(s). Choose a color from the Cell: Color menu and adjust the Shadow and/or Opacity values. Or, to apply a blend, choose from the Blend: Style, Angle, Color, Shade, and Opacity menus.

By default, the background of the table box, which holds all the table cells, is white. To change it, follow these instructions.
Note: If you apply a color to the background of a table box, you won’t be able to see the color unless the cells have a color of None.
To color the background of a table box
- Choose the Item tool, then click a table.
- On the Colors palette, click the Background Color button , then choose a color, shade, and opacity or apply a blend (see pages 275–276).
We applied a blend and a frame to our table box. The border segments have a Width of 0; at a Width above 0, they’d be visible just inside the table box frame.

Tip
You can also use the Box area in the Table pane of the Modify dialog box (Item menu) to specify a background color for a table.
To color the table box frame
- Choose the Item tool.
- Click a table.
- Click the Frame Color button on the Colors palette.
- Click a color swatch on the palette.
Tip
You can also use the Frame tab of the Measurements palette or the Frame pane of the Modify dialog box (Item menu) to color a table frame.
To color table border segments and/or gridlines
- Choose the Content tool and click in a table cell.
- Choose Table > Select > Horizontal Grids, Vertical Grids, Border, or All Grids .
The Table > Select submenu makes it easy to select categories of gridlines.
or
Shift+click individual gridlines with the Content tool.
- Choose from the Style menu (or Control-click/Right-click the table) > Color, Shade, and Opacity submenus.
or
Click the Line Color button on the Colors palette, click a swatch, then specify the shade and opacity.
or
Display the Table Grid tab of the Measurements palette and use its controls to adjust color, shade, and opacity.
or
Use the Grid pane of the Modify dialog box (Item menu)
. Click one of the three icons to the right of the Preview for the components you want to color. In the Line and Gap areas, use the Color, Shade, and Opacity controls to color the selected gridlines . In the Line and Gap areas in the Grid pane of the Modify dialog box (Item menu), choose Color, Shade, and Opacity percentages. After selecting Table > Select > Horizontal Grids, we used the Table Grid tab of the Measurements palette to change the shade to 100% and the width to 2 pt.


Applying blends
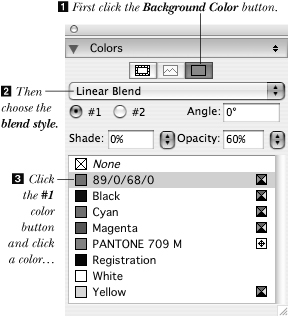
A two-color linear blend can be applied to the background of a text box, picture box, table box, or to a table cell, but not to text, a line, or a frame. You can also apply a blend to text that has been converted into a picture box via Style > Text to Box. The second color can be white or None (so you can fade from a color to transparent) and you can adjust the shade and opacity for the blend colors to create soft gradations.
To apply a blend to a box or table cell
- Choose the Item tool, then click a text box, picture box, contentless box, group, or multiple-item selection. Or choose the Content tool, then select one or more table cells.
- On the Colors palette (F12), click the Background Color button .
...then choose a Shade and Opacity percentage.
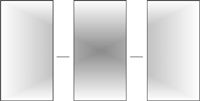
- From the blend style menu , choose Linear Blend, Mid-Linear Blend, Rectangular Blend, Diamond Blend, Circular Blend, or Full Circular Blend (see , next page).
 Mid-Linear (0°)
Mid-Linear (45°)

Rectangular

Diamond

Linear (0°)

Linear (125°)

Circular

Full Circular

A rectangular blend applied to each item individually
The same blend applied to a multiple-item selection that was first merged via Item > Merge > Union

A linear blend applied to each individual item

The same blend applied to a multiple-item selection that was first merged via Item > Merge > Union
- Click the #1 button, then specify a color, shade, and opacity –.
- Click the #2 button
 , then specify a color, shade, and opacity. You can choose different percentages of the same spot color as the #1 and #2 colors.
- Optional: Change the blend angle (−360° to 360°, in increments as small as .001°).

Tip
We can never resist giving you more options. The fastest way to apply a blend is using the Colors palette, but you can also do it in Item > Modify > Box. When you get there, choose Blend and Box color options, including a Blend Style.
Managing color
What is color management?
Every device, whether it’s a monitor or a printer, defines color within its own unique color range (called its “gamut”) when it represents or reproduces color. The purpose of color management is to ensure consistent color by coordinating and matching color among various device gamuts—from monitor color (RGB) to final print output color (CMYK). If a color on a source device (monitor or scanner) is within the gamut of the destination device (printer), then color matching is straightforward. If a color on a source device is outside the gamut of the destination device, then the color management system adjusts the color (alters its hue, lightness, or saturation) to match the color between the source and destination devices. A monitor can’t display, nor can a printing device output, all the colors in the visible spectrum.
Today’s computers use color matching systems (CMS) to maintain color consistency between input and output devices. A CMS is built into the latest versions of both the Macintosh and Windows operating systems. In Mac OS X it’s called ColorSync; in Windows it’s called Image Color Management, or ICM.
How color matching systems work
All color matching systems work in basically the same way. First, they provide a method for identifying the color characteristics of various hardware devices, and save the information as profiles. Each profile records how the device’s color response differs from a reference color space (usually CIE LAB). Each CMS also has a color engine that does the work of converting a file’s color from its original profile to the reference color space and then again to the output device’s color profile. These systems work in conjunction with the QuarkXPress Color Manager to ensure color accuracy between monitor representation and final output by taking into account variations between different color models (RGB color and CMYK color) and device gamuts.
The device profiles are sometimes called ICC profiles because their format was defined by the International Color Consortium (in Windows, they often bear the .icc suffix). They can also be used to match color between applications. Let’s say you create a picture in Photoshop and then import it into a QuarkXPress layout. If you choose the same profiles (particularly the monitor and output profiles) in both applications, the picture will, hopefully, look the same on screen in QuarkXPress as it does in Photoshop, and in both applications it will closely match the final output color. Once this color consistency is established, if you then change the monitor or the final output printer type, you must choose a new profile for each device in both applications.
Calibration is key
Two critical steps in color matching are monitor calibration (generating and maintaining accurate screen characteristics, such as the white point and gamut) and choosing the correct color profile for each device. Although there are applications that you can use specifically for creating device and printer profiles, for most QuarkXPress users, the CMS built into your operating system and the profiles that ship with each device do an adequate job.
The QuarkXPress Color Manager
As you might have guessed by now, color management is a confusing topic—and most color management systems can be confusing, too. That is why QuarkXPress 7 introduces an entirely new “set it and forget it” color management environment. You won’t believe how easy it is.
The QuarkXPress default color management environment
In QuarkXPress 7, the default color management environment is designed to suit most user’s needs. If you never touch a color management control, you will still benefit from its revamped color management engine. However, you also have the option to manage color on your own in a legacy fashion (the way you did in previous versions of QuarkXPress) and you have a new option—to hire a color expert to fine-tune color management settings for you. To get started, be sure the correct monitor profile is selected and experiment with “soft proofing” or previewing output methods on screen.
To check the monitor profile
- Choose QuarkXPress (Edit, in Windows) > Preferences.
- Under Application, click Display.
- Make sure the Monitor Profile chosen is Automatic (this is the monitor recognized by your system) or a custom profile for your monitor .
The Monitor Profile menu in the Display pane of Application Preferences controls how colors display on screen; choose Automatic or the name of your computer/monitor.
- If necessary, change the Monitor Profile, then click OK.

Once you have confirmed the monitor profile, you can soft proof colors on screen.
To soft proof a layout
- Display a layout containing colors, preferably a mixture of spot colors and pictures.
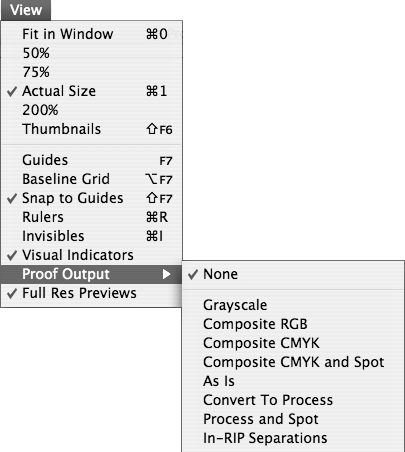
- Choose View > Proof Output > Grayscale. This shows how the layout would look when output for a newspaper, for example.
- Choose View > Proof Output > Composite CMYK or any other option.
- Choose View > Proof Output > None to continue working in the layout as usual.
The Proof Output submenu lets you preview how colors in a layout will look when output in grayscale, composite CMYK, and more. If you design an ad, for example, that will run in black-and-white in the newspaper and in four-color in a magazine, you can preview both versions on screen.
The color management in QuarkXPress 7 is built-in and always on—you can’t disable the XTension or turn it off. You can, however, make sure it’s working for you by making sure the preferences are set properly. Again, Quark has designed the default settings to work for most users so you are unlikely to need to change anything.
To set Color Manager preferences
- Choose QuarkXPress (Edit, in Windows) > Preferences > Print Layout > Color Manager .
The Color Manager preferences affect the active layout; change them with no projects open to affect all new projects.
- In the Transformation Method area, choose a Color Engine. The default option, Automatic, uses your system’s color settings. You can also choose ColorSync (Mac only), Kodak, or LogoSync.
- Check Black Point Compensation to adjust black ink values to suit the output color space.
- In the Source Options area, choose a Source Setup . Each option is a package of color management settings that governs how different color sources are treated, including things such as profiles and rendering intents for solid colors and RGB, CMYK, and grayscale images. The QuarkXPress 7.0 Default option is best if you are new to color management. You can also choose QuarkXPress Emulate Legacy if you prefer the color management used in versions 3.3, 4.0, or 6.0; choose a custom source setup created by a color expert for you; or choose New to create a new source setup (best left to experts).
The Source Setup menu defines where colors are coming from.
- Check Enable Access to Picture Profiles if you want to choose profiles and rendering intents for pictures as you import them rather than relying on defaults.
- In the Soft Proofing area, for Proof Output, choose the default option for the View > Proof Output submenu, which defines how you view colors on screen. If you’ve chosen Composite CMYK, for example, your monitor will try to simulate colors as printed on a four-color press.
- For Rendering Intent choose the method to be used for conversions between color spaces. If the default setting, Absolute Colorimetric, does not suit your typical work or a specific layout, you can change it (see the definitions at right). For example, if you’re working with business graphics rather than photographs, you might choose Saturation.
- If you’re working with imported EPS and PDF files that include multiple color spaces—such as spot colors and RGB images—you can have QuarkXPress color manage the individual sources. To do this, check Color Manage Vector EPS/PDF.
- Click OK.


Tip
Don’t feel bad if you don’t understand all of this or don’t end up changing any of the Color Manager preferences. Few users go to the trouble of implementing color management at any level due to its complexity—and lack of absolute reliability. Soft proofing, for example, can never really show how something will print due to many factors, from the lighting in the room and reflections from your shirt on the monitor to variations in the inks used for printing and the absorbency of the paper. Most users rely on their experience with specific processes. That said, color management gets better and better with every release of QuarkXPress so it never hurts to try it out.
If you check Enable Access to Picture Profiles in the Color Manager pane of the Preferences dialog box, you can view and change all the color management settings for each picture as you import it. Once imported, you can still change color management settings via the Profile Information palette (Window menu).
To choose a profile while importing a picture
- Choose the Item or Content tool, then click a picture box.
- Choose File > Import Picture.
- Locate and click the name of the picture you want to import.
- The Color Depth, Dimensions, Resolution, Type (Format, in Windows), and File Size of the selected picture and the Date it was last modified are displayed .
The Color Management pane in the Import Picture dialog box lets you preview—and change—how a picture’s color will be handled. Options in the Profile menu will change depending on the selected picture.
- Click the Color Management tab, if necessary. The Profile menu shows the picture’s embedded profile (if the picture has one) or the profile specified in the Source Setup in Color Manager preferences. You can change the profile here if you know it’s wrong or another profile will work better for the output method.
- As with the Profile, you can change the embedded/default Rendering Intent to something that works better for the particular picture .
The Rendering Intent menu in the Color Management tab of the Import Picture dialog box (File menu)
- If the picture has the same source color space and output color space (CMYK to CMYK, for example), you can still use color management to display and output the image by checking Color Manage to RGB (or CMYK, Gray, etc.) Destinations.
- Click Open to import the picture.


Tip
To view or change color management information for the selected picture, choose Window > Profile Information ![]() . The palette offers the same controls as the Color Management pane of the Import Picture dialog box—and you can see the changes immediately.
. The palette offers the same controls as the Color Management pane of the Import Picture dialog box—and you can see the changes immediately.
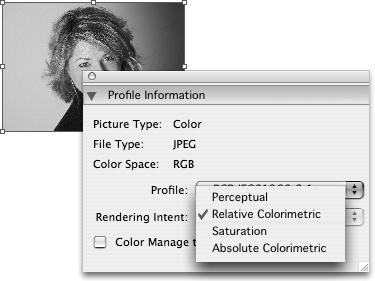
![]() The Profile Information palette lets you change a picture’s profile and rendering intent.
The Profile Information palette lets you change a picture’s profile and rendering intent.
Tip
If the list of profiles in the Profile menu is too long, you can streamline the list in the Profile Manager dialog box ![]() (Utilities menu). Uncheck the profiles you never use, click OK, and they won’t display on the list. You can also use the Browse/Select button in the Auxiliary Profile Folder area to specify a different folder of profiles for use with a layout.
(Utilities menu). Uncheck the profiles you never use, click OK, and they won’t display on the list. You can also use the Browse/Select button in the Auxiliary Profile Folder area to specify a different folder of profiles for use with a layout.
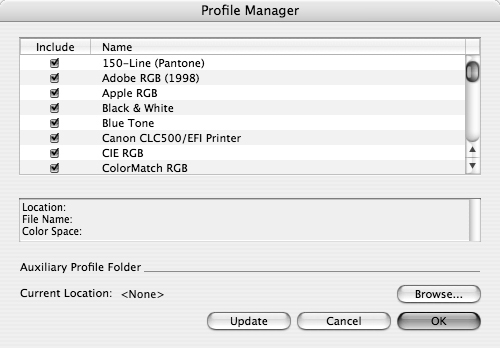
![]() The Profile Manager dialog box (Utilities menu) lets you control which profiles display in menus; you can also add new profiles to QuarkXPress.
The Profile Manager dialog box (Utilities menu) lets you control which profiles display in menus; you can also add new profiles to QuarkXPress.
When color is really key, a company may hire a color expert to generate “source setups” and “output setups” specific to your workflow or even to specific publications. Created through Edit > Color Setups, the setups are portable “packages” of color management information that may be included with Job Jackets or appended/imported into layouts.
To work with color management settings from a color expert
• To work with a custom source setup: First, append the source setup file to a layout using Edit > Color Setups > Source > Append. Then, choose the source setup from the Source Setup menu in Color Manager preferences.
• To work with a custom output setup: First, import the source setup file to a layout using Edit > Color Setups > Source > Append. Then, choose the output setup from the Proof Output menu in Color Manager preferences. You can also choose the new output setup from View > Proof Output. For printing, choose the custom output setup from the Setup menu in the Colors pane of the Print dialog box.