
24. Print
Printing files
To output a print layout
- Display the layout you want to print. You can print only one layout at a time.
- Open the Print dialog box by choosing File > Print (Cmd-P/Ctrl-P).
- Choose a printer from the Printer menu.
- Optional: Choose a print style from the Print Style menu (see page 394). You can override the current print style settings temporarily by entering new settings via the panes in the Print dialog box. These changes won’t affect the original print style. An asterisk will appear next to the print style name to show that a temporary change was made.
- Enter the number of Copies of each page you want to print
 . The default is 1.
The Print dialog box in Mac OS X
- To specify which pages to print, leave the default Pages setting on All, enter nonconsecutive page numbers divided by commas, or enter a range of numbers divided by a hyphen. (See “Absolute page numbers” on page 390.)
- Choose an option from the Sequence menu to specify whether All, Odd, or Even pages print.
- To change the size at which the layout prints, choose or enter a Scale value.
- Check any of the following:
Collate to print full copies of the specified range of Pages instead of multiples of each page.
Spreads to print spreads horizontally on the same sheet of paper.
Back to Front to print pages in reverse order.
Fit Print Area to force the layout to fit on the paper.
- Click any category in the scroll list on the left side to display related panes at the bottom of the Print dialog box. The controls will also vary depending on the Printer and PPD selected. You don’t need to go through all the panes every time you print a file.
Use the Device Options pane to choose the correct Printer Description (PPD)
, which automatically establishes the default Paper Size, Width, and Height. Depending on the PPD, you can change the Page Gap and Paper Offset. You can also change the Resolution, print a Negative Print, and turn on the PostScript Error Handler, which helps you identify printing problems. The Device Options pane in the Print dialog boxUse the Page Options pane to change the Orientation of the pages on the paper, Include Blank Pages, print Thumbnails, specify Page Flip, and specify Page Tiling (for pages that are larger than the paper; see page 391).
Use the Color Options pane
 to choose a Mode (Composite or Separation) and a Setup (Grayscale, Composite RGB, Composite CMYK, Composite CMYK and Spot, or As Is) (see page 393); you can also choose custom output setups created by a color expert. For Halftones, choose Printer or Conventional (see the sidebar on this page and on page 393). Part of the Color Options pane in the Print dialog box
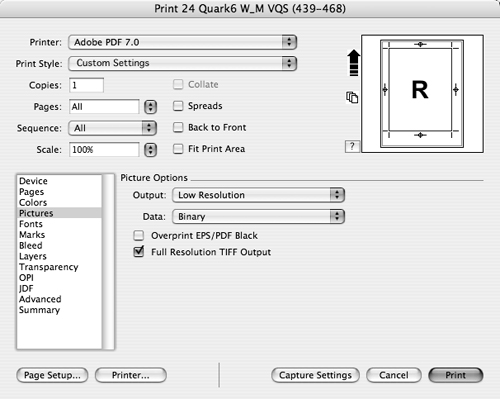
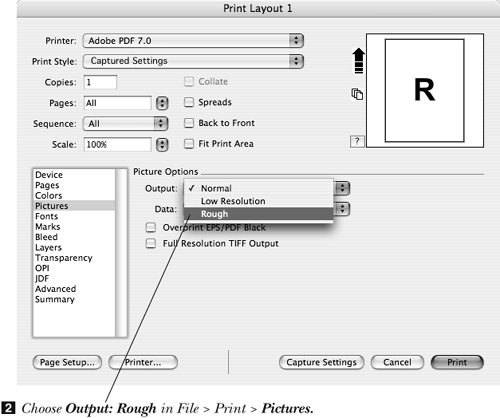
Use the Picture Options pane
 to change the Output type (Normal, Low Resolution, or Rough; see page 392), Data encoding, Overprint EPS/PDF Black, and Full Resolution TIFF Output setting. The Picture Options pane in the Print dialog box
When a PostScript printer is selected from the Printer menu, you can control which fonts download to the printer using the Font Options pane
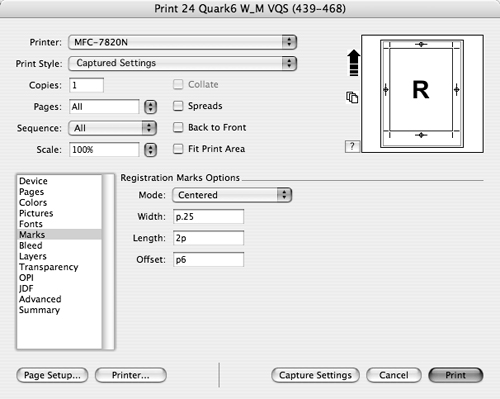
. Leave Select All checked ; the only fonts you should prevent from downloading are 2-byte TrueType fonts resident on the printer (for Asian markets). If you are printing to a PostScript 2, version 2015, or PostScript level 3 or later output device, check Optimize Font Formats to speed up printing. Part of the Font Options pane of the Print dialog boxUse the Registration Marks Options pane (click Marks in the scroll list at left)
to add crop marks and registration marks to pages. Choose Centered or Off Center, and then use the Width and Length fields to specify the size of the crop marks. Use the Offset field to specify how far the marks are placed from the edge of the page. The Registration Marks Options pane in the Print dialog boxUse the Bleed Options pane
to choose bleed options. From the Bleed Type menu, choose Page Items to allow any items that are at least partially on the page to print in their entirety. Asymmetric and Symmetric let you define the width of the bleed area. For Symmetric, enter one Amount value; for Asymmetric, enter Top, Bottom, Inside, and Outside values. With Clip at Bleed Edge unchecked, items that at least partially overlap the bleed area will print in their entirety, within the limits of the output device  ; when it’s unchecked, items won’t print beyond the bleed area
  . The Bleed Options pane in the Print dialog box and the preview area (upper right) that allows you to preview your settings With Page Item s chosen, the whole item prints—as long as at least part of it is on the page. With Asymmetric (or Symmetric) chosen and Clip at Bleed Edge checked, items print only up to the specified Amount (the bleed edge).
Tip
When working with marks and bleeds, it helps to consult the preview in the upper-right corner of the Print dialog box
. Icons indicate the type of device selected (cut sheet or roll fed) and the media feed direction. Point at the icons to view Tool Tips and click the question mark for a key to the colored guides on the preview.
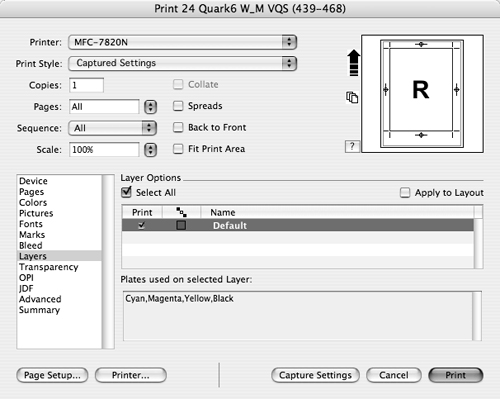
Use the Layer Options pane
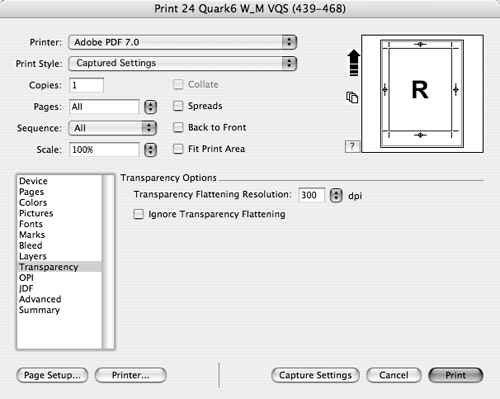
to turn printing temporarily on or off for individual layers (see page 392). If you’re not sure what is on a layer, it might help to select it and view the Plates Used On Selected Layer area. Check Apply to Layout to apply the current print settings to the layers in the Layers palette. The Layer Options pane in the Print dialog boxIf the layout contains objects that will be flattened on output (such as opacity, alpha channel masking, blends to None, line art TIFFs, or bitmap frames), you can choose settings in the Transparency Options pane
. For the Transparency Flattening Resolution, enter a value in the field or choose an option from the menu. If you need to troubleshoot problems when printing transparencies, try checking Ignore Transparency Flattening to print opaque items. This can help narrow down a printing problem to a specific item. The Transparency Options pane in the Print dialog boxControls in the OPI Options pane
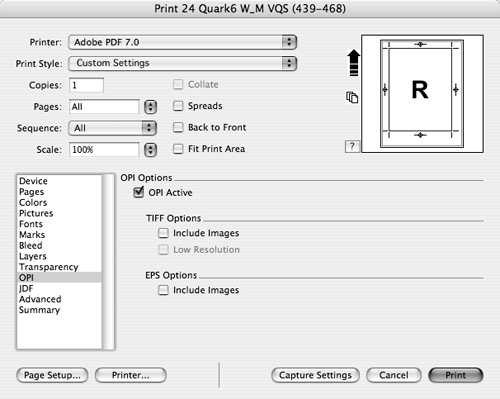
apply only if you’re outputting to an OPI prepress system that’s going to replace your pictures with high-resolution picture files stored on that OPI system. To get started, check OPI Active and then specify which pictures to exchange with the full-resolution versions by checking Include Images under TIFF Options and/or EPS Options. Both picture data and comments will be sent to output. For TIFF files, you also have the option to check Low Resolution and output the TIFF images used in the layout rather than the high-resolution versions. The OPI Options pane in the Print dialog boxIf the project uses a Job Jacket (see Chapter 23), use the JDF Options pane
to specify how that information is handled. Check Output JDF to save the JDF file with the job. You can also choose whether to Include Job Jacket Contact information. The JDF Options pane in the Print dialog boxUse the Advanced Options pane to choose the PostScript Level (2 or 3) used in embedded EPS and PDF files.
Use the Summary pane to review settings from all the panes to be sure they will work for the print job.
- Once you have reviewed all the settings and the preview, click Print.


Capture the settings
Click Capture Settings to save the current settings in the Print dialog box with the layout. This closes the Print dialog box without printing. To save the current settings as a print style, choose New Print Output Style from the Print Style menu.
Printer button: Mac OS X
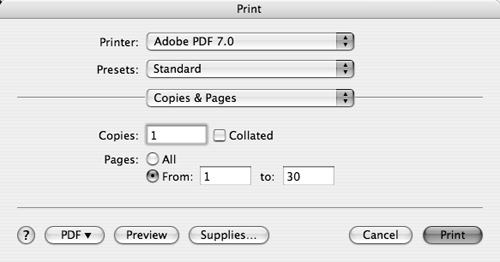
Clicking the Printer button at the bottom of the QuarkXPress Print dialog box opens the Mac OS X Print dialog box ![]() . The Printer menu at the top lets you change printers, and the Presets menu lets you choose from print styles you’ve saved at the system level. The menu in the middle lists options specific to the selected printer. In general, we suggest you choose printing options in the QuarkXPress Print dialog box to ensure proper output. You can, however, set options specific to your printer such as quality. To save new settings, click Print (this won’t actually initiate printing).
. The Printer menu at the top lets you change printers, and the Presets menu lets you choose from print styles you’ve saved at the system level. The menu in the middle lists options specific to the selected printer. In general, we suggest you choose printing options in the QuarkXPress Print dialog box to ensure proper output. You can, however, set options specific to your printer such as quality. To save new settings, click Print (this won’t actually initiate printing).
![]() Clicking Printer in the Print dialog box displays a Print dialog box that is specific to the selected printer (Mac OS X).
Clicking Printer in the Print dialog box displays a Print dialog box that is specific to the selected printer (Mac OS X).
Properties button: Windows
Clicking the Properties button in the QuarkXPress Print dialog box opens the printer’s Properties dialog box ![]() . Options in this dialog box will depend on which printer is currently selected.
. Options in this dialog box will depend on which printer is currently selected.

![]() Clicking Properties in the Print dialog box displays a Properties dialog box that is specific to the selected printer (Windows).
Clicking Properties in the Print dialog box displays a Properties dialog box that is specific to the selected printer (Windows).
Settings chosen in this dialog box override the current settings in the Print dialog box in QuarkXPress. Most settings, however, will update in the QuarkXPress Print dialog box (such as Copies and Orientation). The exception is Paper Size. When you’re done choosing Properties settings, click OK to return to the QuarkXPress Print dialog box.
DeviceN
DeviceN composite color is a printing feature that allows a project containing colors of various types (e.g., a combination of CMYK colors, spot colors, blends, multi-inks, colorized TIFFs) to be output as a single composite print while preserving the file’s color separation information. A print layout can be output as a composite or as separations, with no adjustments needed to the file. As an example, this dual output option would be useful for a project that is to be output to both PDF and to color separations for offset printing.
DeviceN can be chosen as a print option and when exporting to PDF and EPS. To specify DeviceN for print output, choose File > Print. In the Device pane, choose a PostScript composite color device from the PPD menu (only a PostScript level 3–compatible device can utilize DeviceN). In the Colors pane, choose Mode: Composite and Setup: Composite CMYK and Spot.
As Is
With the As Is composite color option chosen, an item in a print layout will output on a PostScript device using that item’s original source color space. This option is helpful when you have, say, an RGB image from an RGB scanner or image-editing program that you want to print as an RGB color composite on a PostScript device. The final output device—not QuarkXPress—will color manage the output. As with DeviceN, As Is color can be chosen for print output (PostScript level 3 printers only), and for PDF and EPS export.
To specify As Is composite color for print output, choose File > Print. In the Device pane, choose a PostScript level 3–compatible device from the PPD menu. In the Colors pane, choose Setup: As Is.

The Pages field in the Print dialog box accepts absolute page numbers (preceded by a plus sign +) and the word “end.” Here, QuarkXPress will print from the second page of the layout to the end of the layout, regardless of the numbers on the pages.
With automatic tiling, any layout whose page size is larger than the standard paper size can be printed in sections on multiple sheets of standard-size paper. Generally, you use tiling to print drafts of oversized documents, such as posters and the like. QuarkXPress automatically prints crop marks to be used as guides for trimming the page sections, as well as margin label codes notating the order for reassembling them into the larger whole.
To print using automatic tiling
- Display the layout you want to print, then choose File > Print (Cmd-P/Ctrl-P).
- Click Pages in the scroll list to display the Page Options pane.
- Choose the appropriate Orientation icon. Portrait is a good choice for a tabloid page.
- Choose Page Tiling: Automatic .
The Page Tiling options are located in the Page Options pane of the Print dialog box.
- Enter a number in the Overlap field. 3 (18p) is the default.
- Optional: If you want your pages to be centered within the overall arrangement of tiles, uncheck Absolute Overlap.
- Adjust any other print settings, then click the Preview pane to preview.
- Click Print.

Tip
To print an oversized layout on one standard size sheet of paper, check Fit Print Area at the top of the Print dialog box.
To suppress printing of a picture
- Choose Utilities > Usage.
- Click the Pictures option in the scroll list at left.
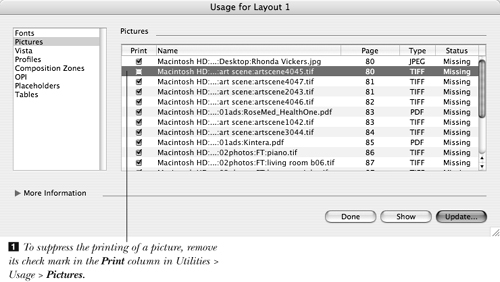
- In the Print column, uncheck any pictures you don’t want to print . The picture won’t print, but if a frame was applied to the box, it will print. (Click the blank box at any time to restore the check mark and turn printing back on.)
- Click Done.
Tip
You can also check Suppress Picture Output in Item > Modify > Picture.
You can print a layout minus all pictures to speed up printing or to help you see the naked, “bare bones” composition.
To suppress printing of all pictures
Choose File > Print. In the Pictures pane, choose Output: Rough ![]() . On the printout, an X will appear in each picture box and ornate frame styles won’t print.
. On the printout, an X will appear in each picture box and ornate frame styles won’t print.
Tip
Another way to hasten printing is to choose Output: Low Resolution. The low-resolution version of the picture that was saved automatically with the QuarkXPress file will print instead of the full-resolution version.
To suppress printing of an item
To suppress printing of an entire item (box, text path, line, or table) from a print layout, including its contents, and including any frame applied to the item, select the item, go to Item > Modify > Box (or Line or Table)(Cmd-M/Ctrl-M), then check Suppress Output ![]() .
.

To suppress printing of a layer
Choose File > Print and then, in the Layers pane, click the check mark in the left column for any layer. You can also double-click a layer in the Layers palette (Window menu) and check Suppress Output. A non-printing layer is a good place to store notes and comments on pages.
You can modify halftones for composite output or separations. We’ll discuss separations, but the process is similar for both. You may need to consult with your output service provider for the proper settings.
To modify halftone settings
- Choose File > Print, and then click Colors in the scroll list at left.
- In the Color Options pane, choose Mode: Separation.
- From the Setup menu, choose which plates to output: Process and Spot (all), Convert to Process, or In-RIP Separations (must be selected for a PostScript Level 3 device). You can also choose a custom output setup from a color expert.
- Choose Halftones: Conventional.
- Use the Print column to control which plates print (checked plates print).
- Each spot color is assigned the screen values of one of the four process colors. Use the Halftone menu to apply screen values from another process color to the currently selected spot color.
- According to instructions from your output provider, choose settings from the Frequency, Angle, and Function menus for each plate.
- Choose other print settings, then click Print.
Tip
If you choose Halftones: Printer for either composite or separation output, QuarkXPress sends no halftone information to the printer.
Tip
To save yourself from repetitive setup work and ensure consistency, create a print output style that contains the desired halftoning options. Then you can choose that style from the Print Style menu in File > Print.

Output styles work like style sheets, except in this case they contain custom output settings for print, PPML, PDF, and EPS output. Using output styles not only saves you time but ensures consistency—so you can be sure the 50 or so settings you’ve chosen are the same each time you output a job.
Once you’ve created an output style for print, you can choose it from the Print Styles menu in the Print dialog box for any QuarkXPress print layout in any project, existing or future. You can temporarily override settings from the currently chosen print style simply by choosing new settings in the Print dialog box.
To create or edit a print output style
- Display a layout that uses the print settings you want to save as a style.
- Choose File > Print.
- Click the Summary option in the scroll list at left to make sure all the print options are set correctly, and then make any changes.
- Choose New Print Output Style from the Print Style menu .
Choose New Print Output Style from the Print Style menu in the Print dialog box to create an output style based on the current settings.
- Enter a name for the style and then click OK.
- Click Capture Settings (to save changes without printing) or Print. The new print style is available to all your projects.

Tip
To create print styles from scratch (and to manage all your output styles), choose Edit > Output Styles ![]() . Click the New button to display a menu and select the type of style to create: PDF, PPML, Print, or EPS.
. Click the New button to display a menu and select the type of style to create: PDF, PPML, Print, or EPS.

![]() Use Edit > Output Styles to manage all your output styles and to create them from scratch.
Use Edit > Output Styles to manage all your output styles and to create them from scratch.
Tip
You can modify the Default Print Output Style in Edit > Output Styles to better suit your needs.
What’s a PPD?
A PPD, short for PostScript Printer Description, is a text file that contains information about a particular PostScript printer’s parameters—how’s that for alliteration?—such as its default resolution, usable paper and page sizes, and PostScript version number.
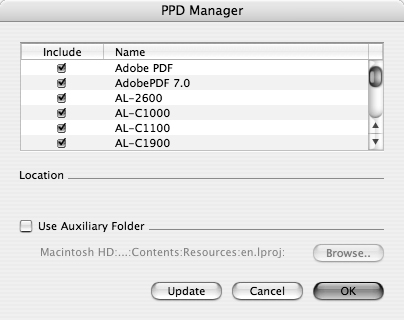
The PPD Manager (Utilities menu), which facilitates the loading of PPDs into QuarkXPress, is helpful in any setting where more than one kind of printer is used. It controls which of the System’s PPDs (and thus printer names) are available in the PPD menu in the Device pane of the Print (File > Print) or Edit Print Style dialog box (Edit > Output Styles > New > Print).
Although an unlimited number of PPDs can be loaded at a time, you can restrict the ones that are loaded to just the printers you output to from QuarkXPress.
To use the PPD manager
- Choose Utilities > PPD Manager .
Use the PPD Manager to load PPDs into QuarkXPress (or to exclude them from loading).
- Click a printer name.
- In the Include column, click the check mark to exclude that printer or restore the check mark to include it.
- Click OK. The PPD menus in QuarkXPress will update to reflect the new settings.
Tip
If you add a new Printer Description file to your system, click Update in the PPD Manager dialog box. Any PPDs that you just added to the System or Library folder will also be added to the current PPD list (unless you checked Use Auxiliary Folder and selected a substitute folder).
Exporting files
Some print shops need a PostScript file of layouts for output. To do this, first prepare the layout according to the output provider’s instructions—including confirming that no fonts or pictures are missing in the Usage dialog box (Utilities menu) and choosing all the prescribed settings in the Print dialog box. Also, be sure the proper Printer Description file for the final print output device is enabled via the PPD Manager (Utilities menu) so it’s available in the Device pane of the Print dialog box.
To create a PostScript file in Mac OS X
- In the Mac OS Printer Setup Utility ([hard drive]/Applications/Utilities), confirm that a PostScript printer or a virtual PostScript printer is selected.
- Display the layout you want to create a PostScript file of, then choose File > Print (Cmd-P).
- Click Printer to display the printer driver’s Print dialog box. If an alert displays, click OK to bypass it.
- Choose a PostScript printer from the Printer menu and change any other options in the dialog box.
- In Mac OS X 10.3 (Panther), check Save as File and choose Format: PostScript.
or
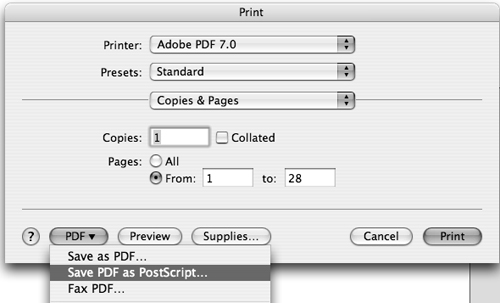
In Mac OS X 10.4 (Tiger), click the PDF button and choose Save PDF as PostScript from its menu
. The Save PDF as PostScript option in the Mac OS X 10.4 (Tiger) printer driver dialog box - Click Save, and then enter a name for the file and choose a location.
- Click Save to return to the standard Print dialog box, and then click Print to save the layout as a PostScript file.
To create a PostScript file in Windows
- In Windows, choose Start > Settings > Printers > Add Printer.
- In the Add Printer Wizard dialog box, click a Manufacturer in the scroll list at left, and then click a PostScript printer at right. You need to do this to map a printer to print to a file . Use the Wizard to set up the printer as usual.
Select a PostScript printer from the Printers list in the Add Printer Wizard dialog box.
- Choose File > Print.
- From the Printer menu, choose the printer set up in the first step.
- Click Print.

Whether you need a PDF for proofing, onscreen viewing, or prepress, QuarkXPress makes it easy to produce one.
To save a layout as a PDF file
- Display the layout you want to save as a PDF, then choose File > Export > Layout as PDF.
or
Control-click/Right-click in a blank part of the layout and choose Export > Layout as PDF.
- Enter a name, and choose a location for the file . (Mac OS X users, keep the .pdf extension.)
The Export as PDF dialog box (File > Export > Layout as PDF)
- At the bottom of the dialog box, enter a range of Pages to be exported.
- Optional: Choose a PDF output style from the PDF Style menu. You can override these settings by clicking Options.
- Optional: To change the export settings, click Options, then change settings in the various panes and click OK. See the QuarkXPress Help file for information about these options.
For information about choosing PDF Export Options, see the QuarkXPress Help file.
- Click Save. The PDF file will appear in the location you chose in step 2, above.

To set PDF preferences
To specify defaults for when PDFs are created, how the files are named, and whether a log file is created, choose QuarkXPress (Edit, in Windows) > Preferences > PDF. We change the Default Name for files from Project_Layout.pdf to Project.pdf.
To create a PDF output style
The Edit > Output Styles dialog box lets you create and save PDF export styles. We recommend you do this for speed and accuracy. For example, you might have a style that creates low-resolution PDFs for proofing and one that creates prepress PDFs. A quick way to create a PDF output style is to choose New PDF Output Style from the PDF Style menu in the PDF Export Options dialog box ![]() .
.
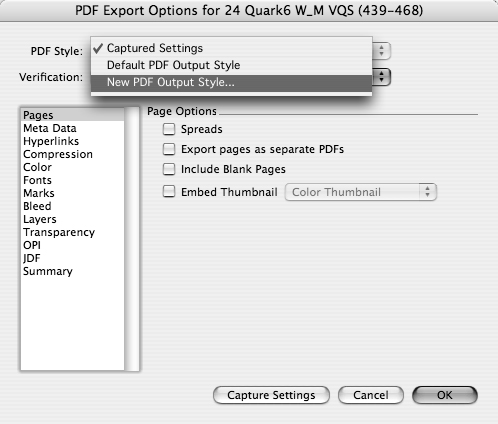
![]() You can create a PDF output style while setting options for PDF export (click Options in File > Export > Layout as PDF).
You can create a PDF output style while setting options for PDF export (click Options in File > Export > Layout as PDF).
The Save Page as EPS command converts a QuarkXPress page into a single picture. Reasons for using this feature include:
• Your output provider or commercial printer requests an EPS file for color-separations.
• You want to import a QuarkXPress page into another application, such as Adobe Photoshop or Adobe Illustrator.
• You want to create a resizable page within a page (e.g., an advertisement or logo).
To save a page as an EPS file
- Display the layout that contains the page you want to save as an EPS file, then choose File > Save Page as EPS (Cmd-Option-Shift-S/Ctrl-Alt-Shift-S).
- Change the file name in the Save As/File Name field if desired and choose a location for the EPS file.
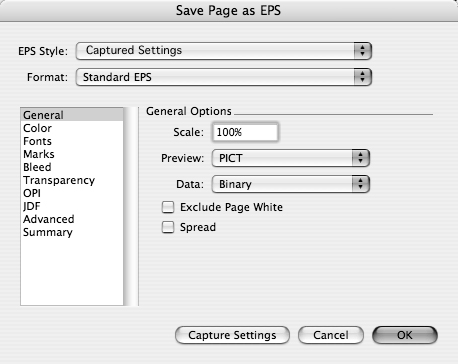
The primary Save Page as EPS dialog box (File > Save Page as EPS)
- The page number that appears in the Page field will be saved as an EPS. The number of the currently displayed page appears here automatically, but you can enter a different number.
- Optional: Choose an EPS output style from the EPS Style menu. You can override these settings by clicking Options.
- Optional: To change the EPS settings, click Options in the primary Save Page as EPS dialog box, then change settings in the various panes and click OK . See the QuarkXPress Help file for information about these options. Most of the controls are similar to those in the Print dialog box.
The second Save Page as EPS dialog box, which displays when you click Options in the primary Save Page as EPS dialog box
- Click Save.

Tip
EPS files can’t be edited in Quark XPress, so be sure to save the original file from which it’s generated so you’ll be able to edit it or generate another EPS file from it later on!
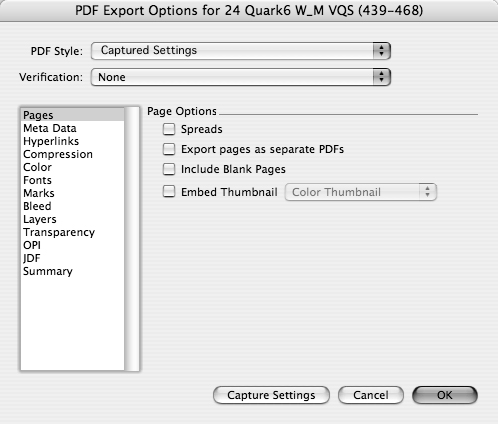
Save Page as EPS comes in handy if you have an ad or a logo that you created in QuarkXPress that you need to use in various sizes ![]() . To place an EPS into a layout, create a picture box and use File > Import Picture. As with any EPS file, in order to output it, the printer fonts must be available for any text it contains and the original files must be available for any pictures it contains.
. To place an EPS into a layout, create a picture box and use File > Import Picture. As with any EPS file, in order to output it, the printer fonts must be available for any text it contains and the original files must be available for any pictures it contains.

![]() This logo was created in QuarkXPress, saved as an EPS file, and then imported into various-sized picture boxes.
This logo was created in QuarkXPress, saved as an EPS file, and then imported into various-sized picture boxes.
To set EPS preferences
To increase the amount of virtual memory available for creating EPS files, choose QuarkXPress (Edit, in Windows) > Preferences > EPS. Increase the value in the Virtual Memory field. The Preview preference lets you choose whether to use the Embedded previews or Generate new previews when importing EPS pictures.
To create an EPS output style
The Edit > Output Styles dialog box lets you create and save EPS export styles. If you create EPS files often, particularly for different output methods, we recommend you do this.
When you hand off a file to an output provider, you must supply the project and layout names, names of fonts and colors used in the project, and other data. You also must supply the original files for any pictures being used in the file, or they won’t output properly. The Collect for Output command gathers copies of all the required elements together for you automatically, and also produces a report with information about the active layout. You can selectively choose whether the layout, linked pictures, color profiles, screen fonts, and printer fonts will be included in the output folder.
To collect for output
- Display the print layout you want to collect output for, then choose File > Collect for Output.
- If the save alert appears, click Yes.
- If any pictures can’t be located or were modified after they were imported into the layout, an alert dialog box will appear. Click List Pictures, update the pictures, click OK, then respond to the next prompt by clicking Save.
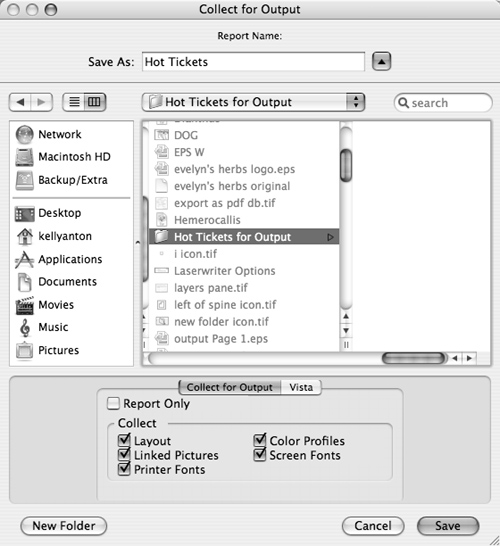
- In the Collect for Output dialog box, choose a location for the folder . In Mac OS X, click New Folder, change the folder name, if desired, then click Create. In Windows, click the New Folder button, change the folder name, if desired, then double-click the folder icon to open it.
The Collect for Output dialog box (File menu) in Mac OS X
- Optional: Change the report name in the Save As/File Name field.
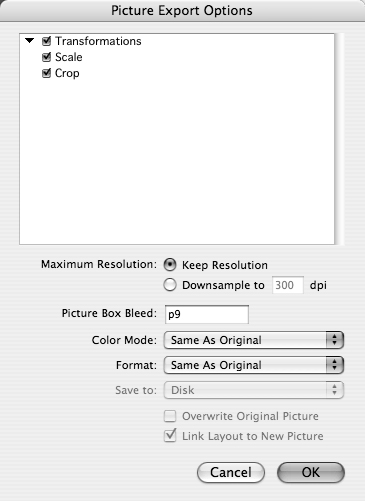
The Picture Export Options dialog box displays if you check Render Picture Alterations in the Vista pane of the Collect for Output dialog box.
- Under Collect, check the file components you want QuarkXPress to place in the folder: Layout, Linked Pictures, and Color Profiles (ICC profiles). In Mac OS X, you also have Screen Fonts and Printer Fonts boxes; Windows has a Fonts box.
- If you want to create new picture files that reflect alterations made in QuarkXPress and with the Picture Effects palette (Window menu), click the Vista tab and check Render Picture Alterations. The Picture Export Options dialog box displays so you can customize the exported pictures; make any changes and click OK. QuarkXPress will automatically collect (and reimport) the new picture files.
- Click Save. If a dire warning prompt regarding collecting fonts appears, click OK if you’re planning only to provide the fonts to your output provider or if you’re collecting them for yourself. (In general, font licensing agreements don’t allow you to simply share fonts with other users.)
A folder containing the current project, the components that you checked in the previous step, and a detailed report file, will be created.
After using the Collect for Output command, if you want to review the report, double-click the report text file in the folder you collected the files into. Take a look at the other files as well. Once you’re satisfied that everything is there, you’ll need to deliver the files to the service provider. You might burn a DVD, stuff the files and upload them to an FTP site, or use some other method as directed by the service provider.
Imagesetting tips
An imagesetter is a device that produces high-resolution (1,250–3,540 dpi) paper or film output from electronic files. The paper or film output, in turn, is used by commercial printers to produce printing plates. Note: Some printers skip the intermediary film output step entirely and go directly to plate—so ask your printer! The following is a checklist of things to do to help your imagesetting run successfully:
• Find out if your commercial printer can output your electronic files. Since they’re intimately familiar with the printing press—its quirks and its requirements—they’re often the best candidate for imagesetting.
• If you’re outputting the file with an output service provider, ask your commercial printer for specific advice regarding such settings as the lpi (lines per inch), emulsion up or down, and negative/positive. Tell your output service what output settings your commercial printer specified, and they’ll enter the correct values in the Print dialog box when they output your file. Don’t guess on this one. Also ask whether you should set trapping values (see pages 404–412) yourself or have the output service do the trapping on their high-end system. You can also ask your commercial printer to talk directly with your output service provider.
• Make sure any pictures in the layout are saved at final printout size and at the appropriate resolution for the final output device, which means approximately 1.5 times the final lpi for a black-and-white or grayscale picture and 2 times the final lpi for a color picture. If a picture requires cropping, rotating, or scaling down, use the Vista tab in the Collect for Output dialog box (File menu) to generate new, modified files—they will output more quickly.
• Use the File > Collect for Output command to collect your project and associated images and to produce a report file. If you don’t supply your output service provider with the original picture files, the low-resolution versions will be used for printing (yech!). The report file lists important specifications that they need in order to output your file properly, such as the fonts used in the layout.
• If your output service provider needs a PDF or PostScript file of your layout, ask them for specific instructions.
• Be sure to supply the correct version of all the necessary fonts. For PostScript fonts, include both the screen and printer fonts, and don’t forget to supply the fonts used in any imported EPS files.
• Include printouts of your file with registration marks or send a PDF version of the file.
• If your layout doesn’t print or takes an inordinately long time to print on your laser printer, don’t assume it will print quickly on an imagesetter. Large pictures, irregularly shaped picture boxes, and clipping paths are some of the many items that can cause a printing error. If you are using the same high-resolution picture more than once, but in very different sizes, import copies of the picture saved at those specific sizes.
• To reduce the amount of information the imagesetter has to calculate, delete any extraneous items from the layout’s pasteboard. To find out if there are any pictures on the pasteboard, choose Utilities > Usage, and click the Pictures tab. If you see the letters “PB” next to a picture name, it means that picture is on the pasteboard.
Color separation tips
• Always refer to a printed swatch book when choosing colors (e.g., a PANTONE swatch book). Computer screens only simulate printed colors, so you won’t get reliable results by choosing colors based on how they appear onscreen.
• Don’t change the shade percentage for a process color via the Colors palette or Item > Modify. Instead, mix a color that has the desired shade percentage built into it. It’s perfectly okay to change the shade percentage for a spot color (e.g., PANTONE), though.
• If your layout contains continuous-tone pictures, such as scanned photographs or artwork produced in an image-editing program, ask your output service provider or commercial printer in which file format (e.g., TIFF, EPS) and in which image mode (e.g., CMYK, RGB) those pictures should be saved. You can use an image-editing program, such as Adobe Photoshop, to change a picture’s file format, resolution, or image mode.
• Ask your output service provider whether to use QuarkXPress or an image-editing program to convert any color pictures from RGB to CMYK for separations. Pictures scanned into CMYK color mode don’t require conversion.
• RGB spot colors from imported Illustrator EPS files will remain as RGB spot colors, and will be listed as such in the Colors dialog box.
• If your layout contains hand-drawn registration or crop marks, apply the Registration color to them to ensure that they appear on all the separation plates.
• For color work, order a color proof of the layout (e.g., Iris, Xerox DocuColor, Matchprint, or a high-end inkjet proof) so it can be inspected for color accuracy.
Trapping colors
Trapping is the deliberate overlapping of colors to help safeguard against gaps that may result on press due to the misalignment of plates, paper shifting, or paper stretching. In QuarkXPress, trapping is applied according to the way colors in each object interact with color(s) below it. Use the mini-glossary at right to familiarize yourself with trapping terminology.
Before exploring the circumstances in which trapping is necessary, we’ll discuss a couple of circumstances in which trapping is unnecessary.
When not to apply trapping
Trapping is unnecessary when black type or a black item or frame is placed on top of a light background color. In this case, the black type will overprint (print on top of) the background color. You can specify a minimum percentage of black to control when and if overprinting will occur.
Trapping is also unnecessary if process colors and adjacent or overlapping colors contain a common color component (C, M, Y, or K). Let’s say you have a red, which contains a percentage of magenta, that touches a blue area that also contains a small percentage of magenta. The two colors both contain magenta, so trapping is unnecessary.
When to apply trapping
Trapping is necessary when you print spot colors, print process colors that don’t have a common color component, or print a light color on a dark background.
In QuarkXPress, trapping values are assigned to the foreground color. A light foreground color spreads into the background color by a specified amount, and a light background color chokes the foreground color. To produce a choke trap in QuarkXPress, the foreground color is assigned a negative trapping value.
Overprint
Knockout
Spread
The spread method of trapping is used when colors knock out and the foreground color is lighter than the background color. The edge of the foreground color object is enlarged slightly to make the foreground color spread into the background color on press ![]() .
.
![]() In a spread trap, the foreground object color spreads into the background object color.
In a spread trap, the foreground object color spreads into the background object color.
Choke

All of these objects (type and artwork) contain the process color magenta. Because they have this color in common, trapping is unnecessary.
In QuarkXPress, trapping can be controlled using several features:
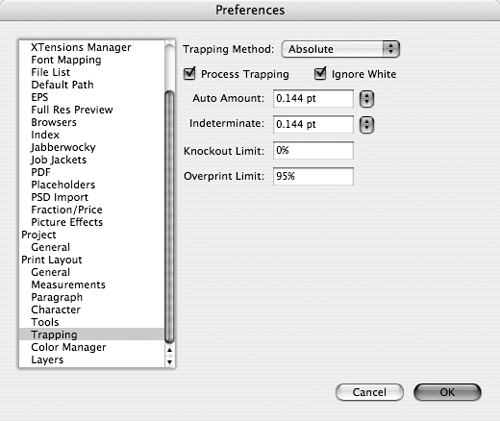
• On a layout basis using QuarkXPress (Edit, in Windows) > Preferences > Print Layout > Trapping.
• On an individual color basis using Edit > Colors (click Edit Trap).
• On an individual item basis using the Show Trap Information palette (Option-F12/Ctrl-F12).
The settings in Colors > Edit Trap override the settings in Trapping preferences. Trap Information palette settings override both the Edit > Colors > Edit Trap and the Trapping preferences settings.
To define automatic trap values and specify the defaults used by QuarkXPress for trapping object colors, you’ll choose settings in the Trapping preferences dialog box.
To choose Trapping preferences for a whole layout
- Choose QuarkXPress (Edit, in Windows) > Preferences > Print Layout > Trapping .
Trapping preferences
- In the Trapping Method area choose Absolute to use the trapping value entered in the Auto Amount or Indeterminate field. The Auto Amount value is used if the foreground color is on top of a flat color. The Indeterminate value is used if the foreground color is on top of multiple shades or colors or over an imported picture. When the object color is darker, the background color chokes into the object color by the Auto Amount. When the foreground object color is lighter, the object color spreads into the background color by the Auto Amount.
or
Choose Proportional to use the trapping value entered in the Auto Amount field, multiplied by the difference in luminosity (lights and darks) between the foreground object color and the background color. The width of the trap will vary and be calculated by multiplying the Auto Amount value by the difference in luminosity between the object and background colors.
or
Choose Knockout All to turn trapping off for all objects. Objects will print with 0 trapping.
- Check or uncheck Process Trapping. With Process Trapping on, each process component (cyan, magenta, yellow, and black) is spread or choked, depending on which one is darker—the foreground object or the background color. For example, if the cyan in the foreground object color is lighter than the cyan in the background color, the foreground object cyan is spread into the background cyan—but only on the cyan plate.
The trap width is equal to half the Auto Amount value when Absolute trapping is specified. When Proportional trapping is specified, the trap width will equal the Auto Amount value multiplied by the difference in luminosity values between the foreground object and background colors.
If Process Trapping is off, the same trapping value will be applied to all the process-color components, using the trapping settings for those colors as specified in the Trap Specifications dialog box (Colors > Edit Trap button).
- Enter a trapping value in the Auto Amount field or choose Overprint from the adjacent menu. Either the value entered or the Overprint setting will be used in the Trap Specifications dialog box (Edit > Colors > Edit Trap) and on the Trap Information palette whenever a field in either of these two locations is set to Auto Amount (+/−).
- Enter a trapping value in the Indeterminate field or choose Overprint from the menu. If a foreground object is over a background that consists of multiple shades or colors, or is over an imported picture, either the value you entered or the Overprint setting will be used.
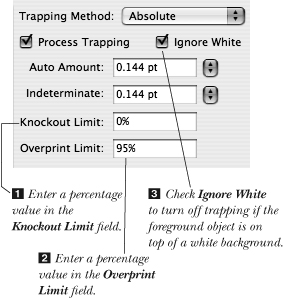
- Enter a Knockout Limit percentage to set the gray (light and dark) value limit at which a foreground object color will knock out the background color (see the sidebar).
- Enter an Overprint Limit value for the shade percentage limit below which the foreground object color won’t overprint the background color. For example, if the Overprint Limit is 92%, a foreground object that’s 85% black won’t overprint, even if that color or object is set to overprint via Edit > Colors > Edit Trap > Trap Specifications. The object will trap according to the Auto Amount value.
An Overprint setting chosen on the Trap Information palette will cause the selected object to overprint regardless of the current trap settings or any Overprint Limit value entered in any other dialog box.
- Leave Ignore White checked to turn off trapping for any instance in which the foreground object is on top of background areas that contain white and other colors. This is the preferred situation, since the white area won’t be considered when the trap is calculated for the other colors.
With Ignore White unchecked, objects on a white background will overprint. If an object is set to spread over a background color, the Indeterminate value will be used for the spread.
- Click OK to close the Preferences dialog box.

The Trap Specifications dialog box controls trapping on a color-by-color basis. The default settings for each color display in this dialog box and can be modified here.
Note: For these instructions, Absolute should be chosen as the Trapping Method in QuarkXPress (Edit, in Windows) > Preferences > Print Layout > Trapping.
To choose trapping values for a color (Trap Specifications)
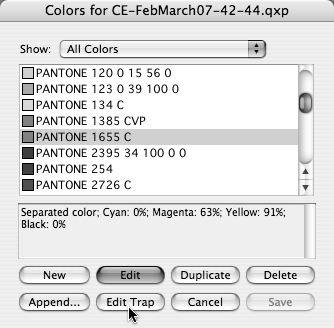
- Choose Edit > Colors (Shift-F12).
- Click a color, then click Edit Trap .
Click a color, then click Edit Trap.
- The name of the foreground color you chose will appear in the title bar of the Trap Specifications dialog box. Click one of the remaining colors listed, any of which could potentially be a background color .
The Trap Specifications dialog box opens.
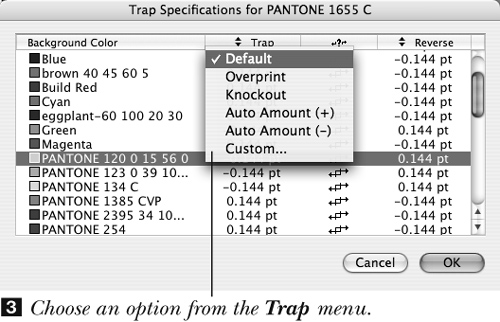
- From the Trap menu , choose:
Default to have QuarkXPress determine how colors will be trapped. With Default chosen, black always overprints.
Overprint to have the foreground color overprint the selected background color when the foreground color shade is equal to or greater than the Overprint Limit value specified in QuarkXPress (Edit, in Windows) > Preferences > Print Layout > Trapping.
Knockout to have the foreground color knock out the selected background color.
Auto Amount (+) to use the auto spread value for the foreground color.
Auto Amount (−) to use the auto choke value for the foreground color.
Custom to enter a custom spread or choke (negative) value for the foreground color.
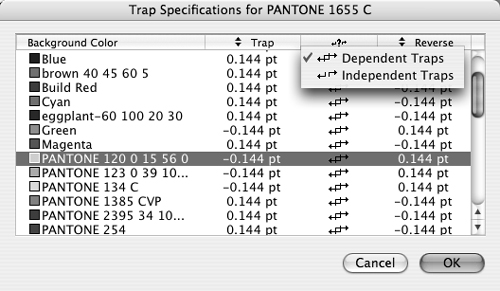
- From the second menu
 , choose Dependent Traps (the default) to create the reverse trap situation for the colors you chose in steps 2 and 3, based on the current setting in the Trap column. Or choose Independent Traps to create a unique trap setting in the Reverse column for these two colors .
Choose Dependent Traps or Independent Traps from the
, choose Dependent Traps (the default) to create the reverse trap situation for the colors you chose in steps 2 and 3, based on the current setting in the Trap column. Or choose Independent Traps to create a unique trap setting in the Reverse column for these two colors .
Choose Dependent Traps or Independent Traps from the  menu.
menu. - If Independent Traps is chosen in the second column, a different Trap setting for the selected background color can be chosen . This Reverse Trap setting will be used when the selected color traps to the color named in the title bar of the dialog box. (If an option other than Default is chosen from the Reverse menu, an asterisk displays in the Reverse column.) The options are the same as in step 4.
Choose an option from the Reverse menu.
Remember that when traps have a Dependent relationship, the Reverse column setting automatically derives from the current Trap column setting, and vice versa. Change either of these columns, and the other will change automatically. When traps have an independent relationship, unique settings can be set in these two columns.
- Click OK, then click Save to close the Colors dialog box.


Tip
Settings in the Trap Specifications dialog box override the settings in QuarkXPress (Edit, in Windows) > Preferences > Print Layout > Trapping.
Tip
If a print layout is open when Edit > Colors is chosen, Edit Trap changes will apply only to the current layout. If no project is open, changes will apply to all subsequently created projects.
Note: Trap Information palette settings override the settings chosen in the Trapping preferences and Trap Specifications dialog boxes.
Note: For these instructions, Absolute should be chosen as the Trapping Method in QuarkXPress (Edit, in Windows) > Preferences > Print Layout > Trapping.
To choose trapping values for an object (Trap Information palette)
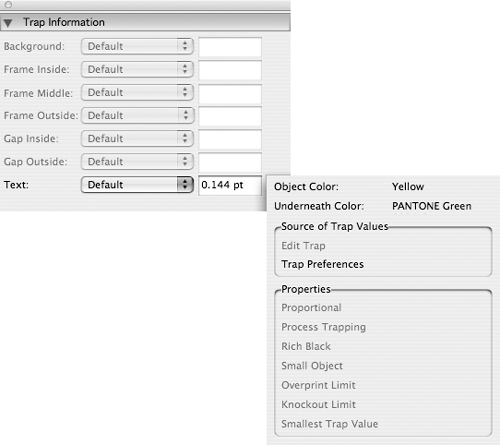
- Choose Window > Trap Information to open the palette (Option-F12/Ctrl-F12) .
This is the Trap Information palette with a picture box selected. Here, the Background color of the picture box (20% Black) defaults to a spread trap of the Auto Amount over the darker color underneath.
- Select the item to which you want to apply trapping.
- Choose a new trap setting from any of the menus on the left side of the palette (the options will vary depending on the type of item chosen):
Default to have the settings in Trapping preferences or Edit Trap be used to determine how colors will trap.
Overprint to have the foreground item color overprint any background color.
Knockout to have the foreground item color knock out any background color.
Auto Amount (+) to have the auto spread value be used for the foreground color or Auto Amount (−) to have the auto choke value be used for the foreground color. The auto amount settings are established in QuarkXPress (Edit, in Windows) > Preferences > Print Layout > Trapping.
Custom to enter a custom spread or choke value for the foreground color.

Tip
Choosing Overprint from the palette will cause that item to overprint, regardless of the foreground or background color shade or the Overprint Limit value.
Tip
To set trapping for text, select the text—the Text option on the palette will become available.
What follows are guidelines for common trapping situations that may occur.
Trapping type
When it comes to trapping, a text box is treated like a single foreground object. The text box color will trap to the background color based on the current trap settings. When a text box with a background of None is on top of a background color, QuarkXPress will trap the type, even if the type itself isn’t overlapping the background color ![]() . This can occur with type that appears inside a large text box.
. This can occur with type that appears inside a large text box.
![]() Press the
Press the ![]() icon on the Trap Information palette to display an explanation of the Default Trap setting.
icon on the Trap Information palette to display an explanation of the Default Trap setting.
To control how text traps, select the text and set it to Overprint or Knockout via the Trap Information palette. You can also select individual characters or words and apply a unique trap setting to them that’s different from the remaining characters in the box. Any box that’s layered on top of a text box will trap to the background color of the text box—not to the type ![]() .
.

![]() In this example, the text only partially overlaps a background color.
In this example, the text only partially overlaps a background color.
QuarkXPress regards type that’s partially on top of a paragraph rule as trapping to an indeterminate background color. If the type is completely within the paragraph rule, the type is trapped based on the type color-to-rule color relationship as per the Edit > Colors trap settings. This relationship can be changed only via Edit > Colors > Edit Trap.
Trapping a frame
A frame is layered on top of the contents of the box the frame is attached to. Using the Trap Information palette, you can apply different trapping settings to the inside, middle, and outside parts of a single-line or multiline frame, and to the gaps in a dashed frame.
Trapping imported pictures
In QuarkXPress, a picture can’t be spread or choked to a background color.
Trapping adjustments that are made to a vector (object-oriented) picture in a drawing program, such as Adobe Illustrator, will output successfully from QuarkXPress. The Trap Information palette provides no trapping controls for the picture itself. Note: Don’t scale an imported vector picture that was created with built-in trapping, because such scaling will also resize the trapping areas in the picture.
You can use the Trap Information palette to specify that a raster (bitmap) picture knock out or overprint a background color. This is helpful if you’re colorizing a grayscale TIFF picture in QuarkXPress. Click a picture, then choose Overprint or Knockout from the Picture menu on the Trap Information palette—whichever setting your commercial printer instructs you to choose.
A line art (black and white) picture to which you’ve applied a shade of black that’s equal to or greater than the Overprint Limit in QuarkXPress will overprint any background color(s) it’s positioned on top of. Use the Trap Information palette to set the picture to knock out, if desired.
Lines and boxes in QuarkXPress can knock out, overprint, or trap to pictures that are underneath them. Use the Trap Information palette to set the type of trap. Type can knock out, overprint, or spread to a picture underneath it.